Lolenge ya kosalela Mosfet Optocoupled HW-532 mpo na kokamba moto ya moteur DC kino na 30V to mokumba na esaleli ya Arduino
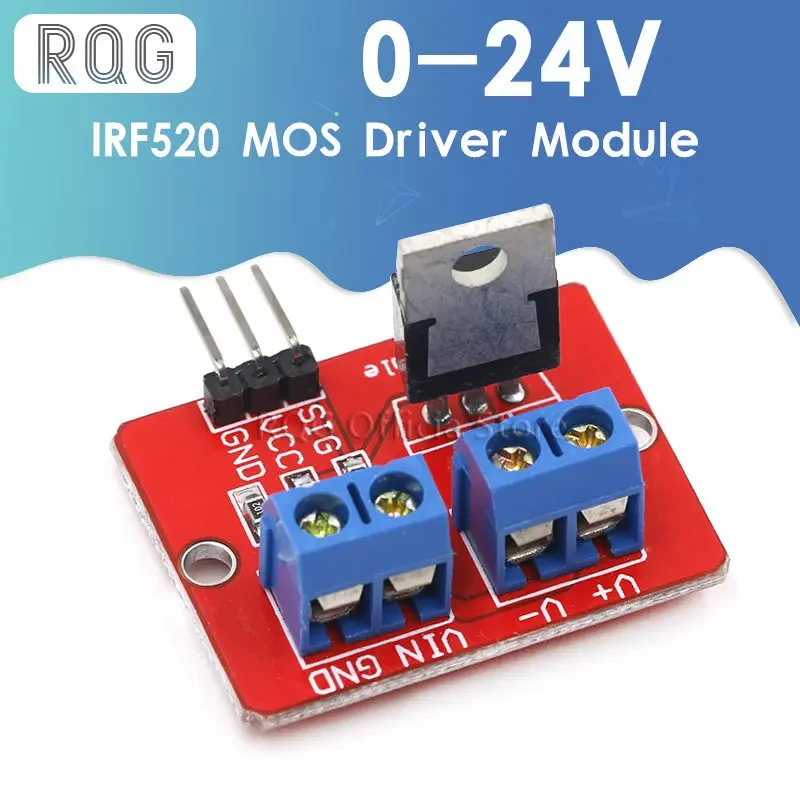
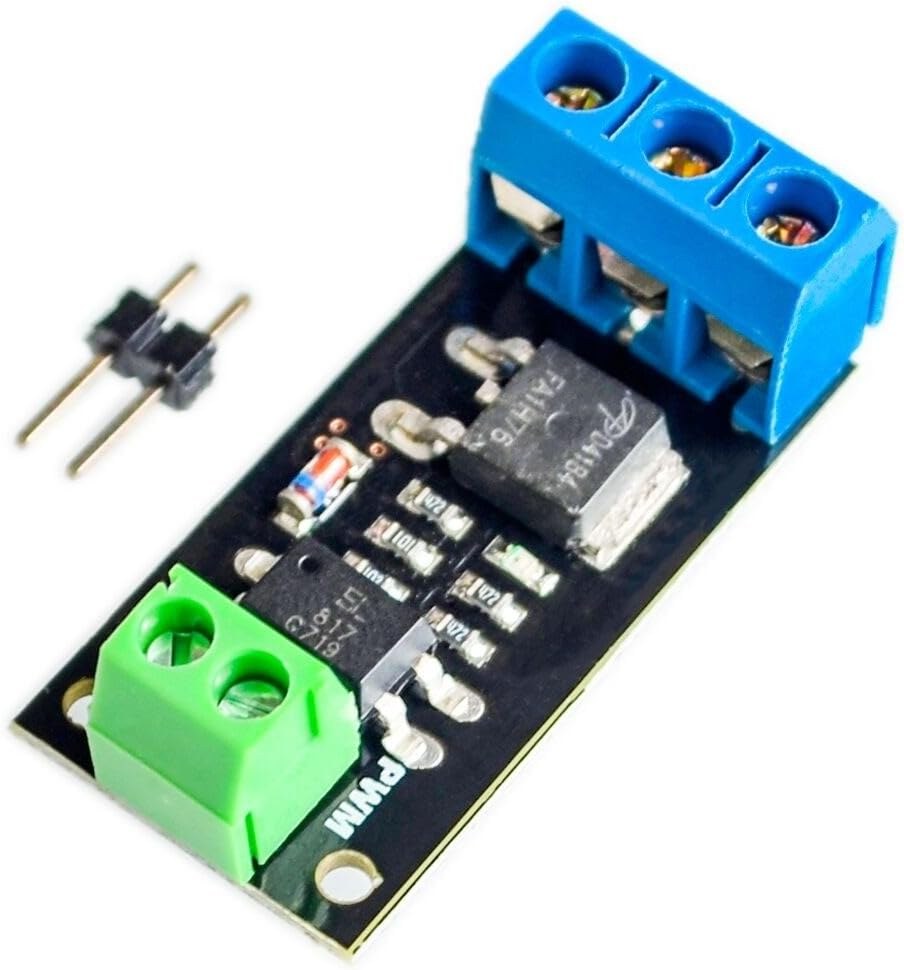
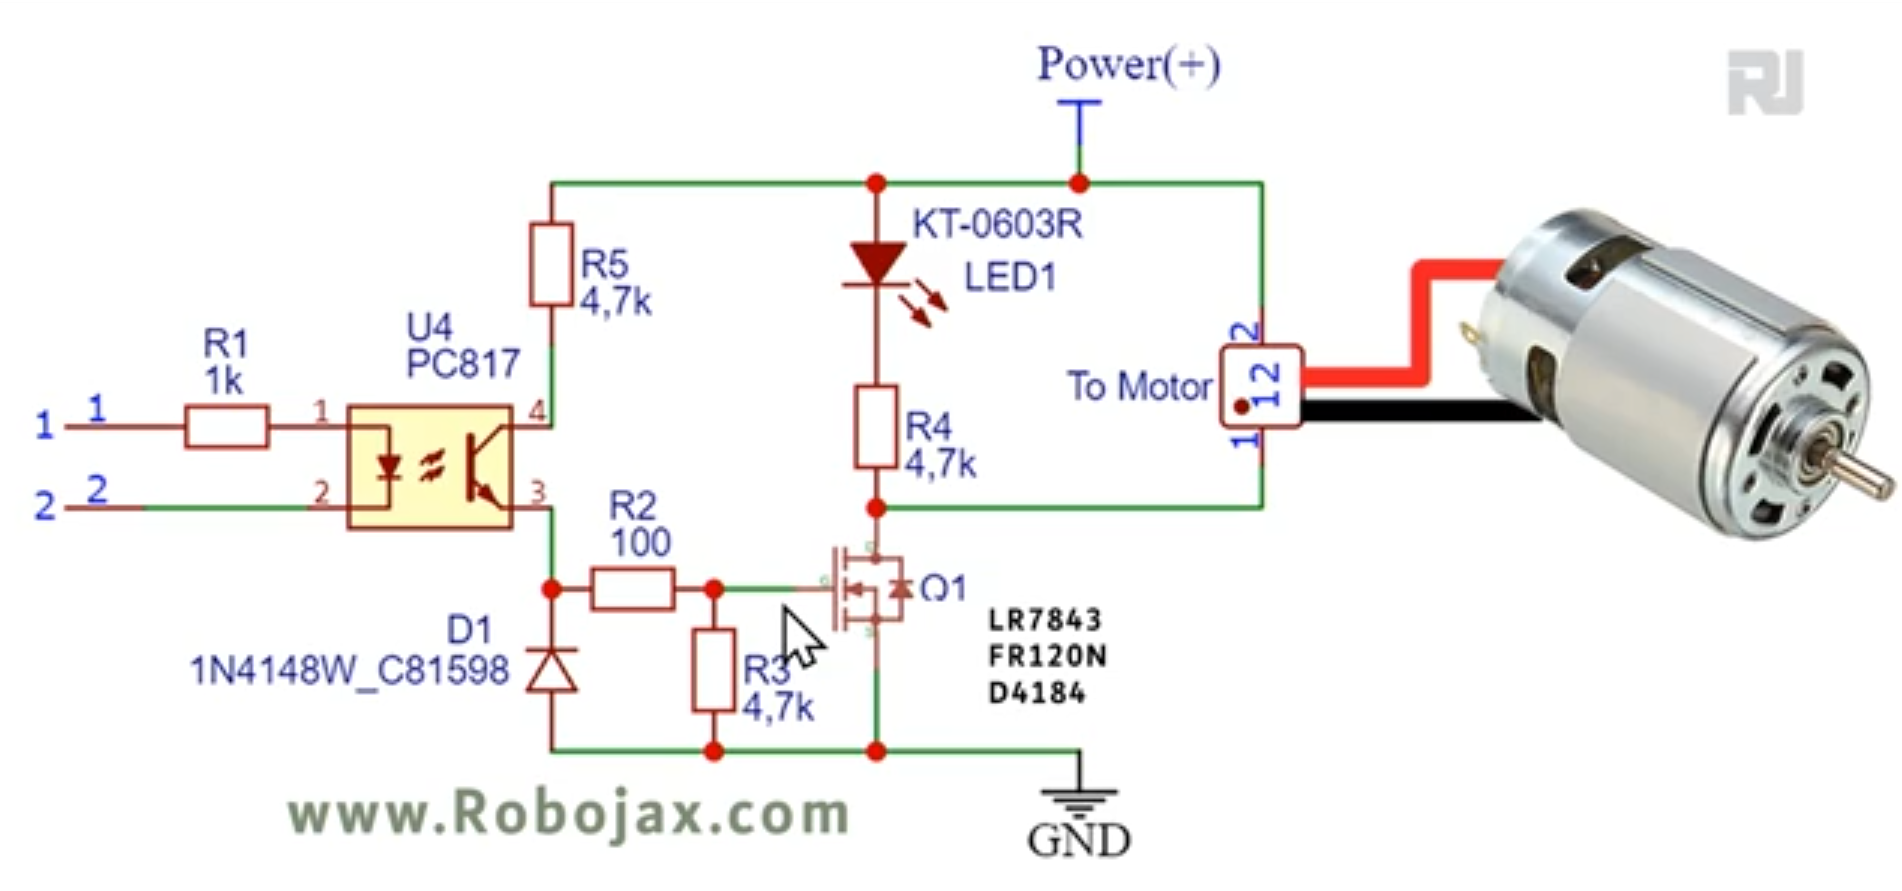
Mokanda oyo ya projɛ́ ezali kolakisa ndenge ya kosala contrôleur ya vitesse ya moteur DC oyo esalelami na Arduino mpe module ya HW-532 optocoupled MOSFET. MOSFET yango ekoki kozala FR120N , LR7843 to D4184. Oyo esalaka ete okoka kokamba vitesse mpe ezaleli ya kozala na likoki ya moteur DC na voltages kino na 30V. Module ya HW-532 epesaka libateli mpe bokabwani, oyo esalaka ete ezala na libateli mpe ya semba koleka kosangisa moteur na Arduino moko na moko.
Projɛ́ oyo ezali na motuya mpo na misala ndenge na ndenge. Tala ndakisa mwa misusu:
- Kokamba na ndenge ya malamu vitesse ya loboko ya robot
- Kosala fan oyo ezali na vitesse ya kobongwana mpo na ba systèmes ya kopepola
- Kosala ba machines automatiques oyo ezali na mouvement oyo ekoki kobongisama
- Kosala contrôle ya valve ya moteur mpo na ba systèmes ya mayi
Matériel/Ba Composants
Ba composants ya liboso ezali Arduino, module ya HW-532 optocoupled MOSFET (na ba options ya MOSFET lokola D4184, LR7843, to FR120N), moteur DC (voltage ya rating ≤ 30V), ba fils ya kosangisa, mpe na ndenge ya kobakisama, potentiomètre mpe bouton-poussoir mpo na contrôle ya avancé (na vidéo na 19:34).
Kopona ya MOSFET na kati ya module ya HW-532 etali na ba besoins ya courant na yo (na vidéo na 01:24). Vidéo epesaka bokokani ya malamu ya ba MOSFET ndenge na ndenge (na vidéo na 06:50) mpe makoki na yango mpo na ba applications ndenge na ndenge (na vidéo na 09:45). Kobosana te kotia diode mpo na ba charges inductives lokola ba moteurs DC mpo na kobatela module (na vidéo na 06:00 mpe 22:02).
Mokambi ya Ba Fils
Ba fils ya liboso esangisaka terminal ya motuya ya moteur na sortie ya HW-532, terminal ya négatif ya moteur na terre ya HW-532, mpe pin ya contrôle ya HW-532 na pin ya digitale ya Arduino (na vidéo na 11:16).

Bokambi ya Code
Code oyo epesami epesaka ba niveaux misato ya contrôle:
- Contrôle ya Kozala na Likoki/Kozala Te: Code oyo ya pete (na vidéo na 15:05) esalelaka pin ya digitale mpo na kobongola moteur na kozala na likoki mpe kozala te. Esika oyo mosaleli akoki kobongola ezali constante
MOTOR_OUT_PIN, oyo eyebanisaka pin nini ya Arduino oyo ekambaka module ya HW-532. - Contrôle ya Vitesse na PWM: Code oyo (na vidéo na 15:39) esalelaka Pulse Width Modulation (PWM) mpo na kokamba vitesse ya moteur. Mosaleli akoki kobongola
SPEED_MAXmpeSPEED_MINmpo na kotia ba limites ya likolo mpe ya se ya contrôle ya vitesse, mpe ba fonctionsmotorControl()mpestopMotor()esalelamaka mpo na kokamba moteur mpe kopesa yango stop, na ndenge ya kokabwana. - Contrôle na Potentiomètre mpe Bouton-Poussoir: Code oyo (na vidéo na 22:12) elingisaka kokamba vitesse ya moteur na potentiomètre mpe kobanda/kopesa stop na yango na bouton-poussoir. Ba esika oyo mosaleli akoki kobongola ezali
POT_PIN(pin ya potentiomètre),MOTOR_OUT_PIN(pin ya contrôle PWM),START_STOP_PIN(pin ya bouton-poussoir),SPEED_MAX, mpeSPEED_MIN.
Projɛ́ ya Malamu/Démonstration
Vidéo emonisaka ndenge misato ya ba codes oyo nyonso ezali kosala. Contrôle ya kozala na likoki/kotika emonisami (na vidéo na 11:41), elandami na contrôle ya vitesse na PWM (na vidéo na 16:53), mpe na suka, contrôle na potentiomètre mpe bouton-poussoir (na vidéo na 23:02).
Ba Chapitres
- [00:00] Introduction mpe Bokeseni ya Projɛ́
- [01:24] Module ya HW-532 mpe Ba Options ya MOSFET
- [03:23] Schéma ya Circuit mpe Bokolimboli
- [05:11] Ba Détails ya Ba Composants
- [06:50] Analyse ya Datasheet ya MOSFET
- [11:16] Ba Fils ya Liboso mpe Démonstration ya Kozala na Likoki/Kotika
- [15:05] Code ya Arduino mpo na Contrôle ya Kozala na Likoki/Kotika
- [15:39] Code ya Arduino mpo na Contrôle ya Vitesse na PWM
- [19:34] Ba Fils na Potentiomètre mpe Bouton-Poussoir
- [22:12] Code ya Arduino na Potentiomètre mpe Bouton-Poussoir
Images


/*
* Lesson 108-1: In this lesson we learn how to use  the module with FR120N , LR7843 and D4184 MOSFET to turn ON/OFF DC load up to up to 10A. HW-532 optically isolated from 5V to 30V load up to 10A depending on the module. Schematic shown, wiring diagram explained, different
method of wiring with push button and potentiometer also shown.
Video https://youtu.be/eqXaqRFAWrA

Written by Ahmad Shamshiri for RoboJax.com
// Published on Aug 25, 2022 in Aajx, ON, Canada.


  Project 1: Turning ON/OFF a motor or load (this project)
  Project 2: Controllign Speed using Arduino code
  Project 3: Controllign Speed using potentiometer and a push button

  * Watch Video instrution for this code: https://youtu.be/eqXaqRFAWrA
  *
  * This code is part of Arduino Step by Step Course which starts here:  https://youtu.be/-6qSrDUA5a8
  *
  * for library of this code visit http://robojax.com/
  *
 If you found this tutorial helpful, please support me so I can continue creating
 content like this. Make a donation using PayPal by credit card https://bit.ly/donate-robojax


  *  * This code is "AS IS" without warranty or liability. Free to be used as long as you keep this note intact.*
  * This code has been download from Robojax.com
     This program is free software: you can redistribute it and/or modify
     it under the terms of the GNU General Public License as published by
     the Free Software Foundation, either version 3 of the License, or
     (at your option) any later version.

     This program is distributed in the hope that it will be useful,
     but WITHOUT ANY WARRANTY; without even the implied warranty of
     MERCHANTABILITY or FITNESS FOR A PARTICULAR PURPOSE.  See the
     GNU General Public License for more details.

     You should have received a copy of the GNU General Public License
     along with this program.  If not, see <https://www.gnu.org/licenses/>.

 */


const int MOTOR_OUT_PIN=2;


void setup() {
    //Robojax  MOSFET Motor driver code
  Serial.begin(9600);
  Serial.println("Robojax LR7834 ,  Arduino");

  pinMode(MOTOR_OUT_PIN, OUTPUT);
  digitalWrite(MOTOR_OUT_PIN, HIGH);


}

// the loop routine runs over and over again forever:
void loop() {


    //Robojax XY-GMOS MOSFET Motor driver code
}//loop end# include <Arduino_LSM6DS3.h>
/*
* Lesson 108-2: In this lesson we learn how to use the module with FR120N , LR7843 and D4184 MOSFET to turn ON/OFF DC load up to up to 10A. HW-532 optically isolated from 5V to 30V load up to 10A depending on the module. Schematic shown, wiring diagram explained, different
method of wiring with push button and potentiometer also shown.
Video https://youtu.be/eqXaqRFAWrA
Get code for this project from https://robojax.com/RJT797
Written by Ahmad Shamshiri for RoboJax.com
// Published on Aug 25, 2022 in Aajx, ON, Canada.
Project 1: Turning ON/OFF a motor or load (this project)
Project 2: Controlling Speed using Arduino code
Project 3: Controlling Speed using potentiometer and a push button
* Watch Video instruction for this code:https://youtu.be/eqXaqRFAWrA
*
* This code is part of Arduino Step by Step Course which starts here: https://youtu.be/-6qSrDUA5a8
*
* for library of this code visit http://robojax.com/
*
If you found this tutorial helpful, please support me so I can continue creating
content like this. Make a donation using PayPal by credit card https://bit.ly/donate-robojax
* * This code is "AS IS" without warranty or liability. Free to be used as long as you keep this note intact.*
* This code has been download from Robojax.com
This program is free software: you can redistribute it and/or modify
it under the terms of the GNU General Public License as published by
the Free Software Foundation, either version 3 of the License, or
(at your option) any later version.
This program is distributed in the hope that it will be useful,
but WITHOUT ANY WARRANTY; without even the implied warranty of
MERCHANTABILITY or FITNESS FOR A PARTICULAR PURPOSE. See the
GNU General Public License for more details.
You should have received a copy of the GNU General Public License
along with this program. If not, see <https://www.gnu.org/licenses/>.
*/
const int MOTOR_OUT_PIN = 3;
const int SPEED_MAX = 100;// in %
const int SPEED_MIN = 0;//in %
const int STOP=0;
const int RUN=1;
int motorState=RUN;//
int motorSpeed = 0;//between 0 to 100%.
//video instruction https://youtu.be/eqXaqRFAWrA
void setup() {
//Robojax XY-GMOS MOSFET Motor driver code
Serial.begin(9600);
Serial.println("Robojax XY-GMOS Motor, Arduino");
pinMode(MOTOR_OUT_PIN, OUTPUT);
}//setup ends
// the loop routine runs over and over again forever:
void loop() {
//video https://youtu.be/eqXaqRFAWrA
motorControl(50);//run motor at 50%
delay(5000);//keep it running for 5000ms or 5 seconds
stopMotor();//stop the motor
delay(3000);//keep it stopped for 5000ms or 5 seconds
for(int i=0; i<100; i++)
{
motorControl(i);
delay(200);
}
stopMotor();//stop motor
delay(3000);//keep it stopped for 5000ms or 5 seconds
for(int i=100; i >0; i--)
{
motorControl(i);
delay(200);
}
//Robojax LR7843 MOSFET Motor driver code
}//loop end
/*
* motorControl(int s)
* @brief controls the motor with the value s
* @param return nothing
* @param "type" is character
* on May 08, 2020 at 02:36 in Ajax, Ontario, Canada
*/
void motorControl(int s)
{
//Robojax LR7843 MOSFET Motor driver code
//video https://youtu.be/eqXaqRFAWrA
int k = map(s, SPEED_MIN, SPEED_MAX, 0, 255);
Serial.print("Speed: "); Serial.print(s);Serial.println("%");
analogWrite(MOTOR_OUT_PIN, k);
}//motorControl
/*
* stopMotor()
* @brief stops the motor
* @param return nothing
* @param
* on May 08, 2020 at 02:36 in Ajax, Ontario, Canada
*/
void stopMotor(){
//Robojax XY-GMOS MOSFET Motor driver code
analogWrite( MOTOR_OUT_PIN, 0);
Serial.println("STOPPED");
}//stopMotor()
/*
 * Lesson 108-3: Controlling Speed of motor using Variable Resistor (potentiometer) and using Start/Stop push button with Arduino.
 *
 * In this lesson we learn how to use  the module with FR120N , LR7843 and D4184 MOSFET to turn ON/OFF DC load up to up to 10A. HW-532 optically isolated from 5V to 30V load up to 10A depending on the module. Schematic shown, wiring diagram explained, different
 method of wiring with push button and potentiometer also shown.
 Video https://youtu.be/eqXaqRFAWrA
   Get codes for this project from https://robojax.com/RJT797
 Written by Ahmad Shamshiri for RoboJax.com
 // Published on Aug 25, 2022 in Aajx, ON, Canada.


   Project 1: Turning ON/OFF a motor or load -
   Project 2: Controlling Speed using Arduino code
   Project 3: Controlling Speed using potentiometer and a push button (this project)

   * Watch Video instruction for this code:https://youtu.be/eqXaqRFAWrA
   *
   * This code is part of Arduino Step by Step Course which starts here:  https://youtu.be/-6qSrDUA5a8
   *
   * for library of this code visit http://robojax.com/
   *
  If you found this tutorial helpful, please support me so I can continue creating
  content like this. Make a donation using PayPal by credit card https://bit.ly/donate-robojax


   *  * This code is "AS IS" without warranty or liability. Free to be used as long as you keep this note intact.*
   * This code has been download from Robojax.com
      This program is free software: you can redistribute it and/or modify
      it under the terms of the GNU General Public License as published by
      the Free Software Foundation, either version 3 of the License, or
      (at your option) any later version.

      This program is distributed in the hope that it will be useful,
      but WITHOUT ANY WARRANTY; without even the implied warranty of
      MERCHANTABILITY or FITNESS FOR A PARTICULAR PURPOSE.  See the
      GNU General Public License for more details.

      You should have received a copy of the GNU General Public License
      along with this program.  If not, see <https://www.gnu.org/licenses/>.

  */

const int POT_PIN =A0;//can change
const int MOTOR_OUT_PIN = 3;//~
const int START_STOP_PIN=2;//for push button switch

const int SPEED_MAX = 100;// in %
const int SPEED_MIN = 0;//in %
  //video instruction https://youtu.be/eqXaqRFAWrA

const int STOP=0;
const int RUN=1;
int motorState=RUN;//
int motorSpeed = 0;//between 0 to 100%.

void pushButton();
void setup() {
    //Robojax XY-GMOS MOSFET Motor driver code
  Serial.begin(9600);
  Serial.println("Robojax XY-GMOS Motor,  Arduino");
  pinMode(START_STOP_PIN, INPUT_PULLUP);
  pinMode(MOTOR_OUT_PIN, OUTPUT);
    //video instruction https://youtu.be/eqXaqRFAWrA


}

// the loop routine runs over and over again forever:
void loop() {

 pushButton();
 int potValue =analogRead(POT_PIN);
 int speedPercent = map(potValue, 0, 1023, 0, 100);

 if(motorState ==RUN)
 {
  motorControl(speedPercent);
 }else{
  stopMotor();
 }


  delay(500);
    //Robojax XY-GMOS MOSFET Motor driver code
      //video instruction https://youtu.be/eqXaqRFAWrA
}//loop end


/*
 * motorControl(int s)
 * @brief controls the motor with the value s
 * @param return nothing
 * @param "type" is character

 * on May 08, 2020 at 02:36 in Ajax, Ontario, Canada
 */
void motorControl(int s)
{
    //Robojax LR7843 MOSFET Motor driver code
      //video instruction https://youtu.be/eqXaqRFAWrA
  int k = map(s, SPEED_MIN, SPEED_MAX, 0, 255);
  Serial.print("Speed: "); Serial.print(s);Serial.println("%");
  analogWrite(MOTOR_OUT_PIN, k);
}//motorControl


/*
 * stopMotor()
 * @brief stops the motor
 * @param return nothing
 * @param

 * on May 08, 2020 at 02:36 in Ajax, Ontario, Canada
 */
void stopMotor(){
    //Robojax XY-GMOS MOSFET Motor driver code
      //video instruction https://youtu.be/eqXaqRFAWrA
  analogWrite( MOTOR_OUT_PIN, 0);
  Serial.println("STOPPED");
}//stopMotor()


/*
 * pushButton()
 * @brief reads the push button
 * @param return nothing
 * @param

 * on May 08, 2020 at 02:36 in Ajax, Ontario, Canada
 */
void pushButton()
{
  //Robojax XY-GMOS MOSFET Motor driver code
  //video instruction https://youtu.be/eqXaqRFAWrA
  if(digitalRead(START_STOP_PIN) ==LOW)
  {
    motorState =!motorState;
    delay(100);
  }

}//pushButton()
Nko o na nki.
-
AmazonPurchase HW-532 from Amazonamzn.to
-
eBay
-
AliExpressPurchase FR120N Motor Driver from AliExpresss.click.aliexpress.com
Mokili na bisika
Pas encore de ressources.
Fichiers📁
Fiche technique (pdf)
-
infineon-IRLR7843 LR7843 MOSFET datasheet
infineon-irlr7843-datasheet-en.pdf0.37 MB
Fritzing File
-
HW-532B Mosfot Module
HW-532B.fzpz0.01 MB
Mabala a mangwe
-
infineon-irfr120n-datasheet-en
infineon-irfr120n-datasheet-en.pdf0.39 MB -
alpha-and-Omega-AOD4184A_datasheet
alpha-and-Omega-AOD4184A_datasheet.pdf0.43 MB