Cara menggunakan Mosfet Optocoupled HW-532 untuk mengontrol kecepatan Motor DC hingga 30V atau beban menggunakan Arduino
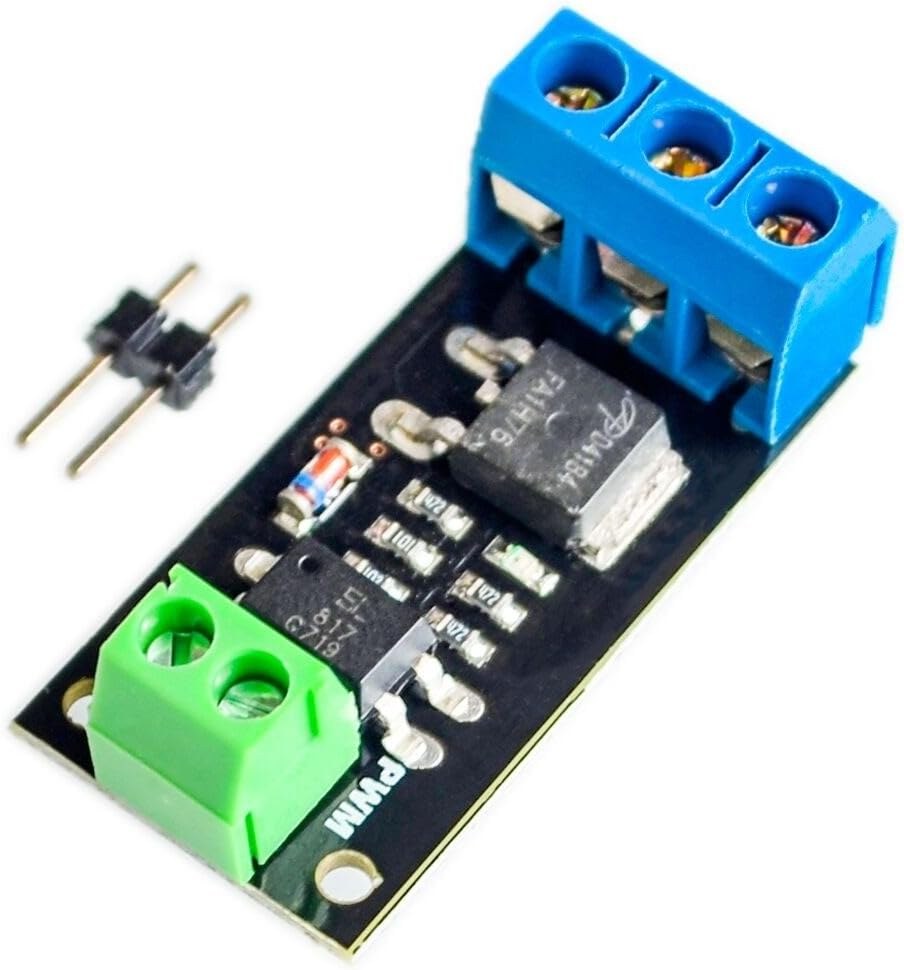
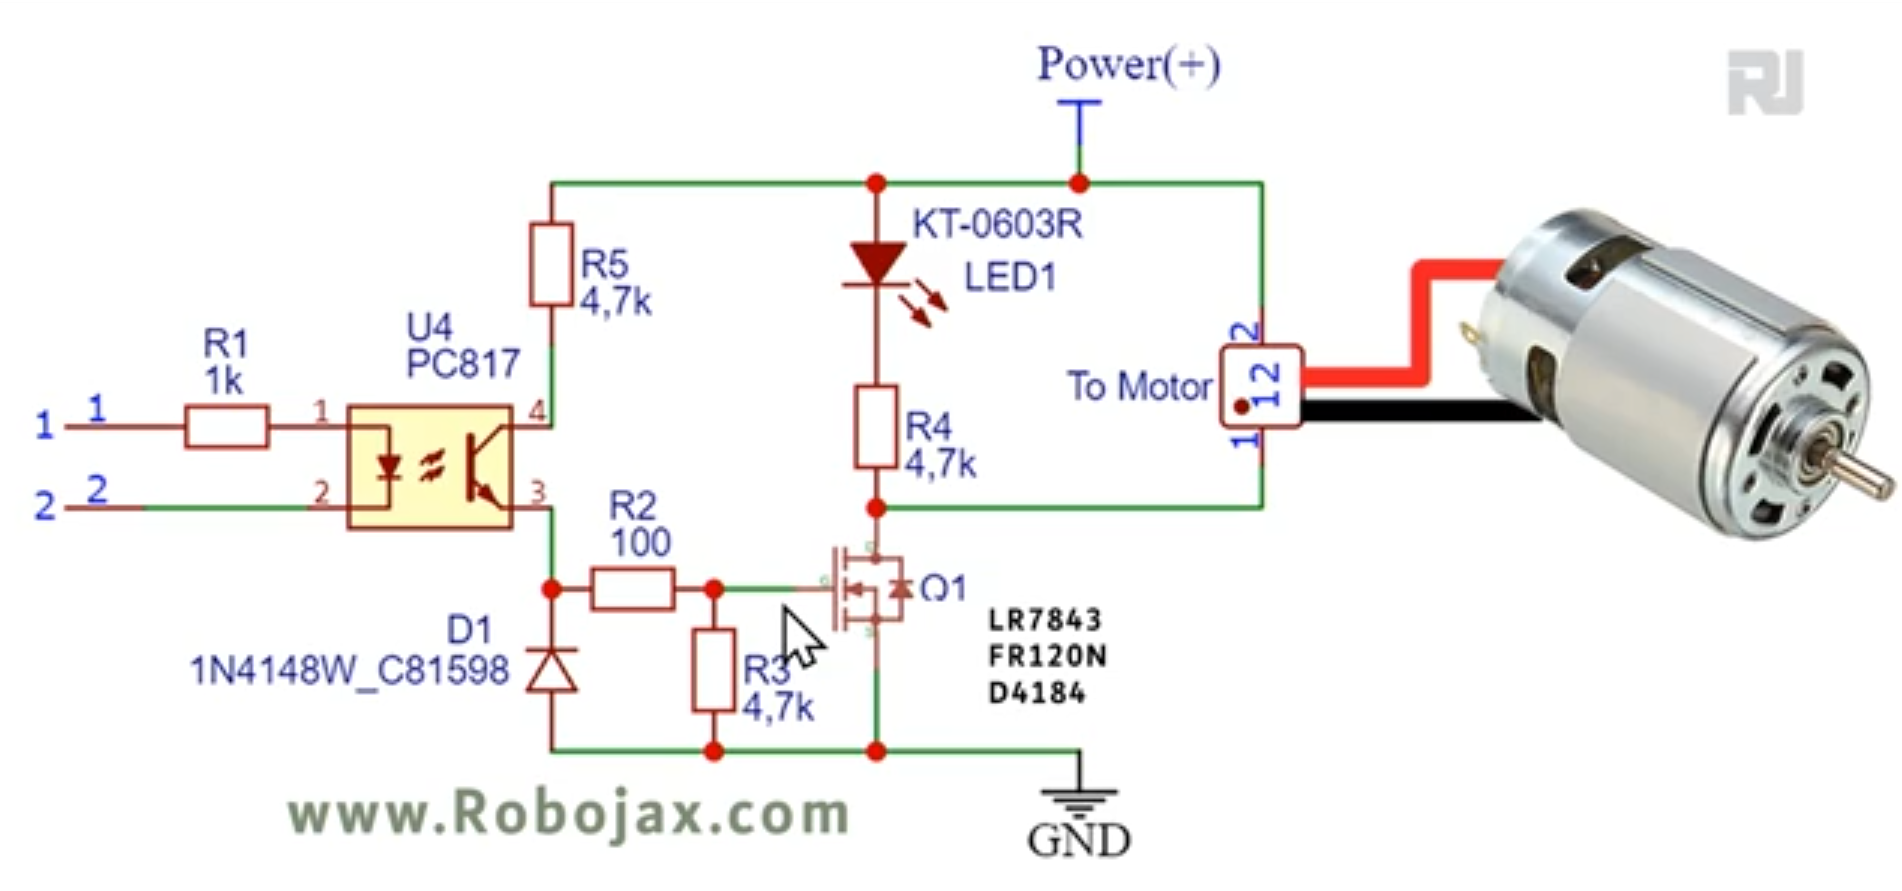
Panduan proyek ini menunjukkan cara membangun pengontrol kecepatan motor DC serbaguna menggunakan Arduino dan modul MOSFET optocoupled HW-532. MOSFET tersebut dapat berupa FR120N , LR7843 atau D4184. Ini memungkinkan Anda mengontrol kecepatan dan status nyala/mati motor DC dengan tegangan hingga 30V. Modul HW-532 menawarkan perlindungan dan isolasi, membuatnya lebih aman dan lebih andal daripada menghubungkan motor langsung ke Arduino.
Proyek ini berguna untuk berbagai aplikasi. Berikut beberapa contohnya:
- Mengontrol kecepatan lengan robot secara presisi
- Membangun kipas dengan kecepatan variabel untuk sistem pendingin
- Membuat mesin otomatis dengan gerakan yang dapat disesuaikan
- Mengembangkan kontrol katup bermotor untuk sistem fluida
Perangkat Keras/Komponen
Komponen inti adalah Arduino, modul MOSFET optocoupled HW-532 (dengan opsi MOSFET seperti D4184, LR7843, atau FR120N), motor DC (rating tegangan ≤ 30V), kabel penghubung, dan opsional, potensiometer dan sakelar tombol tekan untuk kontrol lanjutan (di video pada 19:34).
Pilihan MOSFET di dalam modul HW-532 tergantung pada kebutuhan arus Anda (di video pada 01:24). Video ini memberikan perbandingan rinci dari berbagai MOSFET (di video pada 06:50) dan kesesuaiannya untuk berbagai aplikasi (di video pada 09:45). Ingatlah untuk menyertakan dioda untuk beban induktif seperti motor DC untuk melindungi modul (di video pada 06:00 dan 22:02).
Panduan Pengkabelan
Pengkabelan dasar menghubungkan terminal positif motor ke output HW-532, terminal negatif motor ke ground HW-532, dan pin kontrol HW-532 ke pin digital Arduino (di video pada 11:16).

Penjelasan Kode
Kode yang disediakan menawarkan tiga tingkat kontrol:
- Kontrol Nyala/Mati: Kode sederhana ini (di video pada 15:05) menggunakan pin digital untuk menyalakan dan mematikan motor. Bagian yang dapat dikonfigurasi pengguna adalah konstanta
MOTOR_OUT_PIN, yang mendefinisikan pin Arduino mana yang mengontrol modul HW-532. - Kontrol Kecepatan PWM: Kode ini (di video pada 15:39) menggunakan Pulse Width Modulation (PWM) untuk mengontrol kecepatan motor. Pengguna dapat menyesuaikan
SPEED_MAXdanSPEED_MINuntuk mengatur batas atas dan bawah kontrol kecepatan, dan fungsimotorControl()danstopMotor()digunakan untuk mengontrol motor dan menghentikannya, masing-masing. - Kontrol Potensiometer dan Tombol Tekan: Kode ini (di video pada 22:12) memungkinkan mengontrol kecepatan motor dengan potensiometer dan memulai/menghentikannya dengan tombol tekan. Bagian yang dapat dikonfigurasi pengguna termasuk
POT_PIN(pin potensiometer),MOTOR_OUT_PIN(pin kontrol PWM),START_STOP_PIN(pin tombol tekan),SPEED_MAX, danSPEED_MIN.
Proyek Langsung/Demonstrasi
Video ini menunjukkan pengoperasian ketiga contoh kode. Kontrol nyala/mati ditunjukkan (di video pada 11:41), diikuti oleh kontrol kecepatan PWM (di video pada 16:53), dan akhirnya, kontrol potensiometer dan tombol tekan (di video pada 23:02).
Bab
- [00:00] Pendahuluan dan Gambaran Umum Proyek
- [01:24] Modul HW-532 dan Opsi MOSFET
- [03:23] Skema Rangkaian dan Penjelasan
- [05:11] Detail Komponen
- [06:50] Analisis Datasheet MOSFET
- [11:16] Pengkabelan Dasar dan Demonstrasi Nyala/Mati
- [15:05] Kode Arduino untuk Kontrol Nyala/Mati
- [15:39] Kode Arduino untuk Kontrol Kecepatan PWM
- [19:34] Pengkabelan dengan Potensiometer dan Tombol Tekan
- [22:12] Kode Arduino dengan Potensiometer dan Tombol Tekan
Gambar


/*
* Lesson 108-1: In this lesson we learn how to use  the module with FR120N , LR7843 and D4184 MOSFET to turn ON/OFF DC load up to up to 10A. HW-532 optically isolated from 5V to 30V load up to 10A depending on the module. Schematic shown, wiring diagram explained, different
method of wiring with push button and potentiometer also shown.
Video https://youtu.be/eqXaqRFAWrA

Written by Ahmad Shamshiri for RoboJax.com
// Published on Aug 25, 2022 in Aajx, ON, Canada.


  Project 1: Turning ON/OFF a motor or load (this project)
  Project 2: Controllign Speed using Arduino code
  Project 3: Controllign Speed using potentiometer and a push button

  * Watch Video instrution for this code: https://youtu.be/eqXaqRFAWrA
  *
  * This code is part of Arduino Step by Step Course which starts here:  https://youtu.be/-6qSrDUA5a8
  *
  * for library of this code visit http://robojax.com/
  *
 If you found this tutorial helpful, please support me so I can continue creating
 content like this. Make a donation using PayPal by credit card https://bit.ly/donate-robojax


  *  * This code is "AS IS" without warranty or liability. Free to be used as long as you keep this note intact.*
  * This code has been download from Robojax.com
     This program is free software: you can redistribute it and/or modify
     it under the terms of the GNU General Public License as published by
     the Free Software Foundation, either version 3 of the License, or
     (at your option) any later version.

     This program is distributed in the hope that it will be useful,
     but WITHOUT ANY WARRANTY; without even the implied warranty of
     MERCHANTABILITY or FITNESS FOR A PARTICULAR PURPOSE.  See the
     GNU General Public License for more details.

     You should have received a copy of the GNU General Public License
     along with this program.  If not, see <https://www.gnu.org/licenses/>.

 */


const int MOTOR_OUT_PIN=2;


void setup() {
    //Robojax  MOSFET Motor driver code
  Serial.begin(9600);
  Serial.println("Robojax LR7834 ,  Arduino");

  pinMode(MOTOR_OUT_PIN, OUTPUT);
  digitalWrite(MOTOR_OUT_PIN, HIGH);


}

// the loop routine runs over and over again forever:
void loop() {


    //Robojax XY-GMOS MOSFET Motor driver code
}//loop end# include <Arduino_LSM6DS3.h>
/*
* Lesson 108-2: In this lesson we learn how to use the module with FR120N , LR7843 and D4184 MOSFET to turn ON/OFF DC load up to up to 10A. HW-532 optically isolated from 5V to 30V load up to 10A depending on the module. Schematic shown, wiring diagram explained, different
method of wiring with push button and potentiometer also shown.
Video https://youtu.be/eqXaqRFAWrA
Get code for this project from https://robojax.com/RJT797
Written by Ahmad Shamshiri for RoboJax.com
// Published on Aug 25, 2022 in Aajx, ON, Canada.
Project 1: Turning ON/OFF a motor or load (this project)
Project 2: Controlling Speed using Arduino code
Project 3: Controlling Speed using potentiometer and a push button
* Watch Video instruction for this code:https://youtu.be/eqXaqRFAWrA
*
* This code is part of Arduino Step by Step Course which starts here: https://youtu.be/-6qSrDUA5a8
*
* for library of this code visit http://robojax.com/
*
If you found this tutorial helpful, please support me so I can continue creating
content like this. Make a donation using PayPal by credit card https://bit.ly/donate-robojax
* * This code is "AS IS" without warranty or liability. Free to be used as long as you keep this note intact.*
* This code has been download from Robojax.com
This program is free software: you can redistribute it and/or modify
it under the terms of the GNU General Public License as published by
the Free Software Foundation, either version 3 of the License, or
(at your option) any later version.
This program is distributed in the hope that it will be useful,
but WITHOUT ANY WARRANTY; without even the implied warranty of
MERCHANTABILITY or FITNESS FOR A PARTICULAR PURPOSE. See the
GNU General Public License for more details.
You should have received a copy of the GNU General Public License
along with this program. If not, see <https://www.gnu.org/licenses/>.
*/
const int MOTOR_OUT_PIN = 3;
const int SPEED_MAX = 100;// in %
const int SPEED_MIN = 0;//in %
const int STOP=0;
const int RUN=1;
int motorState=RUN;//
int motorSpeed = 0;//between 0 to 100%.
//video instruction https://youtu.be/eqXaqRFAWrA
void setup() {
//Robojax XY-GMOS MOSFET Motor driver code
Serial.begin(9600);
Serial.println("Robojax XY-GMOS Motor, Arduino");
pinMode(MOTOR_OUT_PIN, OUTPUT);
}//setup ends
// the loop routine runs over and over again forever:
void loop() {
//video https://youtu.be/eqXaqRFAWrA
motorControl(50);//run motor at 50%
delay(5000);//keep it running for 5000ms or 5 seconds
stopMotor();//stop the motor
delay(3000);//keep it stopped for 5000ms or 5 seconds
for(int i=0; i<100; i++)
{
motorControl(i);
delay(200);
}
stopMotor();//stop motor
delay(3000);//keep it stopped for 5000ms or 5 seconds
for(int i=100; i >0; i--)
{
motorControl(i);
delay(200);
}
//Robojax LR7843 MOSFET Motor driver code
}//loop end
/*
* motorControl(int s)
* @brief controls the motor with the value s
* @param return nothing
* @param "type" is character
* on May 08, 2020 at 02:36 in Ajax, Ontario, Canada
*/
void motorControl(int s)
{
//Robojax LR7843 MOSFET Motor driver code
//video https://youtu.be/eqXaqRFAWrA
int k = map(s, SPEED_MIN, SPEED_MAX, 0, 255);
Serial.print("Speed: "); Serial.print(s);Serial.println("%");
analogWrite(MOTOR_OUT_PIN, k);
}//motorControl
/*
* stopMotor()
* @brief stops the motor
* @param return nothing
* @param
* on May 08, 2020 at 02:36 in Ajax, Ontario, Canada
*/
void stopMotor(){
//Robojax XY-GMOS MOSFET Motor driver code
analogWrite( MOTOR_OUT_PIN, 0);
Serial.println("STOPPED");
}//stopMotor()
/*
 * Lesson 108-3: Controlling Speed of motor using Variable Resistor (potentiometer) and using Start/Stop push button with Arduino.
 *
 * In this lesson we learn how to use  the module with FR120N , LR7843 and D4184 MOSFET to turn ON/OFF DC load up to up to 10A. HW-532 optically isolated from 5V to 30V load up to 10A depending on the module. Schematic shown, wiring diagram explained, different
 method of wiring with push button and potentiometer also shown.
 Video https://youtu.be/eqXaqRFAWrA
   Get codes for this project from https://robojax.com/RJT797
 Written by Ahmad Shamshiri for RoboJax.com
 // Published on Aug 25, 2022 in Aajx, ON, Canada.


   Project 1: Turning ON/OFF a motor or load -
   Project 2: Controlling Speed using Arduino code
   Project 3: Controlling Speed using potentiometer and a push button (this project)

   * Watch Video instruction for this code:https://youtu.be/eqXaqRFAWrA
   *
   * This code is part of Arduino Step by Step Course which starts here:  https://youtu.be/-6qSrDUA5a8
   *
   * for library of this code visit http://robojax.com/
   *
  If you found this tutorial helpful, please support me so I can continue creating
  content like this. Make a donation using PayPal by credit card https://bit.ly/donate-robojax


   *  * This code is "AS IS" without warranty or liability. Free to be used as long as you keep this note intact.*
   * This code has been download from Robojax.com
      This program is free software: you can redistribute it and/or modify
      it under the terms of the GNU General Public License as published by
      the Free Software Foundation, either version 3 of the License, or
      (at your option) any later version.

      This program is distributed in the hope that it will be useful,
      but WITHOUT ANY WARRANTY; without even the implied warranty of
      MERCHANTABILITY or FITNESS FOR A PARTICULAR PURPOSE.  See the
      GNU General Public License for more details.

      You should have received a copy of the GNU General Public License
      along with this program.  If not, see <https://www.gnu.org/licenses/>.

  */

const int POT_PIN =A0;//can change
const int MOTOR_OUT_PIN = 3;//~
const int START_STOP_PIN=2;//for push button switch

const int SPEED_MAX = 100;// in %
const int SPEED_MIN = 0;//in %
  //video instruction https://youtu.be/eqXaqRFAWrA

const int STOP=0;
const int RUN=1;
int motorState=RUN;//
int motorSpeed = 0;//between 0 to 100%.

void pushButton();
void setup() {
    //Robojax XY-GMOS MOSFET Motor driver code
  Serial.begin(9600);
  Serial.println("Robojax XY-GMOS Motor,  Arduino");
  pinMode(START_STOP_PIN, INPUT_PULLUP);
  pinMode(MOTOR_OUT_PIN, OUTPUT);
    //video instruction https://youtu.be/eqXaqRFAWrA


}

// the loop routine runs over and over again forever:
void loop() {

 pushButton();
 int potValue =analogRead(POT_PIN);
 int speedPercent = map(potValue, 0, 1023, 0, 100);

 if(motorState ==RUN)
 {
  motorControl(speedPercent);
 }else{
  stopMotor();
 }


  delay(500);
    //Robojax XY-GMOS MOSFET Motor driver code
      //video instruction https://youtu.be/eqXaqRFAWrA
}//loop end


/*
 * motorControl(int s)
 * @brief controls the motor with the value s
 * @param return nothing
 * @param "type" is character

 * on May 08, 2020 at 02:36 in Ajax, Ontario, Canada
 */
void motorControl(int s)
{
    //Robojax LR7843 MOSFET Motor driver code
      //video instruction https://youtu.be/eqXaqRFAWrA
  int k = map(s, SPEED_MIN, SPEED_MAX, 0, 255);
  Serial.print("Speed: "); Serial.print(s);Serial.println("%");
  analogWrite(MOTOR_OUT_PIN, k);
}//motorControl


/*
 * stopMotor()
 * @brief stops the motor
 * @param return nothing
 * @param

 * on May 08, 2020 at 02:36 in Ajax, Ontario, Canada
 */
void stopMotor(){
    //Robojax XY-GMOS MOSFET Motor driver code
      //video instruction https://youtu.be/eqXaqRFAWrA
  analogWrite( MOTOR_OUT_PIN, 0);
  Serial.println("STOPPED");
}//stopMotor()


/*
 * pushButton()
 * @brief reads the push button
 * @param return nothing
 * @param

 * on May 08, 2020 at 02:36 in Ajax, Ontario, Canada
 */
void pushButton()
{
  //Robojax XY-GMOS MOSFET Motor driver code
  //video instruction https://youtu.be/eqXaqRFAWrA
  if(digitalRead(START_STOP_PIN) ==LOW)
  {
    motorState =!motorState;
    delay(100);
  }

}//pushButton()
Hal-hal yang mungkin Anda butuhkan
-
AmazonPurchase HW-532 from Amazonamzn.to
-
eBay
-
AliExpressPurchase FR120N Motor Driver from AliExpresss.click.aliexpress.com
Sumber daya & referensi
Belum ada sumber daya.
Berkas📁
Lembar Data (pdf)
-
infineon-IRLR7843 LR7843 MOSFET datasheet
infineon-irlr7843-datasheet-en.pdf0.37 MB
File Fritzing
-
HW-532B Mosfot Module
HW-532B.fzpz0.01 MB
File lainnya
-
infineon-irfr120n-datasheet-en
infineon-irfr120n-datasheet-en.pdf0.39 MB -
alpha-and-Omega-AOD4184A_datasheet
alpha-and-Omega-AOD4184A_datasheet.pdf0.43 MB