Kako koristiti Mosfet Optocoupled HW-532 za kontrolu brzine DC motora do 30V ili opterećenja koristeći Arduino
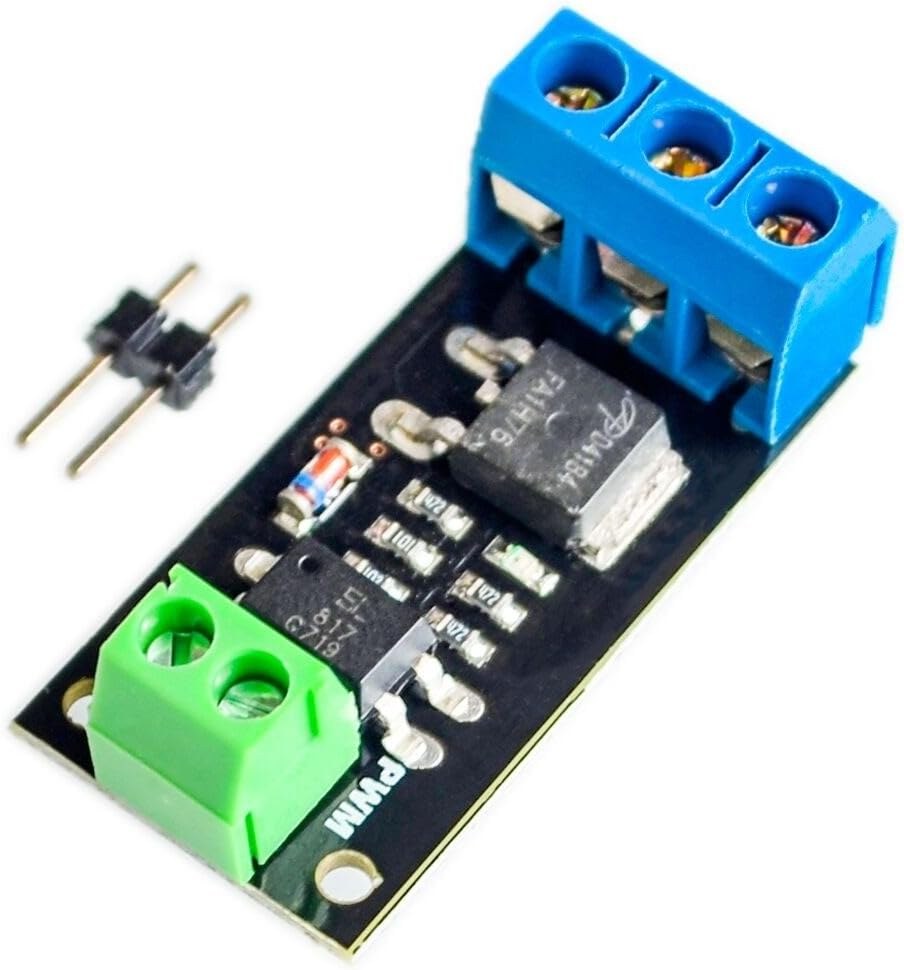
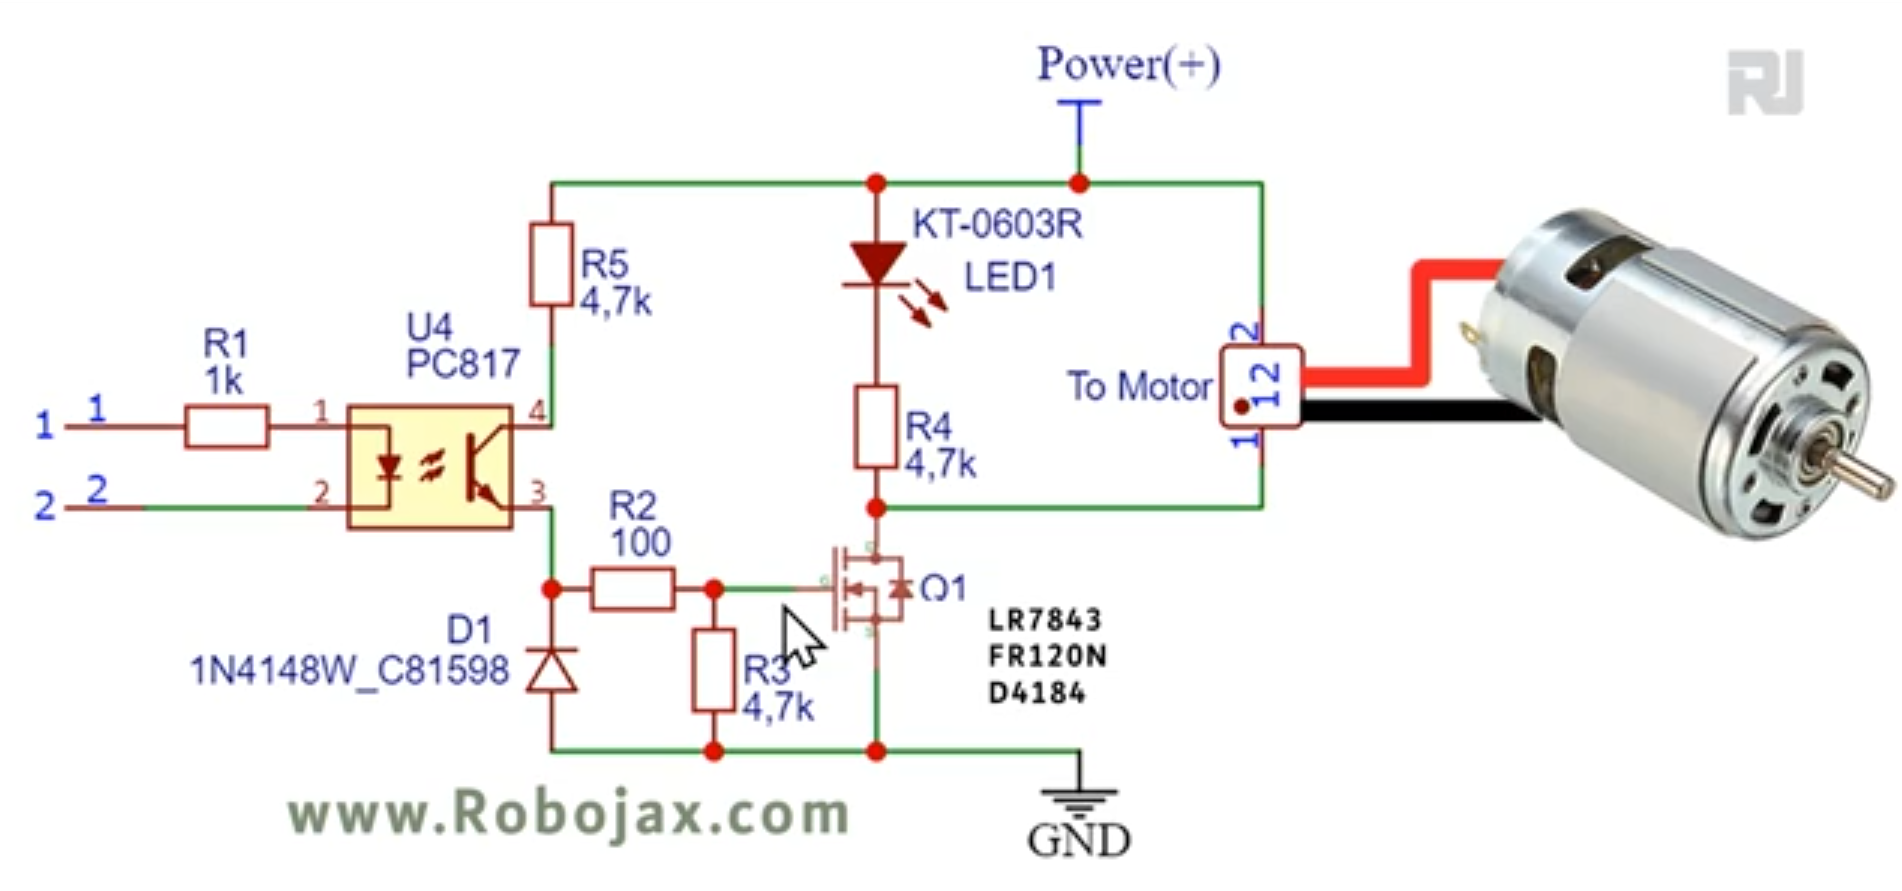
Ovaj projektni vodič pokazuje kako izgraditi svestrani regulator brzine DC motora koristeći Arduino i HW-532 optokaplirani MOSFET modul. MOSFET može biti FR120N, LR7843 ili D4184. Ovo vam omogućava kontrolu brzine i uključenog/isključenog stanja DC motora s naponima do 30V. HW-532 modul nudi zaštitu i izolaciju, čineći ga sigurnijim i pouzdanijim od direktnog povezivanja motora na Arduino.
Ovaj projekt je vrijedan za različite primjene. Evo nekoliko primjera:
- Precizno kontroliranje brzine robotske ruke
- Izgradnja ventilatora s promjenjivom brzinom za rashladne sisteme
- Kreiranje automatiziranih mašina s podesivim kretanjem
- Razvijanje motorizirane kontrole ventila za fluidne sisteme
Hardver/Komponente
Osnovne komponente su Arduino, HW-532 optokaplirani MOSFET modul (s MOSFET opcijama poput D4184, LR7843 ili FR120N), DC motor (naponska vrijednost ≤ 30V), spojne žice, te opcionalno potenciometar i tipkalo za naprednu kontrolu (u videu na 19:34).
Izbor MOSFET-a unutar HW-532 modula ovisi o vašim strujnim zahtjevima (u videu na 01:24). Video pruža detaljno poređenje različitih MOSFET-ova (u videu na 06:50) i njihove prikladnosti za različite primjene (u videu na 09:45). Zapamtite uključiti diodu za induktivna opterećenja poput DC motora kako biste zaštitili modul (u videu na 06:00 i 22:02).
Vodič za povezivanje
Osnovno povezivanje spaja pozitivni terminal motora na izlaz HW-532, negativni terminal motora na masu HW-532, a kontrolni pin HW-532 na digitalni pin Arduina (u videu na 11:16).

Objašnjenje koda
Priloženi kod nudi tri nivoa kontrole:
- Kontrola uključeno/isključeno: Ovaj jednostavni kod (u videu na 15:05) koristi digitalni pin za uključivanje i isključivanje motora. Korisnički podesivi dio je konstanta
MOTOR_OUT_PIN, koja definira koji Arduino pin kontrolira HW-532 modul. - PWM kontrola brzine: Ovaj kod (u videu na 15:39) koristi Pulse Width Modulation (PWM) za kontrolu brzine motora. Korisnik može podesiti
SPEED_MAXiSPEED_MINza postavljanje gornjih i donjih granica kontrole brzine, a funkcijemotorControl()istopMotor()koriste se za kontrolu motora i njegovo zaustavljanje, respektivno. - Kontrola potenciometrom i tipkalom: Ovaj kod (u videu na 22:12) omogućava kontrolu brzine motora potenciometrom i pokretanje/zaustavljanje tipkalom. Korisnički podesivi dijelovi uključuju
POT_PIN(pin potenciometra),MOTOR_OUT_PIN(PWM kontrolni pin),START_STOP_PIN(pin tipkala),SPEED_MAXiSPEED_MIN.
Živi projekt/Demonstracija
Video demonstrira rad sva tri primjera koda. Kontrola uključeno/isključeno prikazana je (u videu na 11:41), zatim PWM kontrola brzine (u videu na 16:53), i na kraju kontrola potenciometrom i tipkalom (u videu na 23:02).
Poglavlja
- [00:00] Uvod i pregled projekta
- [01:24] HW-532 modul i MOSFET opcije
- [03:23] Šema kola i objašnjenje
- [05:11] Detalji komponenti
- [06:50] Analiza MOSFET tehničkog lista
- [11:16] Osnovno povezivanje i demonstracija uključeno/isključeno
- [15:05] Arduino kod za kontrolu uključeno/isključeno
- [15:39] Arduino kod za PWM kontrolu brzine
- [19:34] Povezivanje s potenciometrom i tipkalom
- [22:12] Arduino kod s potenciometrom i tipkalom
Images


/*
* Lesson 108-1: In this lesson we learn how to use  the module with FR120N , LR7843 and D4184 MOSFET to turn ON/OFF DC load up to up to 10A. HW-532 optically isolated from 5V to 30V load up to 10A depending on the module. Schematic shown, wiring diagram explained, different
method of wiring with push button and potentiometer also shown.
Video https://youtu.be/eqXaqRFAWrA

Written by Ahmad Shamshiri for RoboJax.com
// Published on Aug 25, 2022 in Aajx, ON, Canada.


  Project 1: Turning ON/OFF a motor or load (this project)
  Project 2: Controllign Speed using Arduino code
  Project 3: Controllign Speed using potentiometer and a push button

  * Watch Video instrution for this code: https://youtu.be/eqXaqRFAWrA
  *
  * This code is part of Arduino Step by Step Course which starts here:  https://youtu.be/-6qSrDUA5a8
  *
  * for library of this code visit http://robojax.com/
  *
 If you found this tutorial helpful, please support me so I can continue creating
 content like this. Make a donation using PayPal by credit card https://bit.ly/donate-robojax


  *  * This code is "AS IS" without warranty or liability. Free to be used as long as you keep this note intact.*
  * This code has been download from Robojax.com
     This program is free software: you can redistribute it and/or modify
     it under the terms of the GNU General Public License as published by
     the Free Software Foundation, either version 3 of the License, or
     (at your option) any later version.

     This program is distributed in the hope that it will be useful,
     but WITHOUT ANY WARRANTY; without even the implied warranty of
     MERCHANTABILITY or FITNESS FOR A PARTICULAR PURPOSE.  See the
     GNU General Public License for more details.

     You should have received a copy of the GNU General Public License
     along with this program.  If not, see <https://www.gnu.org/licenses/>.

 */


const int MOTOR_OUT_PIN=2;


void setup() {
    //Robojax  MOSFET Motor driver code
  Serial.begin(9600);
  Serial.println("Robojax LR7834 ,  Arduino");

  pinMode(MOTOR_OUT_PIN, OUTPUT);
  digitalWrite(MOTOR_OUT_PIN, HIGH);


}

// the loop routine runs over and over again forever:
void loop() {


    //Robojax XY-GMOS MOSFET Motor driver code
}//loop end# include <Arduino_LSM6DS3.h>
/*
* Lesson 108-2: In this lesson we learn how to use the module with FR120N , LR7843 and D4184 MOSFET to turn ON/OFF DC load up to up to 10A. HW-532 optically isolated from 5V to 30V load up to 10A depending on the module. Schematic shown, wiring diagram explained, different
method of wiring with push button and potentiometer also shown.
Video https://youtu.be/eqXaqRFAWrA
Get code for this project from https://robojax.com/RJT797
Written by Ahmad Shamshiri for RoboJax.com
// Published on Aug 25, 2022 in Aajx, ON, Canada.
Project 1: Turning ON/OFF a motor or load (this project)
Project 2: Controlling Speed using Arduino code
Project 3: Controlling Speed using potentiometer and a push button
* Watch Video instruction for this code:https://youtu.be/eqXaqRFAWrA
*
* This code is part of Arduino Step by Step Course which starts here: https://youtu.be/-6qSrDUA5a8
*
* for library of this code visit http://robojax.com/
*
If you found this tutorial helpful, please support me so I can continue creating
content like this. Make a donation using PayPal by credit card https://bit.ly/donate-robojax
* * This code is "AS IS" without warranty or liability. Free to be used as long as you keep this note intact.*
* This code has been download from Robojax.com
This program is free software: you can redistribute it and/or modify
it under the terms of the GNU General Public License as published by
the Free Software Foundation, either version 3 of the License, or
(at your option) any later version.
This program is distributed in the hope that it will be useful,
but WITHOUT ANY WARRANTY; without even the implied warranty of
MERCHANTABILITY or FITNESS FOR A PARTICULAR PURPOSE. See the
GNU General Public License for more details.
You should have received a copy of the GNU General Public License
along with this program. If not, see <https://www.gnu.org/licenses/>.
*/
const int MOTOR_OUT_PIN = 3;
const int SPEED_MAX = 100;// in %
const int SPEED_MIN = 0;//in %
const int STOP=0;
const int RUN=1;
int motorState=RUN;//
int motorSpeed = 0;//between 0 to 100%.
//video instruction https://youtu.be/eqXaqRFAWrA
void setup() {
//Robojax XY-GMOS MOSFET Motor driver code
Serial.begin(9600);
Serial.println("Robojax XY-GMOS Motor, Arduino");
pinMode(MOTOR_OUT_PIN, OUTPUT);
}//setup ends
// the loop routine runs over and over again forever:
void loop() {
//video https://youtu.be/eqXaqRFAWrA
motorControl(50);//run motor at 50%
delay(5000);//keep it running for 5000ms or 5 seconds
stopMotor();//stop the motor
delay(3000);//keep it stopped for 5000ms or 5 seconds
for(int i=0; i<100; i++)
{
motorControl(i);
delay(200);
}
stopMotor();//stop motor
delay(3000);//keep it stopped for 5000ms or 5 seconds
for(int i=100; i >0; i--)
{
motorControl(i);
delay(200);
}
//Robojax LR7843 MOSFET Motor driver code
}//loop end
/*
* motorControl(int s)
* @brief controls the motor with the value s
* @param return nothing
* @param "type" is character
* on May 08, 2020 at 02:36 in Ajax, Ontario, Canada
*/
void motorControl(int s)
{
//Robojax LR7843 MOSFET Motor driver code
//video https://youtu.be/eqXaqRFAWrA
int k = map(s, SPEED_MIN, SPEED_MAX, 0, 255);
Serial.print("Speed: "); Serial.print(s);Serial.println("%");
analogWrite(MOTOR_OUT_PIN, k);
}//motorControl
/*
* stopMotor()
* @brief stops the motor
* @param return nothing
* @param
* on May 08, 2020 at 02:36 in Ajax, Ontario, Canada
*/
void stopMotor(){
//Robojax XY-GMOS MOSFET Motor driver code
analogWrite( MOTOR_OUT_PIN, 0);
Serial.println("STOPPED");
}//stopMotor()
/*
 * Lesson 108-3: Controlling Speed of motor using Variable Resistor (potentiometer) and using Start/Stop push button with Arduino.
 *
 * In this lesson we learn how to use  the module with FR120N , LR7843 and D4184 MOSFET to turn ON/OFF DC load up to up to 10A. HW-532 optically isolated from 5V to 30V load up to 10A depending on the module. Schematic shown, wiring diagram explained, different
 method of wiring with push button and potentiometer also shown.
 Video https://youtu.be/eqXaqRFAWrA
   Get codes for this project from https://robojax.com/RJT797
 Written by Ahmad Shamshiri for RoboJax.com
 // Published on Aug 25, 2022 in Aajx, ON, Canada.


   Project 1: Turning ON/OFF a motor or load -
   Project 2: Controlling Speed using Arduino code
   Project 3: Controlling Speed using potentiometer and a push button (this project)

   * Watch Video instruction for this code:https://youtu.be/eqXaqRFAWrA
   *
   * This code is part of Arduino Step by Step Course which starts here:  https://youtu.be/-6qSrDUA5a8
   *
   * for library of this code visit http://robojax.com/
   *
  If you found this tutorial helpful, please support me so I can continue creating
  content like this. Make a donation using PayPal by credit card https://bit.ly/donate-robojax


   *  * This code is "AS IS" without warranty or liability. Free to be used as long as you keep this note intact.*
   * This code has been download from Robojax.com
      This program is free software: you can redistribute it and/or modify
      it under the terms of the GNU General Public License as published by
      the Free Software Foundation, either version 3 of the License, or
      (at your option) any later version.

      This program is distributed in the hope that it will be useful,
      but WITHOUT ANY WARRANTY; without even the implied warranty of
      MERCHANTABILITY or FITNESS FOR A PARTICULAR PURPOSE.  See the
      GNU General Public License for more details.

      You should have received a copy of the GNU General Public License
      along with this program.  If not, see <https://www.gnu.org/licenses/>.

  */

const int POT_PIN =A0;//can change
const int MOTOR_OUT_PIN = 3;//~
const int START_STOP_PIN=2;//for push button switch

const int SPEED_MAX = 100;// in %
const int SPEED_MIN = 0;//in %
  //video instruction https://youtu.be/eqXaqRFAWrA

const int STOP=0;
const int RUN=1;
int motorState=RUN;//
int motorSpeed = 0;//between 0 to 100%.

void pushButton();
void setup() {
    //Robojax XY-GMOS MOSFET Motor driver code
  Serial.begin(9600);
  Serial.println("Robojax XY-GMOS Motor,  Arduino");
  pinMode(START_STOP_PIN, INPUT_PULLUP);
  pinMode(MOTOR_OUT_PIN, OUTPUT);
    //video instruction https://youtu.be/eqXaqRFAWrA


}

// the loop routine runs over and over again forever:
void loop() {

 pushButton();
 int potValue =analogRead(POT_PIN);
 int speedPercent = map(potValue, 0, 1023, 0, 100);

 if(motorState ==RUN)
 {
  motorControl(speedPercent);
 }else{
  stopMotor();
 }


  delay(500);
    //Robojax XY-GMOS MOSFET Motor driver code
      //video instruction https://youtu.be/eqXaqRFAWrA
}//loop end


/*
 * motorControl(int s)
 * @brief controls the motor with the value s
 * @param return nothing
 * @param "type" is character

 * on May 08, 2020 at 02:36 in Ajax, Ontario, Canada
 */
void motorControl(int s)
{
    //Robojax LR7843 MOSFET Motor driver code
      //video instruction https://youtu.be/eqXaqRFAWrA
  int k = map(s, SPEED_MIN, SPEED_MAX, 0, 255);
  Serial.print("Speed: "); Serial.print(s);Serial.println("%");
  analogWrite(MOTOR_OUT_PIN, k);
}//motorControl


/*
 * stopMotor()
 * @brief stops the motor
 * @param return nothing
 * @param

 * on May 08, 2020 at 02:36 in Ajax, Ontario, Canada
 */
void stopMotor(){
    //Robojax XY-GMOS MOSFET Motor driver code
      //video instruction https://youtu.be/eqXaqRFAWrA
  analogWrite( MOTOR_OUT_PIN, 0);
  Serial.println("STOPPED");
}//stopMotor()


/*
 * pushButton()
 * @brief reads the push button
 * @param return nothing
 * @param

 * on May 08, 2020 at 02:36 in Ajax, Ontario, Canada
 */
void pushButton()
{
  //Robojax XY-GMOS MOSFET Motor driver code
  //video instruction https://youtu.be/eqXaqRFAWrA
  if(digitalRead(START_STOP_PIN) ==LOW)
  {
    motorState =!motorState;
    delay(100);
  }

}//pushButton()
Things you might need
-
AmazonPurchase HW-532 from Amazonamzn.to
-
eBay
-
AliExpressPurchase FR120N Motor Driver from AliExpresss.click.aliexpress.com
Resources & references
No resources yet.
Files📁
Datasheet (pdf)
-
infineon-IRLR7843 LR7843 MOSFET datasheet
infineon-irlr7843-datasheet-en.pdf0.37 MB
Fritzing File
-
HW-532B Mosfot Module
HW-532B.fzpz0.01 MB
Other files
-
infineon-irfr120n-datasheet-en
infineon-irfr120n-datasheet-en.pdf0.39 MB -
alpha-and-Omega-AOD4184A_datasheet
alpha-and-Omega-AOD4184A_datasheet.pdf0.43 MB