This tutorial demonstrates how to control the brightness of an LED using an ESP32 microcontroller, specifically the SunFounder ESP32 IoT Learning Kit (in video at 00:04). This project is ideal for beginners learning about pulse width modulation (PWM) and its applications in controlling the intensity of light sources. The ESP32's built-in PWM capabilities allow for smooth, precise control, opening up a world of possibilities for creative projects.
Practical Applications:
Creating ambient lighting systems with adjustable brightness.
Building a simple nightlight with gradual fading.
Developing a dynamic indicator light for various states (e.g., low battery, network connection).
Integrating with other sensors and actuators to create complex interactive installations.
Hardware/Components
The project utilizes the SunFounder ESP32 Starter Kit (in video at 00:12), which includes an ESP32 microcontroller, an extension board, various components, and an 18650 lithium battery. You will also need an LED and a 220-ohm resistor (in video at 04:32).
Wiring Guide
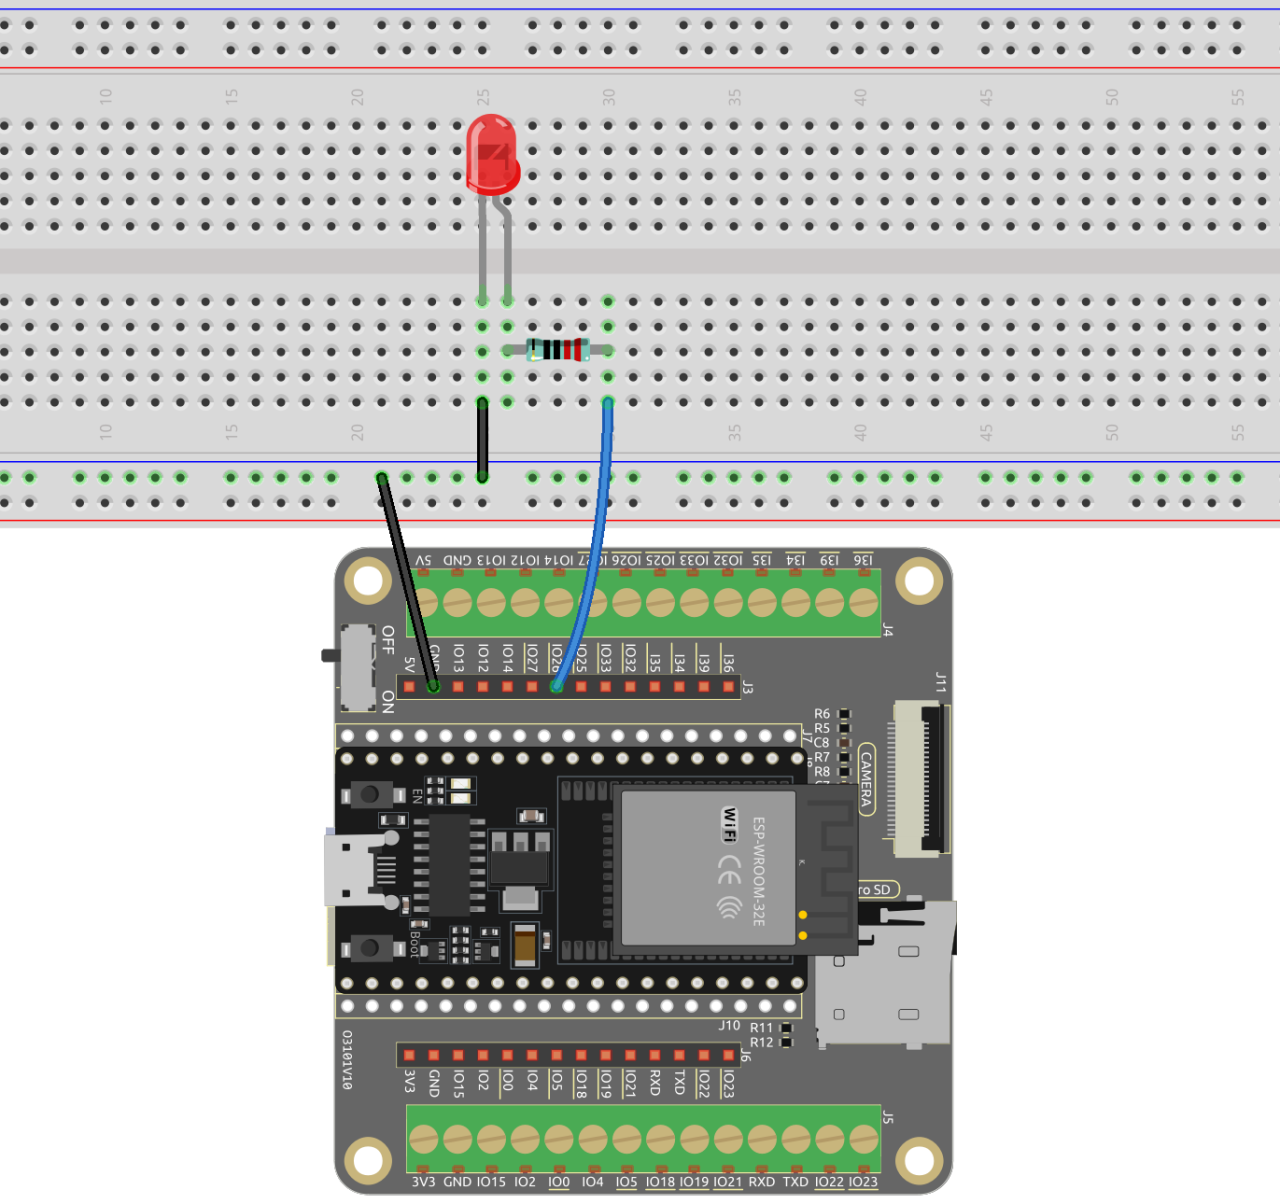
Refer to the wiring diagram in the video (in video at 01:46 and 04:18) and the detailed explanation at timestamp 04:40. The wiring involves connecting the LED's anode to the resistor, the resistor to the ESP32's GPIO 26 pin, and the LED's cathode to ground.
LED_with_Resistor
LED in series with a 220 ohm resistor. Below is the wiring on breadboard.
LED_fade_ESP32
Code Explanation
The Arduino code uses Pulse Width Modulation (PWM) to control the LED's brightness. The key configurable parts are:
ledPin: Defines the GPIO pin connected to the LED (in video at 09:41, set to 26). Change this if you use a different pin.
fadeAmount: Controls the rate at which the LED's brightness changes (in video at 10:06). A higher value results in faster fading. The code automatically reverses the direction when the brightness reaches the minimum (0) or maximum (255) value (in video at 11:44).
const int ledPin = 26;  // The GPIO pin for the LED
int brightness = 0;
int fadeAmount = 5;

void setup() {
  ledcAttachPin(ledPin, 0); // Attach pin to PWM channel
}

void loop() {
  ledcWrite(ledPin, brightness);
  brightness = brightness + fadeAmount;
  if (brightness <= 0 || brightness >= 255) {
    fadeAmount = -fadeAmount;
  }
  delay(50);
}
Live Project/Demonstration
The video demonstrates the fading LED in action (in video at 14:51). The instructor shows how to adjust the fadeAmount variable to control the speed of the fade (in video at 15:16 and 15:51). The process of uploading the code to the ESP32 is also shown (in video at 14:20).
791-ESP32 Tutorial 5/55 - LED Fade, control brightness of an LED in Arduino
Ngôn ngữ: C++
const int ledPin = 26;  // The GPIO pin for the LED
int brightness = 0;
int fadeAmount = 5;

void setup() {
  ledcAttach(ledPin, 5000, 8);  // Attach the LED pin
}

void loop() {
  ledcWrite(ledPin, brightness);  // Write the new brightness value to the PWM pin
  brightness = brightness + fadeAmount;
  if (brightness <= 0 || brightness >= 255) {
    fadeAmount = -fadeAmount;
  }
  delay(50);  // Wait for 50 milliseconds
}
Tiết lộ: Là một đối tác của Amazon, chúng tôi kiếm tiền từ các giao dịch đủ điều kiện. Điều này có nghĩa là chúng tôi có thể nhận được một khoản hoa hồng nhỏ nếu bạn nhấp vào liên kết và thực hiện một giao dịch mà không tốn thêm chi phí nào cho bạn.