In this tutorial, we will learn how to control a 5V water pump using the ESP32 microcontroller and the L293D motor driver. This project is a great introduction to using motor drivers with microcontrollers, enabling you to control devices that require more current than a microcontroller can provide directly. By the end of this tutorial, you will have a working water pump that can be activated and deactivated programmatically.
The ESP32 is a powerful microcontroller that comes with built-in Wi-Fi and Bluetooth capabilities, making it suitable for IoT applications. The L293D motor driver is used to control the water pump by managing the higher current required to operate the motor. This setup allows us to start and stop the pump while ensuring that the ESP32 remains safe from excessive current draw.
Hardware Explained
In this project, we utilize the ESP32 microcontroller, which is known for its versatility and connectivity options. It can function like an Arduino while offering additional features such as Wi-Fi and Bluetooth. The L293D motor driver acts as an interface between the ESP32 and the water pump, allowing for control of the pump's operation without overloading the microcontroller.
The L293D features two H-bridges, enabling it to control the direction and speed of the motor. Each H-bridge can drive a motor in either direction, making it suitable for applications where motor control is needed. In this case, we will only need to enable the pump to run in one direction.
Datasheet Details
Manufacturer
Texas Instruments
Part number
L293D
Logic/IO voltage
4.5 - 36 V
Supply voltage
4.5 - 36 V
Output current (per channel)
600 mA
Peak current (per channel)
1.2 A
PWM frequency guidance
1 kHz - 10 kHz
Input logic thresholds
2 V (high), 0.8 V (low)
Voltage drop / RDS(on) / saturation
1.5 V (max)
Thermal limits
+150 °C (max)
Package
DIP-16
Notes / variants
Includes built-in diodes for inductive load protection
Ensure proper heat dissipation for continuous operation.
Use decoupling capacitors for stable power supply.
Be cautious of input voltage to prevent damage.
Implement PWM for speed control if needed.
Check wiring to avoid shorts, especially with inductive loads.
Wiring Instructions
ESP32-16-motor-pump_wiring
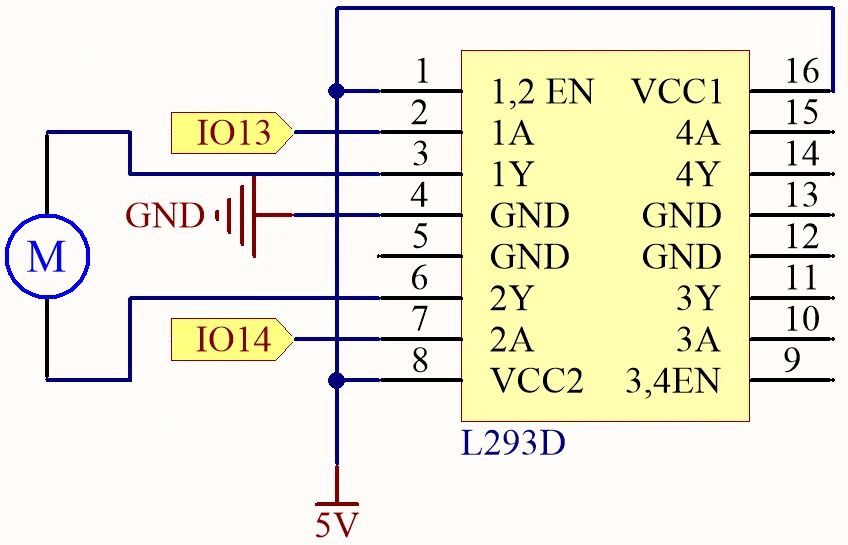
To wire the ESP32 and L293D motor driver with the water pump, follow these steps carefully. First, connect the power supply to the L293D. Connect pin 1 (enable pin for motor A) and pin 8 (Vcc2) to the positive voltage source (5V). Connect pin 4 (ground) to the ground of your circuit.
Next, wire the ESP32 to the L293D. Connect GPIO pin 13 from the ESP32 to pin 2 (input 1) on the L293D, and GPIO pin 14 to pin 7 (input 2). Finally, connect the water pump to pin 3 (output 1) and pin 6 (output 2) of the L293D. Ensure all ground connections are tied together for proper operation. If you follow these instructions, your wiring should be straightforward and functional.
Code Examples & Walkthrough
In the code, we define the pin connections for the motor control. The identifiers motor1A and motor2A correspond to GPIO pins 13 and 14 on the ESP32, respectively. These pins will control the water pump through the L293D driver.
In the setup() function, we initialize the motor control pins as outputs. This ensures that we can send signals to the L293D driver to control the pump. The loop() function then controls the operation of the pump.
void loop() {
  digitalWrite(motor1A, HIGH);
  digitalWrite(motor2A, LOW);
  delay(5);

  digitalWrite(motor1A, LOW);
  digitalWrite(motor2A, LOW);
  delay(2000); // wait for a second
}
In the loop() function, we set motor1A to HIGH and motor2A to LOW to start the pump. After a short delay, we stop the pump by setting both pins LOW. This cycle repeats indefinitely, allowing the pump to run for a brief period and then stop.
Demonstration / What to Expect
Once you have completed the wiring and uploaded the code, you should see the water pump activate and deactivate in a cycle. The pump will run for a short duration, then stop, creating an on-off pattern. Ensure your power supply is adequate for the pump's requirements to avoid any issues (in video at 09:30).