ESP32 튜토리얼 28/55 - LCD가 있는 DHT11 온도 센서 | SunFounder의 ESP32 IoT 학습 키트
이 튜토리얼에서는 ESP32 마이크로컨트롤러와 DHT11 온습도 센서를 인터페이스하는 방법을 살펴보겠습니다. 이 설정을 사용하여 주변 온도와 습도를 측정하고, 결과를 시리얼 모니터와 LCD 화면에 표시합니다. 또한 온도가 특정 임계값을 초과하면 활성화되는 부저를 구현합니다.

이 프로젝트는 DHT11 센서의 사용을 보여줄 뿐만 아니라 내장 Wi-Fi 및 Bluetooth 기능을 포함하는 ESP32의 다재다능함을 보여줍니다. 이 튜토리얼이 끝나면 환경 조건을 지속적으로 모니터링하고 실시간 피드백을 제공하는 작동 설정을 갖게 됩니다.
시각적 가이드는 이 튜토리얼에 포함된 비디오를 확인하세요(비디오 00:00). 시작해 봅시다!
하드웨어 설명
이 프로젝트에 사용된 주요 구성 요소는 ESP32 마이크로컨트롤러, DHT11 센서 및 LCD 디스플레이입니다. ESP32는 DHT11 센서의 데이터를 처리하고 LCD 출력을 제어하는 운영의 두뇌 역할을 합니다.
DHT11 센서는 습도와 온도를 측정하며 단일 데이터 라인을 통해 판독값을 제공합니다. 3.3V~5.5V의 전원 공급이 필요하며 전류 소비가 낮아 배터리 구동 애플리케이션에 적합합니다. LCD는 온도와 습도 값을 실시간으로 표시합니다.
데이터시트 세부 정보
| 제조업체 | GROVE |
|---|---|
| 부품 번호 | DHT11 |
| 로직/IO 전압 | 3.3 – 5.5 V |
| 공급 전압 | 3.3 V |
| 출력 전류(채널당) | 0.5 mA 일반 |
| 피크 전류(채널당) | 2.5 mA 최대 |
| PWM 주파수 가이드 | 해당 없음 |
| 입력 로직 임계값 | 0.3 VCC(낮음), 0.7 VCC(높음) |
| 전압 강하 / RDS(on) / 포화 | 해당 없음 |
| 열 제한 | 0°C ~ 60°C |
| 패키지 | DIP-4 |
| 참고 사항 / 변형 | 해상도: 1°C / 1% RH |
- 데이터 라인에 풀업 저항(5 kΩ 권장)을 사용하세요.
- 정확한 판독을 위해 센서 와이어를 짧게(20m 미만) 유지하세요.
- 최적의 성능을 위해 DHT11에 3.3V를 공급하세요.
- 샘플링 주기는 1초 이상이어야 합니다.
- 판독이 실패하면 배선 연결을 확인하세요(예: 연결되지 않음, 잘못된 핀).
배선 지침
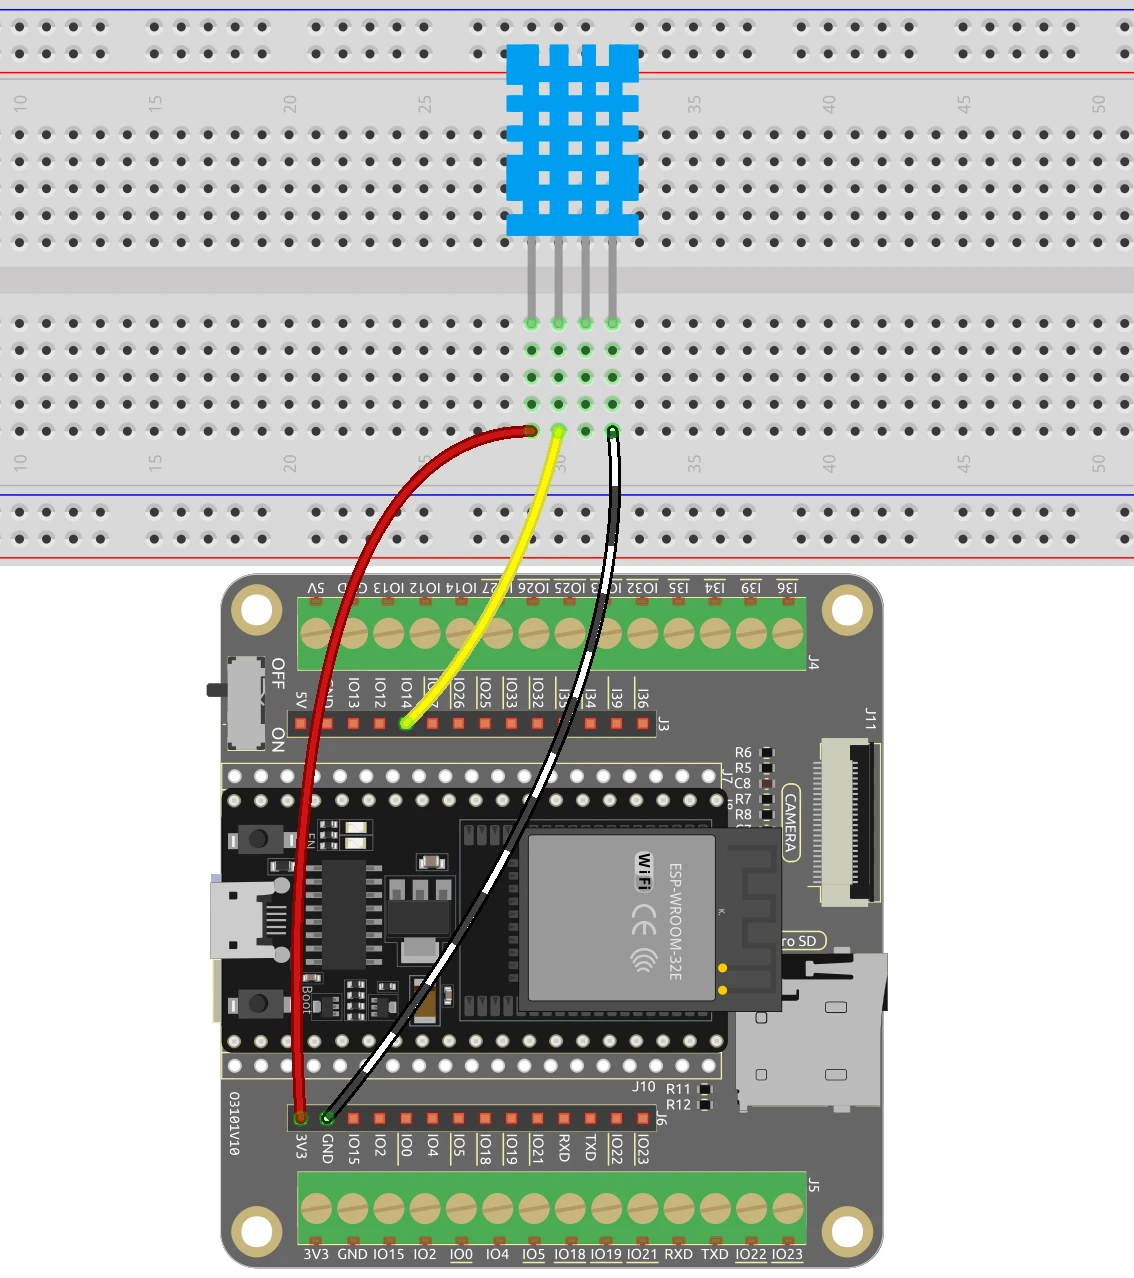

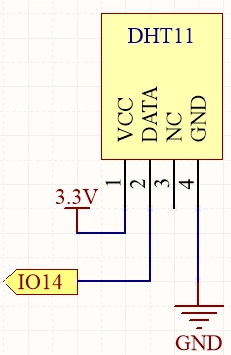
DHT11 센서를 ESP32에 배선하려면 DHT11의 VCC 핀(가장 왼쪽 핀)을 ESP32의 3.3V 출력에 연결하는 것으로 시작하세요. 다음으로 접지 핀(네 번째 핀)을 ESP32의 접지(GND) 핀에 연결합니다. 데이터 핀(두 번째 핀)은 ESP32의 GPIO 핀 14에 연결해야 합니다.
LCD의 경우 VCC 핀을 ESP32의 5V 출력에 연결하세요. 접지 핀은 ESP32의 접지 핀에 연결해야 합니다. LCD의 SDA 및 SCL 핀은 각각 GPIO 핀 21과 22에 연결해야 합니다. 데이터를 읽는 동안 문제가 발생하지 않도록 모든 연결이 안전한지 확인하세요.
코드 예제 및 설명
코드의 첫 번째 부분에서는 DHT 센서를 초기화하고 #define DHTPIN 14로 핀 번호를 설정합니다. 이 식별자를 사용하면 코드 전체에서 DHT11 데이터 라인에 연결된 핀을 쉽게 참조할 수 있습니다.
#include "DHT.h"

#define DHTPIN 14  // DHT11 데이터 핀에 연결된 핀 설정
#define DHTTYPE DHT11 // DHT 11
DHT dht(DHTPIN, DHTTYPE);

void setup() {
  Serial.begin(115200);
  dht.begin();
}
setup() 함수에서 디버깅을 위한 시리얼 통신을 초기화하고 DHT 센서를 시작합니다. 메인 루프에는 센서에 과도한 요청을 보내지 않도록 2초의 지연이 포함됩니다.
다음으로 float humidity = dht.readHumidity(); 및 float temperature = dht.readTemperature();를 사용하여 습도와 온도 값을 읽습니다. 이러한 식별자는 측정된 값을 나중에 사용하기 위해 저장합니다.
void loop() {
  delay(2000);
  float humidity = dht.readHumidity();
  float temperature = dht.readTemperature();
}
마지막으로 읽기 오류가 있는지 확인하고 Serial.print()를 사용하여 값을 시리얼 모니터에 출력합니다. 이를 통해 판독값을 실시간으로 관찰할 수 있습니다.
if (isnan(humidity) || isnan(temperature)) {
  Serial.println("DHT 센서에서 읽기 실패!");
  return;
}
Serial.print("습도: ");
Serial.print(humidity);
Serial.print(" %\t");
Serial.print("온도: ");
Serial.print(temperature);
Serial.println(" *C");
LCD 코드에서는 LCD를 초기화하고 lcd.print() 함수를 사용하여 온도와 습도를 화면에 표시합니다. 이는 DHT11 센서가 수집한 데이터의 시각적 표현을 제공합니다.
데모 / 기대 효과
모든 것이 올바르게 배선되고 코드가 ESP32에 업로드되면 시리얼 모니터와 LCD 화면에 온도 및 습도 판독값이 표시되는 것을 볼 수 있습니다. 온도가 30°C를 초과하면 부저가 활성화되어 청각적 경고를 제공합니다.
역방향 연결에 주의하고, 센서가 극한 조건에 노출되지 않도록 하세요. 이는 측정값에 영향을 줄 수 있습니다. 요구 사항에 따라 부저의 임계값을 조정해야 할 수도 있습니다(영상 15:30 부분 참조).
영상 타임스탬프
- 00:00 시작
- 1:57 DHT11 소개
- 6:18 ESP32와 DHT11 배선
- 7:67 Arduino 코드 설명
- 11:49 Arduino IDE에서 ESP32 보드 및 COM 포트 선택
- 13:30 프로젝트 시연
- 15:32 화씨 온도 얻기
- 16:04 ESP32를 사용하여 LCD에 온도 표시
- 17:20 ESP32를 사용한 DHT11 및 LCD 코드
- 19:49 ESP32를 사용한 DHT11 LCD 데모
- 21:33 온도 값에 따른 조치 취하기
이미지

#include "DHT.h"

#define DHTPIN 14  // Set the pin connected to the DHT11 data pin
#define DHTTYPE DHT11 // DHT 11

DHT dht(DHTPIN, DHTTYPE);

void setup() {
  Serial.begin(115200);
  Serial.println("DHT11 test!");
  dht.begin();
}

void loop() {
  // Wait a few seconds between measurements.
  delay(2000);

  // Reading temperature or humidity takes about 250 milliseconds!
  // Sensor readings may also be up to 2 seconds 'old' (it's a very slow sensor)
  float humidity = dht.readHumidity();
  // Read temperature as Celsius (the default)
  float temperature = dht.readTemperature();

  // Check if any reads failed and exit early (to try again).
  if (isnan(humidity) || isnan(temperature)) {
    Serial.println("Failed to read from DHT sensor!");
    return;
  }
  // Print the humidity and temperature
  Serial.print("Humidity: ");
  Serial.print(humidity);
  Serial.print(" %\t");
  Serial.print("Temperature: ");
  Serial.print(temperature);
  Serial.println(" *C");
}
/*
This is Arduino code to measure temperature and humidity using DHT11/DHT22 and displays it on LCD screen
written by Ahmad Shamshiri for SunFounder's ESP32 IoT learning kit
watch full video https://youtu.be/qRUFZX4eDJg
Full code, wiring diagram and other resources for this tutorial is at https://robojax.com/RJT711
*/
#include "DHT.h"
#include <Wire.h>
#include <LiquidCrystal_I2C.h>


#define DHTPIN 14      // Set the pin connected to the DHT11 data pin
#define DHTTYPE DHT11  // DHT 11

DHT dht(DHTPIN, DHTTYPE);

// Initialize the LCD object with I2C address 0x27, 16 columns, and 2 rows
LiquidCrystal_I2C lcd(0x27, 16, 2);

void setup() {

  // Begin serial communication at 115200 baud
  Serial.begin(115200);

  // Initialize the dht11
  dht.begin();

  // Initialize the LCD
  lcd.init();
  lcd.backlight();

  // Clear the LCD
  lcd.clear();
}

void loop() {
  // Wait a few seconds between measurements.
  delay(2000);

  // Reading temperature or humidity takes about 250 milliseconds!
  // Sensor readings may also be up to 2 seconds 'old' (it's a very slow sensor)
  float humidity = dht.readHumidity();
  // Read temperature as Celsius (the default)
  float temperature = dht.readTemperature();

  // Check if any reads failed and exit early (to try again).
  if (isnan(humidity) || isnan(temperature)) {
    Serial.println("Failed to read from DHT sensor!");
    return;
  }

  // Display temperature and humidity on the LCD
  lcd.setCursor(0, 0);
  lcd.print("Temp: ");
  lcd.print(temperature);
  lcd.write(223);  // Degree symbol
  lcd.print("C");

  lcd.setCursor(0, 1);
  lcd.print("Humi: ");
  lcd.print(humidity);
  lcd.print("%");
}
Common Course Links
Common Course Files
필요할 수 있는 것들
-
아마존Purchase DHT11 from Amazonamzn.to
-
방굿Purchase DHT11 module from Banggoodbanggood.com
자원 및 참고자료
-
문서화ESP32 Tutorial 28/55 - SunFounder doc page for DHT temperature sensordocs.sunfounder.com
파일📁
프리징 파일
-
DHT11 Humitidy and Temperature Sensor (3 pins)
DHT11 Humitidy and Temperature Sensor (3 pins).fzpz0.20 MB
사용자 매뉴얼
-
DHT11 사용자 매뉴얼
robojax-DHT11_manual.pdf0.82 MB