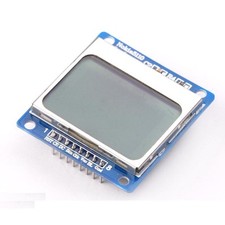
ESP32 教學 25/55 - 使用 NTC 同 LCD 測量溫度 | SunFounder 嘅 ESP32 IoT 學習套件
喺呢個教學入面,我哋會學吓點樣用負溫度系數(NTC)熱敏電阻嚟量度溫度,並且用ESP32微控制器將讀數顯示喺LCD屏幕上面。呢個項目會涉及將NTC熱敏電阻連接到ESP32,同埋用LCD嚟顯示攝氏同華氏嘅溫度讀數。呢個係一個好好嘅方法嚟開始學習用ESP32平台做溫度感應同顯示技術。

我哋會用SunFounder嘅ESP32擴展板,呢塊板增強咗ESP32嘅功能,內置Wi-Fi同藍牙。呢塊板可以好容易同各種感應器同顯示器整合,好適合用喺物聯網項目。NTC熱敏電阻會根據佢嘅電阻嚟提供溫度讀數,而電阻會隨溫度反比例變化。如果想進一步了解設置同代碼,記得睇吓條片(喺片入面00:00位置)。
硬件講解
呢個項目用到嘅主要組件包括ESP32微控制器、一個NTC熱敏電阻、一個電阻同一個LCD顯示器。ESP32係中央處理單元,負責處理熱敏電阻嘅數據同控制LCD顯示器。NTC熱敏電阻會根據溫度改變佢嘅電阻,等我哋可以透過同固定電阻組成嘅分壓器配置嚟計算溫度。

LCD顯示器會顯示攝氏同華氏嘅溫度讀數。我哋會用I2C協議同LCD通訊,咁樣可以簡化接線,因為需要嘅引腳數目會減少。NTC熱敏電阻有個特性,就係佢嘅電阻會隨溫度上升而下降,呢個對我哋嘅計算好重要。
數據手冊詳情
| 製造商 | SunFounder |
|---|---|
| 零件編號 | NTC熱敏電阻 |
| 標稱電阻 | 10 kΩ |
| Beta值 | 3950 K |
| 溫度範圍 | -40°C至125°C |
| 封裝 | 軸向 |
- 確保熱敏電阻嘅額定範圍符合預期嘅溫度範圍。
- 用一個10 kΩ電阻做分壓器;否則讀數會唔準。
- 檢查接線,避免短路。
- 確保LCD嘅I2C地址正確(通常係0x27)。
- 用合適嘅電源電壓畀ESP32同周邊設備。
- 檢查序列監視器嘅波特率同代碼設定一致(115200)。
接線指示


要接線,首先將NTC熱敏電阻連接到ESP32。熱敏電阻冇極性,所以可以任意方向連接。將熱敏電阻嘅一條引腳連接到ESP32嘅接地(GND)引腳。另一條引腳連接到一個10 kΩ電阻,然後電阻再連接到ESP32嘅3.3V引腳。熱敏電阻同電阻之間嘅接點會連接到ESP32嘅引腳35,用嚟讀取電壓嚟計算溫度。
至於LCD,將接地引腳(通常係由上數起第二條)連接到ESP32嘅GND。然後,將VCC(通常係第一條)連接到ESP32嘅5V引腳。SDA引腳(通常係第三條)應該連接到ESP32嘅引腳21,而SCL引腳(通常係第四條)應該連接到引腳22。確保所有連接穩固,並且再三檢查引腳號碼,避免出錯。
代碼示例同講解
代碼首先定義熱敏電阻嘅常數,包括引腳號碼、參考電壓同電阻值。設置函數初始化序列通訊,並將熱敏電阻引腳設定為輸入。
const int thermistorPin = 35; // 連接到熱敏電阻嘅引腳
const float referenceVoltage = 3.3;
const float referenceResistor = 10000; // 另一個電阻
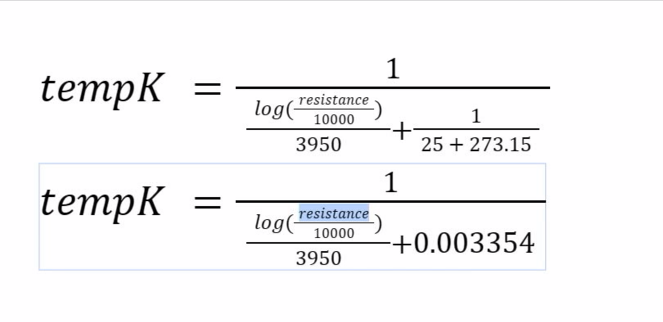
主循環讀取熱敏電阻引腳嘅模擬值,計算電阻,然後用Beta參數方程計算攝氏同華氏溫度。計算出嚟嘅數值會打印到序列監視器。
int adcValue = analogRead(thermistorPin); // 讀取ADC值
float voltage = (adcValue * referenceVoltage) / 4095.0; // 計算電壓
float resistance = (voltage * referenceResistor) / (referenceVoltage - voltage); // 計算熱敏電阻電阻值
最後,溫度會顯示喺LCD上面。lcd.print()函數用嚟顯示溫度數值,連同度數符號。
lcd.setCursor(0, 0);
lcd.print("Temp: ");
lcd.print(tempC, 1);
lcd.write(223); // 度數符號
lcd.print("C");
呢段代碼會每300毫秒更新一次LCD上面嘅最新溫度讀數,做到實時監測。
示範/預期效果
當你執行代碼並完成接線之後,你應該會喺LCD上面見到溫度讀數,同時以攝氏同華氏顯示。如果你用手揸住熱敏電阻,你應該會留意到溫度隨住電阻下降而上升。要小心極性接反,同埋確保接線穩固,因為接線唔啱會導致讀數唔準確(喺影片04:50)。
影片時間戳
- 00:00 開始
- 1:50 項目介紹
- 5:32 接線講解
- 8:20 Arduino NTC代碼(ESP32)講解
- 13:38 喺Arduino IDE入面選擇ESP32板同COM端口
- 15:20 NTC測量溫度示範
- 17:34 NTC溫度顯示喺LCD1602(配ESP32)
- 18:42 NTC Arduino代碼(配LCD)講解
- 21:15 溫度喺LCD上嘅示範
- 23:13 綠色LCD定藍色LCD1601?
圖片


// Define constants
const int thermistorPin = 35; // Pin connected to the thermistor
const float referenceVoltage = 3.3;
const float referenceResistor = 10000; // the 'other' resistor
const float beta = 3950; // Beta value (Typical Value)
const float nominalTemperature = 25; // Nominal temperature for calculating the temperature coefficient
const float nominalResistance = 10000; // Resistance value at nominal temperature

void setup() {
  Serial.begin(115200); // Initialize serial communication
  pinMode(thermistorPin, INPUT); // Set pin as input
}

void loop() {
  int adcValue = analogRead(thermistorPin); // Read ADC value
  float voltage = (adcValue * referenceVoltage) / 4095.0; // Calculate voltage
  float resistance = (voltage * referenceResistor) / (referenceVoltage - voltage); // Calculate thermistor resistance with updated configuration

  // Calculate temperature using the Beta parameter equation
  float tempK = 1 / (((log(resistance / nominalResistance)) / beta) + (1 / (nominalTemperature + 273.15)));

  float tempC = tempK - 273.15; // Get temperature in Celsius
  float tempF = 1.8 * tempC + 32.0; // Get temperature in Fahrenheit

  //Print temperature
  printf("TempC: %.2f C\n", tempC);
  printf("TempF: %.2f F\n", tempF);

  delay(300); // Wait 1 second
}
/*
This is Lesson 25/55 of SunFounder's ESP32 IoT Learning kit code
displays temperature from NTC on LCD screen
written by Ahmad Shamshiri for SunFounder's ESP32 IoT Learnign kit
watch full video https://youtu.be/zJh-gWY0DmE
download this code, wiring diagram and other resources from https://robojax.com/RJT707

*/

#include <Wire.h>
#include <LiquidCrystal_I2C.h>

//SDA->21,SCL->22
LiquidCrystal_I2C lcd(0x27,16,2);  // set the LCD address to 0x27 for a 16 chars and 2 line display


// Define constants
const int thermistorPin = 35; // Pin connected to the thermistor
const float referenceVoltage = 3.3;
const float referenceResistor = 10000; // Resistance value (10k)
const float beta = 3950; // Beta value (Typical Value)
const float nominalTemperature = 25; // Nominal temperature for calculating the temperature coefficient
const float nominalResistance = 10000; // Resistance value at nominal temperature

void setup() {

  lcd.clear();
  lcd.init();// initialize the lcd
  lcd.backlight(); // Turns on the LCD backlight.

  //Serial.begin(115200); // Initialize serial communication
  pinMode(thermistorPin, INPUT); // Set pin as input
}

void loop() {
  int adcValue = analogRead(thermistorPin); // Read ADC value
  float voltage = (adcValue * referenceVoltage) / 4095.0; // Calculate voltage
  float resistance = (voltage * referenceResistor) / (referenceVoltage - voltage); // Calculate thermistor resistance with updated configuration

  // Calculate temperature using the Beta parameter equation
  float tempK = 1 / (((log(resistance / nominalResistance)) / beta) + (1 / (nominalTemperature + 273.15)));

  float tempC = tempK - 273.15; // Get temperature in Celsius
  float tempF = 1.8 * tempC + 32.0; // Get temperature in Fahrenheit

  //Print temperature
  //printf("TempC: %.2f C\n", tempC);
  //printf("TempF: %.2f F\n", tempF);

  // Display temperature on LCD
  lcd.setCursor(0, 0);
  lcd.print("Temp: ");
  lcd.print(tempC, 1);
  lcd.write(223); // Degree symbol
  lcd.print("C");

  lcd.setCursor(0, 1);
  lcd.print("Temp: ");
  lcd.print(tempF, 1);
  lcd.write(223); // Degree symbol
  lcd.print("F");

  delay(300); // Wait 1 second
}
Common Course Links
Common Course Files
資源與參考資料
-
文件记录ESP32 Tutorial 25/55 - SunFounder doc page for NTC thermometerdocs.sunfounder.com
-
文件记录Learn about NTC Thermistordocs.sunfounder.com
文件📁
冇文件可用。