ESP32 ટ્યુટોરિયલ 42/55 - કેમેરા વડે ફોટો લેવો અને માઇક્રો SD પર સેવ કરવો CAM-1 | SunFounder ની ESP32 કિટ
આ ટ્યુટોરિયલમાં, આપણે ESP32 માઇક્રોકંટ્રોલર અને તેના સનફાઉન્ડરના એક્સટેન્શન બોર્ડનો ઉપયોગ કરીને કેમેરા વડે ફોટા કેપ્ચર કરીશું અને તેને સીધા માઇક્રો SD કાર્ડ પર સેવ કરીશું. આ પ્રોજેક્ટ ESP32 ની બિલ્ટ-ઇન ક્ષમતાઓ, જેમ કે Wi-Fi અને બ્લૂટૂથ, નો ઉપયોગ કરીને એક કોમ્પેક્ટ ફોટો લેવાનું ઉપકરણ બનાવે છે. આ ટ્યુટોરિયલના અંત સુધીમાં, તમારી પાસે એક કાર્યક્ષમ સેટઅપ હશે જે છબીઓ લઈ શકે અને સ્ટોર કરી શકે, જે પછીથી કમ્પ્યુટર પર ઍક્સેસ કરી શકાય છે.

જેઓ ESP32 ઇકોસિસ્ટમ માટે નવા છે, તેમના માટે આ કિટ વિવિધ પ્રોજેક્ટ્સ માટે એક બહુમુખી પ્લેટફોર્મ પ્રદાન કરે છે, જેમાં આ પ્રોજેક્ટનો સમાવેશ થાય છે. આ પ્રોજેક્ટમાં વપરાયેલ કેમેરો OV2640 છે, જે 1600x1200 પિક્સેલનું રિઝોલ્યુશન આપે છે. તે આધુનિક સ્માર્ટફોનની ગુણવત્તા સાથે મેળ ન ખાતો હોવા છતાં, તે મૂળભૂત છબી કેપ્ચર કાર્યો માટે પૂરતો છે. કોઈપણ પગલાં સ્પષ્ટ કરવા માટે, આ ટ્યુટોરિયલ સાથેનો વિડિયો ચોક્કસપણે જુઓ (વિડિયોમાં 00:00 પર).

હાર્ડવેર સમજાવ્યું
આ પ્રોજેક્ટના મુખ્ય ઘટકોમાં ESP32 માઇક્રોકંટ્રોલર, કેમેરા મોડ્યુલ (OV2640), અને સ્ટોરેજ માટે માઇક્રો SD કાર્ડનો સમાવેશ થાય છે. ESP32 એક શક્તિશાળી માઇક્રોકંટ્રોલર છે જેમાં સંકલિત Wi-Fi અને બ્લૂટૂથ ક્ષમતાઓ છે, જે તેને IoT એપ્લિકેશન્સ માટે આદર્શ બનાવે છે. કેમેરા મોડ્યુલ છબીઓ કેપ્ચર કરે છે, જે પછી ESP32 દ્વારા પ્રોસેસ કરવામાં આવે છે.
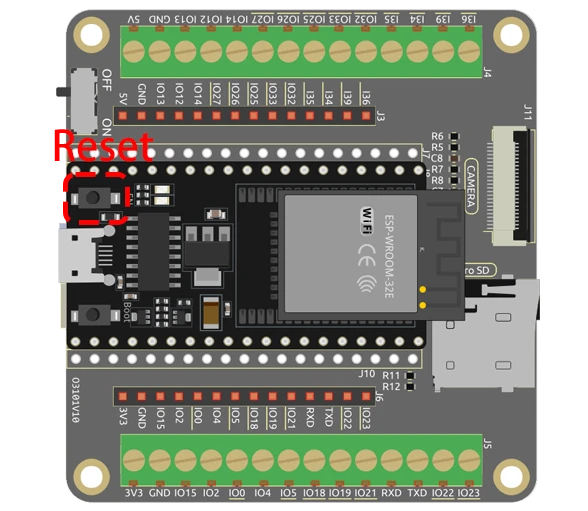
માઇક્રો SD કાર્ડ કેપ્ચર કરેલી છબીઓ માટે સ્ટોરેજ માધ્યમ તરીકે કાર્ય કરે છે. આ સેટઅપમાં, ESP32 ચોક્કસ GPIO પિનનો ઉપયોગ કરીને કેમેરા મોડ્યુલ સાથે વાતચીત કરે છે, અને છબીઓ SD કાર્ડ પર JPEG ફોર્મેટમાં સેવ થાય છે. આ પછીથી ફોટા સરળતાથી મેળવવા અને જોવાની મંજૂરી આપે છે.
- ESP32 બોર્ડમાં દાખલ કરતી વખતે કેમેરો યોગ્ય રીતે દિશામાં છે તેની ખાતરી કરો.
- સુસંગતતા સમસ્યાઓ ટાળવા માટે 32 GB અથવા તેનાથી ઓછી ક્ષમતાવાળા માઇક્રો SD કાર્ડનો ઉપયોગ કરો.
- પ્રોગ્રામિંગ મોડ માટે GPIO 0 ને GND સાથે જોડો.
- બ્રાઉનઆઉટ સમસ્યાઓ ટાળવા માટે પાવર સપ્લાય પર ધ્યાન આપો.
- અસ્પષ્ટ છબીઓ ટાળવા માટે ફોટા લેતી વખતે કેમેરો સ્થિર રાખો.
વાયરિંગ સૂચનાઓ
ESP32 કેમેરા મોડ્યુલને વાયર કરવા માટે, પહેલા ખાતરી કરો કે ESP32 બંધ છે. માઇક્રો SD કાર્ડ મોડ્યુલને ESP32 સાથે નીચેના પિનનો ઉપયોગ કરીને જોડો: SD કાર્ડનો CS પિન ESP32 ના GPIO 5 સાથે, MOSI ને GPIO 23 સાથે, MISO ને GPIO 19 સાથે, અને SCK ને GPIO 18 સાથે જોડો. આગળ, કેમેરા મોડ્યુલના પિન નીચે મુજબ જોડો: PWDN ને GPIO 32 સાથે, XCLK ને GPIO 0 સાથે, SIOD ને GPIO 26 સાથે, અને SIOC ને GPIO 27 સાથે. પિક્સેલ ડેટા પિન Y2 થી Y9 ને તમારા કોડમાં વ્યાખ્યાયિત કર્યા મુજબ GPIO 5 થી GPIO 39 સાથે જોડવા જોઈએ.
ગ્રાઉન્ડ અને પાવર પિન યોગ્ય રીતે જોડવાની ખાતરી કરો. ESP32 ને કિટમાં સમાવિષ્ટ બેટરી દ્વારા પાવર કરી શકાય છે. વાયરિંગ પછી, ઉપકરણ ચાલુ કરતા પહેલા કનેક્શન સુરક્ષિત છે તેની ખાતરી કરો. જો તમે સૂચનાઓનું બારીકાઈથી પાલન કરો છો, તો જ્યારે તમે કોડ અપલોડ કરો છો ત્યારે કેમેરો યોગ્ય રીતે ઇનિશિયલાઇઝ થતો જોવા મળશે.
કોડ ઉદાહરણો અને વોકથ્રુ


કોડમાં, આપણે જરૂરી લાઇબ્રેરીઓ શામેલ કરીને અને કેમેરા પિન રૂપરેખાંકનો વ્યાખ્યાયિત કરીને શરૂ કરીએ છીએ. લીધેલા ફોટાની સંખ્યાનો ટ્રેક રાખવા માટે pictureNumber ચલ ઇનિશિયલાઇઝ કરવામાં આવે છે.
int pictureNumber = 0;

void setup() {
  WRITE_PERI_REG(RTC_CNTL_BROWN_OUT_REG, 0);  // બ્રાઉનઆઉટ ડિટેક્ટર અક્ષમ કરો
  Serial.begin(115200);
  camera_config_t config;
  // કેમેરા માટે રૂપરેખાંકન સેટિંગ્સ
  config.ledc_channel = LEDC_CHANNEL_0;
  // વધારાની કેમેરા સેટિંગ્સ...
}
સેટઅપ ફંક્શન સીરિયલ કમ્યુનિકેશન ઇનિશિયલાઇઝ કરે છે અને કેમેરા સેટિંગ્સ રૂપરેખાંકિત કરે છે. રૂપરેખાંકનમાં શ્રેષ્ઠ કામગીરી માટે ledc_channel, pin_d0, અને xclk_freq_hz જેવા પરિમાણો શામેલ છે.
આગળ, આપણે બહુવિધ ફોટા લેવા માટે લૂપનો ઉપયોગ કરીને છબી કેપ્ચર પ્રક્રિયાને સંભાળીએ છીએ. છબી ડેટા pictureNumber પર આધારિત ફાઇલનામ સાથે SD કાર્ડ પર સેવ થાય છે.
for (int shoot = 0; shoot < 5; shoot++) {
    camera_fb_t *fb = esp_camera_fb_get(); // ફોટો લો
    String path = "/picture" + String(pictureNumber) + ".jpg"; // ફાઇલ પાથ
    File file = fs.open(path.c_str(), FILE_WRITE); // લખવા માટે ફાઇલ ખોલો
    // ફાઇલમાં છબી ડેટા લખો
    file.write(fb->buf, fb->len);
    // EEPROM માં પિક્ચર નંબર અપડેટ કરો
    EEPROM.write(0, pictureNumber);
}
આ લૂપ પાંચ સુધીની છબીઓ કેપ્ચર કરે છે, જ્યાં દરેક છબી અનન્ય ફાઇલનામ સાથે સેવ થાય છે. EEPROM નો ઉપયોગ પ્રોગ્રામને છેલ્લો પિક્ચર નંબર યાદ રાખવા દે છે, જે ખાતરી કરે છે કે દરેક નવી છબી પાસે અનન્ય ઓળખકર્તા છે.
પ્રદર્શન / શું અપેક્ષા રાખવી
જ્યારે તમે કોડ ચલાવો છો, ત્યારે ESP32 કેમેરા અને SD કાર્ડને પ્રારંભ કરશે. ESP32 પર રીસેટ બટન દબાવ્યા પછી, તે શ્રેણીબદ્ધ ફોટા લેશે, જે EEPROM મૂલ્યના આધારે 0 થી 255 સુધી ક્રમિક રીતે નંબર આપવામાં આવશે. છબીઓ કેપ્ચર કર્યા પછી, તમે માઇક્રો SD કાર્ડ કાઢી શકો છો અને તમારા કમ્પ્યુટર પર ચિત્રો જોઈ શકો છો.
સામાન્ય ભૂલોમાં માઇક્રો SD કાર્ડ યોગ્ય રીતે ફોર્મેટ અને દાખલ કરેલું છે તેની ખાતરી કરવી, તેમજ અસ્પષ્ટ છબીઓ ટાળવા માટે સ્થિર કેમેરા સ્થિતિ જાળવવી શામેલ છે. જો તમને કેમેરા દ્વારા છબીઓ કેપ્ચર ન થવાની સમસ્યા આવે, તો કોડમાં સેટ કરેલા વાયરિંગ અને રૂપરેખાંકનો બે વાર તપાસો (વિડિઓમાં 06:45 પર).
વિડિઓ સમયસ્ટેમ્પ્સ
- 00:00 શરૂઆત
- 1:39 પરિચય
- 5:19 ESP32 કેમેરા કોડ સમજાવ્યો
- 11:10 Arduino IDE માં ESP32 બોર્ડ અને COM પોર્ટ પસંદ કરવું
- 12:52 ઘરની અંદર અને બહાર પરીક્ષણમાં ફોટા લેવા
છબીઓ
/*********
  Rui Santos
  Complete project details at https://RandomNerdTutorials.com/esp32-cam-take-photo-save-microsd-card

  IMPORTANT!!!
   - Select Board "AI Thinker ESP32-CAM"
   - GPIO 0 must be connected to GND to upload a sketch
   - After connecting GPIO 0 to GND, press the ESP32-CAM on-board RESET button to put your board in flashing mode

  Permission is hereby granted, free of charge, to any person obtaining a copy
  of this software and associated documentation files.
  The above copyright notice and this permission notice shall be included in all
  copies or substantial portions of the Software.
*********/

#include "esp_camera.h"
#include "Arduino.h"
#include "FS.h"                // SD Card ESP32
#include "SD_MMC.h"            // SD Card ESP32
#include "soc/soc.h"           // Disable brownour problems
#include "soc/rtc_cntl_reg.h"  // Disable brownour problems
#include "driver/rtc_io.h"
#include <EEPROM.h>  // read and write from flash memory

// define the number of bytes you want to access
#define EEPROM_SIZE 1

// Pin definition for CAMERA_MODEL_AI_THINKER
#define PWDN_GPIO_NUM 32
#define RESET_GPIO_NUM -1
#define XCLK_GPIO_NUM 0
#define SIOD_GPIO_NUM 26
#define SIOC_GPIO_NUM 27

#define Y9_GPIO_NUM 35
#define Y8_GPIO_NUM 34
#define Y7_GPIO_NUM 39
#define Y6_GPIO_NUM 36
#define Y5_GPIO_NUM 21
#define Y4_GPIO_NUM 19
#define Y3_GPIO_NUM 18
#define Y2_GPIO_NUM 5
#define VSYNC_GPIO_NUM 25
#define HREF_GPIO_NUM 23
#define PCLK_GPIO_NUM 22

int pictureNumber = 0;

void setup() {
  WRITE_PERI_REG(RTC_CNTL_BROWN_OUT_REG, 0);  //disable brownout detector

  Serial.begin(115200);
  //Serial.setDebugOutput(true);
  //Serial.println();

  camera_config_t config;
  config.ledc_channel = LEDC_CHANNEL_0;
  config.ledc_timer = LEDC_TIMER_0;
  config.pin_d0 = Y2_GPIO_NUM;
  config.pin_d1 = Y3_GPIO_NUM;
  config.pin_d2 = Y4_GPIO_NUM;
  config.pin_d3 = Y5_GPIO_NUM;
  config.pin_d4 = Y6_GPIO_NUM;
  config.pin_d5 = Y7_GPIO_NUM;
  config.pin_d6 = Y8_GPIO_NUM;
  config.pin_d7 = Y9_GPIO_NUM;
  config.pin_xclk = XCLK_GPIO_NUM;
  config.pin_pclk = PCLK_GPIO_NUM;
  config.pin_vsync = VSYNC_GPIO_NUM;
  config.pin_href = HREF_GPIO_NUM;
  config.pin_sscb_sda = SIOD_GPIO_NUM;
  config.pin_sscb_scl = SIOC_GPIO_NUM;
  config.pin_pwdn = PWDN_GPIO_NUM;
  config.pin_reset = RESET_GPIO_NUM;
  config.xclk_freq_hz = 20000000;
  config.pixel_format = PIXFORMAT_JPEG;

  if (psramFound()) {
    config.frame_size = FRAMESIZE_UXGA;  // FRAMESIZE_ + QVGA|CIF|VGA|SVGA|XGA|SXGA|UXGA
    config.jpeg_quality = 10;
    config.fb_count = 2;
  } else {
    config.frame_size = FRAMESIZE_SVGA;
    config.jpeg_quality = 12;
    config.fb_count = 1;
  }

  // Init Camera
  esp_err_t err = esp_camera_init(&config);
  if (err != ESP_OK) {
    Serial.printf("Camera init failed with error 0x%x", err);
    return;
  }

  //Serial.println("Starting SD Card");
  if (!SD_MMC.begin()) {
    Serial.println("SD Card Mount Failed");
    return;
  }

  uint8_t cardType = SD_MMC.cardType();
  if (cardType == CARD_NONE) {
    Serial.println("No SD Card attached");
    return;
  }

  // initialize EEPROM with predefined size
  EEPROM.begin(EEPROM_SIZE);
  pictureNumber = EEPROM.read(0) + 1;

  for (int shoot = 0; shoot < 5; shoot++) {
    camera_fb_t *fb = NULL;

    // Take Picture with Camera
    fb = esp_camera_fb_get();
    if (!fb) {
      Serial.println("Camera capture failed");
      return;
    }

    // Path where new picture will be saved in SD Card
    String path = "/picture" + String(pictureNumber) + ".jpg";

    fs::FS &fs = SD_MMC;
    // Serial.printf("Picture file name: %s\n", path.c_str());

    File file = fs.open(path.c_str(), FILE_WRITE);
    if (!file) {
      Serial.println("Failed to open file in writing mode");
    } else {
      file.write(fb->buf, fb->len);  // Write image data to file
      if (shoot == 4) {
        Serial.printf("Saved file to path: %s\n", path.c_str());
      }else{
        Serial.printf("Shooting... \n");
      }
      EEPROM.write(0, pictureNumber);  // Update the picture number in EEPROM
      EEPROM.commit();
    }
    file.close();                      // Close the file
    esp_camera_fb_return(fb);          // Return the frame buffer back to the camera driver
    delay(200);                        // Short delay between shots
  }
  // Turns off the ESP32-CAM white on-board LED (flash) connected to GPIO 4
  pinMode(4, OUTPUT);
  digitalWrite(4, LOW);
  rtc_gpio_hold_en(GPIO_NUM_4);

  // Put the ESP32-CAM to deep sleep
  delay(2000);
  Serial.println("Going to sleep now");
  delay(2000);
  esp_deep_sleep_start();
  Serial.println("This will never be printed");
}

void loop() {
  // Empty loop as we are putting the ESP32-CAM to deep sleep
}
Common Course Links
Common Course Files
સંસાધનો અને સંદર્ભો
-
દસ્તાવેજીકરણESP32 Tutorial 42/55 - SunFounder doc page for taking photodocs.sunfounder.com
ફાઇલો📁
કોઈ ફાઇલો ઉપલબ્ધ નથી.