Mafunzo ya ESP32 54/55 - Weka Rangi ya Mstari wa LED wa WS2812 kupitia Wifi | Kifurushi cha Kujifunza cha IoT cha ESP32 cha SunFounder
Katika mafunzo haya, tutajifunza jinsi ya kudhibiti rangi ya ukanda wa LED wa WS2812 RGB kwa kutumia microcontroller ya ESP32 kupitia Wi-Fi. Kwa kutumia kichagua rangi, unaweza kuchagua rangi tofauti kutoka kwenye kifaa chako cha mkononi au kompyuta na kutuma taarifa hiyo kwenye ukanda wa LED. Mradi huu unaonyesha uwezo wa ESP32, kuruhusu mwingiliano usio na mshono na taa za LED kupitia kiolesura cha wavuti.

Microcontroller ya ESP32 ina Wi-Fi na Bluetooth, na kuifanya kuwa chaguo hodari kwa matumizi ya IoT. Katika mradi huu, tutazingatia utendaji wa Wi-Fi kudhibiti ukanda wa LED. Watumiaji wataweza kuchagua rangi kwa njia ya nguvu, na kuunda uzoefu wa kuvutia wa kuona. Kwa ufafanuzi zaidi kuhusu mradi huu, hakikisha umeangalia video kwenye (video kwenye 00:00).
Vifaa Vimeelezwa
Vipengele vya msingi vya mradi huu vinajumuisha microcontroller ya ESP32 na ukanda wa LED wa WS2812. ESP32 ni microcontroller yenye nguvu yenye uwezo wa Wi-Fi uliojengewa ndani, kuwezesha mawasiliano na udhibiti wa wireless.
Ukanda wa LED wa WS2812 unajumuisha LED za RGB zinazoweza kushughulikiwa kibinafsi, kuruhusu kuweka rangi ya kila LED kwa kujitegemea. Kila LED inajumuisha mzunguko wa udhibiti na LED ya RGB ndani ya kifurushi kimoja, ambacho hurahisisha wiring na udhibiti wa LED nyingi.
Maelezo ya Datasheet
| Mtengenezaji | Worldsemi |
|---|---|
| Nambari ya sehemu | WS2812B |
| Voltage ya Logic/IO | 3.5–5.3 V |
| Voltage ya usambazaji | 5 V |
| Mkondo wa pato (kwa kila channel) | 20 mA |
| Mkondo wa kilele (kwa kila channel) | 60 mA |
| Mwongozo wa frequency ya PWM | 400 Hz |
| Viwango vya kizingiti cha mantiki ya kuingiza | 0.3 × VDD (chini), 0.7 × VDD (juu) |
| Kushuka kwa voltage / RDS(on) / kueneza | 0.5 V |
| Mipaka ya joto | –40 hadi +80 °C |
| Kifurushi | 5050 SMD |
| Vidokezo / lahaja | Inapatikana katika urefu na usanidi mbalimbali. |
- Hakikisha usambazaji wa umeme sahihi ili kuepuka kuharibu LED.
- Tumia ardhi ya pamoja kati ya ESP32 na ukanda wa LED.
- Weka mistari ya data fupi ili kuzuia kuharibika kwa ishara.
- Zingatia kuongeza capacitor (1000 µF) kwenye usambazaji wa umeme kwa utulivu.
- Tumia resistor (470 Ω) kwenye mstari wa data kwa uadilifu wa ishara.
Maagizo ya Wiring
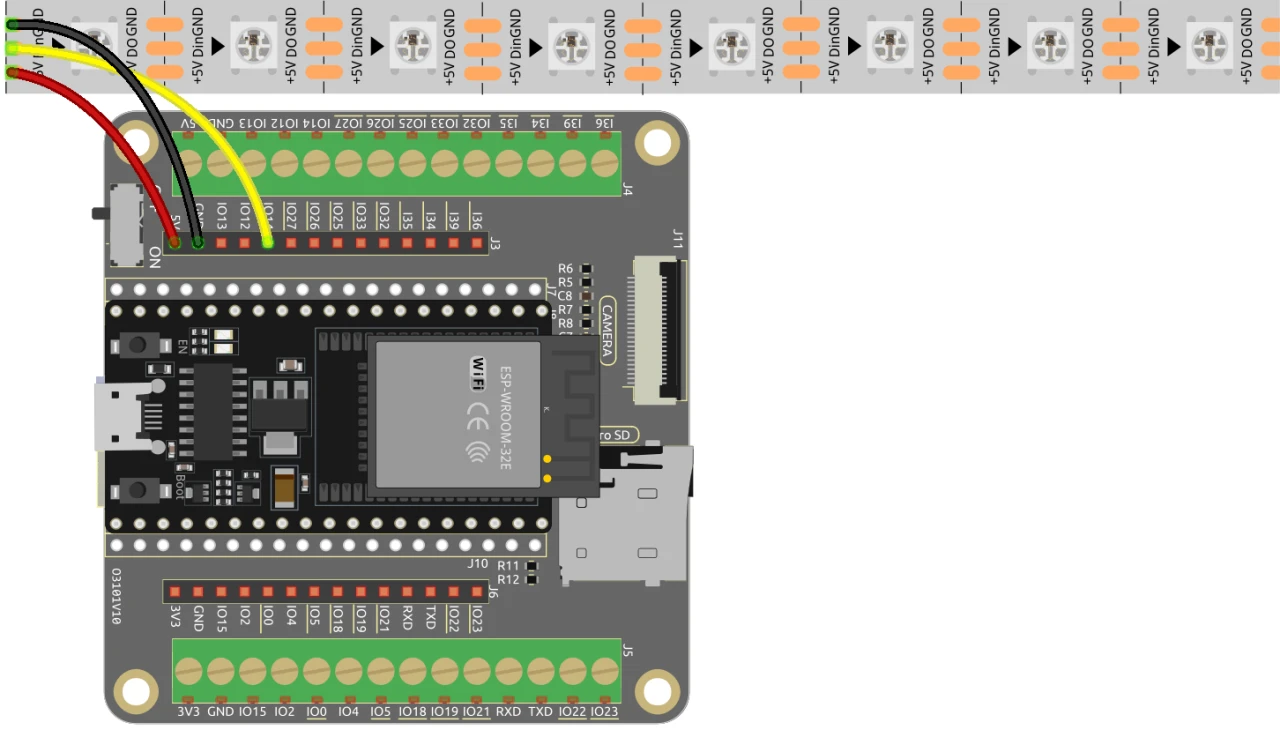
Ili kuunganisha ESP32 kwenye ukanda wa LED wa WS2812, unganisha vipengele kama ifuatavyo: Kwanza, unganisha pini ya 5V ya ukanda wa LED kwenye pato la 5V la ESP32. Ifuatayo, unganisha pini ya ardhi (GND) ya ukanda wa LED kwenye pini ya GND kwenye ESP32. Hatimaye, unganisha pini ya data ya ukanda wa LED (kawaida huitwa DI au Data In) kwenye pini ya GPIO 13 kwenye ESP32. Hakikisha miunganisho yote ni salama ili kuhakikisha utendaji sahihi.
Katika video, njia mbadala za wiring zimetajwa kwa ufupi, lakini usanidi ulioelezwa hapa ndio usanidi unaopendekezwa kwa utendaji bora (video kwenye 03:00).
Mifano ya Msimbo & Mwongozo
Msimbo huanza kwa kujumuisha maktaba muhimu za kudhibiti ukanda wa LED wa WS2812 na kuanzisha seva ya wavuti. Pini ya LED inafafanuliwa kama LED_PIN na idadi ya LED kwenye ukanda imewekwa na NUM_LEDS.
#define LED_PIN 13 // NeoPixel LED strip
#define NUM_LEDS 8 // Number of LEDs
Adafruit_NeoPixel strip = Adafruit_NeoPixel(NUM_LEDS, LED_PIN, NEO_GRB + NEO_KHZ800);
Kipande hiki huanzisha maktaba ya NeoPixel na kuweka ukanda wa LED kwenye pini iliyobainishwa. Kitu cha Adafruit_NeoPixel, strip, ndicho utakachotumia kudhibiti rangi za LED.
Ifuatayo, msimbo huanzisha Wi-Fi na kuanzisha seva ya wavuti kushughulikia maombi yanayoingia. SSID na nenosiri la mtandao vimefafanuliwa, kuruhusu ESP32 kuunganisha kwenye Wi-Fi.
const char *ssid = "your_SSID";
const char *password = "your_PASSWORD";
WebServer server(80);
Katika kipande hiki, badilisha your_SSID na your_PASSWORD na vitambulisho vyako halisi vya Wi-Fi. Muunganisho huu huwezesha ESP32 kuwasiliana na vifaa kwenye mtandao huo huo, kuruhusu udhibiti wa mbali wa ukanda wa LED.
Kazi kuu ya kubadilisha rangi ya LED ni setColor(), ambayo hupitia kila LED na kuweka rangi yake kulingana na thamani za RGB zilizochaguliwa.
void setColor() {
  for (int i = 0; i < NUM_LEDS; i++) {
    strip.setPixelColor(i, valueR, valueG, valueB); // Set the color of the i-th LED
    strip.show(); // Update the LED strip with the new colors
    delay(10); // Wait for 10 milliseconds
  }
}
Kazi hii inahakikisha kwamba kila LED kwenye ukanda inasasishwa na rangi iliyochaguliwa. Kuchelewa kunaruhusu LED kubadilisha rangi vizuri. Unapoingiliana na kiolesura cha wavuti, kazi hii itaitwa kuakisi chaguo zako za rangi.
Maonyesho / Nini cha Kutarajia
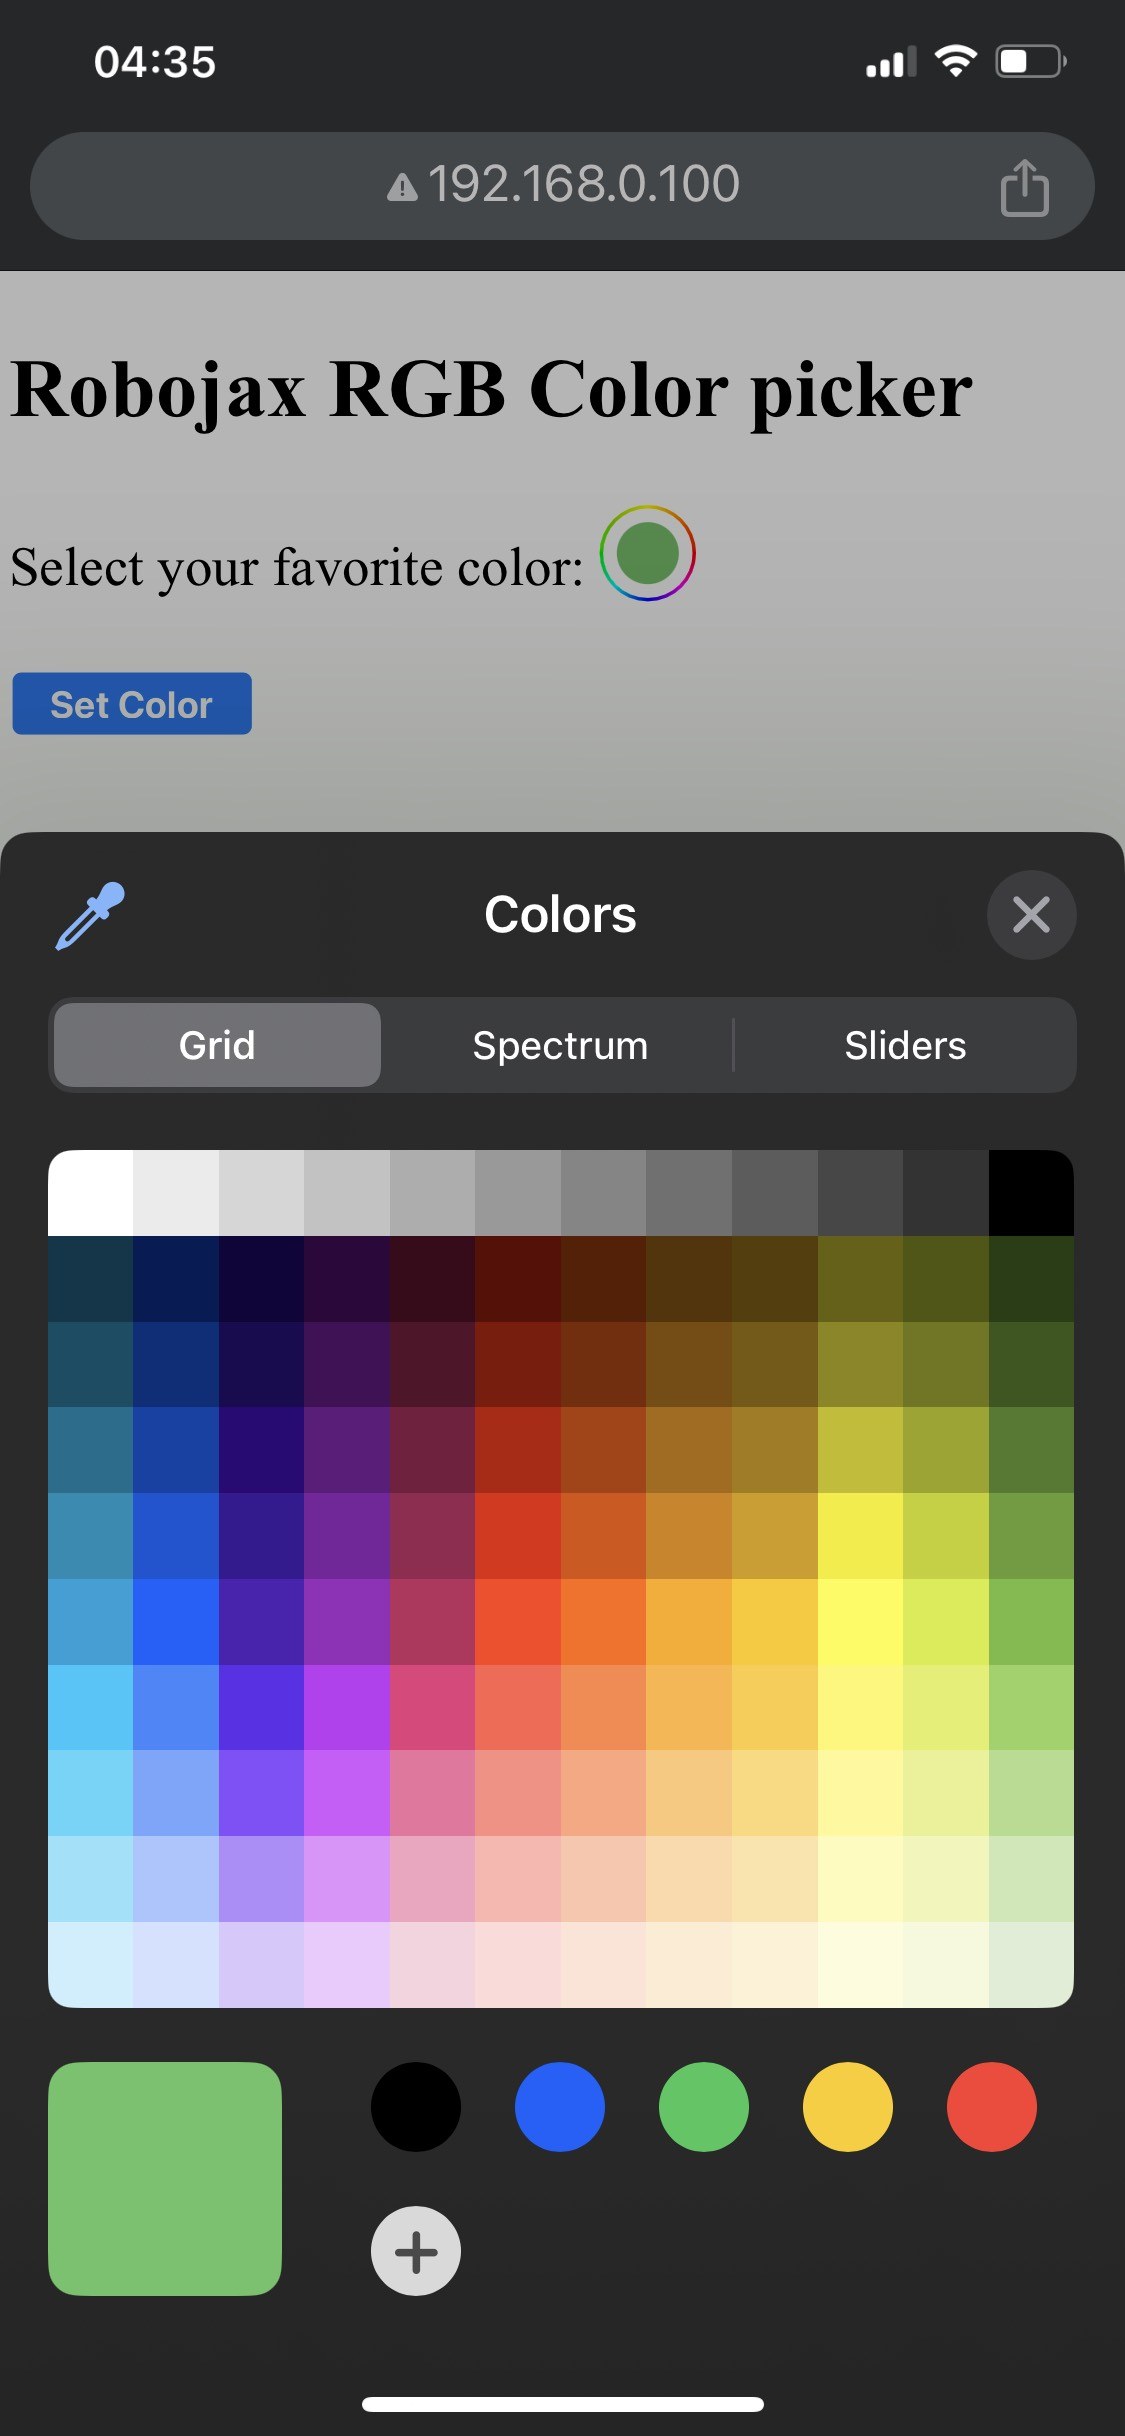

Mpangilio ukikamilika, utaweza kufikia kiolesura cha wavuti kupitia anwani ya IP ya ESP32. Utaona kichagua rangi kinachokuruhusu kuchagua rangi yoyote, ambayo kisha itatumwa kwenye ukanda wa LED. Iwapo ESP32 itapoteza muunganisho wa Wi-Fi, ukanda utamulika rangi ya onyo, kuashiria tatizo (katika video saa 14:30).
Makosa ya kawaida ni pamoja na wiring usio sahihi, ambao unaweza kusababisha LED zisiwake, au kutumia mchanganyiko usio sahihi wa SSID/nenosiri unaozuia ESP32 kuunganisha kwenye mtandao. Daima angalia mara mbili miunganisho yako na hati zako za kuingia.
Vidokezo vya Muda wa Video
- 00:00 Anza
- 2:01 Utangulizi wa mradi
- 3:09 Nyaraka
- 3:47 Rangi ya RGB imeelezewa
- 7:47 Wiring
- 8:40 Msimbo wa Arduino kwa WS2812 na WIFI umeelezewa
- 19:35 Kuchagua bodi ya ESP32 na bandari ya COM katika Arduino IDE
- 21:17 Kudhibiti Ukanda wa LED kupitia onyesho la wifi
Bilder
/*
 * Control RGB LED over wifi using ESP32
 *
 full video instrucions https://youtu.be/J_UFHk_T9aE
📚⬇️ Download and resource page https://robojax.com/RJT687
 * Written by Ahmad Shamshiri on Dec 18, 2023
 *
 * Watch video instruciton for this video:
 *
 * I have combined DHT library of Adafruit with ESP8266 WebServer both links
 * Adafruit DHT library on GitHub: https://github.com/adafruit/DHT-sensor-library
 * and
 * ESP8266 on GitHub : https://github.com/esp8266/Arduino
 *
   Copyright (c) 2015, Majenko Technologies
   All rights reserved.

   Redistribution and use in source and binary forms, with or without modification,
   are permitted provided that the following conditions are met:

 * * Redistributions of source code must retain the above copyright notice, this
     list of conditions and the following disclaimer.

 * * Redistributions in binary form must reproduce the above copyright notice, this
     list of conditions and the following disclaimer in the documentation and/or
     other materials provided with the distribution.

 * * Neither the name of Majenko Technologies nor the names of its
     contributors may be used to endorse or promote products derived from
     this software without specific prior written permission.

   THIS SOFTWARE IS PROVIDED BY THE COPYRIGHT HOLDERS AND CONTRIBUTORS "AS IS" AND
   ANY EXPRESS OR IMPLIED WARRANTIES, INCLUDING, BUT NOT LIMITED TO, THE IMPLIED
   WARRANTIES OF MERCHANTABILITY AND FITNESS FOR A PARTICULAR PURPOSE ARE
   DISCLAIMED. IN NO EVENT SHALL THE COPYRIGHT HOLDER OR CONTRIBUTORS BE LIABLE FOR
   ANY DIRECT, INDIRECT, INCIDENTAL, SPECIAL, EXEMPLARY, OR CONSEQUENTIAL DAMAGES
   (INCLUDING, BUT NOT LIMITED TO, PROCUREMENT OF SUBSTITUTE GOODS OR SERVICES;
   LOSS OF USE, DATA, OR PROFITS; OR BUSINESS INTERRUPTION) HOWEVER CAUSED AND ON
   ANY THEORY OF LIABILITY, WHETHER IN CONTRACT, STRICT LIABILITY, OR TORT
   (INCLUDING NEGLIGENCE OR OTHERWISE) ARISING IN ANY WAY OUT OF THE USE OF THIS
   SOFTWARE, EVEN IF ADVISED OF THE POSSIBILITY OF SUCH DAMAGE.
*/

#include <Adafruit_NeoPixel.h> // Include the Adafruit NeoPixel library

#define LED_PIN 13 // NeoPixel LED strip
#define NUM_LEDS 8 // Number of LEDs
// Create an instance of the Adafruit_NeoPixel class
Adafruit_NeoPixel strip = Adafruit_NeoPixel(NUM_LEDS, LED_PIN, NEO_GRB + NEO_KHZ800);


//initial color of LED strip
int valueR = 178;//from 0 to 255 for Red
int valueG = 27;//from 0 to 255 for Green
int valueB = 84;//from 0 to 255 for Blue

bool showSerialData = false;
String theColorR, theColorG, theColorB;
String theColor ="ff0000";

#include <WiFi.h>
#include <WiFiClient.h>
#include <WebServer.h>
#include <ESPmDNS.h>

const char *ssid = "dars";
const char *password = "hhhhhhhhhhh";

WebServer server(80);

void showColorPicker() {
  String page = "<!DOCTYPE html>\n";
  page +="<html>\n";
  page +="<body>\n";
  page +="<div style=\"zoom: 300%;\">\n";
  page +="<h2>Robojax RGB Color picker</h2>\n";
  page +="<p id=\"result\"></p>\n";
  page +="<form action=\"/color\">\n";
  page +="  <label for=\"favcolor\">Select your favorite color:</label>\n";
  page +="  <input type=\"color\" id=\"favcolor\" name=\"favcolor\" value=\"#";
  page += theColor;
  page +="\"><br><br>\n";
  page +="   <input type=\"submit\" value=\"Set Color\" />\n";
  page +="</form> \n</div>\n";
  page +="</body>\n";
  page +="</html>\n";

  server.send(200,  "text/html", page);


}

//from https://stackoverflow.com/questions/44683071/convert-string-as-hex-to-hexadecimal
uint64_t StrToHex(const char* str)
{
  return (uint64_t) strtoull(str, 0, 16);
}

void getColor(){

 // server.send(200, "text/plain", message);

  if(server.argName(0) == "favcolor")
  {
    String newColor = String(server.arg(0));//get the GET ardument 0 and convert it to string
    theColor = newColor.substring(1);//remove the # sybmot from the begining of color like #B2a48d
    theColorR = newColor.substring(1, 3);//extract B2 from  #B2a48d for example
    theColorG = newColor.substring(3, 5);//extract a4 from  #B2a48d for example
    theColorB = newColor.substring(5, 7);//extract 8d from  #B2a48d for example

    valueR = StrToHex(theColorR.c_str());//convert String to HEX for R
    valueG = StrToHex(theColorG.c_str());//convert String to HEX for G
    valueB = StrToHex(theColorB.c_str());//convert String to HEX for B
    if(showSerialData)
    {
      Serial.print("valueR: ");
      Serial.println(valueR);
      Serial.print("valueG: ");
      Serial.println(valueG);
      Serial.print("valueB: ");
      Serial.println(valueB );
    }

  }

  showColorPicker();//make sure the color picker is shown
  //server.send(200, "text/plain", message);

}


void setColor()
{
  for (int i = 0; i < NUM_LEDS; i++) {
    strip.setPixelColor(i, valueR, valueG, valueB); // Set the color of the i-th LED to red
    strip.show(); // Update the LED strip with the new colors
    delay(10); // Wait for 100 milliseconds
  }
}//

void noConnection()
{
   for (int i = 0; i < NUM_LEDS; i++) {
    strip.setPixelColor(i, 255, 45, 0); // Set the color of the i-th LED to red
    strip.show(); // Update the LED strip with the new colors
    delay(50); // Wait for 100 milliseconds
  }

  delay(200);
   for (int i = NUM_LEDS-1; i >=0; i--) {
    strip.setPixelColor(i, 0, 255, 180); // Set the color of the i-th LED to red
    strip.show(); // Update the LED strip with the new colors
    delay(50); // Wait for 100 milliseconds
  }
}

void handleNotFound() {
  String message = "File Not Found\n\n";
  message += "URI: ";
  message += server.uri();
  message += "\nMethod: ";
  message += (server.method() == HTTP_GET) ? "GET" : "POST";
  message += "\nArguments: ";
  message += server.args();
  message += "\n";

  for (uint8_t i = 0; i < server.args(); i++) {
    message += " " + server.argName(i) + ": " + server.arg(i) + "\n";
  }

  server.send(404, "text/plain", message);

}

void setup_wifi() {
  delay(10);
  // We start by connecting to a WiFi network
  WiFi.mode(WIFI_STA);
  WiFi.begin(ssid, password);
  Serial.println("");

  // Wait for connection
  while (WiFi.status() != WL_CONNECTED) {
    noConnection();
    delay(500);
    Serial.print(".");
  }

  Serial.println("");
  Serial.print("Connected to ");
  Serial.println(ssid);
  Serial.print("Open: http://");
  Serial.print(WiFi.localIP());
  Serial.println(" to read temperature");

  if (MDNS.begin("robojaxRGB")) {
    Serial.println("MDNS responder started");
  }

}

void setup(void) {

  Serial.begin(115200);

  strip.begin(); // Initialize the NeoPixel strip
  strip.show(); // Set initial color to black

  setup_wifi();

  server.on("/", showColorPicker);//show the main page with color picker
  //server.on("/color", setColor);//changes teh color on WS2812 RGB LED


  server.on("/color", HTTP_GET, getColor);


  server.on("/inline", []() {
    server.send(200, "text/plain", "this works as well");
  });
  server.onNotFound(handleNotFound);
  server.begin();
  Serial.println("HTTP server started");
}

void loop(void) {
  //Robojax.com
    while (WiFi.status() != WL_CONNECTED) {
      setup_wifi();
    }

  server.handleClient();
  //showColorPicker();
  setColor();
  delay(300);// change this to larger value (1000 or more) if you don't need very often reading
  // Robojax.com code for ESP32 and DHT11 DHT22
}
Common Course Links
Common Course Files
Resurser och referenser
Inga resurser än.
Filer📁
Inga filer tillgängliga.