ESP32 Tutorial 54/55 - Set WS2812 LED Strip Color over Wifi | SunFounder's ESP32 IoT Learning kit
In this tutorial, we will learn how to control the color of a WS2812 RGB LED strip using an ESP32 microcontroller over Wi-Fi. By utilizing a color picker, you can select different colors from your mobile device or desktop and send that information to the LED strip. This project showcases the capabilities of the ESP32, allowing for seamless interaction with LED lighting through a web interface.

The ESP32 microcontroller is equipped with both Wi-Fi and Bluetooth, making it a versatile choice for IoT applications. In this project, we will focus on the Wi-Fi functionality to control the LED strip. Users will be able to choose colors dynamically, creating a visually engaging experience. For additional clarity on this project, be sure to check out the video at (in video at 00:00).
Hardware Explained
The primary components for this project include the ESP32 microcontroller and the WS2812 LED strip. The ESP32 is a powerful microcontroller with built-in Wi-Fi capabilities, enabling wireless communication and control.
The WS2812 LED strip consists of individually addressable RGB LEDs, allowing you to set the color of each LED independently. Each LED incorporates a control circuit and a RGB LED within a single package, which simplifies the wiring and control of multiple LEDs.
Datasheet Details
| Manufacturer | Worldsemi |
|---|---|
| Part number | WS2812B |
| Logic/IO voltage | 3.5–5.3 V |
| Supply voltage | 5 V |
| Output current (per channel) | 20 mA |
| Peak current (per channel) | 60 mA |
| PWM frequency guidance | 400 Hz |
| Input logic thresholds | 0.3 × VDD (low), 0.7 × VDD (high) |
| Voltage drop / RDS(on) / saturation | 0.5 V |
| Thermal limits | –40 to +80 °C |
| Package | 5050 SMD |
| Notes / variants | Available in various lengths and configurations. |
- Ensure proper power supply to avoid damaging the LEDs.
- Use a common ground between the ESP32 and the LED strip.
- Keep data lines short to prevent signal degradation.
- Consider adding a capacitor (1000 µF) across the power supply for stability.
- Use a resistor (470 Ω) on the data line for signal integrity.
Wiring Instructions

To wire the ESP32 to the WS2812 LED strip, connect the components as follows: First, connect the 5V pin of the LED strip to the 5V output of the ESP32. Next, connect the ground (GND) pin of the LED strip to a GND pin on the ESP32. Finally, connect the data pin of the LED strip (usually labeled as DI or Data In) to GPIO pin 13 on the ESP32. Make sure all connections are secure to ensure proper functionality.
In the video, alternative wiring methods are briefly mentioned, but the setup described here is the recommended configuration for optimal performance (in video at 03:00).
Code Examples & Walkthrough
The code begins by including the necessary libraries for controlling the WS2812 LED strip and setting up the web server. The LED pin is defined as LED_PIN and the number of LEDs in the strip is set with NUM_LEDS.
#define LED_PIN 13 // NeoPixel LED strip
#define NUM_LEDS 8 // Number of LEDs
Adafruit_NeoPixel strip = Adafruit_NeoPixel(NUM_LEDS, LED_PIN, NEO_GRB + NEO_KHZ800);
This snippet initializes the NeoPixel library and sets up the LED strip on the specified pin. The Adafruit_NeoPixel object, strip, is what you will use to control the LED colors.
Next, the code initializes Wi-Fi and sets up a web server to handle incoming requests. The SSID and password for the network are defined, allowing the ESP32 to connect to the Wi-Fi.
const char *ssid = "your_SSID";
const char *password = "your_PASSWORD";
WebServer server(80);
In this excerpt, replace your_SSID and your_PASSWORD with your actual Wi-Fi credentials. This connection enables the ESP32 to communicate with devices on the same network, allowing for remote control of the LED strip.
The main function for changing the LED color is setColor(), which iterates through each LED and sets its color based on the selected RGB values.
void setColor() {
  for (int i = 0; i < NUM_LEDS; i++) {
    strip.setPixelColor(i, valueR, valueG, valueB); // Set the color of the i-th LED
    strip.show(); // Update the LED strip with the new colors
    delay(10); // Wait for 10 milliseconds
  }
}
This function ensures that each LED in the strip is updated with the selected color. The delay allows the LEDs to change color smoothly. As you interact with the web interface, this function will be called to reflect your color choices.
Demonstration / What to Expect
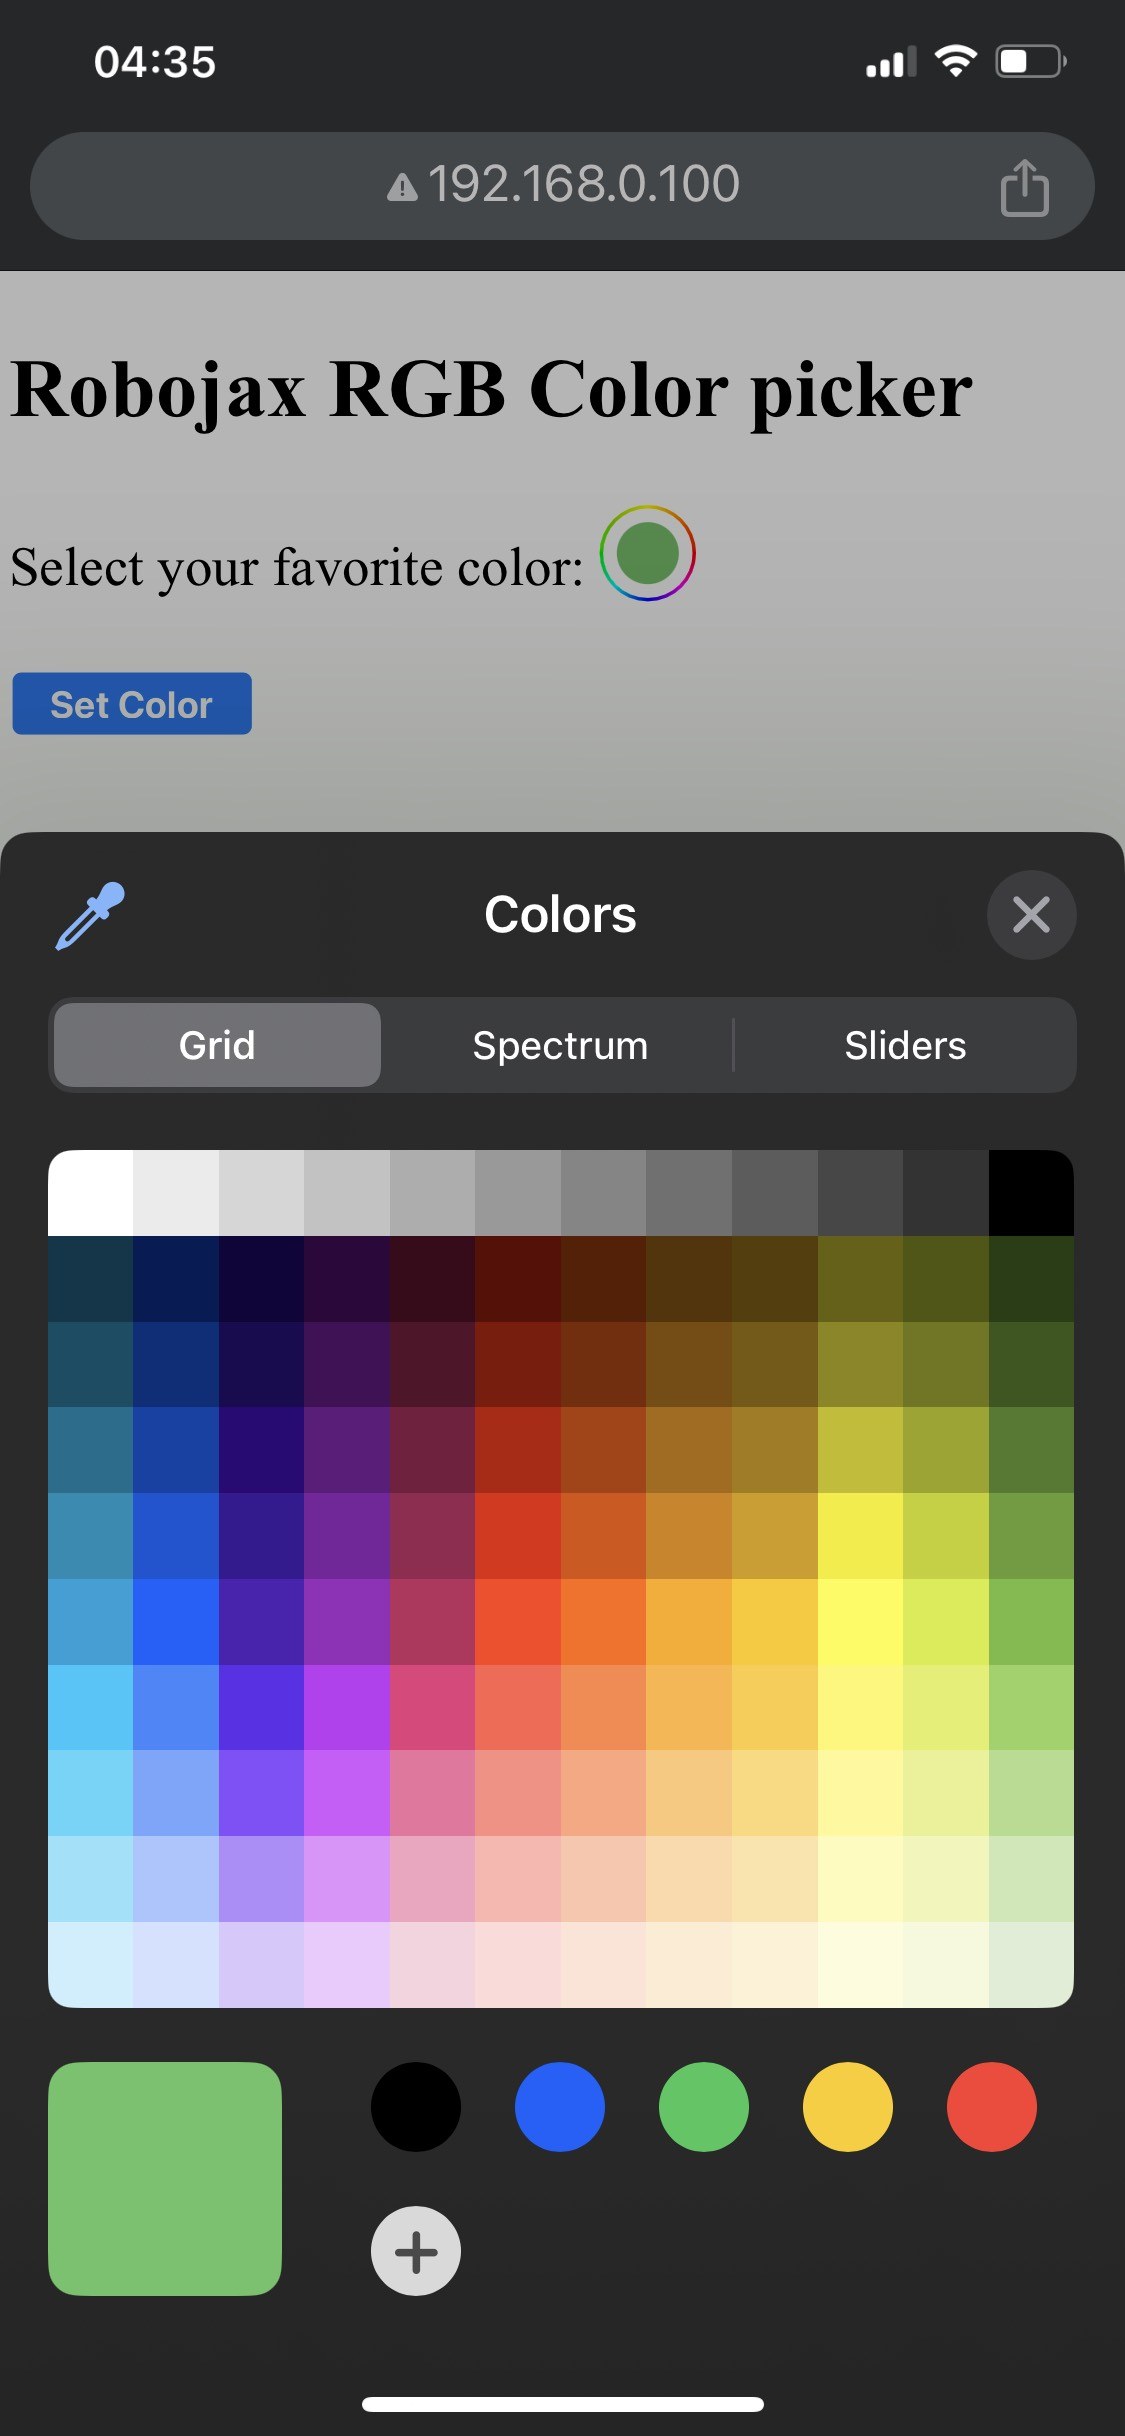

When the setup is complete, you should be able to access the web interface via the ESP32's IP address. You will see a color picker that allows you to select any color, which will then be sent to the LED strip. If the ESP32 loses Wi-Fi connection, the strip will blink a warning color, indicating the issue (in video at 14:30).
Common pitfalls include incorrect wiring, which can lead to the LEDs not lighting up, or using incorrect SSID/password combinations that prevent the ESP32 from connecting to the network. Always double-check your connections and credentials.
Video Timestamps
- 00:00 Start
- 2:01 Introduction to the project
- 3:09 Docs
- 3:47 RGB color explained
- 7:47 Wiring
- 8:40 Arduino code for WS2812 with WIFI explained
- 19:35 Selecting ESP32 board and COM port in Arduino IDE
- 21:17 Controlling LED Strip over wifi demo
Изображения
/*
 * Управление RGB LED по Wi-Fi с использованием ESP32
 *
 * Полные видеоинструкции https://youtu.be/J_UFHk_T9aE
 * 📚⬇️ Скачайте и получите страницу ресурсов https://robojax.com/RJT687
 * Автор: Ахмад Шамшир на 18 декабря 2023 года
 *
 * Смотрите видеоинструкцию к этому видео:
 *
 * Я объединил библиотеку DHT от Adafruit с WebServer ESP8266, оба ссылки
 * Библиотека DHT от Adafruit на GitHub: https://github.com/adafruit/DHT-sensor-library
 * и
 * ESP8266 на GitHub: https://github.com/esp8266/Arduino
 *
 * Авторские права (c) 2015, Majenko Technologies
 * Все права защищены.
 *
 * Перераспределение и использование в исходной и двоичной формах, с модификацией или без, разрешены при соблюдении следующих условий:
 *
 * Перераспределение исходного кода должно сохранять вышеуказанное уведомление о авторских правах, этот
 * список условий и следующий отказ от ответственности.
 *
 * Перераспределение в двоичной форме должно воспроизводить вышеуказанное уведомление о авторских правах, этот
 * список условий и следующий отказ от ответственности в документации и/или
 * других материалах, предоставленных с распространением.
 *
 * Ни название Majenko Technologies, ни имена ее
 * участников не могут использоваться для одобрения или продвижения продуктов, производных от
 * этого программного обеспечения, без специального предварительного письменного разрешения.
 *
 * ЭТО ПРОГРАММНОЕ ОБЕСПЕЧЕНИЕ ПРЕДОСТАВЛЯЕТСЯ ДЕРЖАТЕЛЯМИ АВТОРСКИХ ПРАВ И УЧАСТНИКАМИ "КАК ЕСТЬ" И
 * ЛЮБЫЕ ЯВНЫЕ ИЛИ ПОДРАЗУМЕВАЕМЫЕ ГАРАНТИИ, ВКЛЮЧАЯ, НО НЕ ОГРАНИЧИВАЯСЬ, ПОДРАЗУМЕВАЕМЫЕ
 * ГАРАНТИИ ТОРГОВОЙ ПРИГОДНОСТИ И ПРИГОДНОСТИ ДЛЯ КОНКРЕТНОЙ ЦЕЛИ ОТКЛОНЯЮТСЯ. В НИКАКОМ СЛУЧАЕ НИ ДЕРЖАТЕЛЬ АВТОРСКИХ ПРАВ, НИ УЧАСТНИКИ НЕ НЕСУТ ОТВЕТСТВЕННОСТИ ЗА
 * ЛЮБЫЕ ПРЯМЫЕ, НЕПРЯМЫЕ, СЛУЧАЙНЫЕ, ОСОБЫЕ, ПРИМЕРНЫЕ ИЛИ ПОСЛЕДУЮЩИЕ УБЫТКИ
 * (ВКЛЮЧАЯ, НО НЕ ОГРАНИЧИВАЯСЬ, ЗАКУПКОЙ ЗАМЕЩЕНИЯ ТОВАРОВ И УСЛУГ;
 * ПОТЕРЯ ИСПОЛЬЗОВАНИЯ, ДАННЫХ ИЛИ ПРИБЫЛИ; ИЛИ ПРЕРВАНИЯ БИЗНЕСА) УЧАСТКИ ВСЕХ УРОВНЕЙ, И ПО
 * ЛЮБОЙ ТЕОРИИ ОТВЕТСТВЕННОСТИ, БУДЬ У НАС ГРАЖДАНСКАЯ, СТРОГАЯ ОТВЕТСТВЕННОСТЬ ИЛИ ДЕЛИКТ
 * (ВКЛЮЧАЯ НЕОБЯЗАТЕЛЬНОСТЬ ИЛИ ИНЫЕ) ВОЗНИКАЮЩИЕ В ЛЮБОЙ ФОРМЕ В РЕЗУЛЬТАТЕ ИСПОЛЬЗОВАНИЯ ЭТОГО
 * ПРОГРАММНОГО ОБЕСПЕЧЕНИЯ, ДАЖЕ ЕСЛИ БЫЛИ УВЕДОМЛЕНЫ О ВОЗМОЖНОСТИ ТАКИХ УБЫТКОВ.
 */
#include <Adafruit_NeoPixel.h> // Включите библиотеку Adafruit NeoPixel.

#define LED_PIN 13 // Неоновая светодиодная лента
#define NUM_LEDS 8 // Количество светодиодов
 // Создайте экземпляр класса Adafruit_NeoPixel
Adafruit_NeoPixel strip = Adafruit_NeoPixel(NUM_LEDS, LED_PIN, NEO_GRB + NEO_KHZ800);


 // начальный цвет светодиодной ленты
int valueR = 178; // от 0 до 255 для Красного
int valueG = 27; // от 0 до 255 для Зелёного
int valueB = 84; // от 0 до 255 для синего

bool showSerialData = false;
String theColorR, theColorG, theColorB;
String theColor ="ff0000";

#include <WiFi.h>
#include <WiFiClient.h>
#include <WebServer.h>
#include <ESPmDNS.h>

const char *ssid = "dars";
const char *password = "hhhhhhhhhhh";

WebServer server(80);

void showColorPicker() {
  String page = "<!DOCTYPE html>\n";
  page +="<html>\n";
  page +="<body>\n";
  page +="<div style=\"zoom: 300%;\">\n";
  page +="<h2>Robojax RGB Color picker</h2>\n";
  page +="<p id=\"result\"></p>\n";
  page +="<form action=\"/color\">\n";
  page +="  <label for=\"favcolor\">Select your favorite color:</label>\n";
  page +="  <input type=\"color\" id=\"favcolor\" name=\"favcolor\" value=\"#";
  page += theColor;
  page +="\"><br><br>\n";
  page +="   <input type=\"submit\" value=\"Set Color\" />\n";
  page +="</form> \n</div>\n";
  page +="</body>\n";
  page +="</html>\n";

  server.send(200,  "text/html", page);


}

 // from https://stackoverflow.com/questions/44683071/convert-string-as-hex-to-hexadecimal
uint64_t StrToHex(const char* str)
{
  return (uint64_t) strtoull(str, 0, 16);
}

void getColor(){

 // server.send(200, "text/plain", message);

  if(server.argName(0) == "favcolor")
  {
    String newColor = String(server.arg(0)); // получите аргумент GET 0 и преобразуйте его в строку
    theColor = newColor.substring(1); // уберите символ # в начале цвета, например #B2a48d
    theColorR = newColor.substring(1, 3); // извлечь B2 из #B2a48d, например
    theColorG = newColor.substring(3, 5); // извлечь a4 из #B2a48d, например
    theColorB = newColor.substring(5, 7); // извлечь 8d из #B2a48d, например

    valueR = StrToHex(theColorR.c_str()); // преобразовать строку в HEX для R
    valueG = StrToHex(theColorG.c_str()); // преобразовать строку в шестнадцатеричный формат для G
    valueB = StrToHex(theColorB.c_str()); // преобразовать строку в HEX для B
    if(showSerialData)
    {
      Serial.print("valueR: ");
      Serial.println(valueR);
      Serial.print("valueG: ");
      Serial.println(valueG);
      Serial.print("valueB: ");
      Serial.println(valueB );
    }

  }

  showColorPicker(); // убедитесь, что палитра цветов отображается
 // server.send(200, "text/plain", message);

}


void setColor()
{
  for (int i = 0; i < NUM_LEDS; i++) {
    strip.setPixelColor(i, valueR, valueG, valueB); // Установите цвет i-го светодиода на красный.
    strip.show(); // Обновите светодиодную ленту новыми цветами.
    delay(10); // Подождите 100 миллисекунд.
  }
}

void noConnection()
{
   for (int i = 0; i < NUM_LEDS; i++) {
    strip.setPixelColor(i, 255, 45, 0); // Установите цвет i-го светодиода на красный.
    strip.show(); // Обновите светодиодную ленту новыми цветами.
    delay(50); // Подождите 100 миллисекунд.
  }

  delay(200);
   for (int i = NUM_LEDS-1; i >=0; i--) {
    strip.setPixelColor(i, 0, 255, 180); // Установите цвет i-го светодиода на красный.
    strip.show(); // Обновите светодиодную ленту новыми цветами.
    delay(50); // Подождите 100 миллисекунд.
  }
}

void handleNotFound() {
  String message = "File Not Found\n\n";
  message += "URI: ";
  message += server.uri();
  message += "\nMethod: ";
  message += (server.method() == HTTP_GET) ? "GET" : "POST";
  message += "\nArguments: ";
  message += server.args();
  message += "\n";

  for (uint8_t i = 0; i < server.args(); i++) {
    message += " " + server.argName(i) + ": " + server.arg(i) + "\n";
  }

  server.send(404, "text/plain", message);

}

void setup_wifi() {
  delay(10);
 // Мы начинаем с подключения к WiFi сети.
  WiFi.mode(WIFI_STA);
  WiFi.begin(ssid, password);
  Serial.println("");

 // Ожидание соединения
  while (WiFi.status() != WL_CONNECTED) {
    noConnection();
    delay(500);
    Serial.print(".");
  }

  Serial.println("");
  Serial.print("Connected to ");
  Serial.println(ssid);
  Serial.print("Open: http: // ");
  Serial.print(WiFi.localIP());
  Serial.println(" to read temperature");

  if (MDNS.begin("robojaxRGB")) {
    Serial.println("MDNS responder started");
  }

}

void setup(void) {

  Serial.begin(115200);

  strip.begin(); // Инициализируйте ленту NeoPixel
  strip.show(); // Установите начальный цвет на черный.

  setup_wifi();

  server.on("/", showColorPicker); // показать главную страницу с выбором цвета
 // server.on("/color", setColor);//изменяет цвет на WS2812 RGB светодиоде


  server.on("/color", HTTP_GET, getColor);


  server.on("/inline", []() {
    server.send(200, "text/plain", "this works as well");
  });
  server.onNotFound(handleNotFound);
  server.begin();
  Serial.println("HTTP server started");
}

void loop(void) {
 // Robojax.com
    while (WiFi.status() != WL_CONNECTED) {
      setup_wifi();
    }

  server.handleClient();
 // showColorPicker();
  setColor();
  delay(300); // измените это на большее значение (1000 или больше), если вам не нужно часто читать
 // Код Robojax.com для ESP32 и DHT11 DHT22
}
Common Course Links
Common Course Files
Ресурсы и ссылки
Ресурсов пока нет.
Файлы📁
Нет доступных файлов.