ESP32 ટ્યુટોરિયલ 54/55 - Wifi પર WS2812 LED સ્ટ્રીપ રંગ સેટ કરો | SunFounder ની ESP32 IoT લર્નિંગ કિટ
આ ટ્યુટોરિયલમાં, આપણે ESP32 માઇક્રોકંટ્રોલરનો ઉપયોગ કરીને Wi-Fi દ્વારા WS2812 RGB LED સ્ટ્રીપનો રંગ કેવી રીતે નિયંત્રિત કરવો તે શીખીશું. કલર પિકરનો ઉપયોગ કરીને, તમે તમારા મોબાઇલ ઉપકરણ અથવા ડેસ્કટોપમાંથી વિવિધ રંગો પસંદ કરી શકો છો અને તે માહિતી LED સ્ટ્રીપને મોકલી શકો છો. આ પ્રોજેક્ટ ESP32 ની ક્ષમતાઓ દર્શાવે છે, જે વેબ ઇન્ટરફેસ દ્વારા LED લાઇટિંગ સાથે સીમલેસ ક્રિયાપ્રતિક્રિયાની મંજૂરી આપે છે.

ESP32 માઇક્રોકંટ્રોલર Wi-Fi અને બ્લૂટૂથ બંને સાથે સજ્જ છે, જે તેને IoT એપ્લિકેશન્સ માટે બહુમુખી વિકલ્પ બનાવે છે. આ પ્રોજેક્ટમાં, આપણે LED સ્ટ્રીપને નિયંત્રિત કરવા માટે Wi-Fi કાર્યક્ષમતા પર ધ્યાન કેન્દ્રિત કરીશું. વપરાશકર્તાઓ ગતિશીલ રીતે રંગો પસંદ કરી શકશે, જે દૃષ્ટિની આકર્ષક અનુભવ બનાવશે. આ પ્રોજેક્ટ વિશે વધુ સ્પષ્ટતા માટે, વિડિયો (વિડિયોમાં 00:00 પર) ચોક્કસપણે જુઓ.
હાર્ડવેર સમજાવ્યું
આ પ્રોજેક્ટ માટેના મુખ્ય ઘટકોમાં ESP32 માઇક્રોકંટ્રોલર અને WS2812 LED સ્ટ્રીપનો સમાવેશ થાય છે. ESP32 એ બિલ્ટ-ઇન Wi-Fi ક્ષમતાઓ સાથેનો શક્તિશાળી માઇક્રોકંટ્રોલર છે, જે વાયરલેસ સંચાર અને નિયંત્રણને સક્ષમ કરે છે.
WS2812 LED સ્ટ્રીપમાં વ્યક્તિગત રીતે સંબોધિત કરી શકાય તેવા RGB LEDs હોય છે, જે તમને દરેક LED નો રંગ સ્વતંત્ર રીતે સેટ કરવાની મંજૂરી આપે છે. દરેક LED માં એક જ પેકેજમાં કંટ્રોલ સર્કિટ અને RGB LED શામેલ છે, જે બહુવિધ LEDs ના વાયરિંગ અને નિયંત્રણને સરળ બનાવે છે.
ડેટાશીટ વિગતો
| ઉત્પાદક | વર્લ્ડસેમી |
|---|---|
| ભાગ નંબર | WS2812B |
| લોજિક/IO વોલ્ટેજ | 3.5–5.3 V |
| સપ્લાય વોલ્ટેજ | 5 V |
| આઉટપુટ કરંટ (પ્રતિ ચેનલ) | 20 mA |
| પીક કરંટ (પ્રતિ ચેનલ) | 60 mA |
| PWM ફ્રીક્વન્સી માર્ગદર્શન | 400 Hz |
| ઇનપુટ લોજિક થ્રેશોલ્ડ | 0.3 × VDD (લો), 0.7 × VDD (હાઇ) |
| વોલ્ટેજ ડ્રોપ / RDS(on) / સેચ્યુરેશન | 0.5 V |
| થર્મલ મર્યાદાઓ | –40 થી +80 °C |
| પેકેજ | 5050 SMD |
| નોંધો / વેરિઅન્ટ્સ | વિવિધ લંબાઈ અને રૂપરેખાંકનોમાં ઉપલબ્ધ છે. |
- LEDs ને નુકસાન ન થાય તે માટે યોગ્ય પાવર સપ્લાયની ખાતરી કરો.
- ESP32 અને LED સ્ટ્રીપ વચ્ચે સામાન્ય ગ્રાઉન્ડનો ઉપયોગ કરો.
- સિગ્નલ ડિગ્રેડેશન અટકાવવા માટે ડેટા લાઇન ટૂંકી રાખો.
- સ્થિરતા માટે પાવર સપ્લાય પર કેપેસિટર (1000 µF) ઉમેરવાનું વિચારો.
- સિગ્નલ અખંડિતતા માટે ડેટા લાઇન પર રેઝિસ્ટર (470 Ω) નો ઉપયોગ કરો.
વાયરિંગ સૂચનાઓ
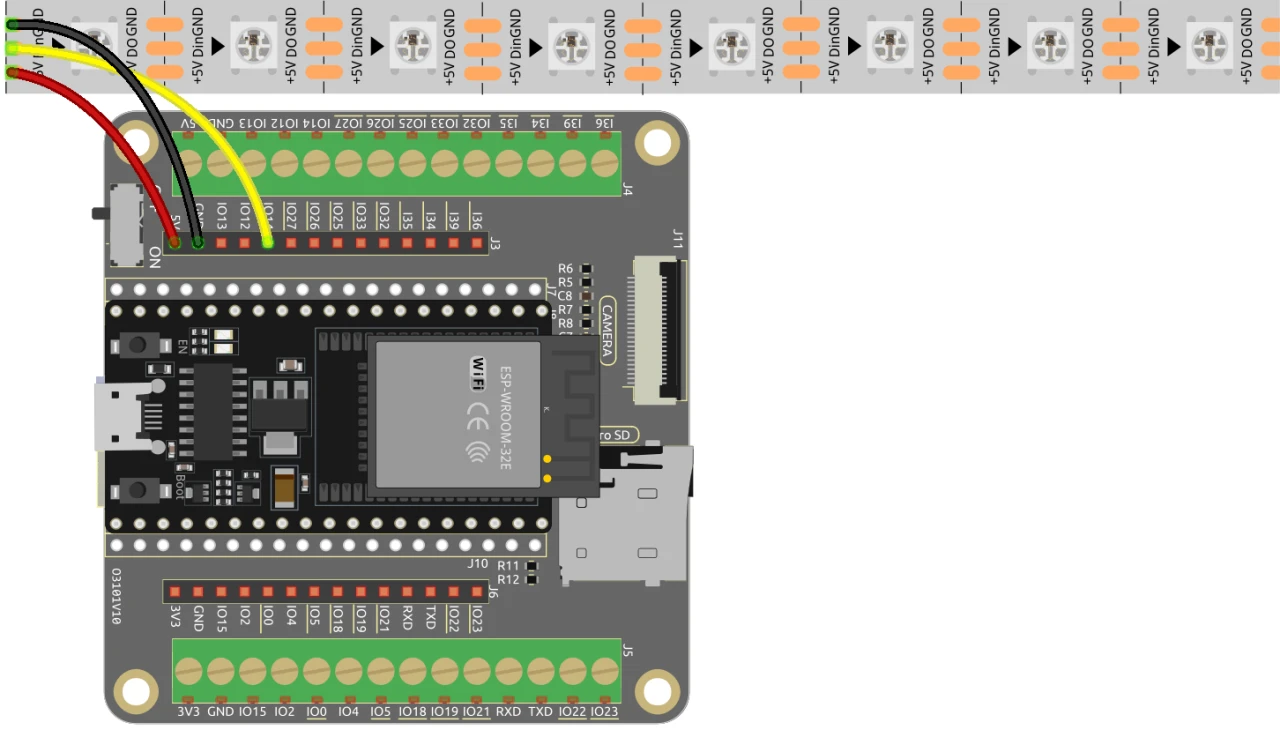
ESP32 ને WS2812 LED સ્ટ્રીપ સાથે વાયર કરવા માટે, ઘટકોને નીચે પ્રમાણે કનેક્ટ કરો: પ્રથમ, LED સ્ટ્રીપનો 5V પિન ESP32 ના 5V આઉટપુટ સાથે કનેક્ટ કરો. આગળ, LED સ્ટ્રીપનો ગ્રાઉન્ડ (GND) પિન ESP32 પરના GND પિન સાથે કનેક્ટ કરો. છેલ્લે, LED સ્ટ્રીપનો ડેટા પિન (સામાન્ય રીતે DI અથવા ડેટા ઇન તરીકે લેબલ થયેલ) ESP32 પરના GPIO પિન 13 સાથે કનેક્ટ કરો. યોગ્ય કાર્યક્ષમતા સુનિશ્ચિત કરવા માટે બધા કનેક્શન સુરક્ષિત છે તેની ખાતરી કરો.
વિડિયોમાં, વૈકલ્પિક વાયરિંગ પદ્ધતિઓનો સંક્ષિપ્તમાં ઉલ્લેખ કરવામાં આવ્યો છે, પરંતુ અહીં વર્ણવેલ સેટઅપ શ્રેષ્ઠ કાર્યક્ષમતા માટે ભલામણ કરેલ રૂપરેખાંકન છે (વિડિયોમાં 03:00 પર).
કોડ ઉદાહરણો અને વોકથ્રુ
કોડ WS2812 LED સ્ટ્રીપને નિયંત્રિત કરવા અને વેબ સર્વર સેટ કરવા માટે જરૂરી લાઇબ્રેરીઓ શામેલ કરીને શરૂ થાય છે. LED પિન LED_PIN તરીકે વ્યાખ્યાયિત થયેલ છે અને સ્ટ્રીપમાં LEDs ની સંખ્યા NUM_LEDS સાથે સેટ થયેલ છે.
#define LED_PIN 13 // NeoPixel LED સ્ટ્રીપ
#define NUM_LEDS 8 // LEDs ની સંખ્યા
Adafruit_NeoPixel strip = Adafruit_NeoPixel(NUM_LEDS, LED_PIN, NEO_GRB + NEO_KHZ800);
આ સ્નિપેટ NeoPixel લાઇબ્રેરીને ઇનિશિયલાઇઝ કરે છે અને ઉલ્લેખિત પિન પર LED સ્ટ્રીપ સેટ કરે છે. Adafruit_NeoPixel ઑબ્જેક્ટ, strip, તે છે જેનો ઉપયોગ તમે LED રંગોને નિયંત્રિત કરવા માટે કરશો.
આગળ, કોડ Wi-Fi ઇનિશિયલાઇઝ કરે છે અને આવતી વિનંતીઓને હેન્ડલ કરવા માટે વેબ સર્વર સેટ કરે છે. નેટવર્ક માટે SSID અને પાસવર્ડ વ્યાખ્યાયિત થયેલ છે, જે ESP32 ને Wi-Fi સાથે કનેક્ટ થવાની મંજૂરી આપે છે.
const char *ssid = "your_SSID";
const char *password = "your_PASSWORD";
WebServer server(80);
આ ભાગમાં, your_SSID અને your_PASSWORD ને તમારા વાસ્તવિક Wi-Fi ઓળખપત્રોથી બદલો. આ કનેક્શન ESP32 ને સમાન નેટવર્ક પરના ઉપકરણો સાથે સંચાર કરવા સક્ષમ બનાવે છે, જે LED સ્ટ્રીપના રિમોટ કંટ્રોલની મંજૂરી આપે છે.
LED રંગ બદલવા માટેનું મુખ્ય કાર્ય setColor() છે, જે દરેક LED દ્વારા પુનરાવર્તન કરે છે અને પસંદ કરેલ RGB મૂલ્યોના આધારે તેનો રંગ સેટ કરે છે.
void setColor() {
  for (int i = 0; i < NUM_LEDS; i++) {
    strip.setPixelColor(i, valueR, valueG, valueB); // i-th LED નો રંગ સેટ કરો
    strip.show(); // નવા રંગો સાથે LED સ્ટ્રીપ અપડેટ કરો
    delay(10); // 10 મિલિસેકન્ડ રાહ જુઓ
  }
}
આ કાર્ય ખાતરી કરે છે કે સ્ટ્રીપમાં દરેક LED પસંદ કરેલ રંગ સાથે અપડેટ થાય છે. વિલંબ LEDs ને સરળતાથી રંગ બદલવાની મંજૂરી આપે છે. જેમ તમે વેબ ઇન્ટરફેસ સાથે ક્રિયાપ્રતિક્રિયા કરો છો, આ કાર્ય તમારી રંગ પસંદગીઓને પ્રતિબિંબિત કરવા માટે કહેવામાં આવશે.
પ્રદર્શન / શું અપેક્ષા રાખવી
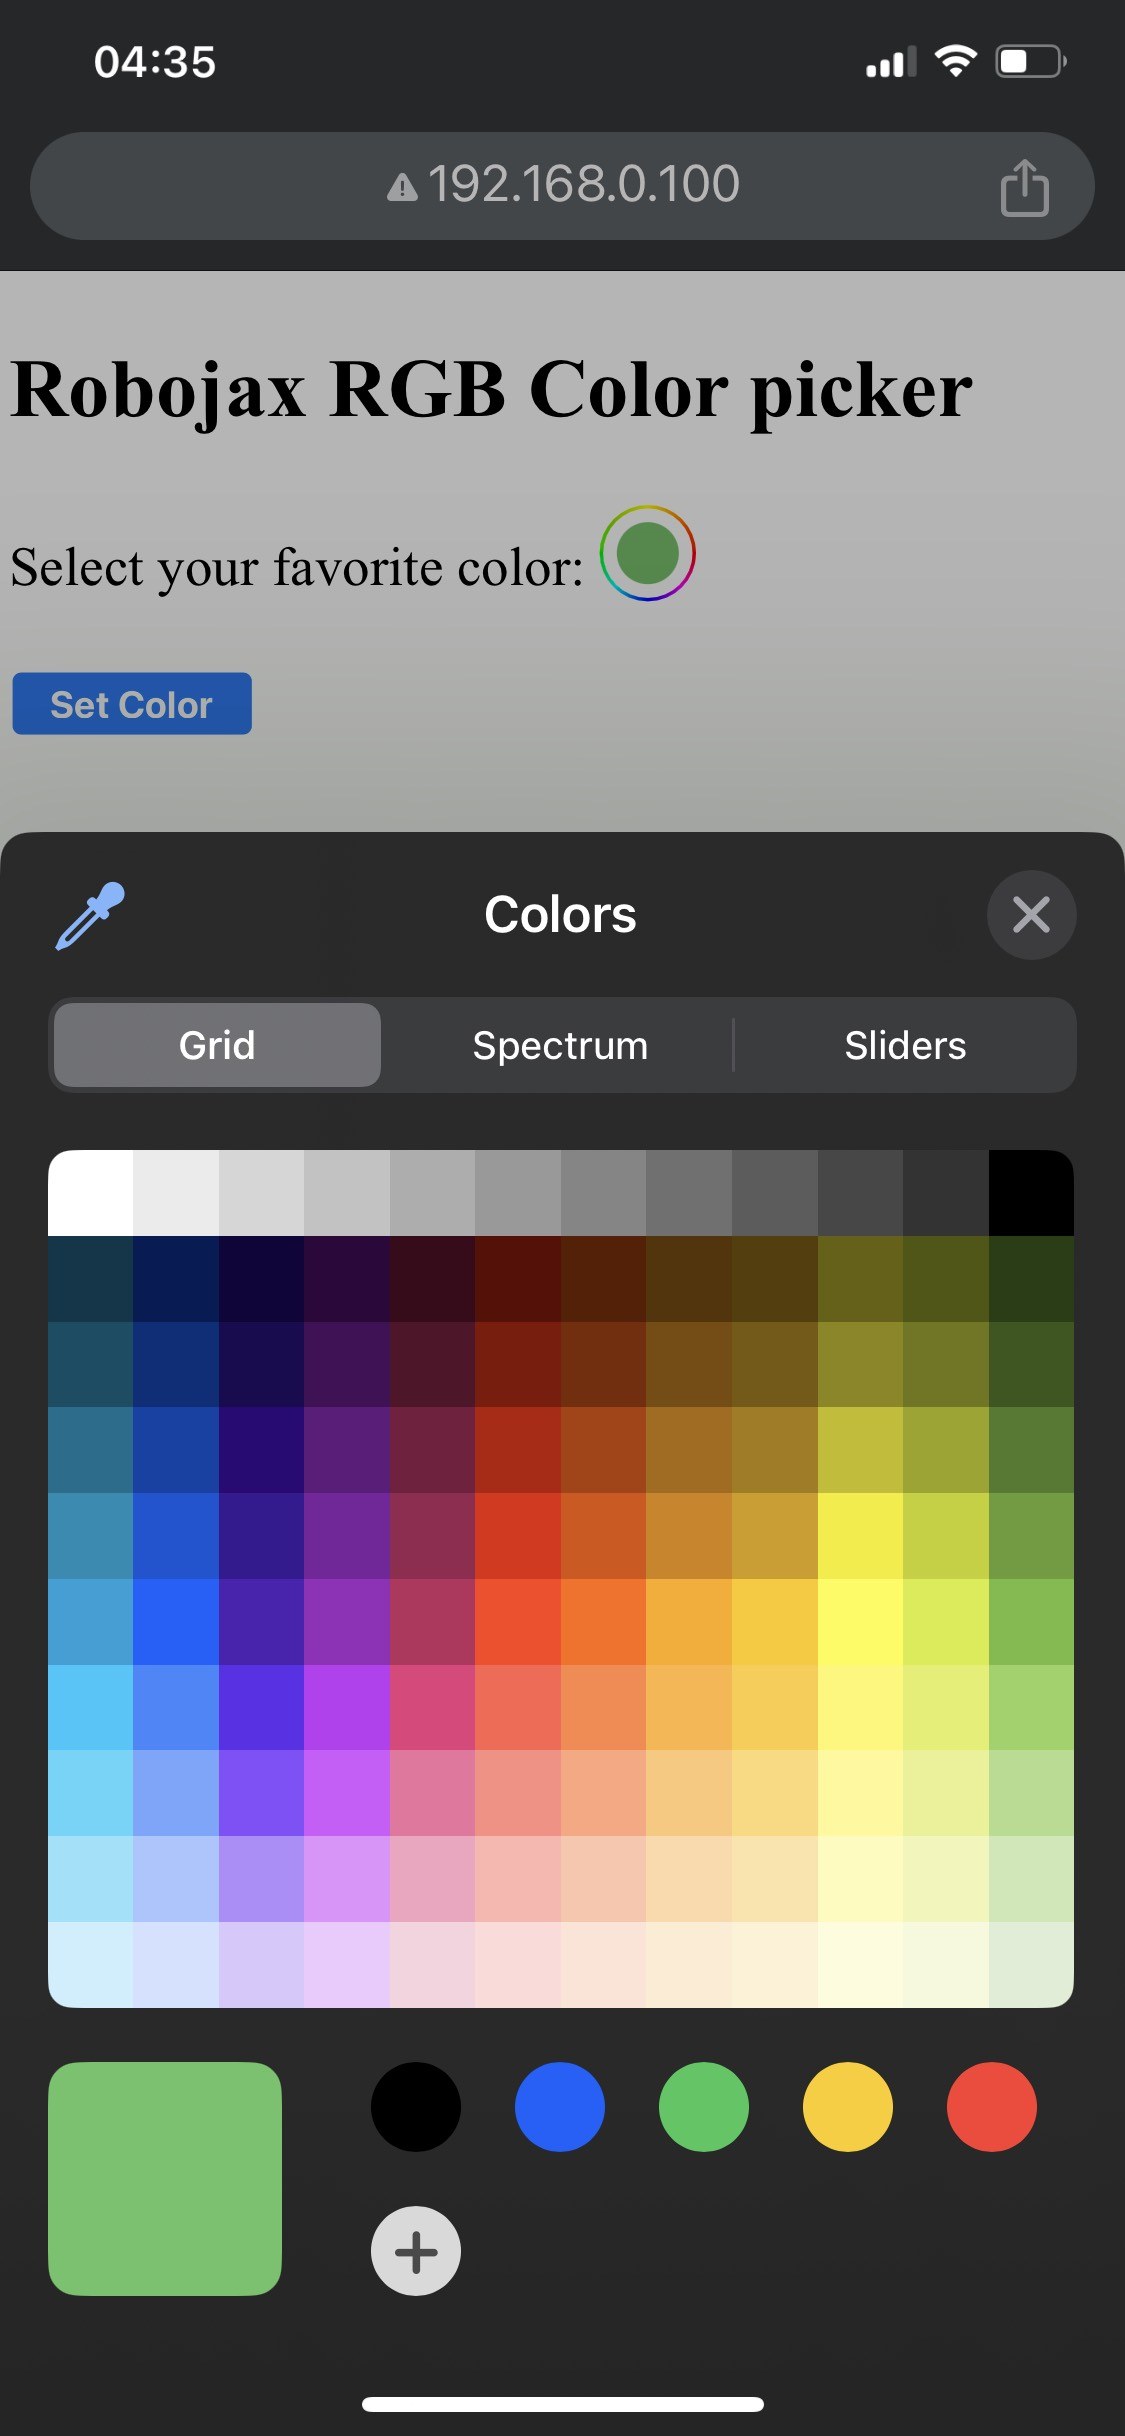

જ્યારે સેટઅપ પૂર્ણ થાય, ત્યારે તમે ESP32 ના IP સરનામા દ્વારા વેબ ઇન્ટરફેસ ઍક્સેસ કરી શકશો. તમને એક રંગ પસંદગીકાર દેખાશે જે તમને કોઈપણ રંગ પસંદ કરવાની મંજૂરી આપે છે, જે પછી LED સ્ટ્રીપ પર મોકલવામાં આવશે. જો ESP32 Wi-Fi કનેક્શન ગુમાવે છે, તો સ્ટ્રીપ ચેતવણી રંગ ઝબકાવશે, જે સમસ્યા દર્શાવે છે (વિડિયોમાં 14:30 પર).
સામાન્ય ભૂલોમાં ખોટી વાયરિંગનો સમાવેશ થાય છે, જેના કારણે LEDs પ્રકાશિત થતી નથી, અથવા ખોટા SSID/પાસવર્ડ સંયોજનોનો ઉપયોગ કરવાથી ESP32 નેટવર્ક સાથે કનેક્ટ થતું અટકાવે છે. હંમેશા તમારા કનેક્શન અને ઓળખપત્રો બે વાર તપાસો.
વિડિયો સમયાંકન
- 00:00 શરૂઆત
- 2:01 પ્રોજેક્ટનો પરિચય
- 3:09 દસ્તાવેજો
- 3:47 RGB રંગ સમજાવ્યો
- 7:47 વાયરિંગ
- 8:40 WIFI સાથે WS2812 માટે Arduino કોડ સમજાવ્યો
- 19:35 Arduino IDE માં ESP32 બોર્ડ અને COM પોર્ટ પસંદ કરવું
- 21:17 વાઇફાઇ ડેમો પર LED સ્ટ્રીપ નિયંત્રિત કરવી
Images
/*
 * Control RGB LED over wifi using ESP32
 *
 full video instrucions https://youtu.be/J_UFHk_T9aE
📚⬇️ Download and resource page https://robojax.com/RJT687
 * Written by Ahmad Shamshiri on Dec 18, 2023
 *
 * Watch video instruciton for this video:
 *
 * I have combined DHT library of Adafruit with ESP8266 WebServer both links
 * Adafruit DHT library on GitHub: https://github.com/adafruit/DHT-sensor-library
 * and
 * ESP8266 on GitHub : https://github.com/esp8266/Arduino
 *
   Copyright (c) 2015, Majenko Technologies
   All rights reserved.

   Redistribution and use in source and binary forms, with or without modification,
   are permitted provided that the following conditions are met:

 * * Redistributions of source code must retain the above copyright notice, this
     list of conditions and the following disclaimer.

 * * Redistributions in binary form must reproduce the above copyright notice, this
     list of conditions and the following disclaimer in the documentation and/or
     other materials provided with the distribution.

 * * Neither the name of Majenko Technologies nor the names of its
     contributors may be used to endorse or promote products derived from
     this software without specific prior written permission.

   THIS SOFTWARE IS PROVIDED BY THE COPYRIGHT HOLDERS AND CONTRIBUTORS "AS IS" AND
   ANY EXPRESS OR IMPLIED WARRANTIES, INCLUDING, BUT NOT LIMITED TO, THE IMPLIED
   WARRANTIES OF MERCHANTABILITY AND FITNESS FOR A PARTICULAR PURPOSE ARE
   DISCLAIMED. IN NO EVENT SHALL THE COPYRIGHT HOLDER OR CONTRIBUTORS BE LIABLE FOR
   ANY DIRECT, INDIRECT, INCIDENTAL, SPECIAL, EXEMPLARY, OR CONSEQUENTIAL DAMAGES
   (INCLUDING, BUT NOT LIMITED TO, PROCUREMENT OF SUBSTITUTE GOODS OR SERVICES;
   LOSS OF USE, DATA, OR PROFITS; OR BUSINESS INTERRUPTION) HOWEVER CAUSED AND ON
   ANY THEORY OF LIABILITY, WHETHER IN CONTRACT, STRICT LIABILITY, OR TORT
   (INCLUDING NEGLIGENCE OR OTHERWISE) ARISING IN ANY WAY OUT OF THE USE OF THIS
   SOFTWARE, EVEN IF ADVISED OF THE POSSIBILITY OF SUCH DAMAGE.
*/

#include <Adafruit_NeoPixel.h> // Include the Adafruit NeoPixel library

#define LED_PIN 13 // NeoPixel LED strip
#define NUM_LEDS 8 // Number of LEDs
// Create an instance of the Adafruit_NeoPixel class
Adafruit_NeoPixel strip = Adafruit_NeoPixel(NUM_LEDS, LED_PIN, NEO_GRB + NEO_KHZ800);


//initial color of LED strip
int valueR = 178;//from 0 to 255 for Red
int valueG = 27;//from 0 to 255 for Green
int valueB = 84;//from 0 to 255 for Blue

bool showSerialData = false;
String theColorR, theColorG, theColorB;
String theColor ="ff0000";

#include <WiFi.h>
#include <WiFiClient.h>
#include <WebServer.h>
#include <ESPmDNS.h>

const char *ssid = "dars";
const char *password = "hhhhhhhhhhh";

WebServer server(80);

void showColorPicker() {
  String page = "<!DOCTYPE html>\n";
  page +="<html>\n";
  page +="<body>\n";
  page +="<div style=\"zoom: 300%;\">\n";
  page +="<h2>Robojax RGB Color picker</h2>\n";
  page +="<p id=\"result\"></p>\n";
  page +="<form action=\"/color\">\n";
  page +="  <label for=\"favcolor\">Select your favorite color:</label>\n";
  page +="  <input type=\"color\" id=\"favcolor\" name=\"favcolor\" value=\"#";
  page += theColor;
  page +="\"><br><br>\n";
  page +="   <input type=\"submit\" value=\"Set Color\" />\n";
  page +="</form> \n</div>\n";
  page +="</body>\n";
  page +="</html>\n";

  server.send(200,  "text/html", page);


}

//from https://stackoverflow.com/questions/44683071/convert-string-as-hex-to-hexadecimal
uint64_t StrToHex(const char* str)
{
  return (uint64_t) strtoull(str, 0, 16);
}

void getColor(){

 // server.send(200, "text/plain", message);

  if(server.argName(0) == "favcolor")
  {
    String newColor = String(server.arg(0));//get the GET ardument 0 and convert it to string
    theColor = newColor.substring(1);//remove the # sybmot from the begining of color like #B2a48d
    theColorR = newColor.substring(1, 3);//extract B2 from  #B2a48d for example
    theColorG = newColor.substring(3, 5);//extract a4 from  #B2a48d for example
    theColorB = newColor.substring(5, 7);//extract 8d from  #B2a48d for example

    valueR = StrToHex(theColorR.c_str());//convert String to HEX for R
    valueG = StrToHex(theColorG.c_str());//convert String to HEX for G
    valueB = StrToHex(theColorB.c_str());//convert String to HEX for B
    if(showSerialData)
    {
      Serial.print("valueR: ");
      Serial.println(valueR);
      Serial.print("valueG: ");
      Serial.println(valueG);
      Serial.print("valueB: ");
      Serial.println(valueB );
    }

  }

  showColorPicker();//make sure the color picker is shown
  //server.send(200, "text/plain", message);

}


void setColor()
{
  for (int i = 0; i < NUM_LEDS; i++) {
    strip.setPixelColor(i, valueR, valueG, valueB); // Set the color of the i-th LED to red
    strip.show(); // Update the LED strip with the new colors
    delay(10); // Wait for 100 milliseconds
  }
}//

void noConnection()
{
   for (int i = 0; i < NUM_LEDS; i++) {
    strip.setPixelColor(i, 255, 45, 0); // Set the color of the i-th LED to red
    strip.show(); // Update the LED strip with the new colors
    delay(50); // Wait for 100 milliseconds
  }

  delay(200);
   for (int i = NUM_LEDS-1; i >=0; i--) {
    strip.setPixelColor(i, 0, 255, 180); // Set the color of the i-th LED to red
    strip.show(); // Update the LED strip with the new colors
    delay(50); // Wait for 100 milliseconds
  }
}

void handleNotFound() {
  String message = "File Not Found\n\n";
  message += "URI: ";
  message += server.uri();
  message += "\nMethod: ";
  message += (server.method() == HTTP_GET) ? "GET" : "POST";
  message += "\nArguments: ";
  message += server.args();
  message += "\n";

  for (uint8_t i = 0; i < server.args(); i++) {
    message += " " + server.argName(i) + ": " + server.arg(i) + "\n";
  }

  server.send(404, "text/plain", message);

}

void setup_wifi() {
  delay(10);
  // We start by connecting to a WiFi network
  WiFi.mode(WIFI_STA);
  WiFi.begin(ssid, password);
  Serial.println("");

  // Wait for connection
  while (WiFi.status() != WL_CONNECTED) {
    noConnection();
    delay(500);
    Serial.print(".");
  }

  Serial.println("");
  Serial.print("Connected to ");
  Serial.println(ssid);
  Serial.print("Open: http://");
  Serial.print(WiFi.localIP());
  Serial.println(" to read temperature");

  if (MDNS.begin("robojaxRGB")) {
    Serial.println("MDNS responder started");
  }

}

void setup(void) {

  Serial.begin(115200);

  strip.begin(); // Initialize the NeoPixel strip
  strip.show(); // Set initial color to black

  setup_wifi();

  server.on("/", showColorPicker);//show the main page with color picker
  //server.on("/color", setColor);//changes teh color on WS2812 RGB LED


  server.on("/color", HTTP_GET, getColor);


  server.on("/inline", []() {
    server.send(200, "text/plain", "this works as well");
  });
  server.onNotFound(handleNotFound);
  server.begin();
  Serial.println("HTTP server started");
}

void loop(void) {
  //Robojax.com
    while (WiFi.status() != WL_CONNECTED) {
      setup_wifi();
    }

  server.handleClient();
  //showColorPicker();
  setColor();
  delay(300);// change this to larger value (1000 or more) if you don't need very often reading
  // Robojax.com code for ESP32 and DHT11 DHT22
}
Common Course Links
Common Course Files
Resources & references
No resources yet.
Files📁
No files available.