ESP32 Tutorial 52/55 - WS2812 CheerLights MQTT Global Sync with LCD | SunFounder ESP32 IoT kit
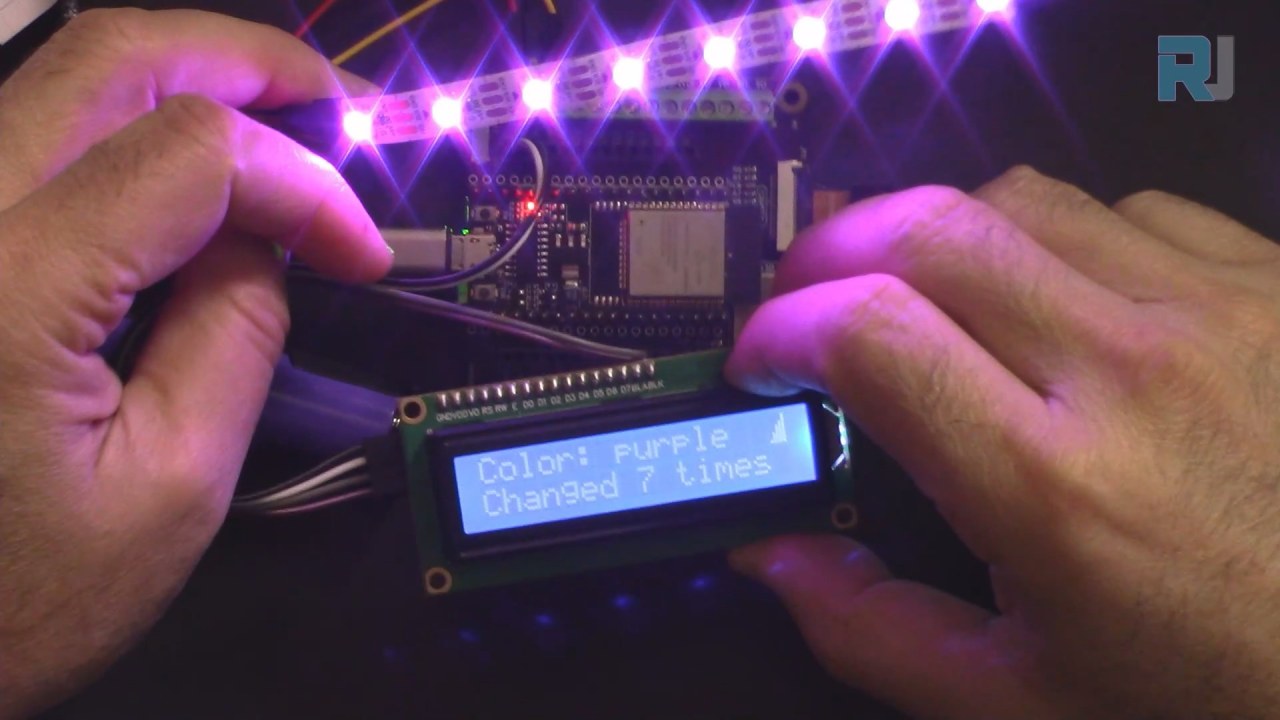
In this tutorial, we will create a CheerLights project using the ESP32, which will synchronize colors globally through MQTT. This project will not only change colors based on inputs from other users but also display the current color and how many times it has been updated on an LCD screen. The outcome is a fun demonstration of IoT capabilities, showcasing how devices can interact and keep users connected across distances. For additional clarification, watch the video at (in video at 00:00).
Hardware Explained
To build this project, you'll need an ESP32 microcontroller, a WS2812 LED strip, and an LCD display. The ESP32 serves as the brain of the operation, utilizing its built-in Wi-Fi capabilities to connect to the internet and receive MQTT messages. This allows real-time updates to the LED colors based on a global input from other users.
The WS2812 LED strip is a popular choice for projects requiring addressable RGB LEDs. Each LED can be controlled independently, allowing for rich color displays. The LCD will provide a visual confirmation of the current color and the number of times it has been changed, enhancing user interaction.

Datasheet Details
| Manufacturer | SunFounder |
|---|---|
| Part number | ESP32 |
| Logic/IO voltage | 3.3 V |
| Supply voltage | 5 V |
| Output current (per channel) | 20 mA |
| Peak current (per channel) | 60 mA |
| PWM frequency guidance | 400 Hz |
| Input logic thresholds | 0.15 V (low), 0.8 V (high) |
| Voltage drop / RDS(on) / saturation | 0.2 V |
| Thermal limits | 85 °C |
| Package | ESP32 module |
| Notes / variants | Includes built-in Wi-Fi and Bluetooth |
- Ensure proper power supply to the ESP32 (5 V) and WS2812 strip (5 V).
- Use a common ground between the ESP32 and the LED strip.
- Implement a proper MQTT broker for color synchronization.
- Pay attention to the data pin connection for the WS2812 (pin 14 as per the code).
- Be cautious with the number of LEDs; exceeding the power limits requires additional power sources.
Wiring Instructions


To wire the components, start by connecting the WS2812 LED strip. Connect the ground pin (usually black) of the LED strip to the ground pin on the ESP32. Next, connect the VCC pin (usually red) of the LED strip to the 5V output on the ESP32. Finally, connect the data pin (often yellow) to GPIO pin 14 on the ESP32.
For the LCD, connect the ground pin (often black) to the ground on the ESP32. The VCC pin (usually red) should be connected to the 5V output. The SDA pin (typically gray) connects to GPIO pin 21, while the SCL pin (usually white) connects to GPIO pin 22. This setup allows the ESP32 to communicate with the LCD and display information as needed.
Code Examples & Walkthrough
In the setup function, we initialize the LCD and connect to Wi-Fi. The code below demonstrates how to define the necessary libraries and set up the LCD:
#include
#include
LiquidCrystal_I2C lcd(0x27, 16,2);  // set the LCD address
void setup() {
  Serial.begin(115200);
  lcd.init(); // initialize the lcd
  lcd.backlight(); // Turns on the LCD backlight.
}
This initializes the LCD for use, allowing it to display messages. The next excerpt shows how the Wi-Fi connection is established:
void setup_wifi() {
  WiFi.begin(ssid, password);
  while (WiFi.status() != WL_CONNECTED) {
    lcdConnect(); //for LCD
    delay(500);
  }
  Serial.println("WiFi connected");
}
This function establishes a connection to the specified Wi-Fi network, displaying a message on the LCD while connecting. Lastly, the color change logic is handled in the callback function:
void callback(char* topic, byte* message, unsigned int length) {
  String messageTemp;
  for (int i = 0; i < length; i++) {
    messageTemp += (char)message[i];
  }
  if (String(topic) == "cheerlights") {
    setColor(messageTemp);
  }
}
This function listens for incoming messages on the "cheerlights" topic and updates the color accordingly. The full code loads below the article, so make sure to review it for the complete implementation.
Demonstration / What to Expect
Upon completion of the project, you can expect the LED strip to change colors based on inputs from a global MQTT feed. The LCD will display the current color name and how many times it has been changed. If you disconnect the internet, the LCD will indicate "Connecting..." until a connection is re-established (in video at 12:30).
Common pitfalls include ensuring that the correct pins are used for data connections and verifying that the Wi-Fi credentials are accurate. If there are any discrepancies in the SSID or password, the ESP32 will fail to connect, and the LCD will continue to display the connecting message.
Video Timestamps
- 00:00 Start
- 1:59 Introduction to the project
- 6:16 Wiring explained
- 8:13 Arduino Code explained
- 14:26 Selecting ESP32 board and COM port on Arduino IDE
- 16:07 CheerLight Demonstration with LCD
Изображения
/*
 * Это оригинальный код из Examples->iot_5_cheerlight от SunFounder. Полные видеоинструкции https://youtu.be/xEqmxMiF-E8 📚⬇️ Страница загрузки и ресурсов https://robojax.com/RJT685
 *
 * Я добавил ЖК-дисплей для отображения:
 * 1- Название цвета
 * 2- Подсчет количества обновлений цвета
 * 3- Показать на ЖК-дисплее, если Wi-Fi подключен
 * 4- Показать "Подключение", если не подключен или отключен
 *
 * Написано Ахмадом Шамширом www.Robojax.com 29 декабря 2023 года
 *
 * :ref: https://randomnerdtutorials.com/esp32-mqtt-publish-subscribe-arduino-ide/ https://docs.sunfounder.com/projects/kepler-kit/en/latest/iotproject/5.mqtt_pub.html
 */
#include <Wire.h>
#include <LiquidCrystal_I2C.h>

 // SDA->21, SCL->22
LiquidCrystal_I2C lcd(0x27, 16,2); // установите адрес LCD на 0x27 для дисплея на 16 символов и 2 строки

int colorCount = 0;
int lastColor=0;

byte connected[] = {
          B00001,
          B00001,
          B00011,
          B00111,
          B00111,
          B01111,
          B01111,
          B11111
};


#include <WiFi.h>
#include <PubSubClient.h>
 // #include <Wire.h>
#include <Adafruit_NeoPixel.h>


 // Замените следующие переменные на вашу комбинацию SSID/Пароль.
const char* ssid = "dars";
const char* password = "5152535455";

 // Добавьте адрес вашего MQTT брокера:
const char* mqtt_server = "mqtt.cheerlights.com";
const char* unique_identifier = "sunfounder-client-sdgvsasdda";

WiFiClient espClient;
PubSubClient client(espClient);
long lastMsg = 0;
int value = 0;


 // Определите поддерживаемые цвета CheerLights и их RGB-значения.
String colorName[] = {"red", "pink", "green", "blue", "cyan", "white", "warmwhite", "oldlace", "purple", "magenta", "yellow", "orange"};

int colorRGB[][3] = { 255,   0,   0, // красный
                      255, 192, 203, // «розовый»
                        0, 255,   0, // зелёный
                        0,   0, 255, // синий
                        0, 255, 255, // циан
                      255, 255, 255, // белый
                      255, 223, 223, // теплый белый
                      255, 223, 223, // "старинное кружево"
                      128,   0, 128, // пурпурный
                      255,   0, 255, // "магента"
                      255, 255,   0, // "жёлтый"
                      255, 165,   0}; // апельсин

 // инициализировать RGB ленту
#define LED_PIN 13
#define NUM_LEDS 8

Adafruit_NeoPixel pixels = Adafruit_NeoPixel(NUM_LEDS, LED_PIN, NEO_GRB + NEO_KHZ800);

void setup() {
  Serial.begin(115200);

  lcd.init(); // инициализировать ЖК-дисплей
  lcd.backlight(); // Включает подсветку ЖК-дисплея.

 // настройки по умолчанию Wi-Fi
  setup_wifi();
  client.setServer(mqtt_server, 1883);
  client.setCallback(callback);

 // rgb лента начало
  pixels.begin();
  pixels.show();

}

void setup_wifi() {
  delay(10);
 // Мы начинаем с подключения к WiFi сети.
  Serial.println();
  Serial.print("Connecting to ");
  Serial.println(ssid);

  WiFi.begin(ssid, password);

  while (WiFi.status() != WL_CONNECTED) {
    lcdConnect(); // для ЖКД
    delay(500);
    Serial.print(".");
  }

  Serial.println("");
  Serial.println("WiFi connected");
  Serial.println("IP address: ");
  Serial.println(WiFi.localIP());
}

void callback(char* topic, byte* message, unsigned int length) {
  Serial.print("Message arrived on topic: ");
  Serial.print(topic);
  Serial.print(". Message: ");
  String messageTemp;

  for (int i = 0; i < length; i++) {
    Serial.print((char)message[i]);
    messageTemp += (char)message[i];
  }
  Serial.println();

 // Если будет получено сообщение по этой теме, вы проверите это сообщение.
 // Изменяет состояние выхода в соответствии с сообщением
  if (String(topic) == "cheerlights") {
    Serial.print("Changing color to ");
    Serial.println(messageTemp);
    setColor(messageTemp);
  }
}

void reconnect() {
 // Циклируем, пока мы не восстановим соединение.
  while (!client.connected()) {
  lcdConnect();
    Serial.print("Attempting MQTT connection...");
 // Попытка подключиться
    if (client.connect(unique_identifier)) {
      Serial.println("connected");
 // Подписаться
      client.subscribe("cheerlights");
    } else {
      Serial.print("failed, rc=");
      Serial.print(client.state());
      Serial.println(" try again in 5 seconds");
 // Подождите 5 секунд перед повторной попыткой.
      delay(5000);
    }
  }
}

void setColor(String color) {
 // Переберите список цветов, чтобы найти соответствующий цвет.
  for (int colorIndex = 0; colorIndex < 12; colorIndex++) {
    if (color == colorName[colorIndex]) {
        lastColor = colorIndex; // вспомни последний цвет
        colorCount++; // увеличить количество
 // Установите цвет каждого неонового пикселя на ленте.
      for (int pixel = 0; pixel < NUM_LEDS; pixel++) {
        pixels.setPixelColor(pixel, pixels.Color (colorRGB [colorIndex][0], colorRGB [colorIndex][1], colorRGB [colorIndex][2]));
        delay(100);
      }
      pixels.show();
    }
  }
}

void lcdConnect()
{
    lcd.clear();
    lcd.setCursor(0, 0); // строка 0
    lcd.print("Connecting...");
    lcd.setCursor(0, 1);
    lcd.print("SSID:"); // линия 1
    lcd.print(ssid);
}

void loop() {
  lcd.clear();

  if (!client.connected()) {
    reconnect();
  }else{
    lcd.createChar(0, connected);
    lcd.setCursor(15, 0);
    lcd.write(byte(0));
  }
  client.loop();


 // первая строка
  lcd.setCursor(0, 0);
  lcd.print("Color: ");
  lcd.print(colorName[lastColor]);

 // второй ряд
  lcd.setCursor(0, 1);
  lcd.print("Changed ");
  lcd.print(colorCount);
  lcd.print(" times");

  delay(1000); // нам нужно задержаться, чтобы успеть прочитать дисплей


}
Common Course Links
Common Course Files
Ресурсы и ссылки
-
ДокументацияESP32 Учебник 52/55 - страница документа SunFounder для CheerLightdocs.sunfounder.com
Файлы📁
Нет доступных файлов.