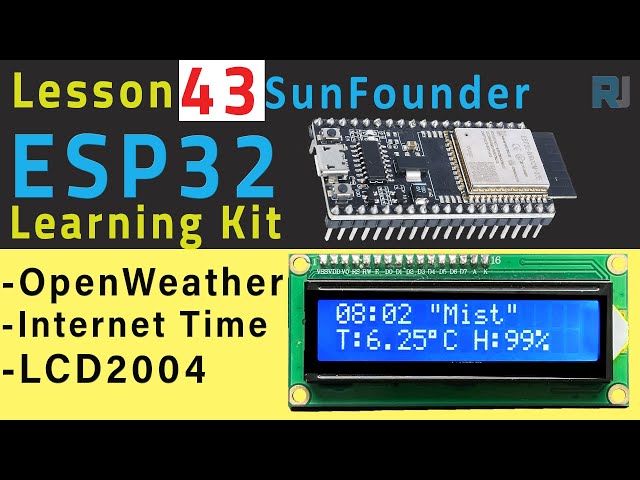
ESP32 Tutorial 43/55 - IoT Internet Weather Station | SunFounder's ESP32 IoT Learning kit
In this tutorial, we will build an Internet-connected weather station using the ESP32 and its camera extension board from SunFounder. This project enables the ESP32 to retrieve real-time weather data, including temperature and humidity, and display it on an LCD screen. This application not only showcases the capabilities of the ESP32 but also demonstrates how to fetch and parse data from an external API.

As we progress through the tutorial, we will wire the components, configure the code, and ensure everything works seamlessly together. The end result will be a fully functional weather station that updates its readings every 10 seconds, providing a clear and concise display of current weather conditions (in video at 00:30).
Hardware Explained
The main components used in this project include the ESP32 microcontroller, an LCD display, and the necessary wiring. The ESP32 is equipped with built-in Wi-Fi and Bluetooth, allowing it to connect to the Internet and retrieve data. The LCD display will show the current weather information, including temperature and humidity.
The LCD we are using is a 16x2 character display, which means it can show two lines of 16 characters each. This will be sufficient for our weather information output. The ESP32 will communicate with the LCD via I2C, which simplifies the wiring by using only two data lines.
Datasheet Details
| Manufacturer | Espressif |
|---|---|
| Part number | ESP32-WROOM-32 |
| Logic/IO voltage | 3.3 V |
| Supply voltage | 3.0–3.6 V |
| Output current (per channel) | 12 mA max |
| Peak current (per channel) | 40 mA |
| PWM frequency guidance | 1 kHz |
| Input logic thresholds | 0.3 V (low), 0.7 V (high) |
| Voltage drop / RDS(on) / saturation | 0.5 V |
| Thermal limits | -40 to 85 °C |
| Package | QFN48 |
| Notes / variants | Includes multiple variants for different applications |
- Ensure the ESP32 is powered with a stable 3.3 V supply.
- Use a common ground for all components to avoid communication issues.
- Check the I2C address of the LCD using an I2C scanner.
- Monitor the Wi-Fi connection status to avoid disconnections during data fetching.
- Handle JSON parsing errors for robustness in data retrieval.
Wiring Instructions

To wire the components, start by connecting the LCD to the ESP32. The LCD will use the I2C interface, so connect the SDA pin of the LCD to GPIO21 on the ESP32 and the SCL pin to GPIO22. Make sure to connect the power and ground pins of the LCD to the 5V and GND pins on the ESP32, respectively.
Next, ensure that the ESP32 is powered correctly using the included lithium battery or a USB connection. The battery provides portability, while the USB connection is useful for programming and debugging. Finally, check all connections are secure to avoid any loose wiring issues that could disrupt functionality.
Code Examples & Walkthrough
In the setup phase of our program, we initialize the serial communication and connect to the Wi-Fi network using the provided SSID and password. The following code snippet handles the Wi-Fi connection:
WiFi.begin(ssid, password);
while(WiFi.status() != WL_CONNECTED) {
  delay(500);
  Serial.print(".");
}
Serial.println("Connected to WiFi network with IP Address: ");
Serial.println(WiFi.localIP());
This code ensures that the ESP32 connects to the specified Wi-Fi network before proceeding with any data fetching. If the connection fails, it will continuously attempt to reconnect.
Next, we need to send an HTTP GET request to retrieve weather data. This is accomplished using the following code snippet:
String serverPath = "http://api.openweathermap.org/data/2.5/weather?q=" + city + "," + countryCode + "&units=metric" + "&APPID=" + openWeatherMapApiKey;
jsonBuffer = httpGETRequest(serverPath.c_str());
Here, we construct the URL for the API request, which includes the city, country code, and our API key. The httpGETRequest function is then called to fetch the weather data.
Finally, we parse the JSON response and display the relevant data on the LCD:
lcd.clear();
lcd.setCursor(0, 0);
lcd.print(time);
lcd.print(" ");
lcd.print(myObject["weather"][0]["main"]);
lcd.setCursor(0, 1);
lcd.print("T:");
lcd.print(myObject["main"]["temp"]);
lcd.print("\xDF");  // "°" char
lcd.print("C ");
lcd.print("H:");
lcd.print(myObject["main"]["humidity"]);
lcd.print("%");
This code snippet updates the LCD display with the current time, weather condition, temperature, and humidity. It clears the previous display and sets the cursor to the appropriate positions for each line.
Demonstration / What to Expect
Upon successful wiring and programming, your weather station will connect to the Wi-Fi and start fetching weather data every 10 seconds. You'll see the current temperature, humidity, and weather conditions displayed on the LCD screen. If the ESP32 fails to connect to Wi-Fi, it will print an error message to the serial monitor.
Be mindful of the API call limits to avoid being blocked from the OpenWeatherMap service. If you encounter any issues with data retrieval, check your API key and ensure your city and country code are correctly specified (in video at 15:45).
Video Timestamps
- 00:00 Start
- 2:00 introduction to project
- 5:04 OpenWeather Account
- 6:11 Wiring
- 8:05 Arduino code explained
- 14:13 JASON Elements in code
- 20:23 Selecting ESP32 board and COM port in Arduino IDE
- 22:05 Demonstration of Weather Station on LCD1602
- 23:45 Demonstration of Weather Station on LCD2004
Images
/*
  Rui Santos
  Complete project details at Complete project details at https://RandomNerdTutorials.com/esp32-http-get-open-weather-map-thingspeak-arduino/

  Permission is hereby granted, free of charge, to any person obtaining a copy
  of this software and associated documentation files.

  The above copyright notice and this permission notice shall be included in all
  copies or substantial portions of the Software.
*/

#include <LiquidCrystal_I2C.h>
#include <WiFi.h>
#include <HTTPClient.h>
#include <Arduino_JSON.h>


// Replace the next variables with your SSID/Password combination
const char* ssid = "SSID";
const char* password = "PASSWORD";

// Your Domain name with URL path or IP address with path
String openWeatherMapApiKey = "openWeatherMapApiKey";

// Replace with your country code and city
// Fine the country code by https://openweathermap.org/find
String city = "CITY";
String countryCode = "COUNTRY CODE";

// THE DEFAULT TIMER IS SET TO 10 SECONDS FOR TESTING PURPOSES
// For a final application, check the API call limits per hour/minute to avoid getting blocked/banned
unsigned long lastTime = 0;
// Timer set to 10 minutes (600000)
//unsigned long timerDelay = 600000;
// Set timer to 10 seconds (10000)
unsigned long timerDelay = 10000;

String jsonBuffer;

// set the LCD number of columns and rows
int lcdColumns = 16;
int lcdRows = 2;

// set LCD address, number of columns and rows
// SDA -> GPIO21, SCL -> GPIO22
// lcd address is 0x27, run an I2C scanner sketch
LiquidCrystal_I2C lcd(0x27, lcdColumns, lcdRows);

// NTP Server time
const char* ntpServer = "pool.ntp.org";
long  gmtOffset_sec = 0;
int   daylightOffset_sec = 0; //3600;

void setup() {
  Serial.begin(115200);

  // WiFi
  WiFi.begin(ssid, password);
  Serial.println("Connecting");
  while(WiFi.status() != WL_CONNECTED) {
    delay(500);
    Serial.print(".");
  }
  Serial.println("");
  Serial.print("Connected to WiFi network with IP Address: ");
  Serial.println(WiFi.localIP());
  Serial.println("Timer set to 10 seconds (timerDelay variable), it will take 10 seconds before publishing the first reading.");

  // initialize LCD
  lcd.init();
  // turn on LCD backlight
  lcd.backlight();

}

void loop() {
  // Send an HTTP GET request
  if ((millis() - lastTime) > timerDelay) {
    // Check WiFi connection status
    if(WiFi.status()== WL_CONNECTED){
      String serverPath = "http://api.openweathermap.org/data/2.5/weather?q=" + city + "," + countryCode + "&units=metric" + "&APPID=" + openWeatherMapApiKey;

      jsonBuffer = httpGETRequest(serverPath.c_str());
      Serial.println(jsonBuffer);
      JSONVar myObject = JSON.parse(jsonBuffer);

      // JSON.typeof(jsonVar) can be used to get the type of the var
      if (JSON.typeof(myObject) == "undefined") {
        Serial.println("Parsing input failed!");
        return;
      }

      // Serial.print("JSON object = ");
      // Serial.println(myObject);
      // Serial.print("Temperature: ");
      // Serial.println(myObject["main"]["temp"]);
      // Serial.print("Pressure: ");
      // Serial.println(myObject["main"]["pressure"]);
      // Serial.print("Humidity: ");
      // Serial.println(myObject["main"]["humidity"]);
      // Serial.print("Wind Speed: ");
      // Serial.println(myObject["wind"]["speed"]);

      // Get time
      gmtOffset_sec =  myObject["timezone"];
      configTime(gmtOffset_sec, daylightOffset_sec, ntpServer);
      // time =
      String time = printLocalTime();

      // LCD Print
      lcd.clear();
      lcd.setCursor(0, 0);
      lcd.print(time);
      lcd.print(" ");
      lcd.print(myObject["weather"][0]["main"]);
      lcd.setCursor(0, 1);
      lcd.print("T:");
      lcd.print(myObject["main"]["temp"]);
      lcd.print("\xDF");  // "°" char
      lcd.print("C ");
      lcd.print("H:");
      lcd.print(myObject["main"]["humidity"]);
      lcd.print("%");

    }
    else {
      Serial.println("WiFi Disconnected");
    }
    lastTime = millis();
  }
}

String printLocalTime(){
  struct tm timeinfo;
  if(!getLocalTime(&timeinfo)){
    Serial.println("Failed to obtain time");
    return "null";
  }
  // Serial.println(&timeinfo, "%A, %B %d %Y %H:%M:%S");

  // get time format HH:MM
  char timeHour[3];
  strftime(timeHour,3, "%H", &timeinfo);
  char timeMinute[3];
  strftime(timeMinute,3, "%M", &timeinfo);
  String time = String(timeHour) + ":" + String(timeMinute);
  Serial.println(time)
;  return time;
}


String httpGETRequest(const char* serverName) {
  WiFiClient client;
  HTTPClient http;

  // Your Domain name with URL path or IP address with path
  http.begin(client, serverName);

  // Send HTTP POST request
  int httpResponseCode = http.GET();

  String payload = "{}";

  if (httpResponseCode>0) {
    Serial.print("HTTP Response code: ");
    Serial.println(httpResponseCode);
    payload = http.getString();
  }
  else {
    Serial.print("Error code: ");
    Serial.println(httpResponseCode);
  }
  // Free resources
  http.end();

  return payload;
}
Common Course Links
Common Course Files
Resources & references
-
DocumentationESP32 Tutorial 43/55- SunFounder doc page for IoT Internet Weather Stationdocs.sunfounder.com
Files📁
No files available.