ESP32 Tutorial 49/55 - Control DC Motor Over The internet using Adafruit IoT | SunFounder's ESP32 kit
In this tutorial, we will explore how to control a DC motor over the internet using the ESP32 and the Adafruit IO MQTT service. The DC motor's speed and direction can be manipulated remotely, allowing for efficient control from anywhere with an internet connection. This project demonstrates the capabilities of the ESP32 microcontroller, which features built-in Wi-Fi, making it ideal for Internet of Things (IoT) applications.

We will be implementing a system where the motor can be started, stopped, and its speed adjusted via a web interface connected to Adafruit IO. Users can subscribe to specific topics for motor control and adjust parameters accordingly. To better understand the process, be sure to check out the video accompanying this tutorial (in video at 00:00).
Hardware Explained
For this project, we will utilize the ESP32 microcontroller, which is the heart of our system. The ESP32 is capable of handling Wi-Fi communications, making it perfect for our IoT application. It connects to the Adafruit IO platform, allowing us to send and receive messages via MQTT protocol.
Additionally, we will be using the L293D motor driver, which is essential for controlling the DC motor. The L293D can drive two DC motors and allows for control of both direction and speed through Pulse Width Modulation (PWM). It essentially acts as an interface between the ESP32 and the motor, managing the higher current required by the motor while isolating the ESP32 from any potentially damaging back-emf signals.
Datasheet Details
| Manufacturer | Texas Instruments |
|---|---|
| Part number | L293D |
| Logic/IO voltage | 4.5 - 36 V |
| Supply voltage | 4.5 - 36 V |
| Output current (per channel) | 600 mA |
| Peak current (per channel) | 1.2 A |
| PWM frequency guidance | 10 kHz (typ.) |
| Input logic thresholds | 0.8 V (high), 2.0 V (low) |
| Voltage drop / RDS(on) / saturation | 1.5 V max |
| Thermal limits | 150 °C |
| Package | DIP-16 |
| Notes / variants | Quadruple high-current half-H driver |
- Ensure proper heat sinking for continuous operation.
- Use PWM to control motor speed effectively.
- Observe input voltage limits to prevent damage.
- Check for proper ground connections between all components.
- Be cautious of back-emf; use diodes if necessary.
- Double-check wiring as polarity can affect motor direction.
- Test with a lower voltage before full operation.
- Watch for overheating during extended use.
- Make sure to debounce mechanical switches if used.
- Ensure the ESP32 is not overloaded by the motor's current.
Wiring Instructions
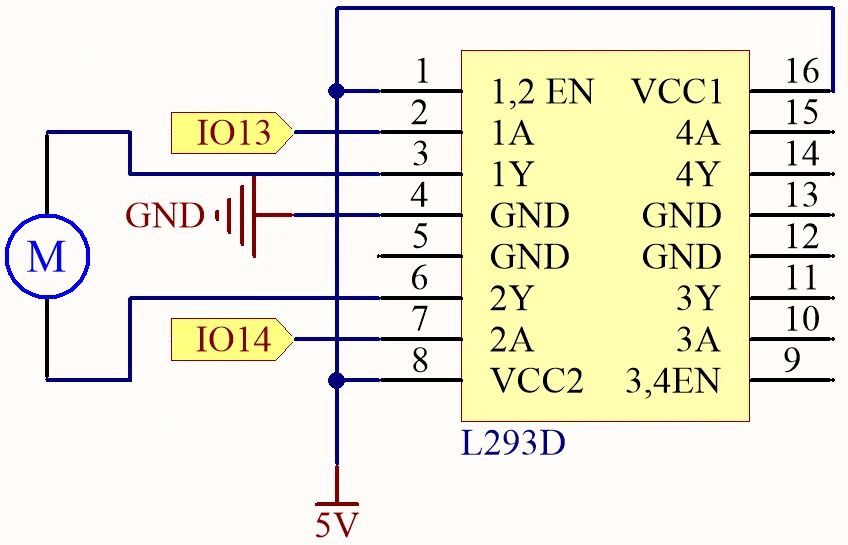
Begin by connecting the power supply. Connect the positive terminal of your external power source to the VCC pin of the L293D (pin 8) and the ground to the GND pin (pin 4). Ensure the ESP32 is powered separately if required, typically through a micro USB connection.
Next, connect the motor to the L293D. One terminal of the motor should be connected to output pin 3 (pin 2 of the L293D) and the other terminal to output pin 6 (pin 7 of the L293D). For control signals, connect pin 13 of the ESP32 to input pin 2 (pin 1 of the L293D) and pin 14 to input pin 7 (pin 2 of the L293D). The enable pin (pin 1) should also be connected to the 5V supply to activate the driver. Lastly, make sure the ESP32 ground is connected to the L293D ground for a common reference.
Code Examples & Walkthrough
The provided code initializes the necessary libraries and sets up the Wi-Fi and MQTT client. Key identifiers include motorSpeed, motorDirection, and motorStart, which manage the motor's operation based on the commands received from Adafruit IO.
bool debug = false;
#define motor1A 13
#define motor2A 14
int motorSpeed = 0;
int motorDirection = 1;
int motorStart = 1;
In this excerpt, the motor pins are defined along with initial variables for controlling speed, direction, and the start/stop state of the motor. The variable motorSpeed will be adjusted based on the input from Adafruit IO.
void setup() {
  Serial.begin(115200);
  WiFi.begin(WLAN_SSID, WLAN_PASS);
  delay(2000);
  while (WiFi.status() != WL_CONNECTED) {
    delay(500);
  }
}
In the setup function, the serial communication is initiated, and the ESP32 connects to the specified Wi-Fi network. This connection is crucial for enabling MQTT communication.
void loop() {
  MQTT_connect();
  mqtt.processPackets(500);
  runMotor();
}
This loop function establishes the MQTT connection and processes incoming packets to control the motor based on the latest commands received. The function runMotor() is called to apply the current settings to the motor.
Demonstration / What to Expect
When the setup is complete and the code is uploaded, you should be able to control the motor through the Adafruit IO dashboard. You can adjust the motor speed using a slider and change its direction with a toggle switch. If everything is wired correctly, the motor will respond to these commands in real-time, showcasing the low latency of the system (in video at 00:00).
Common issues include reversed motor direction due to incorrect wiring, so double-check connections if the motor does not behave as expected. Additionally, ensure that your MQTT topics are correctly set up in Adafruit IO to match the code.
Video Timestamps
- 00:00 Start
- 2:21 Introduction to the project
- 4:20 How DC Motor is controlled
- 6:39 L293D Motor Driver
- 11:42 What is MQTT?
- 15:03 Adafruit IO setup
- 19:17 Wiring Explained
- 22:42 Code explained
- 35:28 Project Demonstration
图像
/*
 * 这是用于ESP32通过Adafruit的MQTT服务控制直流电机的Arduino示例代码
 * 观看视频说明 https://youtu.be/OUgyPXNYg3g
 * 📚⬇️ 下载和资源页面 https://robojax.com/RJT673
 * 作者:Ahamd Shamshiri
 * 日期:2024年2月18日
 *
 * Adafruit MQTT库 ESP32 Adafruit IO SSL/TLS示例
 *
 * /// 参考:https://www.electronicwings.com/esp32/esp32-mqtt-client
 */
bool debug = false;
#define motor1A 13
#define motor2A 14

 // PWM设置
const int freq = 500; // PWM频率:500 Hz
const int resolution = 8; // PWM 分辨率:8 位
const int channelA = 0; // 电机1A的PWM通道:0
const int channelB = 1; // 电机2A的PWM通道:1

char* dir[]={"CCW", "CW"};

int motorSpeed =0;
int motorDirection =1;
int motorStart = 1;
int dutyCycle =0;

#include <WiFi.h>
#include "WiFiClientSecure.h"
#include "Adafruit_MQTT.h"
#include "Adafruit_MQTT_Client.h"

/*
 * WiFi接入点 *********************************/
 *
 * #define WLAN_SSID "书籍"
 * #define WLAN_PASS "88888888"
 *
 *  /************************* Adafruit.io 设置
 */

#define AIO_SERVER "io.adafruit.com"

 // 使用端口8883进行MQTTS
#define AIO_SERVERPORT 8883

 // Adafruit IO 账户配置
 // (要获取这些值,请访问 https://io.adafruit.com 并点击活动密钥)
 // #define AIO_USERNAME "你的 Adafruit IO 用户名"
 // #define AIO_KEY "你的 Adafruit IO 密钥"

#define AIO_USERNAME "robojax"
#define AIO_KEY "aio_jHpm60SEsWUdU5x472FViZjWzsY9"

/*
 * 全球状态(您无需更改此内容!)******************/
 *
 * // WiFiFlientSecure用于SSL/TLS支持
 * WiFiClientSecure client;
 *
 * // 通过传入WiFi客户端和MQTT服务器及登录信息来设置MQTT客户端类。
 * Adafruit_MQTT_Client mqtt(&client, AIO_SERVER, AIO_SERVERPORT, AIO_USERNAME, AIO_KEY);
 *
 * // io.adafruit.com根CA
 * const char* adafruitio_root_ca = \
 *  "-----BEGIN CERTIFICATE-----\n"
 *  "MIIEjTCCA3WgAwIBAgIQDQd4KhM/xvmlcpbhMf/ReTANBgkqhkiG9w0BAQsFADBh\n"
 *  "MQswCQYDVQQGEwJVUzEVMBMGA1UEChMMRGlnaUNlcnQgSW5jMRkwFwYDVQQLExB3\n"
 *  "d3cuZGlnaWNlcnQuY29tMSAwHgYDVQQDExdEaWdpQ2VydCBHbG9iYWwgUm9vdCBH\n"
 *  "MjAeFw0xNzExMDIxMjIzMzdaFw0yNzExMDIxMjIzMzdaMGAxCzAJBgNVBAYTAlVT\n"
 *  "MRUwEwYDVQQKEwxEaWdpQ2VydCBJbmMxGTAXBgNVBAsTEHd3dy5kaWdpY2VydC5j\n"
 *  "b20xHzAdBgNVBAMTFkdlb1RydXN0IFRMUyBSU0EgQ0EgRzEwggEiMA0GCSqGSIb3\n"
 *  "DQEBAQUAA4IBDwAwggEKAoIBAQC+F+jsvikKy/65LWEx/TMkCDIuWegh1Ngwvm4Q\n"
 *  "yISgP7oU5d79eoySG3vOhC3w/3jEMuipoH1fBtp7m0tTpsYbAhch4XA7rfuD6whU\n"
 *  "gajeErLVxoiWMPkC/DnUvbgi74BJmdBiuGHQSd7LwsuXpTEGG9fYXcbTVN5SATYq\n"
 *  "DfbexbYxTMwVJWoVb6lrBEgM3gBBqiiAiy800xu1Nq07JdCIQkBsNpFtZbIZhsDS\n"
 *  "fzlGWP4wEmBQ3O67c+ZXkFr2DcrXBEtHam80Gp2SNhou2U5U7UesDL/xgLK6/0d7\n"
 *  "6TnEVMSUVJkZ8VeZr+IUIlvoLrtjLbqugb0T3OYXW+CQU0kBAgMBAAGjggFAMIIB\n"
 *  "PDAdBgNVHQ4EFgQUlE/UXYvkpOKmgP792PkA76O+AlcwHwYDVR0jBBgwFoAUTiJU\n"
 *  "IBiV5uNu5g/6+rkS7QYXjzkwDgYDVR0PAQH/BAQDAgGGMB0GA1UdJQQWMBQGCCsG\n"
 *  "AQUFBwMBBggrBgEFBQcDAjASBgNVHRMBAf8ECDAGAQH/AgEAMDQGCCsGAQUFBwEB\n"
 *  "BCgwJjAkBggrBgEFBQcwAYYYaHR0cDovL29jc3AuZGlnaWNlcnQuY29tMEIGA1Ud\n"
 *  "HwQ7MDkwN6A1oDOGMWh0dHA6Ly9jcmwzLmRpZ2ljZXJ0LmNvbS9EaWdpQ2VydEds\n"
 *  "b2JhbFJvb3RHMi5jcmwwPQYDVR0gBDYwNDAyBgRVHSAAMCowKAYIKwYBBQUHAgEW\n"
 *  "HGh0dHBzOi8vd3d3LmRpZ2ljZXJ0LmNvbS9DUFMwDQYJKoZIhvcNAQELBQADggEB\n"
 *  "AIIcBDqC6cWpyGUSXAjjAcYwsK4iiGF7KweG97i1RJz1kwZhRoo6orU1JtBYnjzB\n"
 *  "c4+/sXmnHJk3mlPyL1xuIAt9sMeC7+vreRIF5wFBC0MCN5sbHwhNN1JzKbifNeP5\n"
 *  "ozpZdQFmkCo+neBiKR6HqIA+LMTMCMMuv2khGGuPHmtDze4GmEGZtYLyF8EQpa5Y\n"
 *  "jPuV6k2Cr/N3XxFpT3hRpt/3usU/Zb9wfKPtWpoznZ4/44c1p9rzFcZYrWkj3A+7\n"
 *  "TNBJE0GmP2fhXhP1D/XVfIW/h0yCJGEiV9Glm/uGOa3DXHlmbAcxSyCRraG+ZBkA\n"
 *  "7h4SeM6Y8l/7MBRpPCz6l8Y=\n"
 *  "-----END CERTIFICATE-----\n";
 *
 * /****************************** 订阅内容
 */

 // 设置一个名为'test'的发布源和一个名为'test2'的订阅源。
 // 注意,AIO的MQTT路径遵循以下格式:<用户名>/feeds/<数据源名称>
Adafruit_MQTT_Subscribe MOTOR_SPEED = Adafruit_MQTT_Subscribe(&mqtt, AIO_USERNAME "/feeds/motor.speed");
Adafruit_MQTT_Subscribe MOTOR_DIRECTION = Adafruit_MQTT_Subscribe(&mqtt, AIO_USERNAME "/feeds/motor.direction");
Adafruit_MQTT_Subscribe MOTOR_START = Adafruit_MQTT_Subscribe(&mqtt, AIO_USERNAME "/feeds/motor.start");
Common Course Links
Common Course Files
资源与参考
尚无可用资源。
文件📁
没有可用的文件。