ESP32 教學 50/55 - 喺世界任何地方控制 RGB LED | SunFounder 嘅 ESP32 套件
喺呢個教學入面,我哋會學吓點樣用ESP32微控制器透過Wi-Fi、MQTT協議同Adafruit IO服務嚟控制RGB LED嘅顏色。呢個設定令你可以喺世界任何地方改變RGB LED嘅顏色,提供一個IoT技術嘅實際應用。我哋亦都會探討點樣用滑桿同顏色揀選器嚟揀想要嘅顏色。
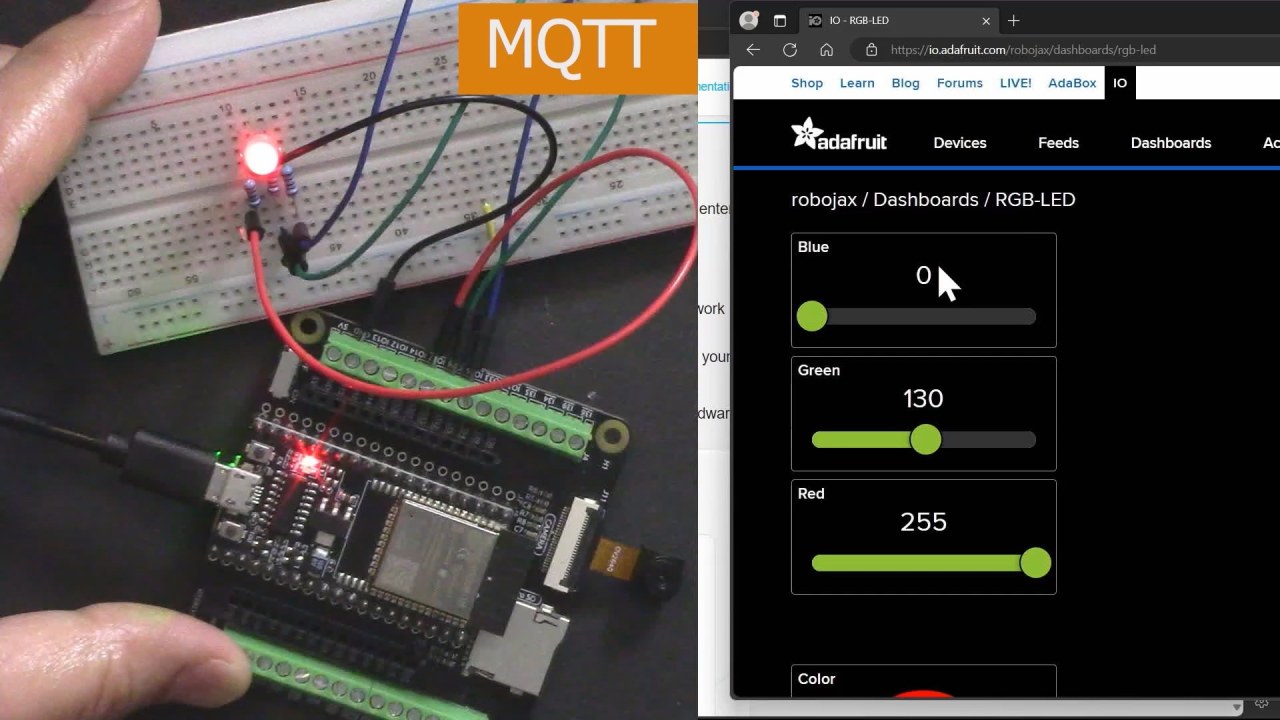
ESP32係一個功能強大嘅微控制器,內置Wi-Fi同藍牙功能,好啱用喺IoT項目。喺呢個製作入面,我哋會將RGB LED連接到ESP32,並透過Adafruit提供嘅MQTT broker嚟控制佢嘅顏色。呢個教學會逐步指導你硬件設定、接線指示同埋令一切順利運作所需嘅代碼(喺影片00:00位置)。
硬件解說
對於呢個項目,我哋主要用到嘅元件係ESP32微控制器同RGB LED。ESP32可以連接Wi-Fi網絡,令佢可以同Adafruit IO服務通訊。RGB LED包含三個獨立嘅LED(紅、綠、藍),可以混合出好多唔同顏色。
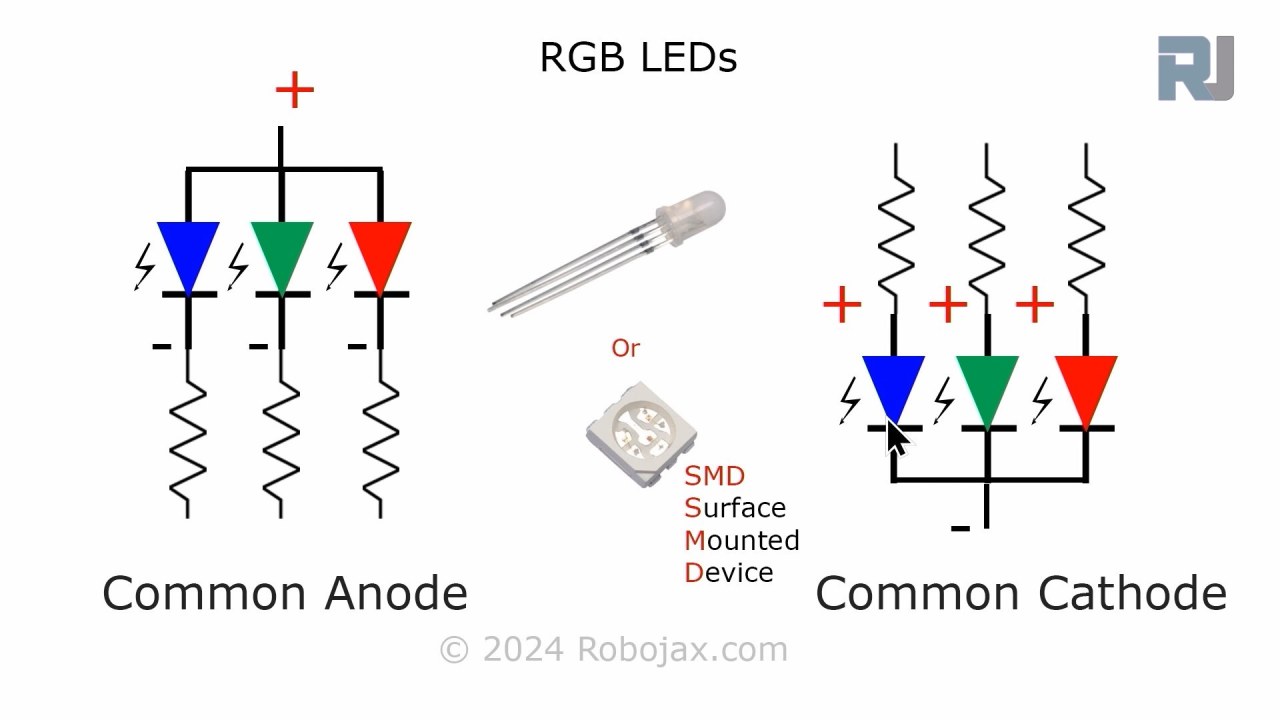
RGB LED係以共陽極或共陰極原理運作,即係話每個獨立LED嘅陽極(正極)或陰極(負極)要正確連接先至可以運作。每種顏色都可以用脈衝寬度調變(PWM)嚟控制,透過改變工作週期嚟調整每個LED嘅亮度。

數據表詳情
| 製造商 | SunFounder |
|---|---|
| 零件編號 | RGB LED |
| 正向電壓(VF) | 2.0–3.4 V |
| 正向電流(IF) | 20 mA |
| 峰值波長(nm) | 紅:620,綠:525,藍:465 |
| 封裝 | 標準4針 |
| 備註/變體 | 可選共陽極或共陰極 |
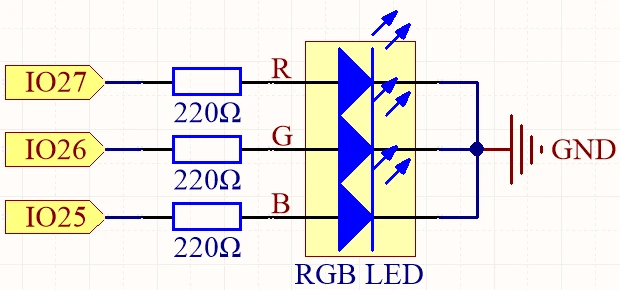
- 每種LED顏色用220歐姆電阻嚟限制電流。
- 確保共陽極或共陰極配置嘅接線正確。
- 檢查ESP32嘅電源供應,避免電壓驟降。
- 保持PWM頻率喺限制範圍內,以確保顏色轉換順暢。
- 確保Wi-Fi憑證正確,先可以連接到Adafruit IO服務。
接線指示
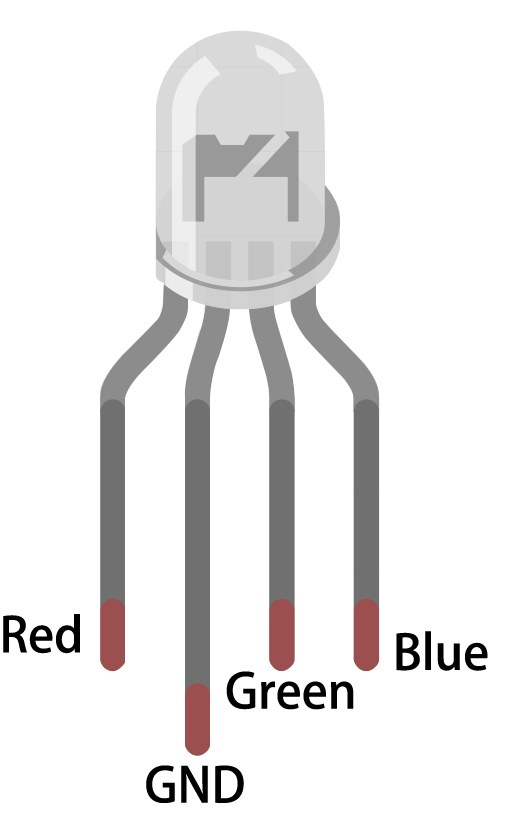
要將RGB LED連接到ESP32,首先識別RGB LED上面嘅針腳。最長嘅針腳係公共針腳。對於共陽極配置,將呢個針腳連接到正電壓供應(3.3V)。另外三個針腳分別對應紅、綠、藍LED。將紅色針腳連接到GPIO 27,綠色針腳連接到GPIO 26,藍色針腳連接到GPIO 25。每個連接都要透過220歐姆電阻嚟限制流經LED嘅電流。
跟住,將ESP32嘅接地(GND)連接到電路嘅接地線。確保接線穩固,避免出現間歇性連接。如果使用共陰極RGB LED,就將公共針腳連接到接地,並將各個顏色針腳透過電阻連接到正電源。通電之前要再三檢查所有連接。
代碼示例及講解
喺Arduino代碼入面,我哋首先用識別碼redPin、greenPin同bluePin嚟定義紅、綠、藍LED嘅針腳。另外,我哋用redChannel、greenChannel同blueChannel嚟定義每種顏色嘅PWM通道。PWM頻率設定為5000 Hz,解析度為8位元。
const int redPin = 27;
const int greenPin = 26;
const int bluePin = 25;

const int redChannel = 0;
const int greenChannel = 1;
const int blueChannel = 2;喺setup()函數入面,我哋初始化PWM通道並連接相應嘅針腳。我哋亦都用定義好嘅憑證連接到Wi-Fi網絡,並設定MQTT客戶端同Adafruit IO通訊。
void setup() {
  ledcSetup(redChannel, freq, resolution);
  ledcAttachPin(redPin, redChannel);
  // 連接到WiFi
  WiFi.begin(WLAN_SSID, WLAN_PASS);
}
主循環檢查MQTT連接並處理傳入嘅訊息。佢亦都會將當前RGB值打印到序列監視器。LED嘅顏色會根據透過MQTT訂閱收到嘅值嚟更新。
void loop() {
  MQTT_connect();
  mqtt.processPackets(500);
  setColor();
}
如果想睇完整代碼嘅更多詳情,請參考文章下面載入嘅完整代碼。
示範/預期效果
一旦所有嘢設定好同埋代碼上傳咗之後,你應該會見到RGB LED對Adafruit IO儀表板嘅顏色改變有反應。當你調整紅色、綠色同藍色嘅滑桿時,LED應該會跟住改變顏色。如果你遇到任何問題,確保Wi-Fi連接穩定,同埋MQTT主題名稱同代碼入面定義嘅一致(喺影片17:30)。
常見嘅錯誤包括接線唔正確、主題名稱唔匹配,同埋忘記設定正確嘅Wi-Fi憑證。如果LED冇著燈,再檢查吓電阻連接,同埋確保ESP32供電正確。
影片時間標記
- 00:00 開始
- 2:23 項目介紹
- 4:43 咩係MQTT
- 7:55 Adafruit IO設定
- 14:09 接線解釋
- 16:07 代碼解釋
- 27:03 喺Arduino IDE揀ESP32板同COM埠
- 29:12 項目示範
- 31:25 咩係RGB LED?
- 35:26 RGB顏色
圖片
/***********************************************************************
 This is Arduino sketch for ESP32 to control RGB LED using MQTT service of Adafruit
 video instruction https://youtu.be/-9q1GfGsnr0
 📚⬇️ Download and resource page https://robojax.com/RJT672
 Written By Ahamd Shamshiri
 on Feb 18, 2024

  Adafruit MQTT Library ESP32 Adafruit IO SSL/TLS example


/// ref: https://www.electronicwings.com/esp32/esp32-mqtt-client
*/
// Define RGB LED pins
const int redPin = 27;
const int greenPin = 26;
const int bluePin = 25;

// Define PWM channels
const int redChannel = 0;
const int greenChannel = 1;
const int blueChannel = 2;

// Define PWM frequency and resolution
const int freq = 5000;
const int resolution = 8;
int colorR, colorG, colorB;

#include <WiFi.h>
#include "WiFiClientSecure.h"
#include "Adafruit_MQTT.h"
#include "Adafruit_MQTT_Client.h"

/************************* WiFi Access Point *********************************/


#define WLAN_SSID "Book"
#define WLAN_PASS "888-888"

/************************* Adafruit.io Setup *********************************/

#define AIO_SERVER "io.adafruit.com"

// Using port 8883 for MQTTS
#define AIO_SERVERPORT 8883

// Adafruit IO Account Configuration
// (to obtain these values, visit https://io.adafruit.com and click on Active Key)
// #define AIO_USERNAME "YOUR_ADAFRUIT_IO_USERNAME"
// #define AIO_KEY      "YOUR_ADAFRUIT_IO_KEY"

#define AIO_USERNAME "robojax"
#define AIO_KEY "aio_NBQQ75Rn7liRNcRn5uGUBMsBYmjD"

/************ Global State (you don't need to change this!) ******************/

// WiFiFlientSecure for SSL/TLS support
WiFiClientSecure client;

// Setup the MQTT client class by passing in the WiFi client and MQTT server and login details.
Adafruit_MQTT_Client mqtt(&client, AIO_SERVER, AIO_SERVERPORT, AIO_USERNAME, AIO_KEY);


// io.adafruit.com root CA
const char* adafruitio_root_ca = \
      "-----BEGIN CERTIFICATE-----\n"
      "MIIEjTCCA3WgAwIBAgIQDQd4KhM/xvmlcpbhMf/ReTANBgkqhkiG9w0BAQsFADBh\n"
      "MQswCQYDVQQGEwJVUzEVMBMGA1UEChMMRGlnaUNlcnQgSW5jMRkwFwYDVQQLExB3\n"
      "d3cuZGlnaWNlcnQuY29tMSAwHgYDVQQDExdEaWdpQ2VydCBHbG9iYWwgUm9vdCBH\n"
      "MjAeFw0xNzExMDIxMjIzMzdaFw0yNzExMDIxMjIzMzdaMGAxCzAJBgNVBAYTAlVT\n"
      "MRUwEwYDVQQKEwxEaWdpQ2VydCBJbmMxGTAXBgNVBAsTEHd3dy5kaWdpY2VydC5j\n"
      "b20xHzAdBgNVBAMTFkdlb1RydXN0IFRMUyBSU0EgQ0EgRzEwggEiMA0GCSqGSIb3\n"
      "DQEBAQUAA4IBDwAwggEKAoIBAQC+F+jsvikKy/65LWEx/TMkCDIuWegh1Ngwvm4Q\n"
      "yISgP7oU5d79eoySG3vOhC3w/3jEMuipoH1fBtp7m0tTpsYbAhch4XA7rfuD6whU\n"
      "gajeErLVxoiWMPkC/DnUvbgi74BJmdBiuGHQSd7LwsuXpTEGG9fYXcbTVN5SATYq\n"
      "DfbexbYxTMwVJWoVb6lrBEgM3gBBqiiAiy800xu1Nq07JdCIQkBsNpFtZbIZhsDS\n"
      "fzlGWP4wEmBQ3O67c+ZXkFr2DcrXBEtHam80Gp2SNhou2U5U7UesDL/xgLK6/0d7\n"
      "6TnEVMSUVJkZ8VeZr+IUIlvoLrtjLbqugb0T3OYXW+CQU0kBAgMBAAGjggFAMIIB\n"
      "PDAdBgNVHQ4EFgQUlE/UXYvkpOKmgP792PkA76O+AlcwHwYDVR0jBBgwFoAUTiJU\n"
      "IBiV5uNu5g/6+rkS7QYXjzkwDgYDVR0PAQH/BAQDAgGGMB0GA1UdJQQWMBQGCCsG\n"
      "AQUFBwMBBggrBgEFBQcDAjASBgNVHRMBAf8ECDAGAQH/AgEAMDQGCCsGAQUFBwEB\n"
      "BCgwJjAkBggrBgEFBQcwAYYYaHR0cDovL29jc3AuZGlnaWNlcnQuY29tMEIGA1Ud\n"
      "HwQ7MDkwN6A1oDOGMWh0dHA6Ly9jcmwzLmRpZ2ljZXJ0LmNvbS9EaWdpQ2VydEds\n"
      "b2JhbFJvb3RHMi5jcmwwPQYDVR0gBDYwNDAyBgRVHSAAMCowKAYIKwYBBQUHAgEW\n"
      "HGh0dHBzOi8vd3d3LmRpZ2ljZXJ0LmNvbS9DUFMwDQYJKoZIhvcNAQELBQADggEB\n"
      "AIIcBDqC6cWpyGUSXAjjAcYwsK4iiGF7KweG97i1RJz1kwZhRoo6orU1JtBYnjzB\n"
      "c4+/sXmnHJk3mlPyL1xuIAt9sMeC7+vreRIF5wFBC0MCN5sbHwhNN1JzKbifNeP5\n"
      "ozpZdQFmkCo+neBiKR6HqIA+LMTMCMMuv2khGGuPHmtDze4GmEGZtYLyF8EQpa5Y\n"
      "jPuV6k2Cr/N3XxFpT3hRpt/3usU/Zb9wfKPtWpoznZ4/44c1p9rzFcZYrWkj3A+7\n"
      "TNBJE0GmP2fhXhP1D/XVfIW/h0yCJGEiV9Glm/uGOa3DXHlmbAcxSyCRraG+ZBkA\n"
      "7h4SeM6Y8l/7MBRpPCz6l8Y=\n"
      "-----END CERTIFICATE-----\n";

/****************************** Feeds ***************************************/

// Setup a feed called 'test' for publishing and 'test2' for subscription.
// Notice MQTT paths for AIO follow the form: <username>/feeds/<feedname>
Adafruit_MQTT_Subscribe COLOR_R = Adafruit_MQTT_Subscribe(&mqtt, AIO_USERNAME "/feeds/rgb-led-color.red");
Adafruit_MQTT_Subscribe COLOR_G = Adafruit_MQTT_Subscribe(&mqtt, AIO_USERNAME "/feeds/rgb-led-color.green");
Adafruit_MQTT_Subscribe COLOR_B = Adafruit_MQTT_Subscribe(&mqtt, AIO_USERNAME "/feeds/rgb-led-color.blue");
Adafruit_MQTT_Subscribe COLOR_RGB = Adafruit_MQTT_Subscribe(&mqtt, AIO_USERNAME "/feeds/color-picker");


/*************************** Sketch Code ************************************/


void setup() {
  // Set up PWM channels
  ledcSetup(redChannel, freq, resolution);
  ledcSetup(greenChannel, freq, resolution);
  ledcSetup(blueChannel, freq, resolution);

  // Attach pins to corresponding PWM channels
  ledcAttachPin(redPin, redChannel);
  ledcAttachPin(greenPin, greenChannel);
  ledcAttachPin(bluePin, blueChannel);

  Serial.begin(115200);
  delay(10);

  Serial.println(F("Adafruit IO MQTTS (SSL/TLS) Example"));

  // Connect to WiFi access point.
  Serial.println();
  Serial.println();
  Serial.print("Connecting to ");
  Serial.println(WLAN_SSID);

  delay(1000);

  WiFi.begin(WLAN_SSID, WLAN_PASS);
  delay(2000);

  while (WiFi.status() != WL_CONNECTED) {
    delay(500);
    Serial.print(".");
  }
  Serial.println();

  Serial.println("WiFi connected");
  Serial.println("IP address: ");
  Serial.println(WiFi.localIP());

  // Set Adafruit IO's root CA
  client.setCACert(adafruitio_root_ca);

  // register callback for feed
  COLOR_R.setCallback(color_R_Callback);
  // Setup MQTT subscription for time feed.
  mqtt.subscribe(&COLOR_R);

    // register callback for feed
  COLOR_G.setCallback(color_G_Callback);
  // Setup MQTT subscription for time feed.
  mqtt.subscribe(&COLOR_G);

    // register callback for feed
  COLOR_B.setCallback(color_B_Callback);
  // Setup MQTT subscription for time feed.
  mqtt.subscribe(&COLOR_B);

    // register callback for feed
  COLOR_RGB.setCallback(color_RGB_Callback);
  // Setup MQTT subscription for time feed.
  mqtt.subscribe(&COLOR_RGB);


}

// uint32_t x=0;


void loop() {

  // Ensure the connection to the MQTT server is alive (this will make the first
  // connection and automatically reconnect when disconnected).  See the MQTT_connect
  // function definition further below.
  MQTT_connect();

  Serial.print("R: ");
  Serial.print (colorR);
  Serial.print(" G: ");
  Serial.print (colorG);
  Serial.print(" B: ");
  Serial.println(colorB);

  // wait 0.5 seconds for subscription messages
  mqtt.processPackets(500);
  setColor();

  // wait a couple seconds to avoid rate limit
  //delay(2000);
}

void color_R_Callback(char* message, uint16_t len) {
  char messageBuffer[40];
  //snprintf(messageBuffer, sizeof(messageBuffer), "Color status is :: %s, len :: %u", message, len);
  //Serial.println(messageBuffer);
  Serial.println(message);
  String inString = message;//sotre the message to String

  colorR  =  inString.toInt();//convert the message to Integer
  if(colorR >255 || colorR < 0)
  {
    colorR = 0;
  }

}

void color_G_Callback(char* message, uint16_t len) {
  char messageBuffer[40];
  //snprintf(messageBuffer, sizeof(messageBuffer), "Color status is :: %s, len :: %u", message, len);
  //Serial.println(messageBuffer);
  Serial.println(message);
  String inString = message;//sotre the message to String

  colorG  =  inString.toInt();//convert the message to Integer
  if(colorG >255 || colorG < 0)
  {
    colorG = 0;
  }

}

void color_B_Callback(char* message, uint16_t len) {
  char messageBuffer[40];
  //snprintf(messageBuffer, sizeof(messageBuffer), "Color status is :: %s, len :: %u", message, len);
  //Serial.println(messageBuffer);
  Serial.println(message);
  String inString = message;//sotre the message to String

  colorB  =  inString.toInt();//convert the message to Integer
  if(colorB >255 || colorB < 0)
  {
    colorB = 0;
  }

}

void color_RGB_Callback(char* message, uint16_t len) {
  char messageBuffer[40];
  //snprintf(messageBuffer, sizeof(messageBuffer), "Color status is :: %s, len :: %u", message, len);
  //Serial.println(messageBuffer);
  Serial.println(message);
  String newColor = String( message);//
  if(newColor.length() == 7)
  {

    String theColorR = newColor.substring(1, 3);//extract B2 from  #B2a48d for example
    String theColorG = newColor.substring(3, 5);//extract a4 from  #B2a48d for example
    String theColorB = newColor.substring(5, 7);//extract 8d from  #B2a48d for example

    colorR = StrToHex(theColorR.c_str());//convert String to HEX for R
    colorG = StrToHex(theColorG.c_str());//convert String to HEX for G
    colorB = StrToHex(theColorB.c_str());//convert String to HEX for B


  }


}

//from https://stackoverflow.com/questions/44683071/convert-string-as-hex-to-hexadecimal
uint64_t StrToHex(const char* str)
{
  return (uint64_t) strtoull(str, 0, 16);
}

void setColor() {
  // For common-anode RGB LEDs, use 255 minus the color value
  ledcWrite(redChannel, colorR);
  ledcWrite(greenChannel, colorG);
  ledcWrite(blueChannel, colorB);
}


// Function to connect and reconnect as necessary to the MQTT server.
// Should be called in the loop function and it will take care if connecting.
void MQTT_connect() {
  int8_t ret;
  // Stop if already connected.
  if (mqtt.connected()) {
    return;
  }
  Serial.print("Connecting to MQTT... ");
  uint8_t retries = 3;
  while ((ret = mqtt.connect()) != 0) {  // connect will return 0 for connected
    Serial.println(mqtt.connectErrorString(ret));
    Serial.println("Retrying MQTT connection in 5 seconds...");
    mqtt.disconnect();
    delay(5000);  // wait 5 seconds
    retries--;
    if (retries == 0) {
      // basically die and wait for WDT to reset me
      while (1)
        ;
    }
  }
  Serial.println("MQTT Connected!");
}
Common Course Links
Common Course Files
你可能需要嘅嘢
-
阿里巴巴速卖通ESP32-S3 N16R8 on AliExpresss.click.aliexpress.com
資源與參考資料
暫時冇資源。
文件📁
数据表 (pdf)
-
ESP32 C3 Datasheet English
esp32-c3_datasheet_en[1].pdf0.86 MB