Tutorial ESP32 50/55 - Kontrol LED RGB dari mana saja di dunia | Kit ESP32 SunFounder
Dalam tutorial ini, kita akan mempelajari cara mengontrol warna LED RGB menggunakan mikrokontroler ESP32 melalui Wi-Fi, dengan memanfaatkan protokol MQTT dan layanan Adafruit IO. Pengaturan ini memungkinkan Anda mengubah warna LED RGB dari mana saja di dunia, memberikan aplikasi praktis dari teknologi IoT. Kita juga akan menjelajahi cara menggunakan penggeser dan pemilih warna untuk memilih warna yang diinginkan.
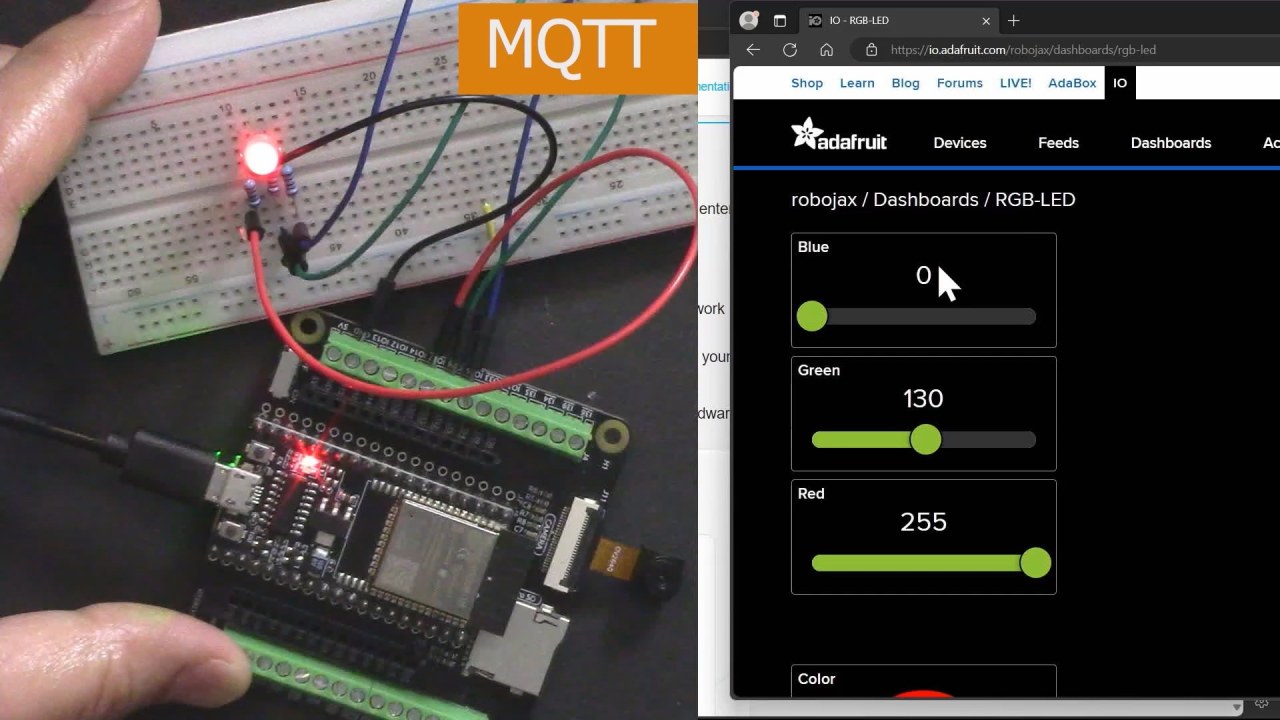
ESP32 adalah mikrokontroler yang kuat dengan kemampuan Wi-Fi dan Bluetooth bawaan, menjadikannya ideal untuk proyek IoT. Dalam pembuatan ini, kita akan menghubungkan LED RGB ke ESP32 dan mengontrol warnanya melalui broker MQTT yang disediakan oleh Adafruit. Tutorial ini akan memandu Anda melalui pengaturan perangkat keras, instruksi pengkabelan, dan kode yang diperlukan untuk membuat semuanya berjalan lancar (dalam video pada 00:00).
Penjelasan Perangkat Keras
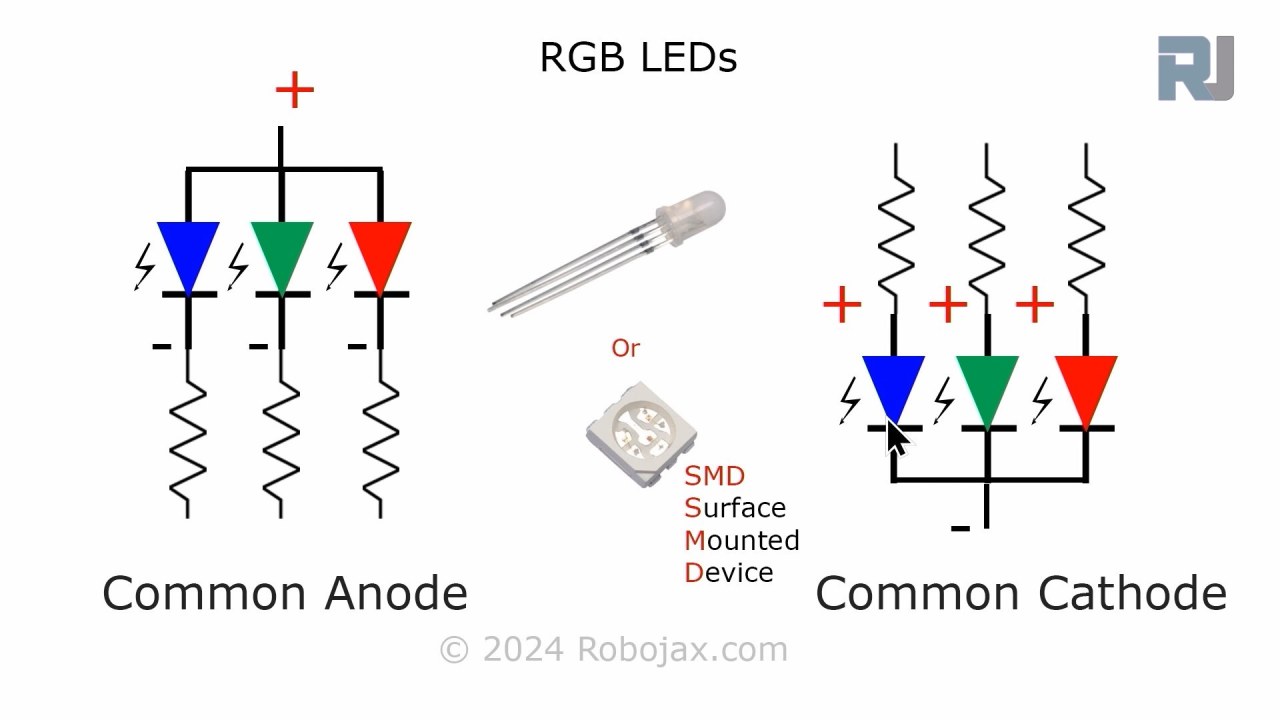
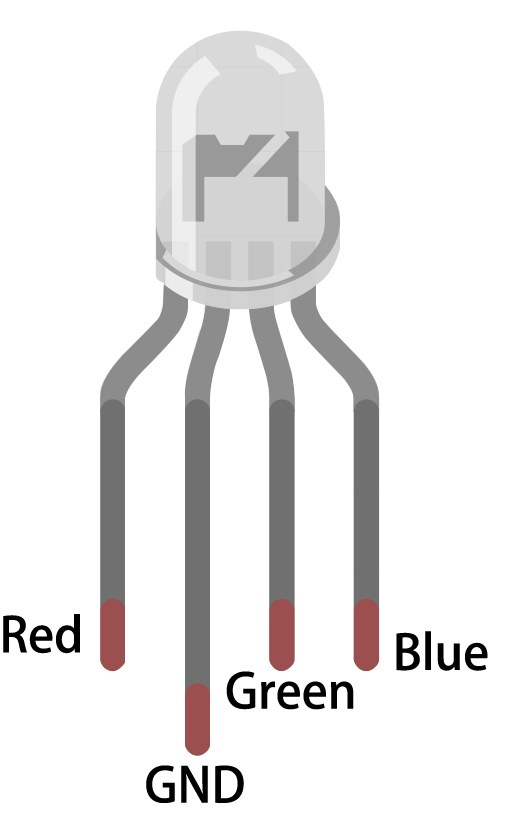
Untuk proyek ini, komponen utama yang akan kita gunakan adalah mikrokontroler ESP32 dan LED RGB. ESP32 mampu terhubung ke jaringan Wi-Fi, memungkinkannya berkomunikasi dengan layanan Adafruit IO. LED RGB berisi tiga LED individual (merah, hijau, dan biru) yang dapat dicampur untuk menciptakan berbagai macam warna.
LED RGB beroperasi dengan prinsip anoda bersama atau katoda bersama, yang berarti anoda (positif) atau katoda (negatif) dari LED individual harus dihubungkan dengan benar agar berfungsi. Setiap warna dapat dikontrol menggunakan Pulse Width Modulation (PWM), yang menyesuaikan kecerahan setiap LED dengan memvariasikan siklus kerja.

Detail Datasheet
| Produsen | SunFounder |
|---|---|
| Nomor bagian | LED RGB |
| Tegangan maju (VF) | 2,0–3,4 V |
| Arus maju (IF) | 20 mA |
| Panjang gelombang puncak (nm) | Merah: 620, Hijau: 525, Biru: 465 |
| Kemasan | Standar 4-pin |
| Catatan / varian | Opsi anoda bersama atau katoda bersama tersedia |
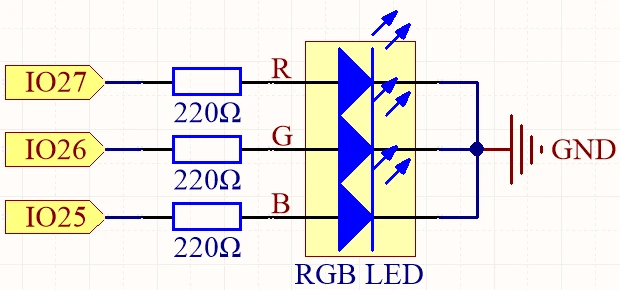
- Gunakan resistor 220 ohm untuk setiap warna LED untuk membatasi arus.
- Pastikan pengkabelan yang benar untuk konfigurasi anoda atau katoda bersama.
- Periksa catu daya ESP32 untuk menghindari penurunan tegangan.
- Jaga frekuensi PWM dalam batas untuk transisi warna yang halus.
- Pastikan kredensial Wi-Fi benar untuk terhubung ke layanan Adafruit IO.
Instruksi Pengkabelan
Untuk menghubungkan LED RGB ke ESP32, mulailah dengan mengidentifikasi pin pada LED RGB. Pin terpanjang adalah pin bersama. Untuk konfigurasi anoda bersama, hubungkan pin ini ke suplai tegangan positif (3,3V). Tiga pin lainnya sesuai dengan LED merah, hijau, dan biru. Hubungkan pin merah ke GPIO 27, pin hijau ke GPIO 26, dan pin biru ke GPIO 25. Setiap koneksi ini harus dibuat melalui resistor 220 ohm untuk membatasi arus yang mengalir melalui LED.
Selanjutnya, hubungkan ground (GND) ESP32 ke jalur ground rangkaian Anda. Pastikan pengkabelan aman untuk mencegah koneksi yang terputus-putus. Jika menggunakan LED RGB katoda bersama, hubungkan pin bersama ke ground sebagai gantinya dan hubungkan pin warna individual ke suplai positif melalui resistor. Periksa kembali semua koneksi sebelum memberi daya pada rangkaian.
Contoh Kode & Panduan
Dalam kode Arduino, kita mulai dengan mendefinisikan pin untuk LED merah, hijau, dan biru menggunakan pengidentifikasi redPin, greenPin, dan bluePin. Selain itu, kita mendefinisikan saluran PWM untuk setiap warna menggunakan redChannel, greenChannel, dan blueChannel. Frekuensi PWM diatur ke 5000 Hz dengan resolusi 8-bit.
const int redPin = 27;
const int greenPin = 26;
const int bluePin = 25;

const int redChannel = 0;
const int greenChannel = 1;
const int blueChannel = 2;
Dalam fungsi setup(), kita menginisialisasi saluran PWM dan melampirkan pin yang sesuai. Kita juga terhubung ke jaringan Wi-Fi menggunakan kredensial yang ditentukan dan mengatur klien MQTT untuk komunikasi dengan Adafruit IO.
void setup() {
  ledcSetup(redChannel, freq, resolution);
  ledcAttachPin(redPin, redChannel);
  // Terhubung ke WiFi
  WiFi.begin(WLAN_SSID, WLAN_PASS);
}
Loop utama memeriksa koneksi MQTT dan memproses pesan yang masuk. Ini juga mencetak nilai RGB saat ini ke monitor serial. Warna LED diperbarui berdasarkan nilai yang diterima melalui langganan MQTT.
void loop() {
  MQTT_connect();
  mqtt.processPackets(500);
  setColor();
}
Untuk detail lebih lanjut tentang kode lengkap, silakan merujuk ke kode lengkap yang dimuat di bawah artikel ini.
Demonstrasi / Apa yang Diharapkan
Setelah semuanya diatur dan kode diunggah, Anda akan melihat LED RGB merespons perubahan warna yang dilakukan melalui dasbor Adafruit IO. Saat Anda menyesuaikan penggeser untuk merah, hijau, dan biru, LED akan berubah warna sesuai dengan itu. Jika Anda mengalami masalah, pastikan koneksi Wi-Fi stabil dan nama topik MQTT cocok dengan yang didefinisikan dalam kode (di video pada 17:30).
Kesalahan umum termasuk pemasangan kabel yang salah, nama topik yang tidak cocok, dan lupa mengatur kredensial Wi-Fi yang benar. Jika LED tidak menyala, periksa kembali koneksi resistor dan pastikan ESP32 diberi daya dengan benar.
Stempel Waktu Video
- 00:00 Mulai
- 2:23 Pengenalan proyek
- 4:43 Apa itu MQTT
- 7:55 Pengaturan Adafruit IO
- 14:09 Penjelasan pemasangan kabel
- 16:07 Penjelasan kode
- 27:03 Memilih papan ESP32 dan port COM di Arduino IDE
- 29:12 Demonstrasi proyek
- 31:25 Apa itu LED RGB?
- 35:26 Warna RGB
Gambar
/***********************************************************************
 This is Arduino sketch for ESP32 to control RGB LED using MQTT service of Adafruit
 video instruction https://youtu.be/-9q1GfGsnr0
 📚⬇️ Download and resource page https://robojax.com/RJT672
 Written By Ahamd Shamshiri
 on Feb 18, 2024

  Adafruit MQTT Library ESP32 Adafruit IO SSL/TLS example


/// ref: https://www.electronicwings.com/esp32/esp32-mqtt-client
*/
// Define RGB LED pins
const int redPin = 27;
const int greenPin = 26;
const int bluePin = 25;

// Define PWM channels
const int redChannel = 0;
const int greenChannel = 1;
const int blueChannel = 2;

// Define PWM frequency and resolution
const int freq = 5000;
const int resolution = 8;
int colorR, colorG, colorB;

#include <WiFi.h>
#include "WiFiClientSecure.h"
#include "Adafruit_MQTT.h"
#include "Adafruit_MQTT_Client.h"

/************************* WiFi Access Point *********************************/


#define WLAN_SSID "Book"
#define WLAN_PASS "888-888"

/************************* Adafruit.io Setup *********************************/

#define AIO_SERVER "io.adafruit.com"

// Using port 8883 for MQTTS
#define AIO_SERVERPORT 8883

// Adafruit IO Account Configuration
// (to obtain these values, visit https://io.adafruit.com and click on Active Key)
// #define AIO_USERNAME "YOUR_ADAFRUIT_IO_USERNAME"
// #define AIO_KEY      "YOUR_ADAFRUIT_IO_KEY"

#define AIO_USERNAME "robojax"
#define AIO_KEY "aio_NBQQ75Rn7liRNcRn5uGUBMsBYmjD"

/************ Global State (you don't need to change this!) ******************/

// WiFiFlientSecure for SSL/TLS support
WiFiClientSecure client;

// Setup the MQTT client class by passing in the WiFi client and MQTT server and login details.
Adafruit_MQTT_Client mqtt(&client, AIO_SERVER, AIO_SERVERPORT, AIO_USERNAME, AIO_KEY);


// io.adafruit.com root CA
const char* adafruitio_root_ca = \
      "-----BEGIN CERTIFICATE-----\n"
      "MIIEjTCCA3WgAwIBAgIQDQd4KhM/xvmlcpbhMf/ReTANBgkqhkiG9w0BAQsFADBh\n"
      "MQswCQYDVQQGEwJVUzEVMBMGA1UEChMMRGlnaUNlcnQgSW5jMRkwFwYDVQQLExB3\n"
      "d3cuZGlnaWNlcnQuY29tMSAwHgYDVQQDExdEaWdpQ2VydCBHbG9iYWwgUm9vdCBH\n"
      "MjAeFw0xNzExMDIxMjIzMzdaFw0yNzExMDIxMjIzMzdaMGAxCzAJBgNVBAYTAlVT\n"
      "MRUwEwYDVQQKEwxEaWdpQ2VydCBJbmMxGTAXBgNVBAsTEHd3dy5kaWdpY2VydC5j\n"
      "b20xHzAdBgNVBAMTFkdlb1RydXN0IFRMUyBSU0EgQ0EgRzEwggEiMA0GCSqGSIb3\n"
      "DQEBAQUAA4IBDwAwggEKAoIBAQC+F+jsvikKy/65LWEx/TMkCDIuWegh1Ngwvm4Q\n"
      "yISgP7oU5d79eoySG3vOhC3w/3jEMuipoH1fBtp7m0tTpsYbAhch4XA7rfuD6whU\n"
      "gajeErLVxoiWMPkC/DnUvbgi74BJmdBiuGHQSd7LwsuXpTEGG9fYXcbTVN5SATYq\n"
      "DfbexbYxTMwVJWoVb6lrBEgM3gBBqiiAiy800xu1Nq07JdCIQkBsNpFtZbIZhsDS\n"
      "fzlGWP4wEmBQ3O67c+ZXkFr2DcrXBEtHam80Gp2SNhou2U5U7UesDL/xgLK6/0d7\n"
      "6TnEVMSUVJkZ8VeZr+IUIlvoLrtjLbqugb0T3OYXW+CQU0kBAgMBAAGjggFAMIIB\n"
      "PDAdBgNVHQ4EFgQUlE/UXYvkpOKmgP792PkA76O+AlcwHwYDVR0jBBgwFoAUTiJU\n"
      "IBiV5uNu5g/6+rkS7QYXjzkwDgYDVR0PAQH/BAQDAgGGMB0GA1UdJQQWMBQGCCsG\n"
      "AQUFBwMBBggrBgEFBQcDAjASBgNVHRMBAf8ECDAGAQH/AgEAMDQGCCsGAQUFBwEB\n"
      "BCgwJjAkBggrBgEFBQcwAYYYaHR0cDovL29jc3AuZGlnaWNlcnQuY29tMEIGA1Ud\n"
      "HwQ7MDkwN6A1oDOGMWh0dHA6Ly9jcmwzLmRpZ2ljZXJ0LmNvbS9EaWdpQ2VydEds\n"
      "b2JhbFJvb3RHMi5jcmwwPQYDVR0gBDYwNDAyBgRVHSAAMCowKAYIKwYBBQUHAgEW\n"
      "HGh0dHBzOi8vd3d3LmRpZ2ljZXJ0LmNvbS9DUFMwDQYJKoZIhvcNAQELBQADggEB\n"
      "AIIcBDqC6cWpyGUSXAjjAcYwsK4iiGF7KweG97i1RJz1kwZhRoo6orU1JtBYnjzB\n"
      "c4+/sXmnHJk3mlPyL1xuIAt9sMeC7+vreRIF5wFBC0MCN5sbHwhNN1JzKbifNeP5\n"
      "ozpZdQFmkCo+neBiKR6HqIA+LMTMCMMuv2khGGuPHmtDze4GmEGZtYLyF8EQpa5Y\n"
      "jPuV6k2Cr/N3XxFpT3hRpt/3usU/Zb9wfKPtWpoznZ4/44c1p9rzFcZYrWkj3A+7\n"
      "TNBJE0GmP2fhXhP1D/XVfIW/h0yCJGEiV9Glm/uGOa3DXHlmbAcxSyCRraG+ZBkA\n"
      "7h4SeM6Y8l/7MBRpPCz6l8Y=\n"
      "-----END CERTIFICATE-----\n";

/****************************** Feeds ***************************************/

// Setup a feed called 'test' for publishing and 'test2' for subscription.
// Notice MQTT paths for AIO follow the form: <username>/feeds/<feedname>
Adafruit_MQTT_Subscribe COLOR_R = Adafruit_MQTT_Subscribe(&mqtt, AIO_USERNAME "/feeds/rgb-led-color.red");
Adafruit_MQTT_Subscribe COLOR_G = Adafruit_MQTT_Subscribe(&mqtt, AIO_USERNAME "/feeds/rgb-led-color.green");
Adafruit_MQTT_Subscribe COLOR_B = Adafruit_MQTT_Subscribe(&mqtt, AIO_USERNAME "/feeds/rgb-led-color.blue");
Adafruit_MQTT_Subscribe COLOR_RGB = Adafruit_MQTT_Subscribe(&mqtt, AIO_USERNAME "/feeds/color-picker");


/*************************** Sketch Code ************************************/


void setup() {
  // Set up PWM channels
  ledcSetup(redChannel, freq, resolution);
  ledcSetup(greenChannel, freq, resolution);
  ledcSetup(blueChannel, freq, resolution);

  // Attach pins to corresponding PWM channels
  ledcAttachPin(redPin, redChannel);
  ledcAttachPin(greenPin, greenChannel);
  ledcAttachPin(bluePin, blueChannel);

  Serial.begin(115200);
  delay(10);

  Serial.println(F("Adafruit IO MQTTS (SSL/TLS) Example"));

  // Connect to WiFi access point.
  Serial.println();
  Serial.println();
  Serial.print("Connecting to ");
  Serial.println(WLAN_SSID);

  delay(1000);

  WiFi.begin(WLAN_SSID, WLAN_PASS);
  delay(2000);

  while (WiFi.status() != WL_CONNECTED) {
    delay(500);
    Serial.print(".");
  }
  Serial.println();

  Serial.println("WiFi connected");
  Serial.println("IP address: ");
  Serial.println(WiFi.localIP());

  // Set Adafruit IO's root CA
  client.setCACert(adafruitio_root_ca);

  // register callback for feed
  COLOR_R.setCallback(color_R_Callback);
  // Setup MQTT subscription for time feed.
  mqtt.subscribe(&COLOR_R);

    // register callback for feed
  COLOR_G.setCallback(color_G_Callback);
  // Setup MQTT subscription for time feed.
  mqtt.subscribe(&COLOR_G);

    // register callback for feed
  COLOR_B.setCallback(color_B_Callback);
  // Setup MQTT subscription for time feed.
  mqtt.subscribe(&COLOR_B);

    // register callback for feed
  COLOR_RGB.setCallback(color_RGB_Callback);
  // Setup MQTT subscription for time feed.
  mqtt.subscribe(&COLOR_RGB);


}

// uint32_t x=0;


void loop() {

  // Ensure the connection to the MQTT server is alive (this will make the first
  // connection and automatically reconnect when disconnected).  See the MQTT_connect
  // function definition further below.
  MQTT_connect();

  Serial.print("R: ");
  Serial.print (colorR);
  Serial.print(" G: ");
  Serial.print (colorG);
  Serial.print(" B: ");
  Serial.println(colorB);

  // wait 0.5 seconds for subscription messages
  mqtt.processPackets(500);
  setColor();

  // wait a couple seconds to avoid rate limit
  //delay(2000);
}

void color_R_Callback(char* message, uint16_t len) {
  char messageBuffer[40];
  //snprintf(messageBuffer, sizeof(messageBuffer), "Color status is :: %s, len :: %u", message, len);
  //Serial.println(messageBuffer);
  Serial.println(message);
  String inString = message;//sotre the message to String

  colorR  =  inString.toInt();//convert the message to Integer
  if(colorR >255 || colorR < 0)
  {
    colorR = 0;
  }

}

void color_G_Callback(char* message, uint16_t len) {
  char messageBuffer[40];
  //snprintf(messageBuffer, sizeof(messageBuffer), "Color status is :: %s, len :: %u", message, len);
  //Serial.println(messageBuffer);
  Serial.println(message);
  String inString = message;//sotre the message to String

  colorG  =  inString.toInt();//convert the message to Integer
  if(colorG >255 || colorG < 0)
  {
    colorG = 0;
  }

}

void color_B_Callback(char* message, uint16_t len) {
  char messageBuffer[40];
  //snprintf(messageBuffer, sizeof(messageBuffer), "Color status is :: %s, len :: %u", message, len);
  //Serial.println(messageBuffer);
  Serial.println(message);
  String inString = message;//sotre the message to String

  colorB  =  inString.toInt();//convert the message to Integer
  if(colorB >255 || colorB < 0)
  {
    colorB = 0;
  }

}

void color_RGB_Callback(char* message, uint16_t len) {
  char messageBuffer[40];
  //snprintf(messageBuffer, sizeof(messageBuffer), "Color status is :: %s, len :: %u", message, len);
  //Serial.println(messageBuffer);
  Serial.println(message);
  String newColor = String( message);//
  if(newColor.length() == 7)
  {

    String theColorR = newColor.substring(1, 3);//extract B2 from  #B2a48d for example
    String theColorG = newColor.substring(3, 5);//extract a4 from  #B2a48d for example
    String theColorB = newColor.substring(5, 7);//extract 8d from  #B2a48d for example

    colorR = StrToHex(theColorR.c_str());//convert String to HEX for R
    colorG = StrToHex(theColorG.c_str());//convert String to HEX for G
    colorB = StrToHex(theColorB.c_str());//convert String to HEX for B


  }


}

//from https://stackoverflow.com/questions/44683071/convert-string-as-hex-to-hexadecimal
uint64_t StrToHex(const char* str)
{
  return (uint64_t) strtoull(str, 0, 16);
}

void setColor() {
  // For common-anode RGB LEDs, use 255 minus the color value
  ledcWrite(redChannel, colorR);
  ledcWrite(greenChannel, colorG);
  ledcWrite(blueChannel, colorB);
}


// Function to connect and reconnect as necessary to the MQTT server.
// Should be called in the loop function and it will take care if connecting.
void MQTT_connect() {
  int8_t ret;
  // Stop if already connected.
  if (mqtt.connected()) {
    return;
  }
  Serial.print("Connecting to MQTT... ");
  uint8_t retries = 3;
  while ((ret = mqtt.connect()) != 0) {  // connect will return 0 for connected
    Serial.println(mqtt.connectErrorString(ret));
    Serial.println("Retrying MQTT connection in 5 seconds...");
    mqtt.disconnect();
    delay(5000);  // wait 5 seconds
    retries--;
    if (retries == 0) {
      // basically die and wait for WDT to reset me
      while (1)
        ;
    }
  }
  Serial.println("MQTT Connected!");
}
Common Course Links
Common Course Files
Hal-hal yang mungkin Anda butuhkan
-
AliExpressESP32-S3 N16R8 on AliExpresss.click.aliexpress.com
Sumber daya & referensi
Belum ada sumber daya.
Berkas📁
Lembar Data (pdf)
-
ESP32 C3 Datasheet English
esp32-c3_datasheet_en[1].pdf0.86 MB