Este tutorial es parte de: Tutoriales de WiFi LoRa 32
Todos los videos relacionados con Heltec WiFi LoRa 32 se encuentran en este grupo. Los enlaces a otros videos se encuentran debajo de este artículo.
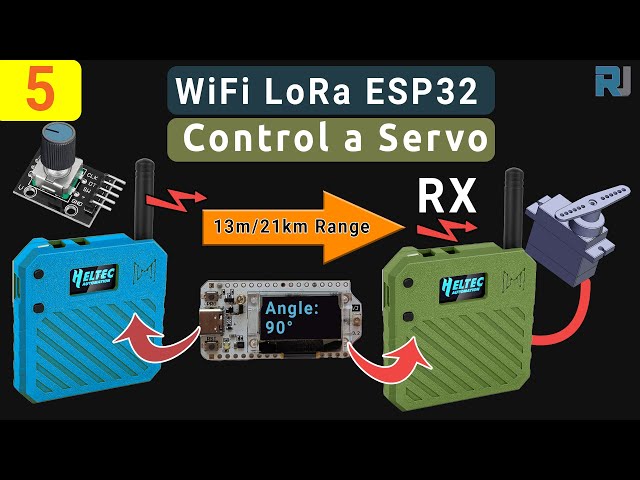
¡Controla un motor servo desde lejos! Tutorial de Arduino Heltec WiFi LoRa 32 V3 (TX)
En esta guía, estamos tomando los bocetos exactos de nuestro proyecto de servo Heltec ESP32 LoRa V3 y explicando cómo funcionan, sin código adicional. Aprenderás cómo el transmisor lee un codificador rotatorio, asegura y envía ese ángulo a través de LoRa, y cómo el receptor lo descifra y controla un micro-servo. Todos los enlaces de piezas y código están a continuación, y si haces un pedido a través de nuestros enlaces de afiliados, nos ayudas a seguir creando estos tutoriales.
Instalando placas Heltec ESP32
Añade esta ruta en las preferencias de tu IDE de Arduino como se muestra en el video:https://resource.heltec.cn/download/package_heltec_esp32_index.json
1. Hardware y configuración del transmisor (TX)
En el lado de TX necesitas:
-
Placa Heltec WiFi LoRa 32 V3 (en caja Meshnology N33, alimentada por batería de 3000 mAh)
-
Codificador rotatorio conectado a GPIO 6 (CLK), GPIO 5 (DT), GPIO 4 (SW)
-
Pantalla OLED en I²C (SDA= 4, SCL= 15)
El boceto comienza incluyendo e inicializando todo exactamente como enHeltec_ESP32_LoRa_V3_Sevo_TX_AiRotaryEncoder.ino:
cppCopyEdit#include "AiEsp32RotaryEncoder.h"
#include "HT_SSD1306Wire.h"
#include "LoRaWan_APP.h"
#include "mbedtls/aes.h"
// …
static SSD1306Wire display(0x3c, 500000, SDA_OLED, SCL_OLED, GEOMETRY, RST_OLED);
AiEsp32RotaryEncoder rotaryEncoder = AiEsp32RotaryEncoder(
    PIN_A, PIN_B, SW_PIN, ROTARY_ENCODER_VCC_PIN, false, true, true);
const int homePosition = 90;
const int MAX_ANGLE    = 180;
int servoAngel = homePosition;
Ensetup(), el código:
-
Activa en la pantalla, establece la fuente.
-
Llamadas
rotaryEncoder.begin(),rotaryEncoder.setup(readEncoderISR),rotaryEncoder.setBoundaries(0, MAX_ANGLE, true)yrotaryEncoder.setAcceleration(20) -
Restablece el codificador a
homePosition -
Inicializa LoRa a través de
Mcu.begin(HELTEC_BOARD, SLOW_CLK_TPYE)y configuraRadioEvents, canal, y parámetros exactamente como en el boceto proporcionado.
2. Enviando el ángulo de forma segura
Cada ciclo de bucle se ejecutarotary_loop(), que:
-
Lee el codificador en la ISR.
-
Cuando
servoAngelcambios, los empaqueta en un búfer de 16 bytes, cifra con AES-128encryptAES()desde el boceto), y llamadascppCopyEditRadio.Send(data, sizeof(data)); -
Conjuntos
lora_idle = falsehastaOnTxDone()enciende y reinicia.
3. Hardware y configuración del receptor (RX)
En el lado de RX necesitas:
-
Placa Heltec WiFi LoRa 32 V3 (mismo caso/batería)
-
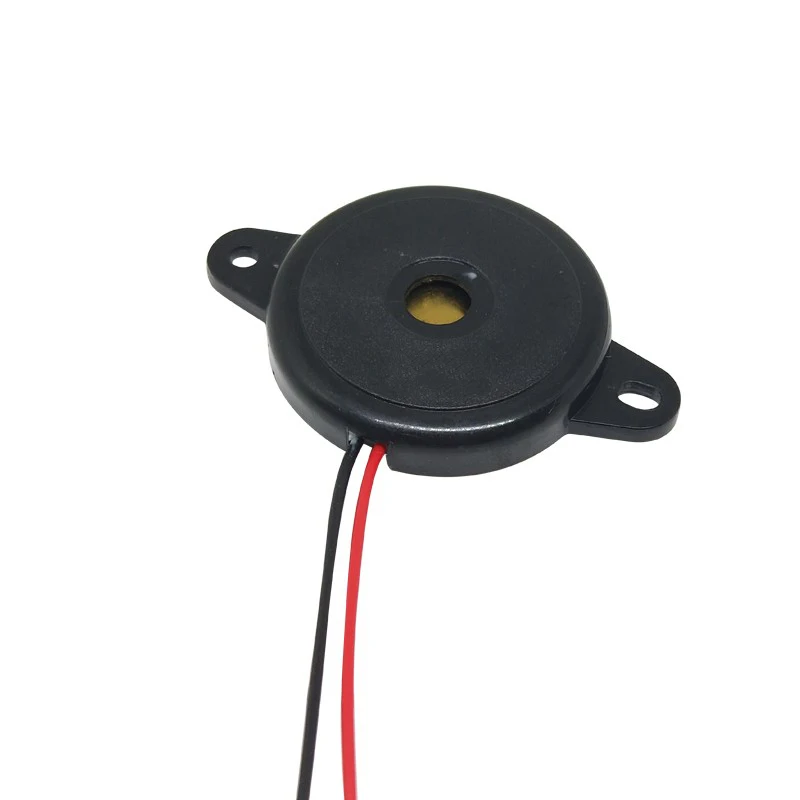
Microservomotor (por ejemplo, SG90) en GPIO 6 (o cualquier pin PWM probado)
-
pantalla OLED
El boceto enHeltec_ESP32_LoRa_V3_Sevo_RX.inocomienza con:
cppCopyEdit#include <ESP32Servo.h>
#include "HT_SSD1306Wire.h"
#include "LoRaWan_APP.h"
#include "mbedtls/aes.h"
// …
const int servoPin       = 6;
const int SERVO_DUTY_MIN = 400;  // us
const int SERVO_DUTY_MAX = 2400; // us
Servo    myservo;
int      servoAngel     = homePosition;
Ensetup(), it:
-
Potencias en Vext para el módulo de pantalla/LoRa
VextON()) -
Llamadas
Radio.Init(&RadioEvents)y configura RX con los mismos parámetros de LoRa -
Adjunta el servo con
myservo.attach(servoPin, SERVO_DUTY_MIN, SERVO_DUTY_MAX)y lo centra enhomePosition.
4. Recibiendo, descifrando y controlando el servo
El núcleo es elOnRxDone(uint8_t *payload, …)callback:
cppCopyEditdecryptAES((uint8_t*)rxpacket, userKey);
if (isNumber(rxpacket)) {
  servoAngel = atoi(rxpacket);
  myservo.write(servoAngel);
  delay(15);
}
Serial.println("Angle: " + String(servoAngel));
lora_idle = true;
Descifra el bloque de 16 bytes, lo convierte en un entero y actualiza inmediatamente el servo.
5. Soporte para pin PWM y ajuste de servo
Probamos estos pines ESP32 para salida PWM y todos funcionan para controlar un micro-servo:
CopyEdit1, 2, 3, 4, 5, 6, 19, 35, 36, 38, 39, 40, 41, 42, 45, 47, 48
Para un SG90 estándar, nuestro código utiliza un rango de pulsos de400 µs(0Ã'°) to2400 µs(180°), que ofrece un barrido suave y completo sin temblores.
6. Diagrama de cableado
A continuación se encuentran los espacios donde puedes insertar tus esquemas de TX y RX:


Código y enlaces de afiliados
Todos los bocetos anteriores están disponibles para descargar en la sección "Código y Recursos" a continuación. Si deseas construir esto tú mismo, considera comprar tu módulo Heltec LoRa32 V3, la caja Meshnology N33, el codificador rotativo y el servo SG90 a través de nuestros enlaces de afiliados. No te costará nada extra y nos ayuda a seguir creando tutoriales gratuitos como este.
Capítulos de video para referencia
-
00:00 Introducción y Visión General
-
00:05 Conceptos de Control Remoto
-
00:19 Conceptos básicos de comunicación LoRa
-
00:23 Vista previa de hardware
-
00:28 Exhibición de Carcasas y Baterías
-
Características del Módulo 01:03
-
01:42 Especificaciones y Conectividad
-
02:54 Alimentando el Servo
-
03:05 Cableado y Pinout
-
09:35 Colocación de la antena
-
11:04 Montaje de Caja
-
29:26 Subiendo bocetos
-
35:09 Prueba de rango 1.2 km
-
36:38 Prueba de rango 1.4 km
-
38:41 Resumen de Rendimiento
-
43:04 Conclusión y Apoyo
Este tutorial es parte de: Tutoriales de WiFi LoRa 32
- Usando Heltec WiFi LoRa 32 V3 para transmitir temperatura utilizando DHT22 hasta 1.4 km
- ¿13 millas 20 km sin WiFi? ¡Cómo LoRa envió voltaje a través de distancias locas! (Heltec WiFi LoRa 32 V3)
- Enciende un dispositivo a 13 millas (21 km) de distancia - ¡El proyecto off-grid definitivo de LoRa con WiFi LoRa 32!
- Sistema de Alerta de Puerta Remota desde 13 millas 21 km de distancia con LoRa - ¡Fuera de la Red! (Heltec WiFi LoRa 32 V3)
- Proyecto de relé remoto DIY: módulo Heltec LoRa 32 de 13 millas sin Wi-Fi/sin SIM
- How to Use the Heltec LoRa CubeCell Development Board HTCC-AB01
/*
File: Heltec_ESP32_LoRa_V3_Sevo_TX_AiRotaryEncoder.ino
written on 24 Jun, 2025 by Ahmad Shamshiri

 * =====================================================================
 * ARDUINO CODE DESCRIPTION: SECURE LoRa SERVO CONTROL SYSTEM (TX)
 * =====================================================================
 *
 * HARDWARE COMPONENTS:
 * -------------------
 *  - Main Controller: Heltec WiFi LoRa 32 V3
 *  - Enclosure: Meshnology N33 case with 3000mAh battery
 *  - Input: Rotary encoder with push-button
 *  - Feedback: Built-in OLED display
 *  - Output: Servo motor + LoRa wireless transmission
 *
 * SYSTEM FUNCTIONALITY:
 * -------------------
 * [1] ROTARY ENCODER CONTROL:
 *     - Clockwise/Counter-clockwise rotation adjusts target angle (0°-180°)
 *     - Real-time angle display on OLED screen
 *     - Push-button returns servo to Home position (default: 90°)
 *
 * [2] SECURE WIRELESS TRANSMISSION:
 *     - All angle values encrypted before LoRa transmission
 *     - Home position command transmitted as special secure packet
 *     - Uses 433MHz LoRa band for reliable communication
 *
 * [3] POWER MANAGEMENT:
 *     - Optimized for battery operation (3000mAh)
 *     - Low-power modes between transmissions
 *
 * FOR COMPLETE SETUP INSTRUCTIONS:
 * Please watch the tutorial video at: https://youtu.be/EPynuJ7sasY
 * =====================================================================

Watch full video explaination:  https://youtu.be/EPynuJ7sasY
Resources page: https://robojax.com/T635


 * DISCLAIMER:
 * This code is provided "AS IS" without warranty of any kind. The author
 * shall not be held liable for any damages arising from the use of this code.
 *
 * LICENSE:
 * This work is licensed under the GNU General Public License v3.0
 * Permissions beyond the scope of this license may be available at Robojax.com
 *
 * SHARING TERMS:
 * You are free to share, copy and modify this code for non-commercial purposes
 * PROVIDED you:
 * 1. Keep this entire comment block intact with the original code
 * 2. Include the original Robojax.com link
 * 3. Keep the YouTube tutorial link (if applicable)
 * 4. Clearly indicate any modifications made
 *
 * Original tutorial at: https://robojax.com/T635
 * YouTube Video: https://youtu.be/EPynuJ7sasY
 *
 * ********************************************************************
 */

#include <Wire.h>
#include "HT_SSD1306Wire.h"
#include "WiFi.h"
static SSD1306Wire  display(0x3c, 500000, SDA_OLED, SCL_OLED, GEOMETRY_128_64, RST_OLED); // addr , freq , i2c group , resolution , rst


const int TX_POWER = 2;//dBm from 2 to 20. when powered via battery 2 to 14dBm is the best option
const int MAX_ANGLE = 180;//the most common is 180, but you can set it as needed

String labelAngle = "Angle";
const int homePosition = 90; //initial position


//endcoder
const int SW_PIN = 4;//define a pin for rotary encode switch
const int PIN_A  = 6;
const int PIN_B  = 5;//
const int ANGLE_STEP  = 6;//
const bool debug= false;//to print debug data in serial moinitor set it to true, else false

int servoAngel = homePosition;
int oldAngleValue = servoAngel;
#include "mbedtls/aes.h"//for securing data
#include <cstring>  // For memset, memcpy
mbedtls_aes_context aes;
const char *userKey = "hyhT676#h~_1a"; //Security key.


#include "LoRaWan_APP.h"
#include "AiEsp32RotaryEncoder.h"
#include "Arduino.h"
#define ROTARY_ENCODER_VCC_PIN -1

//instead of changing here, rather change numbers above
AiEsp32RotaryEncoder rotaryEncoder = AiEsp32RotaryEncoder(
            PIN_A,
            PIN_B,
            SW_PIN,
            ROTARY_ENCODER_VCC_PIN,
            ANGLE_STEP);


#define RF_FREQUENCY                                915432000 // Hz

#define TX_OUTPUT_POWER                             TX_POWER        // dBm from 2 to 20. when powered via battery 2 to 14dBm

#define LORA_BANDWIDTH                              0         // [0: 125 kHz,
                                                              //  1: 250 kHz,
                                                              //  2: 500 kHz,
                                                              //  3: Reserved]
#define LORA_SPREADING_FACTOR                       7         // [SF7..SF12]
#define LORA_CODINGRATE                             1         // [1: 4/5,
                                                              //  2: 4/6,
                                                              //  3: 4/7,
                                                              //  4: 4/8]
#define LORA_PREAMBLE_LENGTH                        8         // Same for Tx and Rx
#define LORA_SYMBOL_TIMEOUT                         0         // Symbols
#define LORA_FIX_LENGTH_PAYLOAD_ON                  false
#define LORA_IQ_INVERSION_ON                        false


#define RX_TIMEOUT_VALUE                            1000
#define BUFFER_SIZE                                 64 // Define the payload size here

char txpacket[BUFFER_SIZE];
char rxpacket[BUFFER_SIZE];

double txNumber;

bool lora_idle=true;

static RadioEvents_t RadioEvents;
unsigned long lastTxTime = 0;
void OnTxDone( void );
void OnTxTimeout( void );
void decryptAES(uint8_t *data, const char *key);
void encryptAES(uint8_t *data, const char *key);
void processKey(const char *userKey, uint8_t *processedKey, size_t keySize);
void VextON(void);

void rotary_loop();//prototyp function: rotary encoder
void IRAM_ATTR readEncoderISR();//prototyp function: rotary encoder
void rotary_onButtonClick();//prototyp function: rotary encoder

void setup() {
  Serial.begin(115200);
  Serial.println();

  VextON();
  delay(100);

	//we must initialize rotary encoder
	rotaryEncoder.begin();
	rotaryEncoder.setup(readEncoderISR);
	bool circleValues = false;
	rotaryEncoder.setBoundaries(0, MAX_ANGLE, circleValues); //minValue, maxValue, circleValues true|false (when max go to min and vice versa)
	/*Rotary acceleration introduced 25.2.2021.
   * in case range to select is huge, for example - select a value between 0 and 1000 and we want 785
   * without accelerateion you need long time to get to that number
   * Using acceleration, faster you turn, faster will the value raise.
   * For fine tuning slow down.
   */
	//rotaryEncoder.disableAcceleration(); //acceleration is now enabled by default - disable if you dont need it
	rotaryEncoder.setAcceleration(20); //or set the value - larger number = more accelearation; 0 or 1 means disabled acceleration
  rotaryEncoder.reset(homePosition); //set home position

  // Initialising the UI will init the display too.
  display.init();
  display.setFont(ArialMT_Plain_10);
  //LoRa stuff
  Mcu.begin(HELTEC_BOARD,SLOW_CLK_TPYE);

    txNumber=0;

    RadioEvents.TxDone = OnTxDone;
    RadioEvents.TxTimeout = OnTxTimeout;

    Radio.Init( &RadioEvents );
    Radio.SetChannel( RF_FREQUENCY );
    Radio.SetTxConfig( MODEM_LORA, TX_OUTPUT_POWER, 0, LORA_BANDWIDTH,
                                   LORA_SPREADING_FACTOR, LORA_CODINGRATE,
                                   LORA_PREAMBLE_LENGTH, LORA_FIX_LENGTH_PAYLOAD_ON,
                                   true, 0, 0, LORA_IQ_INVERSION_ON, 3000 );

}


void displayAngle() {
    display.clear();  // Clear display before new content

    // Line 1: Text: Angle
    display.setTextAlignment(TEXT_ALIGN_LEFT);

    // Line 2: Temperature value in 24pt font
    display.setFont(ArialMT_Plain_24);

    // Format
    String angleString = String(servoAngel) + "°"; //

    display.setFont(ArialMT_Plain_16);
    display.drawString(0, 0, labelAngle);
    display.setFont(ArialMT_Plain_24);
    display.drawString(0, 15, angleString);

    display.display();  // Update OLED
}


void VextON(void)
{
  pinMode(Vext,OUTPUT);
  digitalWrite(Vext, LOW);
}

void VextOFF(void) //Vext default OFF
{
  pinMode(Vext,OUTPUT);
  digitalWrite(Vext, HIGH);
}

void sendData()
{

  String txData = String(servoAngel) ;

  uint8_t data[BUFFER_SIZE];
  memset(data, 0, sizeof(data));  // Zero-padding
  strncpy((char*)data, txData.c_str(), sizeof(data) - 1); // Copy string safely

  encryptAES(data, userKey);  // Encrypt before sending
  if(lora_idle == true)
    {
      //delay(1000);
      Radio.Send(data,  sizeof(data));
      if(debug){
      Serial.print("Sending: ");
      Serial.println((char *)data);
      }
      lora_idle = false;
      oldAngleValue =servoAngel;//keep record of angle change
    }
    Radio.IrqProcess( );
}


void loop() {
  rotary_loop();
  // clear the display
  display.clear();

  displayAngle(); //

  if(oldAngleValue != servoAngel)
  {
	  sendData();
  }
  //delay(100);

}


void OnTxDone( void )
{
        if(debug){
	        Serial.println("TX done......");
        }
	lora_idle = true;
}

void OnTxTimeout( void )
{
    Radio.Sleep( );
        if(debug){
	        Serial.println("TX Timeout......");
        }
    lora_idle = true;
}


/**
 * Converts a user-provided plaintext key into a fixed-length 16-byte (128-bit)
 * or 32-byte (256-bit) key.
 */
void processKey(const char *userKey, uint8_t *processedKey, size_t keySize) {
    memset(processedKey, 0, keySize); // Fill with zeros
    size_t len = strlen(userKey);
    if (len > keySize) len = keySize; // Truncate if too long
    memcpy(processedKey, userKey, len); // Copy valid key part
}

/**
 * Encrypts a 16-byte (one block) message using AES-128.
 */
void encryptAES(uint8_t *data, const char *key) {
    uint8_t processedKey[16]; // 128-bit key
    processKey(key, processedKey, 16);

    mbedtls_aes_init(&aes);
    mbedtls_aes_setkey_enc(&aes, processedKey, 128);
    mbedtls_aes_crypt_ecb(&aes, MBEDTLS_AES_ENCRYPT, data, data);
    mbedtls_aes_free(&aes);
}

/**
 * Decrypts a 16-byte (one block) message using AES-128.
 */
void decryptAES(uint8_t *data, const char *key) {
    uint8_t processedKey[16]; // 128-bit key
    processKey(key, processedKey, 16);

    mbedtls_aes_init(&aes);
    mbedtls_aes_setkey_dec(&aes, processedKey, 128);
    mbedtls_aes_crypt_ecb(&aes, MBEDTLS_AES_DECRYPT, data, data);
    mbedtls_aes_free(&aes);
}


void rotary_onButtonClick()
{
	static unsigned long lastTimePressed = 0;
	//ignore multiple press in that time milliseconds
	if (millis() - lastTimePressed < 500)
	{
		return;
	}
	lastTimePressed = millis();

	        if(debug){
	          Serial.print("button pressed ");
	          Serial.print(millis());
	          Serial.println(" milliseconds after restart");
          }
}

void rotary_loop()
{
	//dont print anything unless value changed
	if (rotaryEncoder.encoderChanged())
	{
		        if(debug){
	            Serial.print("Value: ");
		          Serial.println(rotaryEncoder.readEncoder());
            }
    servoAngel = rotaryEncoder.readEncoder();

	}
	if (rotaryEncoder.isEncoderButtonClicked())
	{
    rotaryEncoder.reset(homePosition);
    servoAngel = homePosition;
		rotary_onButtonClick();
	}
}

void IRAM_ATTR readEncoderISR()
{
	rotaryEncoder.readEncoder_ISR();
}
Common Course Links
Common Course Files
Recursos y referencias
-
ExternoEnlace del sitio web de Heltec WiFi Kit 32heltec.org
Archivos📁
No hay archivos disponibles.