Lesson 28/31: Car-6 SunFounder self Driving Arduino car using | Robojax
In this project, we will build a basic self-driving car using an Arduino, an ultrasonic sensor, and two infrared sensors. This is a fantastic introductory project for learning about autonomous navigation, sensor fusion, and decision-making logic. The car can move forward, backward, and make turns to avoid obstacles, effectively finding a clear path on its own. This project is based on the SunFounder 3-in-1 Arduino kit and is part of Robojax's Arduino course.
This project is not just about building a toy; it is a practical introduction to the core concepts behind autonomous robotics. The same logic and sensors are used in real-world applications like robotic vacuum cleaners, automated guided vehicles in warehouses, and even the navigation systems of more complex robots. By understanding how to combine distance sensing with simple navigation rules, you can create a variety of projects, such as:
- Building a small robot that can navigate a room and avoid furniture.
- Creating an automated vehicle that can follow a simple path or patrol an area.
- Learning how to implement basic obstacle-avoidance algorithms for larger robotics projects.
Hardware Components
This project uses the components from the SunFounder 3-in-1 kit. The essential parts are:
- Arduino Uno board
- SunFounder 2WD or 3-in-1 car chassis with motors
- Motor driver module (e.g., L298N or similar)
- HC-SR04 Ultrasonic distance sensor
- Two IR obstacle sensors
- Jumper wires and a power source for the motors
Wiring Guide
Wiring is the critical first step to bring your self-driving car to life. The connections are straightforward, but it is essential to double-check each one to avoid damaging your components. The logic behind the wiring is to connect the Arduino's control pins to the motor driver and sensors, allowing the Arduino to read data and send commands.
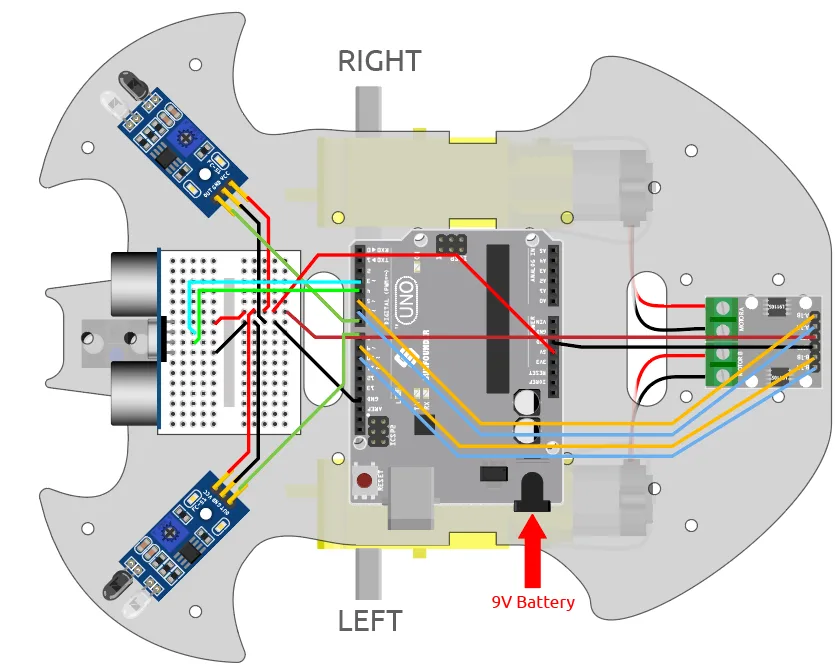
- Motor Driver Pins (A-1B, A-1A, B-1B, B-1A): These pins control the speed and direction of the two motors. They are connected to Arduino pins 5, 6, 9, and 10, which are PWM-capable, allowing for variable speed control.
- Ultrasonic Sensor (Trig and Echo): The Trig pin sends out an ultrasonic pulse, and the Echo pin receives the reflected signal. The Trig pin is connected to Arduino pin 3, and the Echo pin is connected to Arduino pin 4.
- IR Sensors (Left and Right): These sensors detect if an obstacle is directly in front of them. The left IR sensor is connected to Arduino pin 8, and the right IR sensor is connected to pin 7. They are used to check the space on the car's sides.
For a detailed visual guide, please refer to the wiring diagram below, which maps out each connection clearly.
Code Explanation
The code is written in the Arduino programming language (C++). The full program is available for download from the resource page linked in the video description. Let's break down the key, user-configurable parts of this sketch.
Pin Definitions
At the top of the code, you define the pins that connect the Arduino to the various components. You can change these if you are using different pins on your board.
const int A_1B = 5;
const int A_1A = 6;
const int B_1B = 9;
const int B_1A = 10;

const int echoPin = 4;
const int trigPin = 3;

const int rightIR = 7;
const int leftIR = 8;
The A_1B, A_1A, B_1B, and B_1A pins control the H-bridge motor driver. By setting these pins HIGH or LOW in different combinations, you can control the direction of each motor. The echoPin and trigPin are for the ultrasonic sensor, and rightIR and leftIR are for the infrared sensors.
Behavior Variables and Logic
The core logic of the self-driving behavior is in the loop() function. The car makes decisions based on the readings from the IR sensors and the ultrasonic sensor. The code defines specific distances that trigger different actions. For example, the distance variable is measured in centimeters. The logic is as follows:
- If the distance is greater than 50 cm: The path ahead is clear, so the car moves forward at a speed of 200.
- If the distance is between 2 cm and 10 cm: The car is too close to an obstacle. It reverses for one second, then turns back-left for half a second to find a new path.
- If the distance is between 10 cm and 50 cm: The car is in a "caution zone." It moves forward, but at a slower speed of 150.
These threshold values (50 cm, 10 cm, and 2 cm) and the speeds (200 and 150) are the primary variables you can adjust to change your car's behavior. For instance, you might increase the "safe" distance to 60 cm if your car is moving fast.
Custom Functions
The code includes several custom functions to control the car's movements. These are used throughout the main loop to make the code cleaner and easier to understand.
moveForward(int speed): This function sets the motor pins to drive the car forward. Thespeedparameter (0-255) controls how fast the motors turn.moveBackward(int speed): Similar tomoveForward, but it reverses the motor direction to move the car backward.backLeft(int speed)andbackRight(int speed): These functions turn the car by running one motor in reverse while the other is stopped. This is a pivot turn that helps the car change direction effectively.stopMove(): This function stops all motors by setting all control pins to LOW.readSensorData(): This function sends a pulse from the ultrasonic sensor and measures the time it takes for the echo to return. It then calculates the distance in centimeters and returns the value.
Live Project Demonstration
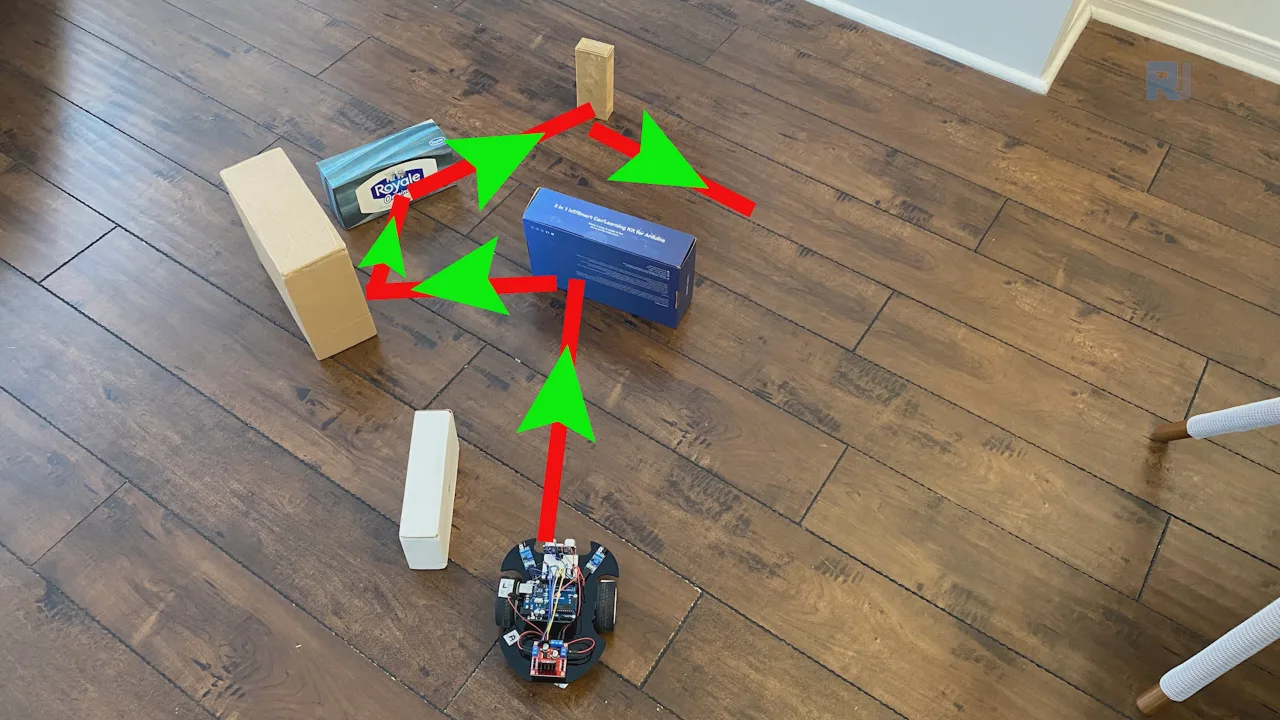
(in video at 07:09) In the demonstration, the car is placed in an environment with various obstacles like boxes and walls. The logic of the car is visible as it navigates. When the ultrasonic sensor detects a wall or obstacle more than 50 cm away, it confidently drives forward. As it gets closer, the IR sensors on the sides check for open space.
If an obstacle is detected on the left, the car performs a back-right turn to avoid it and vice-versa. When the car finds itself in a tight spot, such as under a table (in video at 07:49), it uses its reverse and turn functions to extricate itself and find a clear path. The car continuously reads its environment and makes decisions, demonstrating a reactive control system that doesn't rely on a pre-planned path.
Video Chapters
- [00:00] Introduction to the Self-Driving Car Project
- [00:28] About the SunFounder 3-in-1 Kit
- [01:32] Opening the Code and Overview
- [02:02] Explanation of Code Structure and New Functions
- [03:11] Setting up Pins in the Setup Function
- [03:28] The Main Decision-Making Logic in the Loop
- [05:41] Live Demonstration: The Car in Action
- [07:09] Demonstration with Obstacles and Wall Following
- [09:58] Conclusion and Final Thoughts
Images
This code has not been parsed yet. Please return to the admin panel to parse it.Common Course Links
Common Course Files
Things you might need
-
AmazonSunFounder Arduino Learning kit on AliExpresss.click.aliexpress.com
-
Amazon
-
Amazon
-
Amazon
-
Amazon
Resources & references
-
DocumentationDocumentation for SunFounder 3 in 1 IoT/Smart Car/Learning Kit¶docs.sunfounder.com
-
ExternalPurchase SunFounder's 3-in-1 Smart car learning kitsunfounder.com
Files📁
Arduino Libraries (zip)
-
SunFounder's 3-in-1 Smart Car learning kit source code
3in1-kit-main-v2.zip12.80 MB