Lesson 18/31: Using Servo Motor with Arduino SunFounder's Arduino Kit
Servo motors are the workhorses of countless robotics and remote-control projects, providing precise angular control for everything from steering mechanisms to robotic arms. This guide, based on Lesson 18 of the SunFounder Arduino Kit course, will walk you through the fundamentals of using a servo motor with an Arduino. You'll learn how to connect the hardware and control the motor's position using two different methods: a simple sweeping motion and a knob-controlled position. The knowledge you gain here is highly practical and can be applied to a wide range of projects, including:
- Building a robotic arm that can grip and move objects with precision.
- Creating a remote-controlled car or boat with a servo for steering.
- Developing a solar tracker that follows the sun to maximize energy collection.
- Constructing a pan-and-tilt camera mount for surveillance or photography.
- Automating a model airplane's control surfaces, like the rudder or ailerons.

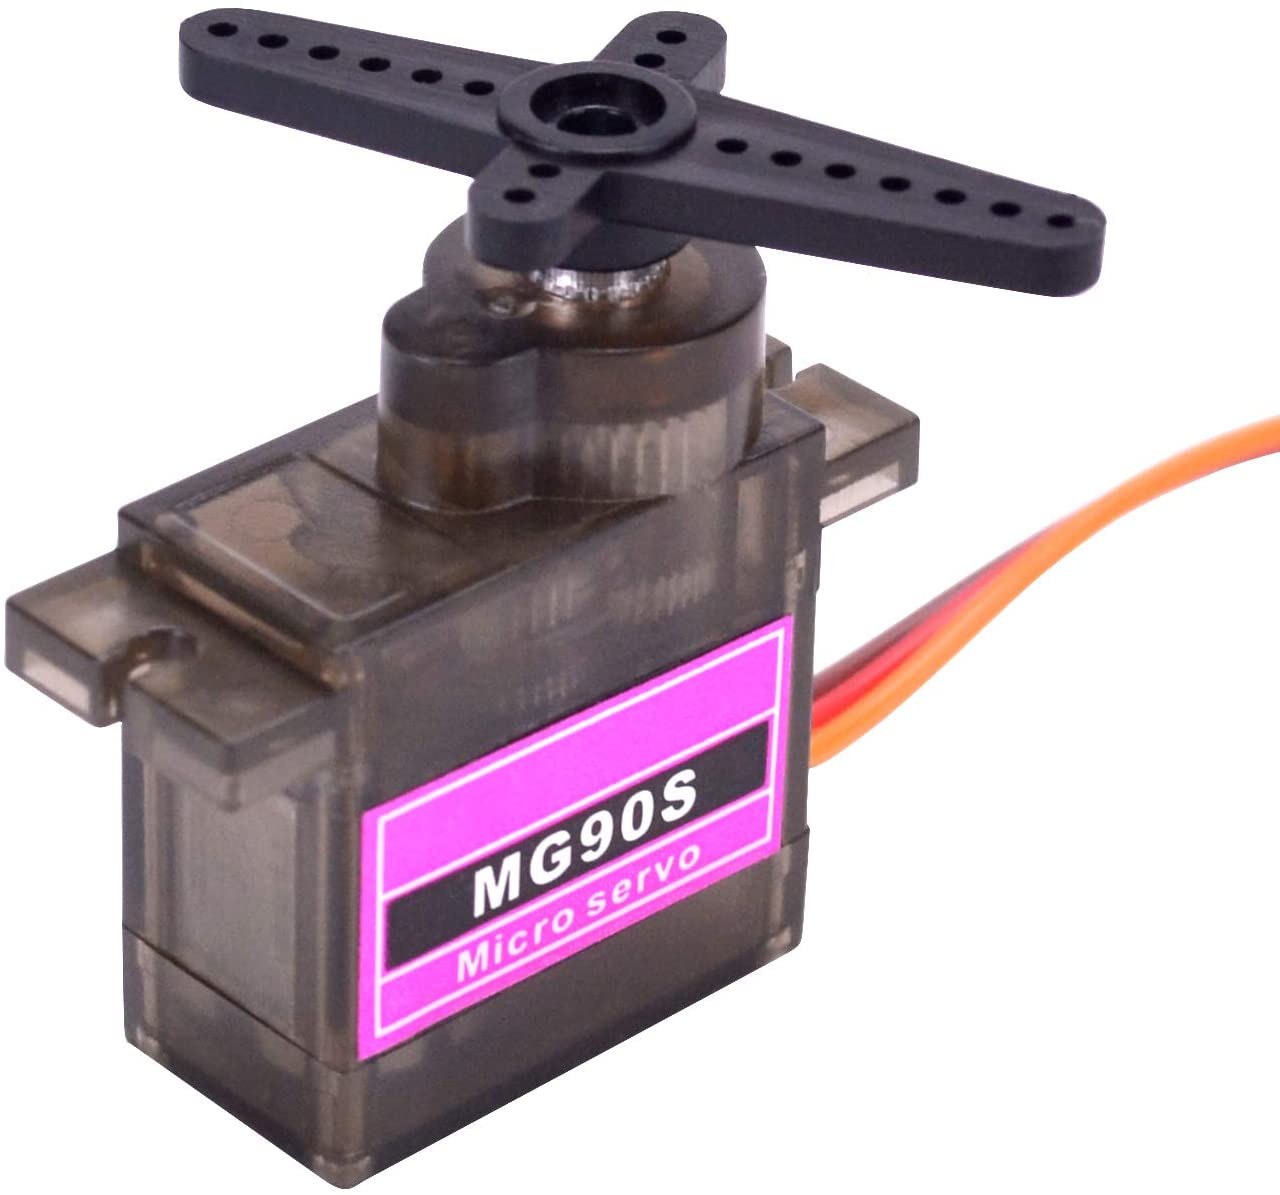
Hardware Overview
Before diving into the code, it's essential to understand the servo motor itself. As demonstrated in the video, a servo motor does not spin continuously like a standard DC motor. Instead, it rotates to a specific angular position, typically between 0 and 180 degrees. This makes it ideal for applications requiring precise movement. The video highlights several examples, from steering an RC car to controlling the complex joints of a robotic arm (in video at 00:06).
Servos come in various sizes, with the physical size and torque rating determining their price and application. A small micro servo is perfect for lightweight models, while a larger, more powerful servo is needed for heavier tasks like steering a "very powerful or thick car" (in video at 01:59).
Most hobby servos have three wires housed in a standard connector. The video explains a clever design choice: the middle wire is always the power wire (VCC), typically 5V. This is a safety feature that protects the device from incorrect polarity if the connector is plugged in backward (in video at 03:27). The other two wires are for ground (GND) and the control signal.
Wiring Guide
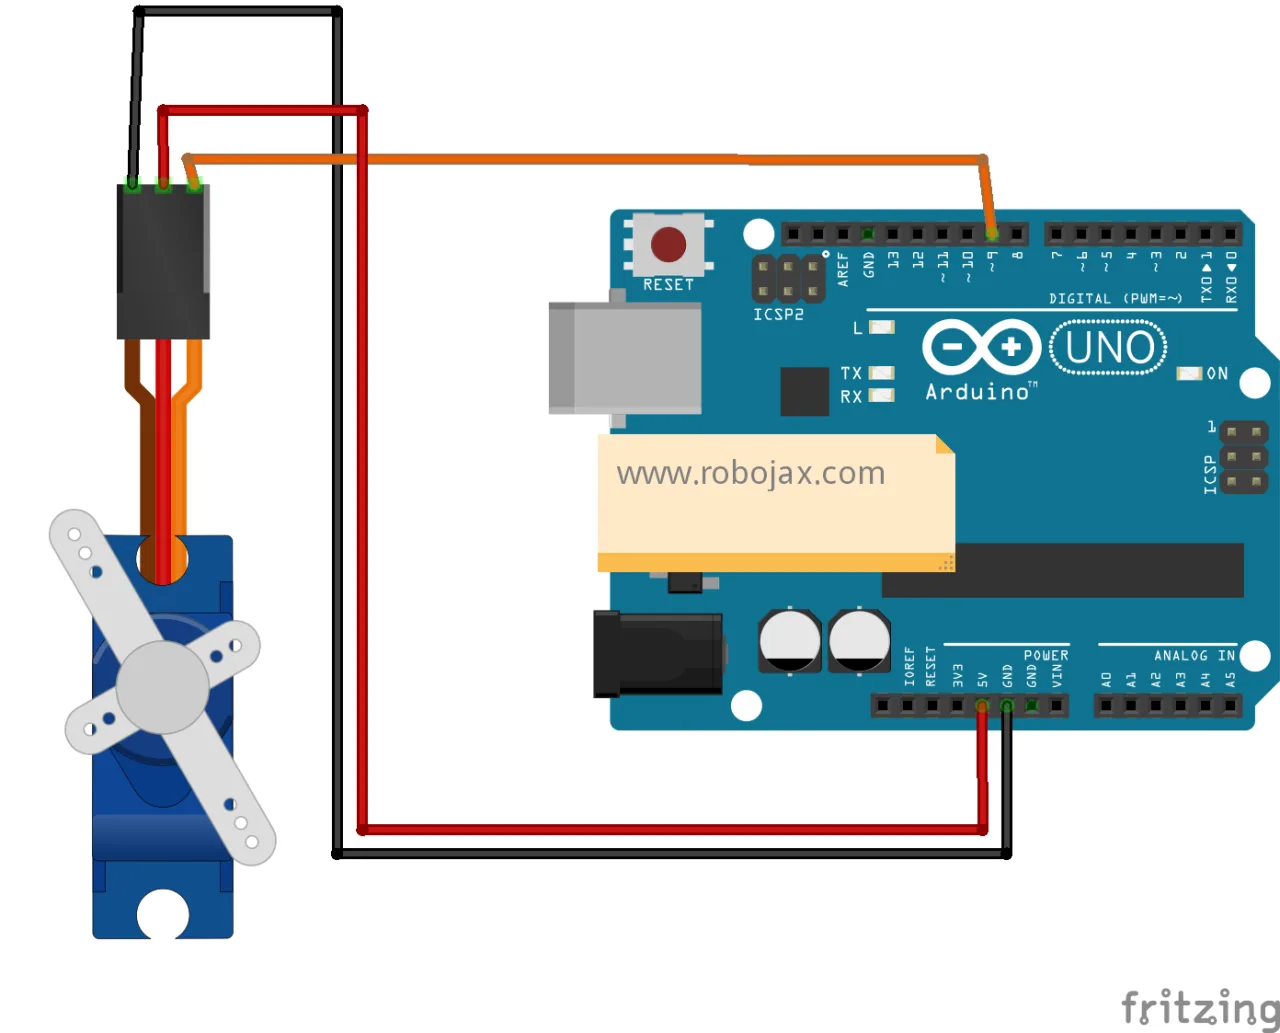
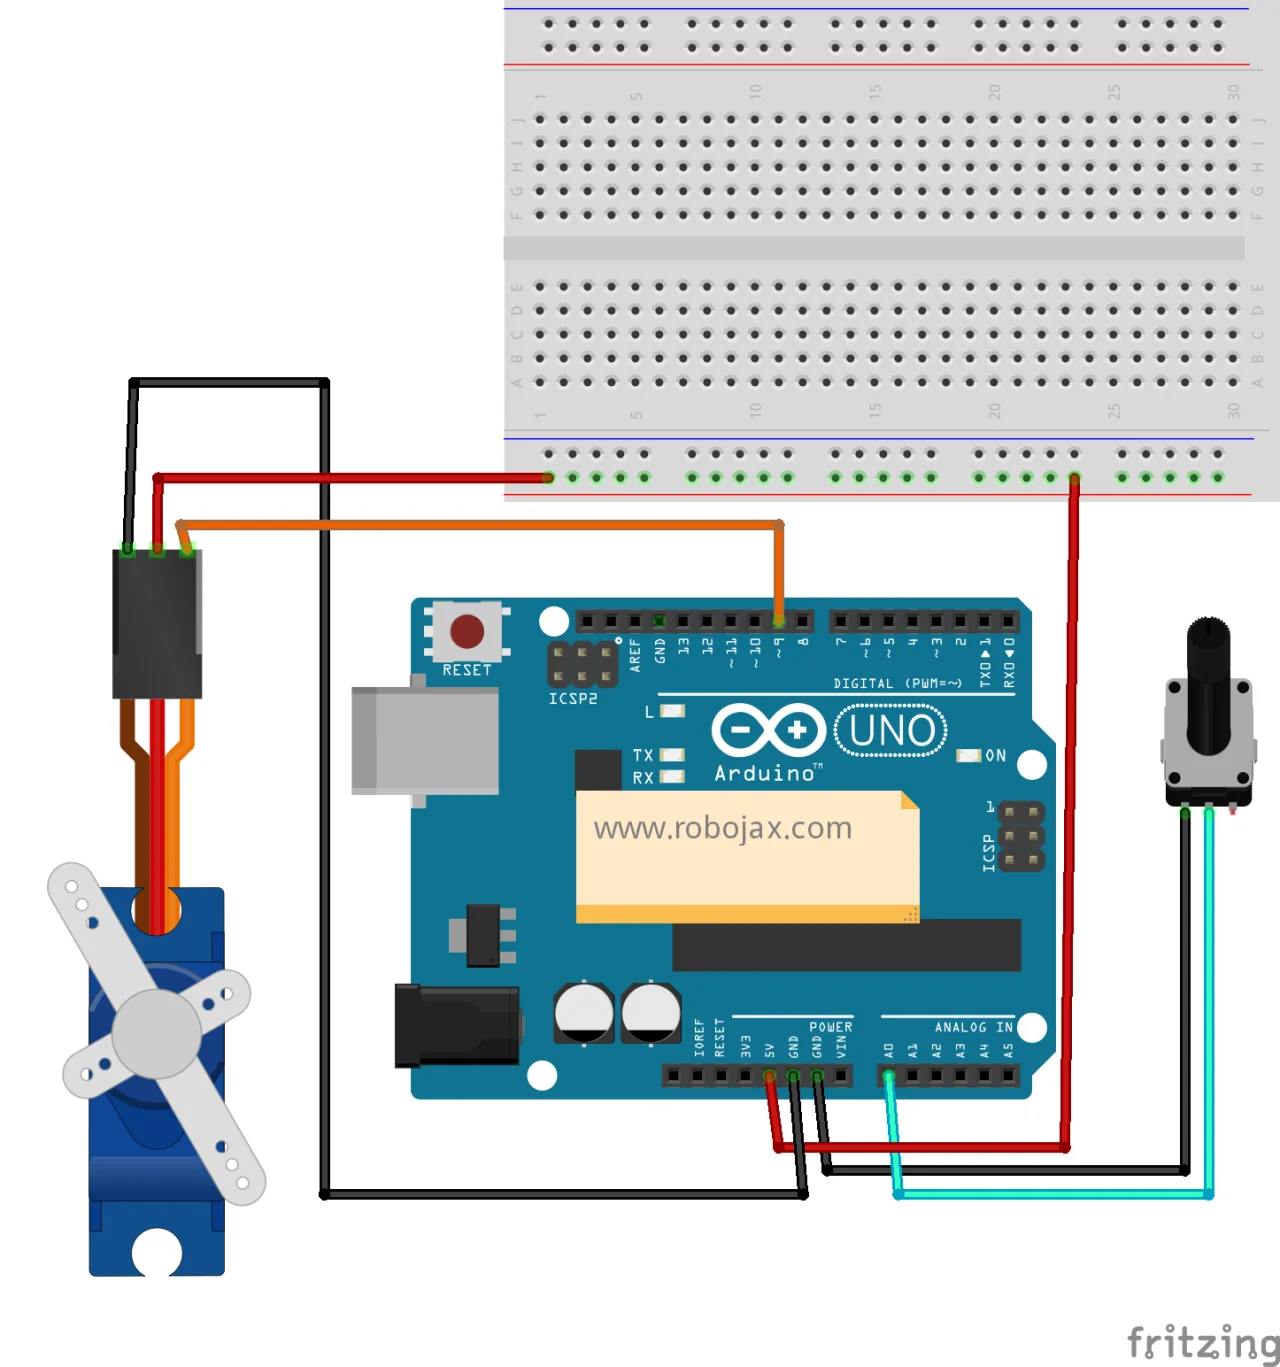
Wiring the servo to your Arduino is straightforward. The video provides a clear demonstration of the connections (in video at 04:48). The three pins on the servo connector are connected to the Arduino as follows:
- Signal Wire (often orange or yellow): Connect this to a digital PWM pin on the Arduino. The example uses pin 9.
- Power Wire (often red): Connect this to the 5V pin on the Arduino.
- Ground Wire (often brown or black): Connect this to one of the GND pins on the Arduino.
In the video, the presenter uses male-to-male DuPont jumper wires to connect the female connector on the servo to the Arduino's pin headers (in video at 05:23).
Program 1: Controlling Servo Motor (Sweep)
This first program is the classic "sweep" example. It's designed to demonstrate the full range of motion of the servo by moving it back and forth between 0 and 180 degrees. This is a great way to verify your wiring is correct and to see your servo in action. The video demonstrates uploading this code and watching the servo sweep back and forth (in video at 09:21).
To control the servo, the code first includes the built-in Servo.h library, which simplifies the process of generating the necessary control signals. You then create a servo object and give it a name, like myservo. In the setup() function, you attach this object to a specific pin using myservo.attach(9), telling the Arduino that the servo's signal wire is connected to pin 9.
The magic happens in the loop() function, which uses two for loops to move the servo. The first loop increments a position variable pos from 0 to 180, moving the servo one degree at a time. The second loop does the opposite, decrementing pos from 180 back to 0. The crucial part is the delay(15) at the end of each loop iteration. This pause gives the servo enough time to physically move to the new position before the next command is sent. Without this delay, the servo would not be able to keep up and would stall or jitter (in video at 12:31).
This example is perfect for learning, but in a real application, you will likely want to set the servo to a specific angle. As shown in the video, you can modify the code by replacing the for loops with a single command like myservo.write(90) to move the servo to 90 degrees and hold it there (in video at 10:09).
Program 2: Controlling Servo Motor (Knob)
This second program takes servo control a step further by introducing a potentiometer (a knob) to provide real-time, manual control over the servo's position. This is a fantastic way to understand how analog input can be translated into precise physical movement.
This program builds on the previous one by adding a potentiometer. A potentiometer is a variable resistor that acts as an analog voltage divider. When you turn the knob, it changes the voltage at its output pin. The Arduino reads this voltage using an analog-to-digital converter (ADC) on one of its analog pins, converting it to a value between 0 and 1023.
The key to this program is the map() function. This function scales a number from one range to another. In this case, it's used to translate the potentiometer's raw value (0 to 1023) to a value suitable for the servo (0 to 180 degrees). The code reads the potentiometer's value with analogRead(potpin), scales it using map(val, 0, 1023, 0, 180), and then sends that scaled value to the servo with myservo.write(val). This creates a direct link where turning the knob to its midpoint will position the servo at 90 degrees, and so on.
This method of control is highly intuitive and is the foundation for many human-machine interfaces, from simple remote controls to complex robotic controllers.
Live Project Demonstration
The video provides a live demonstration of both programs in action. For the sweep program, you can see the servo arm moving smoothly from 0 to 180 degrees and back again. The presenter also shows how adjusting the step size in the for loop (e.g., from 1 degree to 20 degrees) and the delay time changes the servo's behavior, making the motion faster but less smooth (in video at 11:19).
For the knob program, the demonstration shows how turning the potentiometer directly controls the servo's position in real-time. This visual feedback is excellent for understanding the relationship between the analog input and the physical output.
Chapters
- [00:00] Introduction to Servo Motors
- [01:07] Applications of Servo Motors
- [02:57] Anatomy of a Servo Motor
- [04:48] Wiring the Servo to Arduino
- [06:06] Exploring the Sweep Example Code
- [09:21] Demonstrating the Sweep Program
- [10:04] Setting a Custom Servo Angle
- [11:19] Modifying Sweep Speed and Step Size
- [13:15] Example of Another Servo Motor
Images
/*
Lesson 18/31: Controlling servo motor (sweep)
Get this code and watch video Download and resource page https://robojax.com/RJT601
YouTube video https://www.youtube.com/watch?v=KAt1WUWpHLQ


 * This code is "AS IS" without warranty or liability. Free to be used as long as you keep this note intact.*
 * This code has been download from Robojax.com
    This program is free software: you can redistribute it and/or modify
    it under the terms of the GNU General Public License as published by
    the Free Software Foundation, either version 3 of the License, or
    (at your option) any later version.

    This program is distributed in the hope that it will be useful,
    but WITHOUT ANY WARRANTY; without even the implied warranty of
    MERCHANTABILITY or FITNESS FOR A PARTICULAR PURPOSE.  See the
    GNU General Public License for more details.

    You should have received a copy of the GNU General Public License
    along with this program.  If not, see <https://www.gnu.org/licenses/>.
 */

#include <Servo.h>

Servo myservo;  // create Servo object to control a servo
// twelve Servo objects can be created on most boards

int pos = 0;    // variable to store the servo position

void setup() {
  myservo.attach(9);  // attaches the servo on pin 9 to the Servo object
}

void loop() {
  for (pos = 0; pos <= 180; pos += 1) { // goes from 0 degrees to 180 degrees
    // in steps of 1 degree
    myservo.write(pos);              // tell servo to go to position in variable 'pos'
    delay(15);                       // waits 15 ms for the servo to reach the position
  }
  for (pos = 180; pos >= 0; pos -= 1) { // goes from 180 degrees to 0 degrees
    myservo.write(pos);              // tell servo to go to position in variable 'pos'
    delay(15);                       // waits 15 ms for the servo to reach the position
  }
}
/*
Lesson 18/31: Controlling servo motor (knob)
Get this code and watch video Download and resource page https://robojax.com/RJT601
YouTube video https://www.youtube.com/watch?v=KAt1WUWpHLQ


 * This code is "AS IS" without warranty or liability. Free to be used as long as you keep this note intact.*
 * This code has been download from Robojax.com
    This program is free software: you can redistribute it and/or modify
    it under the terms of the GNU General Public License as published by
    the Free Software Foundation, either version 3 of the License, or
    (at your option) any later version.

    This program is distributed in the hope that it will be useful,
    but WITHOUT ANY WARRANTY; without even the implied warranty of
    MERCHANTABILITY or FITNESS FOR A PARTICULAR PURPOSE.  See the
    GNU General Public License for more details.

    You should have received a copy of the GNU General Public License
    along with this program.  If not, see <https://www.gnu.org/licenses/>.
 */
#include <Servo.h>

Servo myservo;  // create servo object to control a servo

int potpin = 0;  // analog pin used to connect the potentiometer
int val;    // variable to read the value from the analog pin

void setup() {
  myservo.attach(9);  // attaches the servo on pin 9 to the servo object
}

void loop() {
  val = analogRead(potpin);            // reads the value of the potentiometer (value between 0 and 1023)
  val = map(val, 0, 1023, 0, 180);     // scale it to use it with the servo (value between 0 and 180)
  myservo.write(val);                  // sets the servo position according to the scaled value
  delay(15);                           // waits for the servo to get there
}
Common Course Links
Common Course Files
Things you might need
-
AmazonSunFounder Arduino Learning Kit on AliExpresss.click.aliexpress.com
-
Amazon
-
Amazon
-
Amazon
-
Amazon
Resources & references
-
DocumentationDocumentation for SunFounder 3 in 1 IoT/Smart Car/Learning Kitdocs.sunfounder.com
-
ExternalPurchase SunFounder's 3-in-1 Smart car learning kitsunfounder.com
Files📁
Arduino Libraries (zip)
-
SunFounder's 3-in-1 Smart Car learning kit source code
3in1-kit-main-v2.zip12.80 MB