搜索代码

课程 35-2:使用 HTU21D 温度传感器 - 自定义代码

课程 35-2:使用 HTU21D 温度传感器 - 自定义代码

在本教程中,我们将探讨如何使用HTU21D温度传感器与Arduino一起测量温度和湿度。HTU21D是一款可靠的低功耗传感器,通过I2C通信,便于集成到您的项目中。在本课程结束时,您将拥有一段可以读取摄氏度、华氏度和开尔文温度以及相对湿度的工作代码。

HTU21D module

在我们深入了解布线和代码之前,了解涉及的组件至关重要。HTU21D 传感器需要最少的连接:电源、接地和两根用于数据传输的 I2C 线。这种简单性使其成为各种应用的绝佳选择,从气象站到智能家居设备。有关视觉指南,请参考时间戳 03:45 的视频。

硬件解析

本项目的主要组件是HTU21D传感器,它测量温度和湿度。该传感器可以在1.5V至3.6V的电压下运行,使其适用于不同的应用。它提供高分辨率的读数,温度测量范围为-40°C至+125°C,湿度读数的分辨率为0.04%。

此外,该传感器使用I2C通信,这需要两个引脚:SDA(数据线)和SCL(时钟线)。这使得与Arduino和其他微控制器的集成变得简单,无需复杂的布线。Adafruit库简化了与传感器的交互,轻松处理数据获取和通信协议。

数据表详情

制造商TE Connectivity
零件编号HTU21D-F
逻辑/IO电压1.5 - 3.6 伏
供电电压3.3 V
当前消耗(待机)0.02 微安 (典型值)
当前消耗(有功)450 µA (典型值)
温度范围-40 到 +125 °C
湿度范围0 到 100 %RH
解决方案0.04 %RH;0.01 °C
包裹6针DFN

  • 确保正确供电以避免传感器损坏。
  • 如果未集成,请在SDA和SCL线路上使用上拉电阻。
  • 保持传感器连接短,以最小化噪音。
  • 在操作过程中监测电压以保持稳定。
  • 考虑在电源引脚附近使用一个电容器进行解耦。
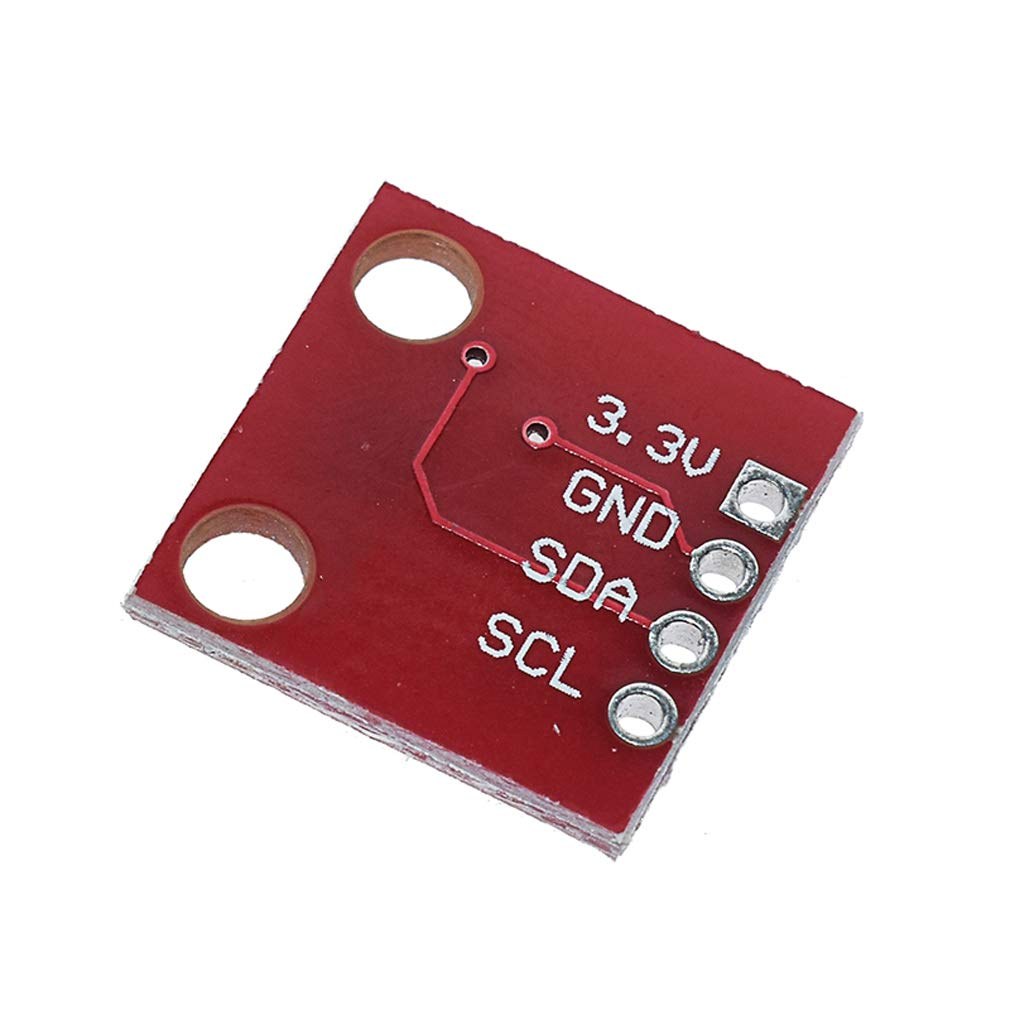
接线说明

Arduino wiring for HTU21DF light intesity sensor

要连接HTU21D温度传感器,首先连接电源和地线。将传感器的左侧引脚连接到3.3V电源,确保其能够承受所需的电压。第二个引脚,通常标记为红色,应连接到地线。

接下来,将传感器的SDA引脚连接到引脚A4在Arduino上,该引脚作为I2C通信的数据线。然后,将SCL引脚连接到引脚A5作为时钟线。确保这些连接牢固,因为松动的线路可能导致间歇性读数或无法与传感器通信。

代码示例与演练

在代码中,我们首先包含必要的库并初始化传感器。Adafruit_HTU21DF htu = Adafruit_HTU21DF();创建传感器类的实例。在setup()我们开始串行通信并检查传感器是否正确连接。

void setup() {
  Serial.begin(9600);
  if (!htu.begin()) {
    Serial.println("Couldn't find sensor!");
    while (1);
  }
}

该代码片段检查传感器是否正常工作。如果没有,它将打印错误信息并停止程序。loop()在该功能中,我们持续读取温度和湿度值。

void loop() {
    Serial.print(getHTU('C'));
    Serial.print("C");
    Serial.print(getHTU('H'));
    Serial.println("%");
    delay(1000);
}

这里,函数getHTU()使用不同的参数调用以获取摄氏温度和湿度。延迟确保每秒进行一次读数,使串行监视器上的输出平滑。完整代码可在文章下方查阅。

演示 / 预期内容

一旦所有连接正确并且代码已上传,您应该在串行监视器中看到温度和湿度读数。温度将以摄氏度显示,后面跟随相应的湿度百分比。如果您对传感器施加热量,您应该会看到温度相应上升(在视频中的 10:15)。

注意传感器的限制;如果温度超过125°C,它可能会返回不正确的读数或显示为零。确保连接牢固,并确保传感器正确供电,以避免在操作过程中出现任何问题。

视频时间戳

  • 00:00介绍
  • 03:45接线传感器
  • 05:30代码漫游
  • 10:15示范
  • 12:00结论

图像

Arduino wiring for HTU21DF light intesity sensor
HTU21D module
HTU21D module
HTU21D module-back
HTU21D module-back
513-Lesson 35: Using HTU21D Temperature Sensor (F, C, K, RH)
语言: C++
/*
 * Robojax Arduino Step-by-Step Course
 * Part 4: Temperature Sensors
 * Lesson 35: HTU21D Temperature Sensor Custom code
 
 * Written/Updated by Ahmad Shamshiri on July 13, 2019
 * in Ajax, Ontario, Canada

 
  Please watch video instructions here https://youtu.be/LyA0yAKlf9E
 This code is available at http://robojax.com/course1/?vid=lecture35
 
with over 100 lectures free on YouTube. Watch it here http://robojax.com/L/?id=338
Get the code for the course: http://robojax.com/L/?id=339  
If you found this tutorial helpful, please support me so I can continue creating.
Make a donation using PayPal http://robojax.com/L/?id=64

 * Code is available at http://robojax.com/learn/arduino

 * This code is "AS IS" without warranty or liability. Free to be used as long as you keep this note intact.
 * This code has been downloaded from Robojax.com
    This program is free software: you can redistribute it and/or modify
    it under the terms of the GNU General Public License as published by
    the Free Software Foundation, either version 3 of the License, or
    (at your option) any later version.

    This program is distributed in the hope that it will be useful,
    but WITHOUT ANY WARRANTY; without even the implied warranty of
    MERCHANTABILITY or FITNESS FOR A PARTICULAR PURPOSE.  See the
    GNU General Public License for more details.

    You should have received a copy of the GNU General Public License
    along with this program.  If not, see <https://www.gnu.org/licenses/>. 
    
	
 */ 
 /*

 
**************************************************
*
  This is an example for the HTU21D-F Humidity & Temperature Sensor

  Designed specifically to work with the HTU21D-F sensor from Adafruit
  ----> https://www.adafruit.com/products/1899

  These displays use I2C to communicate; 2 pins are required to
  interface
 ***************************************************
*/

#include <Wire.h>
#include "Adafruit_HTU21DF.h"

// Connect Vin to 3-5VDC
// Connect GND to ground
// Connect SCL to I2C clock pin (A5 on UNO)
// Connect SDA to I2C data pin (A4 on UNO)

Adafruit_HTU21DF htu = Adafruit_HTU21DF();

void setup() {
//Get the code for the course: http://robojax.com/L/?id=339  	
  Serial.begin(9600);
  Serial.println("Robojax.com");
  Serial.println("HTU21D-F test");

  if (!htu.begin()) {
    Serial.println("Couldn't find sensor!");
    while (1);
  }
}

void loop() {
//Get the code for the course: http://robojax.com/L/?id=339  
    Serial.print(getHTU('C'));
    printDegree();
    Serial.println("C");
    
    Serial.print(getHTU('F'));
    printDegree();
    Serial.println("F");

    Serial.print(getHTU('K'));
    Serial.println("K");    
    Serial.println(" ");  

    Serial.print("Humidity:");
    Serial.print(getHTU('H'));
    Serial.println("%");

    if(getHTU('C') <81)
    {
      //digitalWrite(5, LOW);
          
    }
    delay(1000);
}


/*
 * @brief returns temperature or relative humidity
 * @param "type" is character
 *     C = Celsius
 *     K = Kelvin
 *     F = Fahrenheit
 *     H = Humidity
 * @return returns one of the values above
 * Usage: to get Fahrenheit type: getHTU('F')
 * to print it on serial monitor Serial.println(getHTU('F'));
 * Written by Ahmad Shamshiri on July 13, 2019
 * in Ajax, Ontario, Canada
 * www.Robojax.com 
 */
float getHTU(char type)
{
	//Get the code for the course: http://robojax.com/L/?id=339  
  float value;
    float temp = htu.readTemperature();
    float rel_hum = htu.readHumidity();
   if(type =='F')
   {
    value = temp *9/5 + 32;//convert to Fahrenheit 
   }else if(type =='K')
   {
    value = temp + 273.15;//convert to Kelvin
   }else if(type =='H')
   {
    value = rel_hum;//return relative humidity
   }else{
    value = temp;// return Celsius
   }
   return value;
}//


/*
 * @brief prints degree symbol on serial monitor
 * @param none
 * @return returns nothing
 * Written by Ahmad Shamshiri on July 13, 2019
 * for Robojax Tutorial Robojax.com
 */
 void printDegree()
{
    Serial.print("\xC2"); 
    Serial.print("\xB0");  
}

|||您可能需要的东西

文件📁

数据手册 (pdf)