呢個教學係以下嘅一部分: 数字式相对湿度和温度传感器 HTU21D
本文下方提供了与数字式相对湿度和温度传感器 HTU21D 相关的视频链接。
第35-1课:使用HTU21D温度传感器
喺呢個教學入面,我哋會探討點樣用Arduino嚟用HTU21D溫度同濕度感測器。HTU21D係一個細細粒嘅感測器,透過I2C通訊,好容易同微控制器連接。上完呢一課,你就會識得讀取溫度同濕度數值,並且透過Arduino序列埠監控器顯示出嚟。

為咗呢個項目,我哋會用專為HTU21D感測器設計嘅Adafruit函式庫。呢個函式庫簡化咗讀取感測器數據嘅過程,等我哋可以專注喺將感測器整合入我哋嘅項目度。你會見到感測器嘅溫度讀數以攝氏、華氏同開爾文顯示,仲有相對濕度百分比(喺影片03:15位置)。
硬件解說
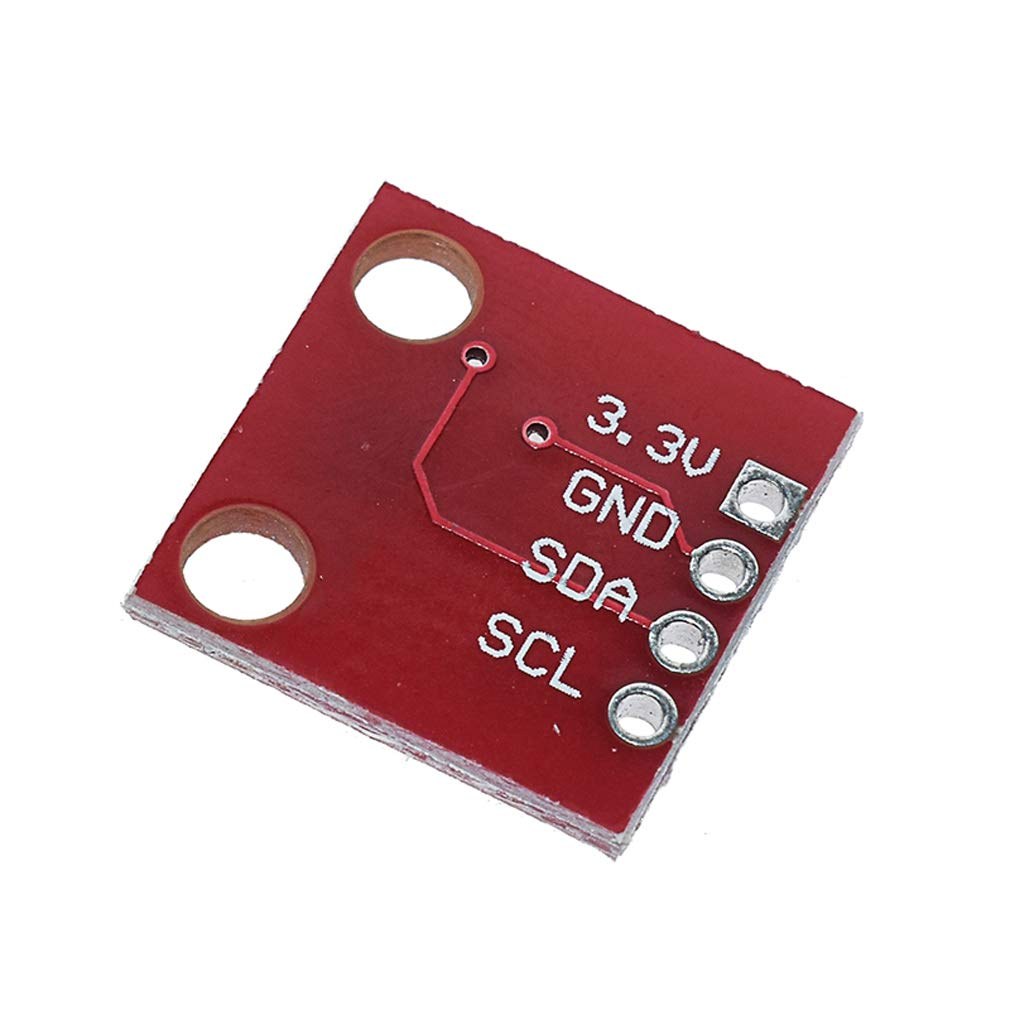
呢個項目嘅主要元件係HTU21D溫度同濕度感測器。呢個感測器嘅供電電壓係1.5至3.6伏特,耗電量好低,好適合用喺電池供電嘅裝置。佢用I2C協議同Arduino通訊,只需要兩條數據線:SDA用嚟傳數據,SCL用嚟傳時鐘訊號。
為咗供電畀感測器,我哋會將佢連接到3.3V或者5V電源,視乎你用緊嘅模組。Adafruit版本包含咗一個電壓穩壓器,令佢可以喺兩個電壓水平下順暢運作。呢種靈活性令佢成為各種應用嘅好選擇。
數據手冊細節
| 製造商 | TE Connectivity |
|---|---|
| 零件編號 | HTU21D-F |
| 邏輯/IO電壓 | 1.5 - 3.6 V |
| 供電電壓 | 3.3 V(典型值) |
| 電流消耗(閒置) | 0.02 µA |
| 電流消耗(量度時) | 450 µA(典型值) |
| 溫度範圍 | -40 至 +125 °C |
| 濕度解析度 | 0.04 % |
| 封裝 | 6腳DFN |
- 確保電壓水平正確,避免損壞感測器。
- 如果模組冇包含上拉電阻,就要喺I2C線上加。
- 保持接線短啲,減少對I2C通訊嘅干擾。
- 如果喺高溫環境使用,要考慮加散熱。
- 檢查感測器嘅方向,確保針腳連接正確。
接線指示
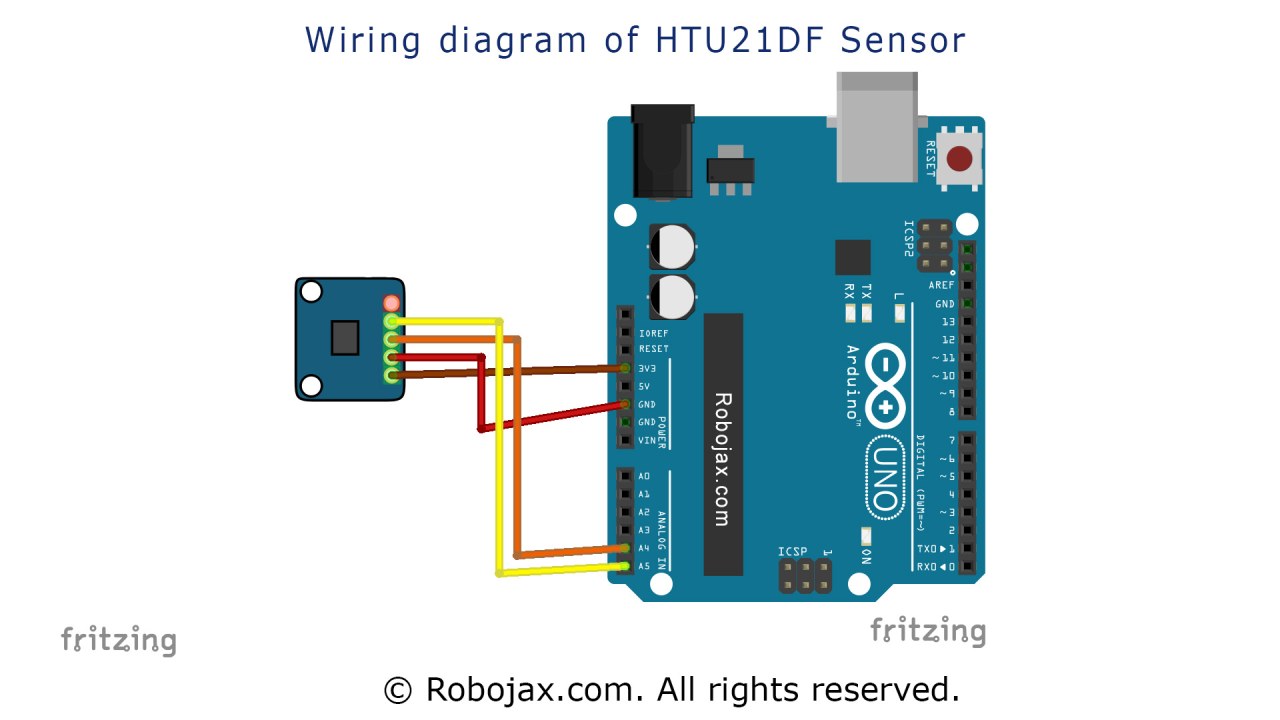
要將HTU21D感測器接線到Arduino,首先將感測器嘅VCC針腳連接到Arduino嘅3.3V電源針腳。跟住,將感測器嘅GND針腳連接到Arduino嘅接地(GND)針腳。然後,將感測器嘅SDA針腳連接到Arduino嘅模擬針腳A4,呢個係I2C數據線。最後,將感測器嘅SCL針腳連接到模擬針腳A5,呢個係I2C時鐘線。確保你嘅連接穩固,避免讀數間歇性出現。
為咗清楚起見,如果你用緊另一塊板,要確認SDA同SCL嘅正確針腳,因為佢哋可能唔同。呢個接線設定會令Arduino可以有效同HTU21D感測器通訊(喺影片05:00位置)。
程式碼示例同講解
下面係setup函數嘅節錄,佢初始化序列通訊並檢查感測器係咪搵到:
void setup() {
  Serial.begin(9600);
  if (!htu.begin()) {
    Serial.println("搵唔到感測器!");
    while (1);
  }
}
呢段程式碼以9600嘅鮑率開始序列通訊,並嘗試初始化HTU21D感測器。如果偵測唔到感測器,佢會印出錯誤訊息並停止進一步執行。
程式嘅主迴圈會持續讀取溫度同濕度數值:
void loop() {
    Serial.print(getHTU('C'));
    Serial.println("C");
    Serial.print("濕度:");
    Serial.print(getHTU('H'));
    Serial.println("%");
    delay(1000);
}喺呢個迴圈入面,我哋用'C'嚟呼叫getHTU函數攞攝氏溫度,用'H'攞濕度。結果每秒印一次去序列監控器。咁就可以實時觀察感測器讀數。
另外,我哋有個getHTU函數,根據輸入嘅字符返回溫度或者濕度:
float getHTU(char type) {
    float temp = htu.readTemperature();
    float rel_hum = htu.readHumidity();
    return (type == 'H') ? rel_hum : temp;
}
呢個函數從感測器讀取溫度同濕度,並根據指定嘅類型返回相應嘅數值。呢種模組化嘅做法令程式碼保持乾淨同容易維護。
示範/預期效果
成功設定並執行程式碼之後,你應該會喺序列監控器見到溫度同濕度數值印出嚟。如果你加熱感測器,溫度讀數應該會相應上升,而濕度可能會下降。如果溫度超過感測器嘅最大範圍,佢可能會顯示出乎意料嘅結果,例如零(喺影片12:00位置)。
影片時間戳
- 00:00 - 介紹
- 03:15 - 感測器概覽
- 05:00 - 接線指示
- 10:00 - 程式碼講解
- 12:00 - 示範
圖片
呢個教學係以下嘅一部分: 数字式相对湿度和温度传感器 HTU21D
- 第35-2课:使用HTU21D温度传感器自定义代码
- 第35課:用Arduino使用HTU21D溫度感測器
- 第36課:使用HTU21D溫度感測器配合LCD Arduino逐步課程
- Using Two More HTU21DF Humidity and Temperature Sensors with Arduino
- Displaying Temperature from an HTU21D on an LCD
- Displaying Temperature from an HTU21D as a Bar Graph on an LCD
- How to Use the HTU21DF Humidity and Temperature Sensor with Arduino (Basic Code)
- How to Use the HTU21DF Humidity and Temperature Sensor with Arduino (Custom Code)
/*
 * Robojax Arduino Step-by-Step Course
 * Part 4: Temperature Sensors
 * Lesson 35: HTU21D Temperature Sensor


 * Updated by Ahmad Shamshiri on July 13, 2019
 * in Ajax, Ontario, Canada

  Please watch video instructions here https://youtu.be/LyA0yAKlf9E
 This code is available at http://robojax.com/course1/?vid=lecture35

with over 100 lectures free on YouTube. Watch it here http://robojax.com/L/?id=338
Get the code for the course: http://robojax.com/L/?id=339
If you found this tutorial helpful, please support me so I can continue creating.
Make a donation using PayPal http://robojax.com/L/?id=64

 * Code is available at http://robojax.com/learn/arduino

 * This code is "AS IS" without warranty or liability. Free to be used as long as you keep this note intact.
 * This code has been downloaded from Robojax.com
    This program is free software: you can redistribute it and/or modify
    it under the terms of the GNU General Public License as published by
    the Free Software Foundation, either version 3 of the License, or
    (at your option) any later version.

    This program is distributed in the hope that it will be useful,
    but WITHOUT ANY WARRANTY; without even the implied warranty of
    MERCHANTABILITY or FITNESS FOR A PARTICULAR PURPOSE.  See the
    GNU General Public License for more details.

    You should have received a copy of the GNU General Public License
    along with this program.  If not, see <https://www.gnu.org/licenses/>.


 */
/*

**************************************************
*
  This is an example for the HTU21D-F Humidity & Temp Sensor

  Designed specifically to work with the HTU21D-F sensor from Adafruit
  ----> https://www.adafruit.com/products/1899

  These displays use I2C to communicate; 2 pins are required to
  interface
 ****************************************************/

#include <Wire.h>
#include "Adafruit_HTU21DF.h"

// Connect Vin to 3-5VDC
// Connect GND to ground
// Connect SCL to I2C clock pin (A5 on UNO)
// Connect SDA to I2C data pin (A4 on UNO)

Adafruit_HTU21DF htu = Adafruit_HTU21DF();

void setup() {
  Serial.begin(9600);
  Serial.println("Robojax.com");
  Serial.println("HTU21D-F test");

  if (!htu.begin()) {
    Serial.println("Couldn't find sensor!");
    while (1);
  }
}

void loop() {
//Get the code for the course: http://robojax.com/L/?id=339
    Serial.print(getHTU('C'));
    printDegree();
    Serial.println("C");

    Serial.print(getHTU('F'));
    printDegree();
    Serial.println("F");

    Serial.print(getHTU('K'));
    Serial.println("K");
    Serial.println(" ");

    Serial.print("Humidity:");
    Serial.print(getHTU('H'));
    Serial.println("%");

    if(getHTU('C') <81)
    {
      //digitalWrite(5, LOW);

    }
    delay(1000);
}

/*
 * @brief returns temperature or relative humidity
 * @param "type" is character
 *     C = Celsius
 *     K = Kelvin
 *     F = Fahrenheit
 *     H = Humidity
 * @return returns one of the values above
 * Usage: to get Fahrenheit type: getHTU('F')
 * to print it on serial monitor Serial.println(getHTU('F'));
 * Written by Ahmad Shamshiri on July 13, 2019
 * in Ajax, Ontario, Canada
 * www.Robojax.com
 */
float getHTU(char type)
{
	//Get the code for the course: http://robojax.com/L/?id=339
  float value;
    float temp = htu.readTemperature();
    float rel_hum = htu.readHumidity();
   if(type =='F')
   {
    value = temp *9/5 + 32;//convert to Fahrenheit
   }else if(type =='K')
   {
    value = temp + 273.15;//convert to Kelvin
   }else if(type =='H')
   {
    value = rel_hum;//return relative humidity
   }else{
    value = temp;// return Celsius
   }
   return value;
}//

/*
 * @brief prints degree symbol on serial monitor
 * @param none
 * @return returns nothing
 * Written by Ahmad Shamshiri on July 13, 2019
 * for Robojax Tutorial Robojax.com
 */
void printDegree()
{
    Serial.print("\\xC2");
    Serial.print("\\xB0");
}
你可能需要嘅嘢
-
亞馬遜
-
易贝Purchase HTU21D from eBayebay.us
-
阿里巴巴速卖通Purchase HTU21D or SHT21 from AliExpresss.click.aliexpress.com
資源與參考資料
-
外部Difference between HTU21DF and HTU21D (image)robojax.com
文件📁
数据表 (pdf)
-
HTU21D_temerature_humidity_datasheet
HTU21D_temerature_humidity_datasheet.pdf0.96 MB -
HTU31D HTU31V Temperature and Himidity Sensors Datasheet
HTU31_Sensors_Datasheet.pdf0.67 MB