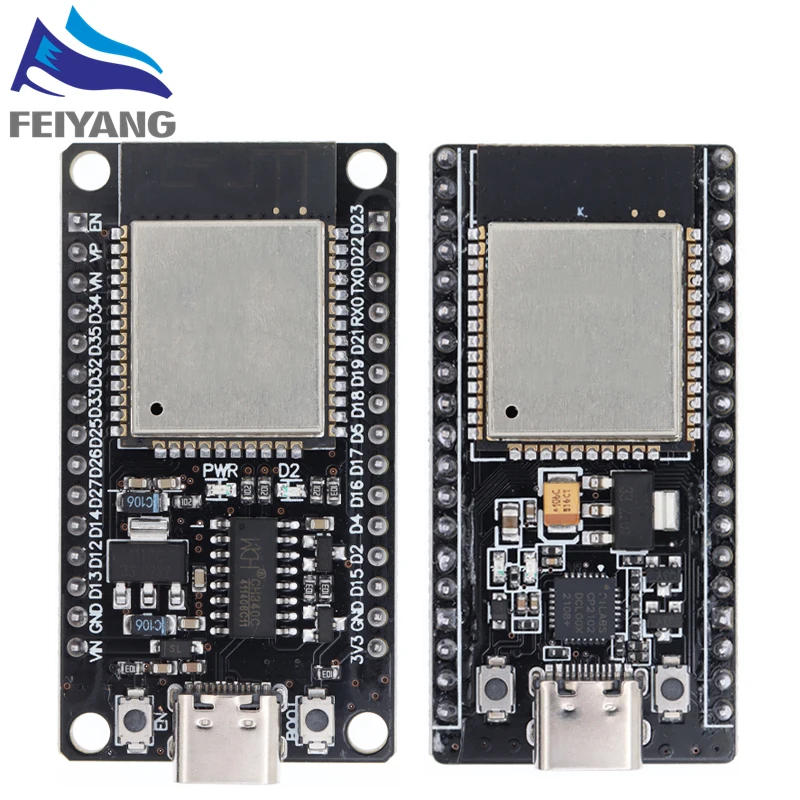
Tento návod je súčasťou: Digitálny senzor relatívnej vlhkosti a teploty HTU21D
Videá súvisiace s digitálnym senzorom relatívnej vlhkosti a teploty HTU21D. Odkazy na ďalšie videá nájdete pod týmto článkom.
Lekcia 36: Použitie teplotného senzora HTU21D s LCD Arduino Kurz krok za krokom

Teplotný a vlhkostný snímač HTU21D je obľúbenou voľbou pre mnohé projekty s Arduinom vďaka svojej jednoduchosti použitia a presnosti. V tejto lekcii si postavíme jednoduchý projekt, ktorý číta údaje o teplote a vlhkosti zo snímača a zobrazuje ich na LCD obrazovke. Na konci tohto tutoriálu budete mať funkčné zapojenie, ktoré nepretržite zobrazuje teplotu v stupňoch Celzia, Fahrenheita a Kelvina, ako aj relatívnu vlhkosť v percentách. Pre ďalšie objasnenie sa môžete pozrieť na video (vo videu na mm:ss).

Vysvetlenie hardvéru
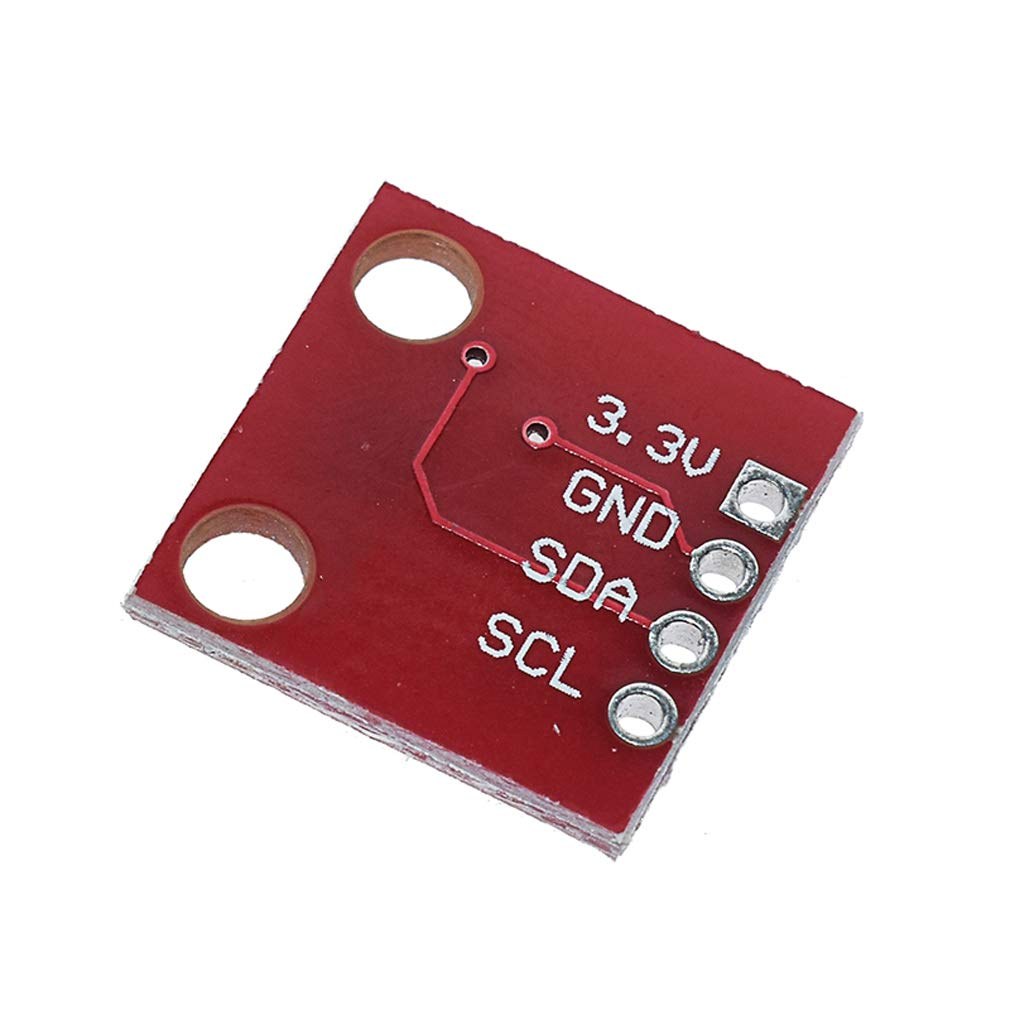
Hlavným komponentom tohto projektu je teplotný a vlhkostný snímač HTU21D, ktorý komunikuje cez I2C. Tento snímač pracuje v rozsahu napätia 1,5 až 3,6 voltov, čo ho robí vhodným pre systémy s 3,3V aj 5V napájaním. Spotrebúva veľmi málo energie, zvyčajne iba 0,02 mikroampéra v pokoji a 450 mikroampérov počas merania. Okrem HTU21D použijeme aj LCD displej, konkrétne LCD1602 s I2C. Tento displej umožňuje jednoduchý výstup textových údajov a vyžaduje iba dva piny na komunikáciu: SDA (dátový vodič) a SCL (hodinový vodič). Kombinácia týchto komponentov nám umožní vytvoriť informatívny displej na monitorovanie teploty a vlhkosti.
Podrobnosti z datasheetu
| Výrobca | TE Connectivity |
|---|---|
| Označenie súčiastky | HTU21D-F |
| Logické/I-O napätie | 1,5 - 3,6 V |
| Napájacie napätie | 3,3 V (typ.) |
| Výstupný prúd (typ.) | 0,02 µA (v pokoji), 450 µA (pri meraní) |
| Rozsah teplôt | -40 až +125 °C |
| Rozsah vlhkosti | 0 až 100 %RH |
| Rozlíšenie (teplota) | 0,01 °C |
| Rozlíšenie (vlhkosť) | 0,04 %RH |
| Puzdro | DFN-6 |
- Použite pull-up rezistor pre vodiče SDA a SCL, ak nie je integrovaný.
- Zabezpečte správne napájacie napätie, aby ste nepoškodili snímač.
- Dodržiavajte správne zapojenie, aby ste predišli chybám komunikácie.
- Skontrolujte I2C adresu, ak snímač neodpovedá.
- Použite oneskorenie medzi meraniami, aby ste predišli preťaženiu snímača.
- Uistite sa, že LCD je kompatibilný s I2C komunikáciou.
Pokyny na zapojenie
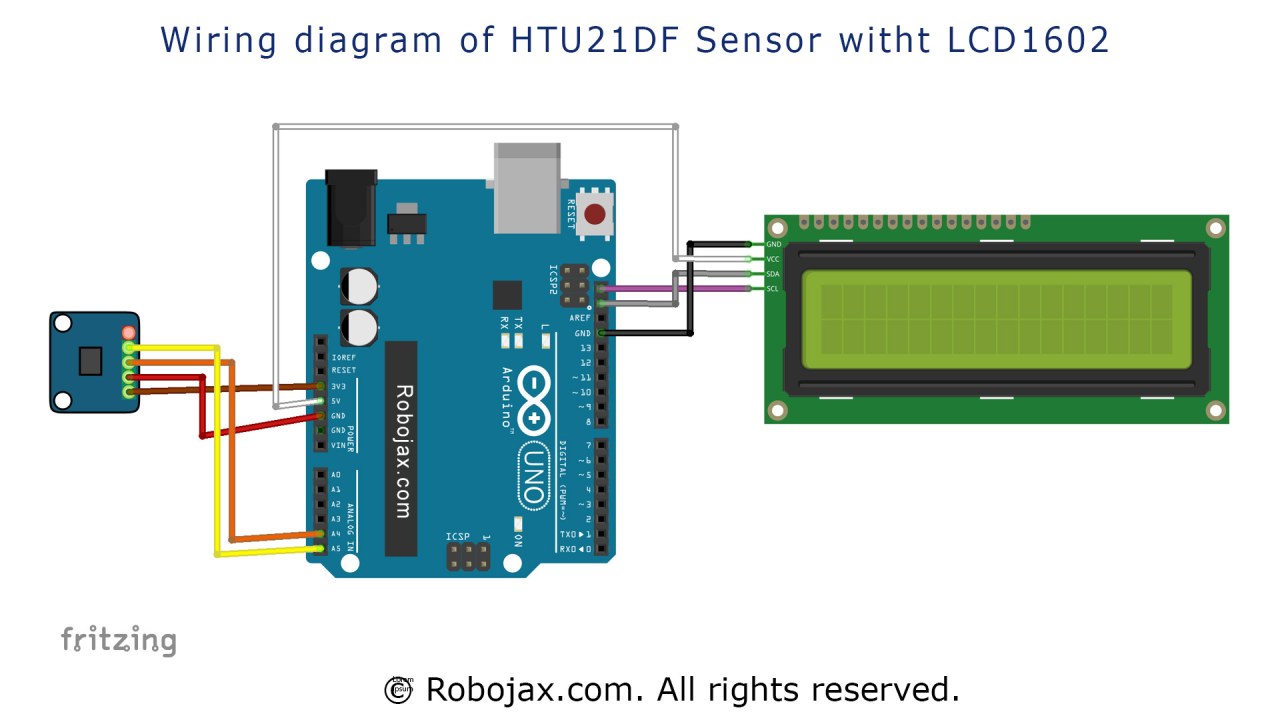
Na zapojenie snímača HTU21D a LCD displeja začnite s napájacími pripojeniami. Pripojte ľavý pin HTU21D k 3,3V napájaciemu zdroju a druhý pin (často červený) k zemi. Ďalej pripojte pin SDA snímača HTU21D k analógovému pinu A4 na Arduine a pin SCL k analógovému pinu A5. Pre displej LCD1602 pripojte pin VCC k rovnakému 3,3V napájaciemu zdroju a pin GND k zemi. Pin SDA na LCD by mal byť tiež pripojený k A4 a pin SCL k A5, čo umožní obom komponentom zdieľať I2C zbernicu. Uistite sa, že všetky pripojenia sú pevné, aby bola zabezpečená správna komunikácia medzi Arduinom, snímačom a displejom.
Príklady kódu a vysvetlenie
Nasledujúci kód inicializuje snímač HTU21D a LCD displej. Vo funkcii setup sa LCD pripraví na použitie a skontroluje sa pripojenie snímača:
void setup() {
  lcd.begin();
  lcd.backlight();
  if (!htu.begin()) {
      lcd.print("Robojax HTUD1DF");
      lcd.setCursor(0,1);
      lcd.print("sensor missing");
      while (1);
  } else {
      lcd.print("Robojax HTUD1DF");
      lcd.setCursor(0,1);
      lcd.print("Demo");
  }
  delay(2000);
}
Tento úryvok skontroluje, či je snímač správne pripojený. Ak nie, zobrazí chybové hlásenie na LCD a zastaví program. Ak snímač funguje, zobrazí demo hlásenie na dve sekundy. Funkcia loop je miesto, kde prebieha hlavné čítanie a zobrazovanie. Tu voláme funkciu `lcdDisplay` na zobrazenie teploty v rôznych jednotkách:
void loop() {
   lcd.clear(); // vymaže predchádzajúce hodnoty z obrazovky
   lcdDisplay(0, 0, "Celsius: ", 10, 0, getHTU('C'), 'd');
   lcdDisplay(0, 1, "Fahrenheit: ", 10, 1, getHTU('F'), 'd');
   delay(5000);
}
V tejto slučke sa LCD vymaže a zobrazia sa hodnoty teploty v stupňoch Celzia a Fahrenheita. Funkcia `getHTU` sa volá so znakom 'C' pre Celzia a 'F' pre Fahrenheita. Nakoniec je definovaná funkcia `getHTU`, ktorá číta teplotu alebo vlhkosť na základe vstupného znaku:
float getHTU(char type) {
   float temp = htu.readTemperature();
   float rel_hum = htu.readHumidity();
   if(type =='F') {
       return temp * 9/5 + 32; // prevod na Fahrenheita
   } else if(type =='K') {
       return temp + 273.15; // prevod na Kelvina
   } else if(type =='H') {
       return rel_hum; // vráti relatívnu vlhkosť
   } else {
       return temp; // vráti Celzia
   }
}
Táto funkcia číta teplotu a vlhkosť zo senzora a prevádza teplotu na požadovanú jednotku. Nezabudnite si pozrieť kompletný kód načítaný pod článkom, kde nájdete ďalšie podrobnosti.
Ukážka / Čo očakávať
Po dokončení zapojenia a nahraní kódu by ste mali vidieť hodnoty teploty a vlhkosti zobrazené na LCD. Údaje sa budú aktualizovať každých pár sekúnd, čo odráža aktuálne podmienky. Ak na senzor privediete teplo, mali by ste si všimnúť, že teplota stúpa, zatiaľ čo vlhkosť by sa mala mierne znížiť. Dávajte pozor na maximálny teplotný limit senzora; jeho prekročenie môže viesť k nepresným údajom alebo poškodeniu senzora (vo videu v čase mm:ss).
Časové značky videa
- 00:00 - Úvod do projektu
- 01:15 - Pokyny na zapojenie
- 03:30 - Prehľad kódu
- 10:00 - Ukážka nastavenia
Obrázky
Tento návod je súčasťou: Digitálny senzor relatívnej vlhkosti a teploty HTU21D
- Lekcia 35-1: Použitie teplotného senzora HTU21D
- Lekcia 35-2: Použitie vlastného kódu pre teplotný senzor HTU21D
- Lekcia 35: Použitie teplotného senzora HTU21D s Arduinom
- Using Two More HTU21DF Humidity and Temperature Sensors with Arduino
- Displaying Temperature from an HTU21D on an LCD
- Displaying Temperature from an HTU21D as a Bar Graph on an LCD
- How to Use the HTU21DF Humidity and Temperature Sensor with Arduino (Basic Code)
- How to Use the HTU21DF Humidity and Temperature Sensor with Arduino (Custom Code)
/*
 * Robojax Arduino Step-by-Step Course
 * Part 4: Temperature Sensors
 * Lesson 36: HTU21D Temperature Sensor with LCD1602 and LCD2004 Display


 * Display Temperature from HTU21DF on LCD1602-I2C or LCD2004
 * Updated by Ahmad Shamshiri on July 13, 2019


  Please watch video instructions here https://youtu.be/SrFJKbmiaPM
 This code is available at http://robojax.com/course1/?vid=lecture36

with over 100 lectures free on YouTube. Watch it here http://robojax.com/L/?id=338
Get the code for the course: http://robojax.com/L/?id=339

If you found this tutorial helpful, please support me so I can continue creating
and make a donation using PayPal http://robojax.com/L/?id=64


*
  This is an example for the HTU21D-F Humidity & Temp Sensor

  Designed specifically to work with the HTU21D-F sensor from Adafruit
  ----> https://www.adafruit.com/products/1899

  These displays use I2C to communicate; 2 pins are required to
  interface

 Watch Introduction to a 360 Servo video with code: https://youtu.be/b_xvu6wWafA
You can get the wiring diagram from my Arduino Course at Udemy.com
Learn Arduino step by step with all libraries, codes, and wiring diagrams all in one place.
Visit my course now http://robojax.com/L/?id=62

If you found this tutorial helpful, please support me so I can continue creating
content like this.
or make a donation using PayPal http://robojax.com/L/?id=64

 * Code is available at http://robojax.com/learn/arduino

 * This code is "AS IS" without warranty or liability. Free to be used as long as you keep this note intact.
 * This code has been downloaded from Robojax.com
    This program is free software: you can redistribute it and/or modify
    it under the terms of the GNU General Public License as published by
    the Free Software Foundation, either version 3 of the License, or
    (at your option) any later version.

    This program is distributed in the hope that it will be useful,
    but WITHOUT ANY WARRANTY; without even the implied warranty of
    MERCHANTABILITY or FITNESS FOR A PARTICULAR PURPOSE.  See the
    GNU General Public License for more details.

    You should have received a copy of the GNU General Public License
    along with this program.  If not, see <https://www.gnu.org/licenses/>.

*/

#include <Wire.h>
#include "Adafruit_HTU21DF.h"

// Connect Vin to 3-5VDC
// Connect GND to ground
// Connect SCL to I2C clock pin (A5 on UNO)
// Connect SDA to I2C data pin (A4 on UNO)

Adafruit_HTU21DF htu = Adafruit_HTU21DF();

// start of settings for LCD1602 with I2C
#include <LiquidCrystal_I2C.h>
// Set the LCD address to 0x27 for a 16 chars and 2 line display
LiquidCrystal_I2C lcd(0x3F, 16, 2);
// end of settings for LCD1602 with I2C

void setup() {
	//Get the code for the course: http://robojax.com/L/?id=339
  lcd.begin();
  lcd.backlight();
  if (!htu.begin()) {
      lcd.print("Robojax HTUD1DF");
      lcd.setCursor(0,1);
      lcd.print("sensor missing");
    while (1);
  }else{
  // initialize the LCD

  lcd.print("Robojax HTUD1DF");
  lcd.setCursor(0,1);
  lcd.print("Demo");
  }
  delay(2000);
}

void loop() {
//Get the code for the course: http://robojax.com/L/?id=339
   lcd.clear();// clear previous values from screen
lcdDisplay(
             // to print Celsius:
             0, // character 0
             0, // line 0
             "Celsius: ",

             // to print Celsius
             10, // character 10
             0, // line 0
             getHTU('C'),
             'd'
             );

  lcdDisplay(
             // to print fahrenheit:
             0, // character 0
             1, // line 1
             "Fahrenheit: ",

             // to print Fahrenheit
             10, // character 9
             1, // line 0
             getHTU('F'),
             'd'
             );
    delay(5000);
lcdDisplay(
             // to print Kelvin:
             0, // character 0
             0, // line 0
             "Kelvin: ",

             // to print Celsius
             9, // character 10
             0, // line 0
             getHTU('K'),
             'k'
             );
  lcdDisplay(
             // to print humidity text
             0, // character 0
             1, // line 1
             "Humidity: ",

             // to print humidity
             10, // character 9
             1, // line 1
             getHTU('H'),
             '%'
             );

        delay(5000);
}

/*
 * @brief returns temperature or relative humidity
 * @param "type" is character
 *     C = Celsius
 *     K = Kelvin
 *     F = Fahrenheit
 *     H = Humidity
 * @return returns one of the values above
 * Usage: to get Fahrenheit type: getHTU('F')
 * to print it on serial monitor Serial.println(getHTU('F'));
 * Written by Ahmad Shamshiri on July 13, 2019
 * in Ajax, Ontario, Canada
 * www.Robojax.com
 */
float getHTU(char type)
{
	//Get the code for the course: http://robojax.com/L/?id=339
  float value;
    float temp = htu.readTemperature();
    float rel_hum = htu.readHumidity();
   if(type =='F')
   {
    value = temp *9/5 + 32;//convert to Fahrenheit
   }else if(type =='K')
   {
    value = temp + 273.15;//convert to Kelvin
   }else if(type =='H')
   {
    value = rel_hum;//return relative humidity
   }else{
    value = temp;// return Celsius
   }
   return value;
}//


/*
 * lcdDisplay(int tc, int tr, String title, int vc, int vr, float value)
 * displays value and title on LCD1602
 * How to use:
 * If you want to display: "Voltage: 13.56mV" starting from the first character
 * on the second row.
 * use:
 * lcdDisplay(0, 1, "Voltage: ", 13.56,'d')
 *
 *   'd' is degree symbol
 * tc  is character number  (0)
 * tr is row in the lcd (1)
 * title is the text (Voltage:)
 * vc value for character
 * vr value for  row or line
 * value is the value (13.56)
 */
void lcdDisplay(int tc, int tr, String title, int vc, int vr, float value,char symbol)
{
   // Robojax.com LCD1602 for HTU21D Demo
   lcd.setCursor (tc,tr); //
   lcd.print(title);

   lcd.setCursor (vc,vr); //
   lcd.print(value);
   if(symbol == 'd')
   {
    lcd.print((char)223);
   }else if(symbol =='%')
   {
    lcd.print("%");
   }else if(symbol =='k')
   {
    lcd.print("K");
   }
 // Robojax.com LCD1602 for HTU21D Demo
}
Veci, ktoré by ste mohli potrebovať
-
Amazon
-
eBayPurchase HTU21D from eBayebay.us
-
AliExpressPurchase HTU21D or SHT21 from AliExpresss.click.aliexpress.com
Zdroje a referencie
-
ExternéAdafruit HTU21D Library (GitHub)github.com
-
ExternéDifference between HTU21DF and HTU21D (image)robojax.com
-
Externé
Súbory📁
Datasheet (pdf)
-
HTU21D_teplota_vlhkosť_datasheet
HTU21D_temerature_humidity_datasheet.pdf0.96 MB