આ ટ્યુટોરિયલ આનો ભાગ છે: ડિજિટલ સાપેક્ષ ભેજ અને તાપમાન સેન્સર HTU21D
ડિજિટલ સાપેક્ષ ભેજ અને તાપમાન સેન્સર HTU21D સંબંધિત વિડિઓઝ. અન્ય વિડિઓઝની લિંક્સ આ લેખની નીચે છે.
પાઠ ૩૬: એલસીડી આર્ડુઇનો સાથે HTU21D તાપમાન સેન્સરનો ઉપયોગ સ્ટેપ-બાય-સ્ટેપ કોર્સ

HTU21D તાપમાન અને ભેજ સેન્સર તેની સરળતા અને ચોકસાઈને કારણે ઘણા Arduino પ્રોજેક્ટ્સ માટે લોકપ્રિય પસંદગી છે. આ પાઠમાં, આપણે એક સરળ પ્રોજેક્ટ બનાવીશું જે સેન્સરમાંથી તાપમાન અને ભેજનો ડેટા વાંચે છે અને તેને LCD સ્ક્રીન પર પ્રદર્શિત કરે છે. આ ટ્યુટોરિયલના અંત સુધીમાં, તમારી પાસે એક કાર્યકારી સેટઅપ હશે જે સતત તાપમાન સેલ્સિયસ, ફેરનહીટ અને કેલ્વિનમાં તેમજ સાપેક્ષ ભેજની ટકાવારી દર્શાવે છે. વધુ સ્પષ્ટતા માટે, તમે વિડિયોનો સંદર્ભ લઈ શકો છો (વિડિયોમાં mm:ss પર).

હાર્ડવેર સમજાવ્યું
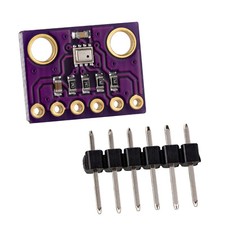
આ પ્રોજેક્ટનો મુખ્ય ઘટક HTU21D તાપમાન અને ભેજ સેન્સર છે, જે I2C દ્વારા સંચાર કરે છે. આ સેન્સર 1.5 થી 3.6 વોલ્ટની વોલ્ટેજ રેન્જમાં કાર્ય કરે છે, જે તેને 3.3V અને 5V બંને સિસ્ટમો માટે યોગ્ય બનાવે છે. તે ખૂબ જ ઓછી શક્તિ વાપરે છે, સામાન્ય રીતે નિષ્ક્રિય સ્થિતિમાં માત્ર 0.02 માઇક્રોએમ્પિયર અને માપન દરમિયાન 450 માઇક્રોએમ્પિયર. HTU21D ઉપરાંત, આપણે LCD ડિસ્પ્લે પણ વાપરીશું, ખાસ કરીને I2C સાથે LCD1602. આ ડિસ્પ્લે ટેક્સ્ટ ડેટા આઉટપુટ કરવાની સરળતા આપે છે અને સંચાર માટે માત્ર બે પિનની જરૂર પડે છે: SDA (ડેટા લાઇન) અને SCL (ક્લોક લાઇન). આ ઘટકોનું સંયોજન આપણને તાપમાન અને ભેજના સ્તરોનું નિરીક્ષણ કરવા માટે એક માહિતીપ્રદ ડિસ્પ્લે બનાવવામાં સક્ષમ બનાવશે.
ડેટાશીટ વિગતો
| ઉત્પાદક | TE કનેક્ટિવિટી |
|---|---|
| ભાગ નંબર | HTU21D-F |
| લોજિક/IO વોલ્ટેજ | 1.5 - 3.6 V |
| સપ્લાય વોલ્ટેજ | 3.3 V (સામાન્ય) |
| આઉટપુટ કરંટ (સામાન્ય) | 0.02 µA (નિષ્ક્રિય), 450 µA (માપન) |
| તાપમાન રેન્જ | -40 થી +125 °C |
| ભેજ રેન્જ | 0 થી 100 %RH |
| રિઝોલ્યુશન (તાપમાન) | 0.01 °C |
| રિઝોલ્યુશન (ભેજ) | 0.04 %RH |
| પેકેજ | DFN-6 |
- જો સંકલિત ન હોય તો SDA અને SCL લાઇનો માટે પુલ-અપ રેઝિસ્ટર વાપરો.
- સેન્સરને નુકસાન ન થાય તે માટે યોગ્ય પાવર સપ્લાય વોલ્ટેજની ખાતરી કરો.
- સંચાર ભૂલો અટકાવવા માટે યોગ્ય વાયરિંગ જાળવો.
- જો સેન્સર પ્રતિસાદ ન આપે તો I2C સરનામું તપાસો.
- સેન્સર ઓવરલોડ અટકાવવા માટે રીડિંગ્સ વચ્ચે વિલંબ કરો.
- ખાતરી કરો કે LCD I2C સંચાર સાથે સુસંગત છે.
વાયરિંગ સૂચનાઓ
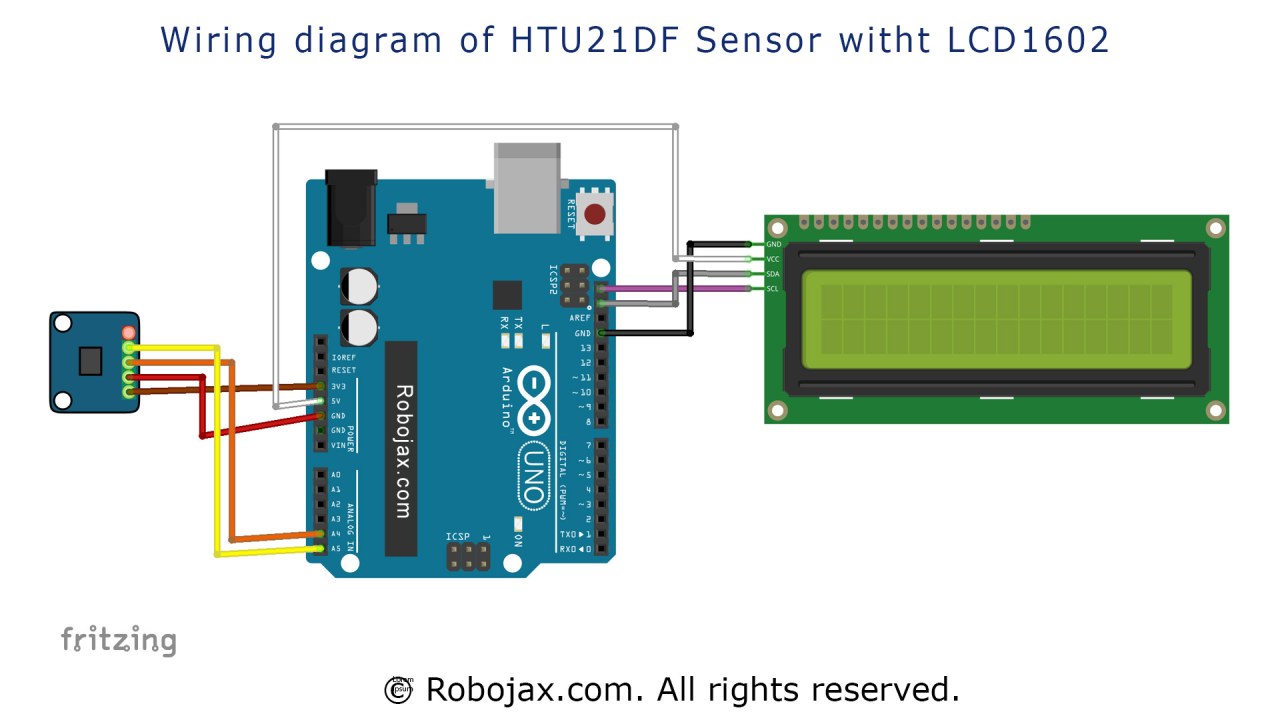
HTU21D સેન્સર અને LCD ડિસ્પ્લેને વાયર કરવા માટે, પાવર કનેક્શનથી શરૂ કરો. HTU21D ના ડાબા પિનને 3.3V પાવર સ્ત્રોત સાથે અને બીજા પિનને (ઘણીવાર લાલ) ગ્રાઉન્ડ સાથે જોડો. આગળ, HTU21D ના SDA પિનને Arduino ના એનાલોગ પિન A4 સાથે અને SCL પિનને એનાલોગ પિન A5 સાથે જોડો. LCD1602 ડિસ્પ્લે માટે, VCC પિનને સમાન 3.3V પાવર સ્ત્રોત સાથે જોડો અને GND પિનને ગ્રાઉન્ડ સાથે જોડો. LCD પરનો SDA પિન પણ A4 સાથે જોડાવો જોઈએ, અને SCL પિન A5 સાથે જોડાવો જોઈએ, જે બંને ઘટકોને I2C બસ શેર કરવાની મંજૂરી આપે છે. Arduino, સેન્સર અને ડિસ્પ્લે વચ્ચે યોગ્ય સંચાર સુનિશ્ચિત કરવા માટે બધા કનેક્શન સુરક્ષિત છે તેની ખાતરી કરો.
કોડ ઉદાહરણો અને વોકથ્રુ
નીચેનો કોડ HTU21D સેન્સર અને LCD ડિસ્પ્લેને પ્રારંભ કરે છે. સેટઅપ ફંક્શનમાં, LCD ઉપયોગ માટે તૈયાર કરવામાં આવે છે અને સેન્સર કનેક્ટિવિટી માટે તપાસવામાં આવે છે:
void setup() {
  lcd.begin();
  lcd.backlight();
  if (!htu.begin()) {
      lcd.print("Robojax HTUD1DF");
      lcd.setCursor(0,1);
      lcd.print("sensor missing");
      while (1);
  } else {
      lcd.print("Robojax HTUD1DF");
      lcd.setCursor(0,1);
      lcd.print("Demo");
  }
  delay(2000);
}
આ અંશ તપાસે છે કે સેન્સર યોગ્ય રીતે જોડાયેલ છે કે નહીં. જો નહીં, તો તે LCD પર ભૂલ સંદેશ દર્શાવે છે અને પ્રોગ્રામને અટકાવે છે. જો સેન્સર કાર્યરત છે, તો તે બે સેકન્ડ માટે ડેમો સંદેશ દર્શાવે છે. લૂપ ફંક્શન એ છે જ્યાં મુખ્ય વાંચન અને પ્રદર્શન થાય છે. અહીં, આપણે વિવિધ એકમોમાં તાપમાન દર્શાવવા માટે `lcdDisplay` ફંક્શનને કૉલ કરીએ છીએ:
void loop() {
   lcd.clear(); // clear previous values from screen
   lcdDisplay(0, 0, "Celsius: ", 10, 0, getHTU('C'), 'd');
   lcdDisplay(0, 1, "Fahrenheit: ", 10, 1, getHTU('F'), 'd');
   delay(5000);
}
આ લૂપમાં, LCD સાફ કરવામાં આવે છે, અને સેલ્સિયસ અને ફેરનહીટમાં તાપમાન રીડિંગ્સ પ્રદર્શિત થાય છે. `getHTU` ફંક્શનને સેલ્સિયસ માટે 'C' અને ફેરનહીટ માટે 'F' અક્ષર સાથે કૉલ કરવામાં આવે છે. છેલ્લે, `getHTU` ફંક્શન ઇનપુટ અક્ષરના આધારે તાપમાન અથવા ભેજ વાંચવા માટે વ્યાખ્યાયિત કરવામાં આવે છે:
float getHTU(char type) {
   float temp = htu.readTemperature();
   float rel_hum = htu.readHumidity();
   if(type =='F') {
       return temp * 9/5 + 32; // convert to Fahrenheit
   } else if(type =='K') {
       return temp + 273.15; // convert to Kelvin
   } else if(type =='H') {
       return rel_hum; // return relative humidity
   } else {
       return temp; // return Celsius
   }
}
આ ફંક્શન સેન્સરમાંથી તાપમાન અને ભેજ વાંચે છે અને તાપમાનને માંગેલા એકમમાં રૂપાંતરિત કરે છે. વધારાની વિગતો માટે લેખની નીચે લોડ કરેલો સંપૂર્ણ કોડ ચકાસવાનું ભૂલશો નહીં.
પ્રદર્શન / શું અપેક્ષા રાખવી
વાયરિંગ પૂર્ણ કરીને કોડ અપલોડ કર્યા પછી, તમારે LCD પર તાપમાન અને ભેજના મૂલ્યો પ્રદર્શિત થતાં જોવા જોઈએ. રીડિંગ્સ દર થોડી સેકંડે અપડેટ થશે, જે વર્તમાન પરિસ્થિતિઓને પ્રતિબિંબિત કરશે. જો તમે સેન્સર પર ગરમી લગાવો છો, તો તમારે તાપમાન તે મુજબ વધતું જોવું જોઈએ, જ્યારે ભેજ થોડો ઘટવો જોઈએ. સેન્સરની મહત્તમ તાપમાન મર્યાદાનું ધ્યાન રાખો; આ મર્યાદા ઓળંગવાથી અચોક્કસ રીડિંગ્સ અથવા સેન્સર નિષ્ફળતા થઈ શકે છે (વિડિયોમાં mm:ss પર).
વિડિયો ટાઇમસ્ટેમ્પ્સ
- 00:00 - પ્રોજેક્ટનો પરિચય
- 01:15 - વાયરિંગ સૂચનાઓ
- 03:30 - કોડ વોકથ્રુ
- 10:00 - સેટઅપનું પ્રદર્શન
છબીઓ
આ ટ્યુટોરિયલ આનો ભાગ છે: ડિજિટલ સાપેક્ષ ભેજ અને તાપમાન સેન્સર HTU21D
- પાઠ 35-1: HTU21D તાપમાન સેન્સરનો ઉપયોગ
- પાઠ 35-2: HTU21D તાપમાન સેન્સર કસ્ટમ કોડનો ઉપયોગ
- પાઠ 35: આર્ડુઇનો સાથે HTU21D તાપમાન સેન્સરનો ઉપયોગ
- Using Two More HTU21DF Humidity and Temperature Sensors with Arduino
- Displaying Temperature from an HTU21D on an LCD
- Displaying Temperature from an HTU21D as a Bar Graph on an LCD
- How to Use the HTU21DF Humidity and Temperature Sensor with Arduino (Basic Code)
- How to Use the HTU21DF Humidity and Temperature Sensor with Arduino (Custom Code)
/*
 * Robojax Arduino Step-by-Step Course
 * Part 4: Temperature Sensors
 * Lesson 36: HTU21D Temperature Sensor with LCD1602 and LCD2004 Display


 * Display Temperature from HTU21DF on LCD1602-I2C or LCD2004
 * Updated by Ahmad Shamshiri on July 13, 2019


  Please watch video instructions here https://youtu.be/SrFJKbmiaPM
 This code is available at http://robojax.com/course1/?vid=lecture36

with over 100 lectures free on YouTube. Watch it here http://robojax.com/L/?id=338
Get the code for the course: http://robojax.com/L/?id=339

If you found this tutorial helpful, please support me so I can continue creating
and make a donation using PayPal http://robojax.com/L/?id=64


*
  This is an example for the HTU21D-F Humidity & Temp Sensor

  Designed specifically to work with the HTU21D-F sensor from Adafruit
  ----> https://www.adafruit.com/products/1899

  These displays use I2C to communicate; 2 pins are required to
  interface

 Watch Introduction to a 360 Servo video with code: https://youtu.be/b_xvu6wWafA
You can get the wiring diagram from my Arduino Course at Udemy.com
Learn Arduino step by step with all libraries, codes, and wiring diagrams all in one place.
Visit my course now http://robojax.com/L/?id=62

If you found this tutorial helpful, please support me so I can continue creating
content like this.
or make a donation using PayPal http://robojax.com/L/?id=64

 * Code is available at http://robojax.com/learn/arduino

 * This code is "AS IS" without warranty or liability. Free to be used as long as you keep this note intact.
 * This code has been downloaded from Robojax.com
    This program is free software: you can redistribute it and/or modify
    it under the terms of the GNU General Public License as published by
    the Free Software Foundation, either version 3 of the License, or
    (at your option) any later version.

    This program is distributed in the hope that it will be useful,
    but WITHOUT ANY WARRANTY; without even the implied warranty of
    MERCHANTABILITY or FITNESS FOR A PARTICULAR PURPOSE.  See the
    GNU General Public License for more details.

    You should have received a copy of the GNU General Public License
    along with this program.  If not, see <https://www.gnu.org/licenses/>.

*/

#include <Wire.h>
#include "Adafruit_HTU21DF.h"

// Connect Vin to 3-5VDC
// Connect GND to ground
// Connect SCL to I2C clock pin (A5 on UNO)
// Connect SDA to I2C data pin (A4 on UNO)

Adafruit_HTU21DF htu = Adafruit_HTU21DF();

// start of settings for LCD1602 with I2C
#include <LiquidCrystal_I2C.h>
// Set the LCD address to 0x27 for a 16 chars and 2 line display
LiquidCrystal_I2C lcd(0x3F, 16, 2);
// end of settings for LCD1602 with I2C

void setup() {
	//Get the code for the course: http://robojax.com/L/?id=339
  lcd.begin();
  lcd.backlight();
  if (!htu.begin()) {
      lcd.print("Robojax HTUD1DF");
      lcd.setCursor(0,1);
      lcd.print("sensor missing");
    while (1);
  }else{
  // initialize the LCD

  lcd.print("Robojax HTUD1DF");
  lcd.setCursor(0,1);
  lcd.print("Demo");
  }
  delay(2000);
}

void loop() {
//Get the code for the course: http://robojax.com/L/?id=339
   lcd.clear();// clear previous values from screen
lcdDisplay(
             // to print Celsius:
             0, // character 0
             0, // line 0
             "Celsius: ",

             // to print Celsius
             10, // character 10
             0, // line 0
             getHTU('C'),
             'd'
             );

  lcdDisplay(
             // to print fahrenheit:
             0, // character 0
             1, // line 1
             "Fahrenheit: ",

             // to print Fahrenheit
             10, // character 9
             1, // line 0
             getHTU('F'),
             'd'
             );
    delay(5000);
lcdDisplay(
             // to print Kelvin:
             0, // character 0
             0, // line 0
             "Kelvin: ",

             // to print Celsius
             9, // character 10
             0, // line 0
             getHTU('K'),
             'k'
             );
  lcdDisplay(
             // to print humidity text
             0, // character 0
             1, // line 1
             "Humidity: ",

             // to print humidity
             10, // character 9
             1, // line 1
             getHTU('H'),
             '%'
             );

        delay(5000);
}

/*
 * @brief returns temperature or relative humidity
 * @param "type" is character
 *     C = Celsius
 *     K = Kelvin
 *     F = Fahrenheit
 *     H = Humidity
 * @return returns one of the values above
 * Usage: to get Fahrenheit type: getHTU('F')
 * to print it on serial monitor Serial.println(getHTU('F'));
 * Written by Ahmad Shamshiri on July 13, 2019
 * in Ajax, Ontario, Canada
 * www.Robojax.com
 */
float getHTU(char type)
{
	//Get the code for the course: http://robojax.com/L/?id=339
  float value;
    float temp = htu.readTemperature();
    float rel_hum = htu.readHumidity();
   if(type =='F')
   {
    value = temp *9/5 + 32;//convert to Fahrenheit
   }else if(type =='K')
   {
    value = temp + 273.15;//convert to Kelvin
   }else if(type =='H')
   {
    value = rel_hum;//return relative humidity
   }else{
    value = temp;// return Celsius
   }
   return value;
}//


/*
 * lcdDisplay(int tc, int tr, String title, int vc, int vr, float value)
 * displays value and title on LCD1602
 * How to use:
 * If you want to display: "Voltage: 13.56mV" starting from the first character
 * on the second row.
 * use:
 * lcdDisplay(0, 1, "Voltage: ", 13.56,'d')
 *
 *   'd' is degree symbol
 * tc  is character number  (0)
 * tr is row in the lcd (1)
 * title is the text (Voltage:)
 * vc value for character
 * vr value for  row or line
 * value is the value (13.56)
 */
void lcdDisplay(int tc, int tr, String title, int vc, int vr, float value,char symbol)
{
   // Robojax.com LCD1602 for HTU21D Demo
   lcd.setCursor (tc,tr); //
   lcd.print(title);

   lcd.setCursor (vc,vr); //
   lcd.print(value);
   if(symbol == 'd')
   {
    lcd.print((char)223);
   }else if(symbol =='%')
   {
    lcd.print("%");
   }else if(symbol =='k')
   {
    lcd.print("K");
   }
 // Robojax.com LCD1602 for HTU21D Demo
}
તમને જોઈતી વસ્તુઓ
-
Amazon
-
eBayPurchase HTU21D from eBayebay.us
-
AliExpressPurchase HTU21D or SHT21 from AliExpresss.click.aliexpress.com
સંસાધનો અને સંદર્ભો
-
બાહ્યAdafruit HTU21D Library (GitHub)github.com
-
બાહ્યDifference between HTU21DF and HTU21D (image)robojax.com
ફાઇલો📁
ડેટાશીટ (pdf)
-
HTU21D_temerature_humidity_datasheet
HTU21D_temerature_humidity_datasheet.pdf0.96 MB