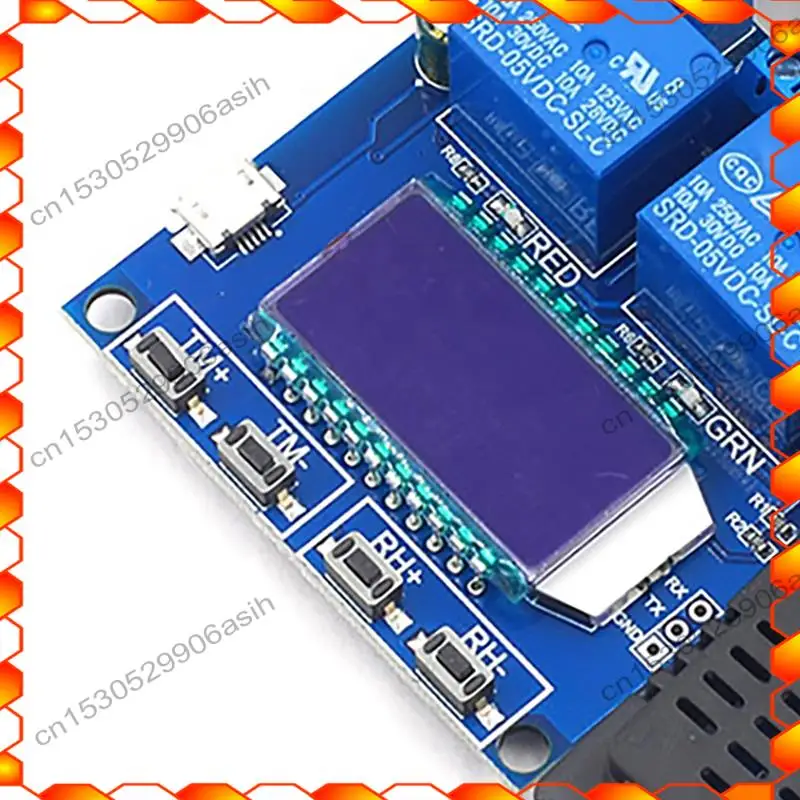
课程52-1:基本代码:使用Arduino通过继电器控制直流电机
在本课中,我们将学习如何使用两个继电器和一个Arduino控制直流电动机的方向。通过改变施加于电动机的电压极性,我们可以反转其方向。这个项目简单明了,非常适合希望了解Arduino继电器控制的初学者。请确保观看视频以获得额外的见解和演示(视频在00:00)。
在本教程中,我们将使用两个继电器来切换电源对电动机的极性。当一个继电器被激活时,它允许电流朝一个方向流动,使电动机朝一个方向旋转。当另一个继电器被激活时,它会反转电流的流动,导致电动机朝相反的方向旋转。继电器充当由Arduino控制的开关。


硬件解析
该项目的主要组件包括一块Arduino控制板、两个继电器、一台直流电动机和一个电源。Arduino控制板是操作的核心,向继电器发送信号以控制电动机的方向。每个继电器有三个端子:公共端(COM)、常闭端(NC)和常开端(NO)。当被激活时,继电器将COM端子连接到NC或NO端子,从而有效地切换电路。
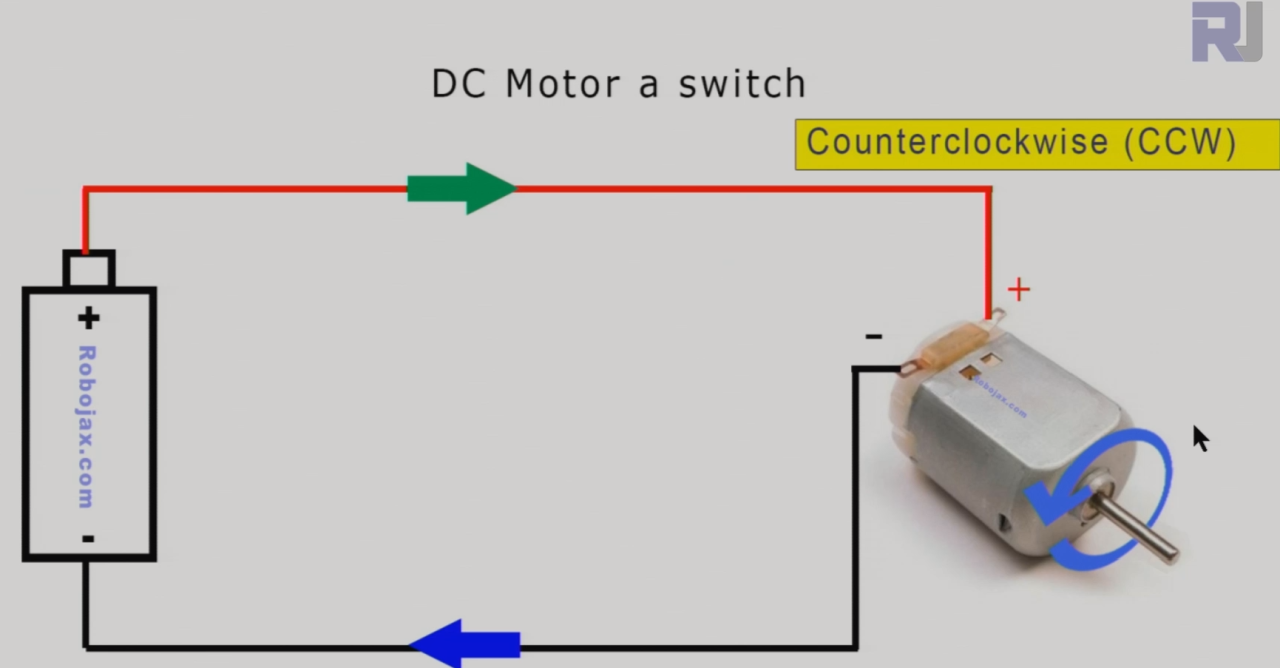
上面的图像显示了如何将电动机的电线连接到电池,电动机例如以逆时针方向(CCW)旋转。
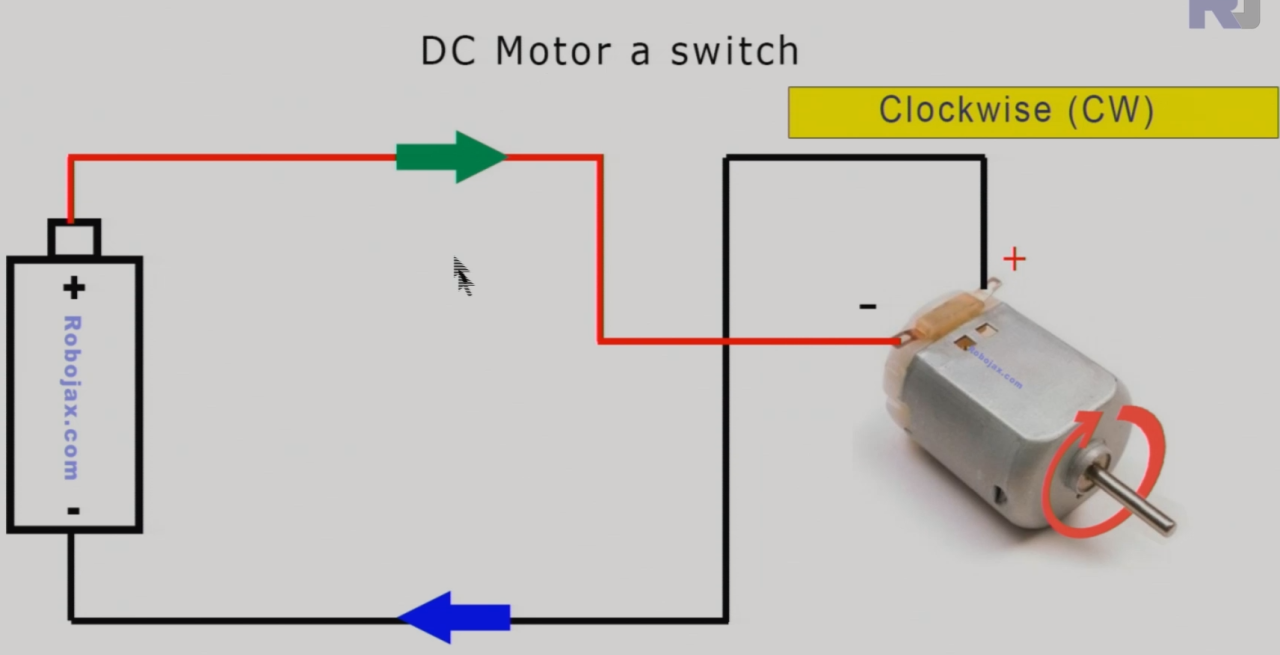
上面的图像显示,如果将 + 和 - 的电线连接到电机的不同端子,电机将以顺时针方向(CW)旋转。
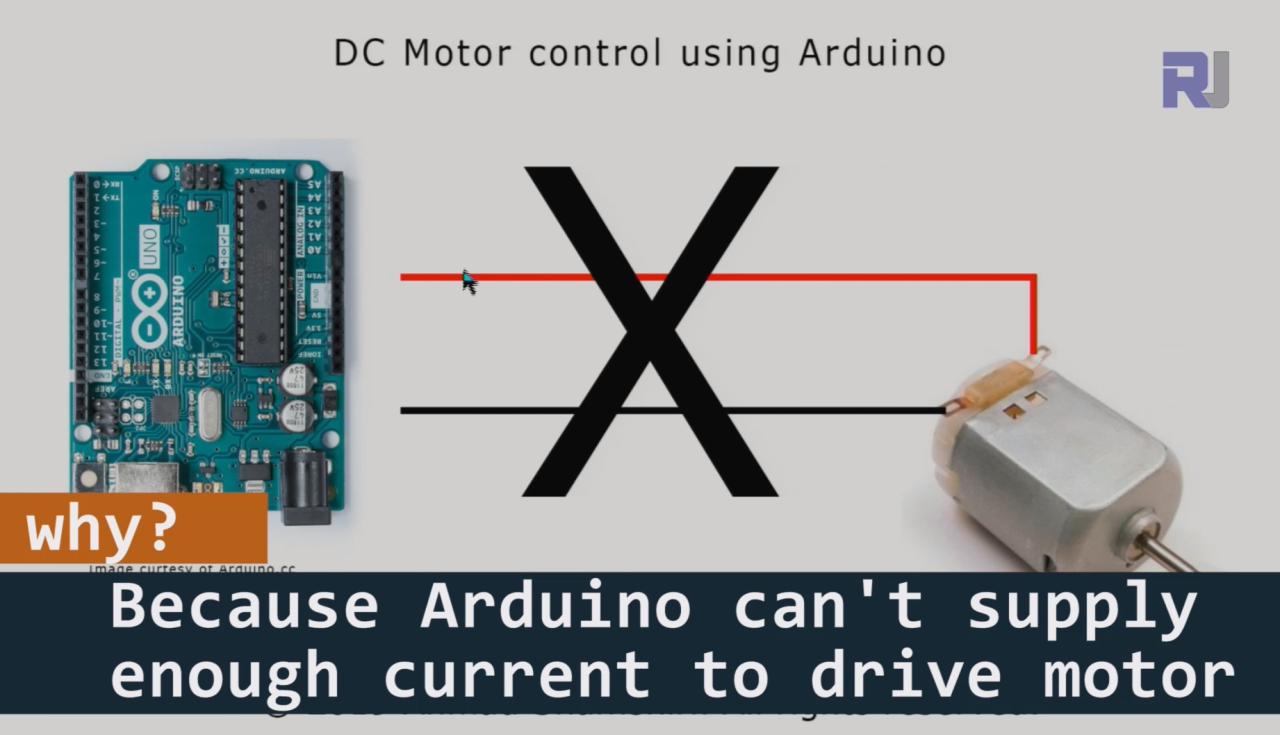
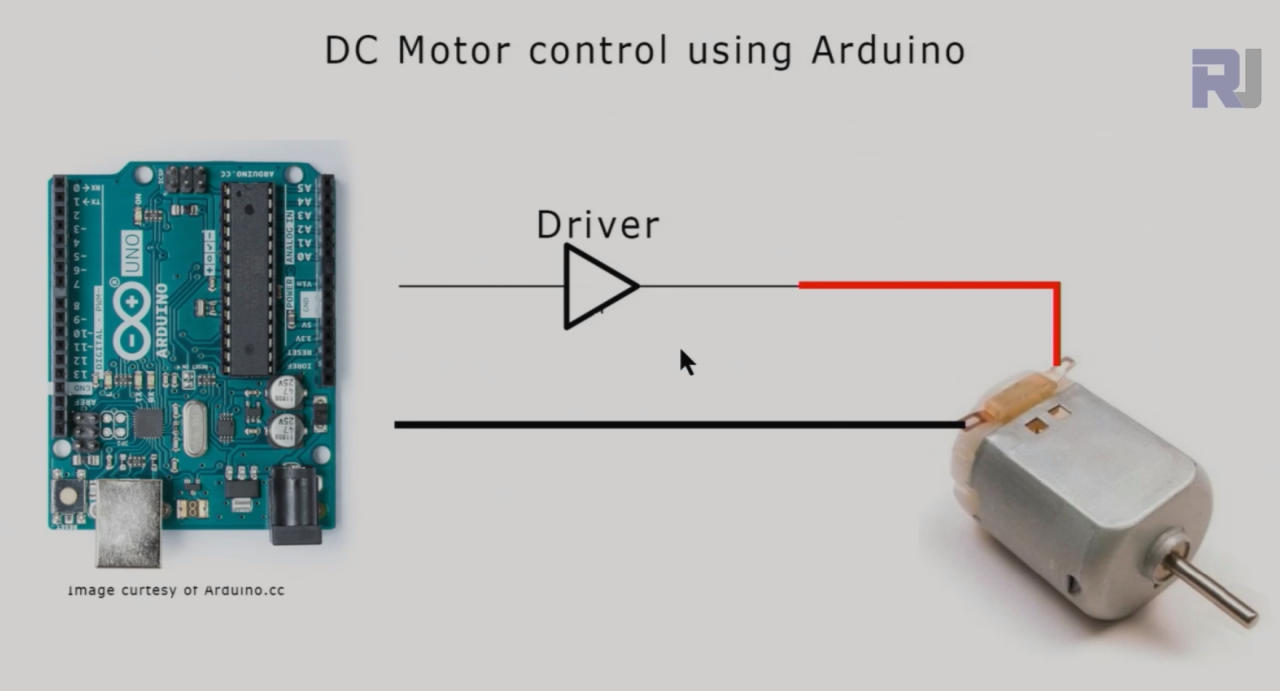
我们不能直接将继电器连接到Arduino、ESP32或树莓派板,因为电机需要非常高的电流才能工作。
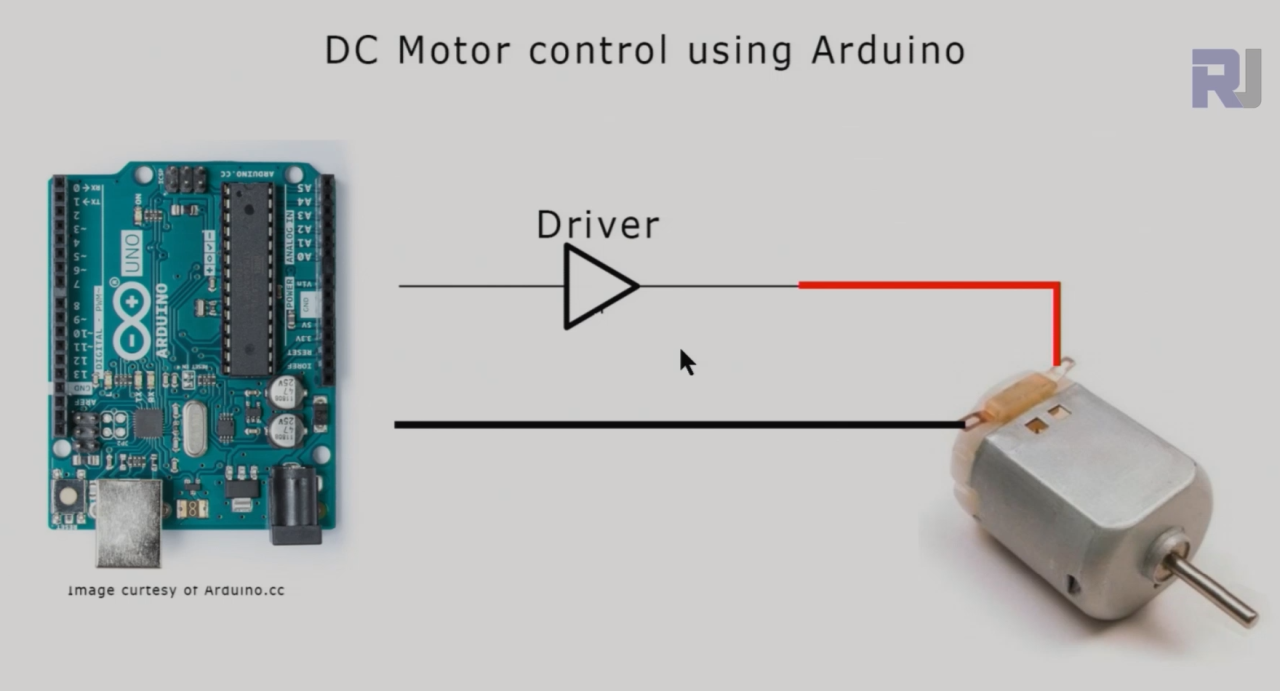
我们需要电机驱动器连接在Arduino和电机之间。
继电器很重要,因为它们允许Arduino控制高功率设备,比如电机,而无需直接连接。这一点至关重要,因为Arduino的输出引脚只能承受有限的电流。通过使用继电器,我们可以安全地从Arduino控制电机的运行。
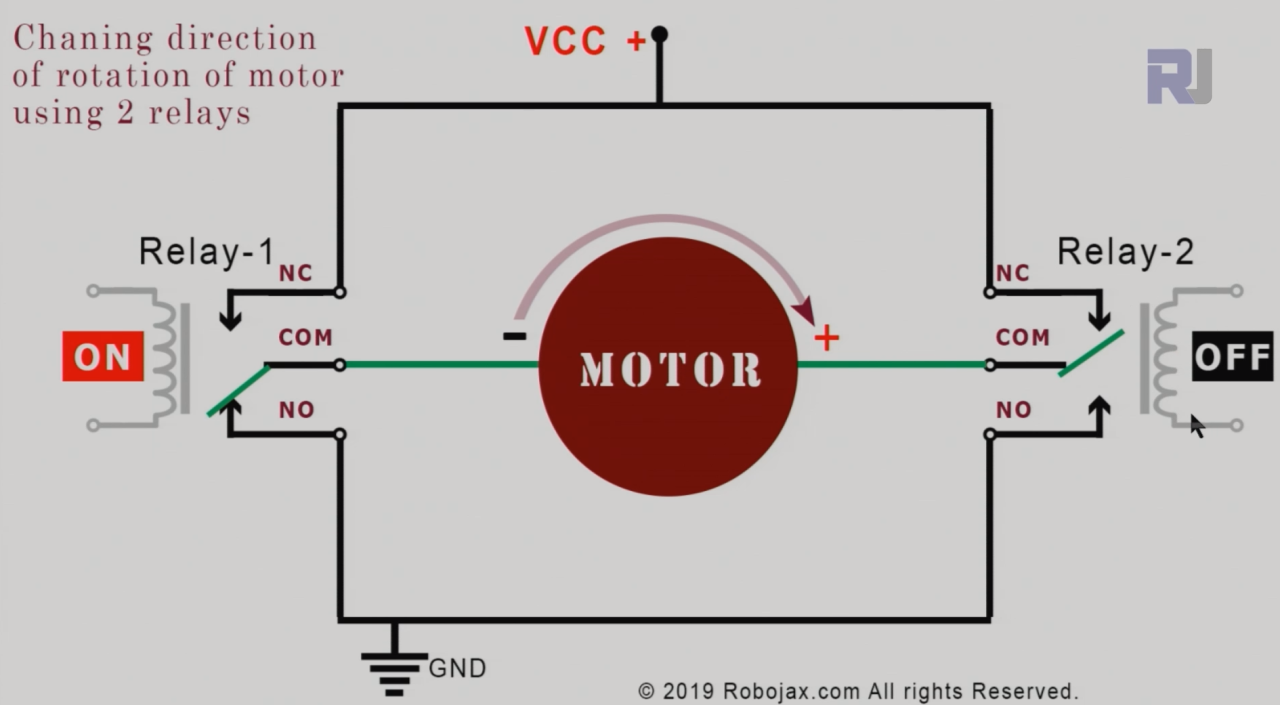
我们可以连接两个继电器,如上所示,以控制电机的旋转方向。当继电器1开启,继电器2关闭时,电机顺时针旋转。
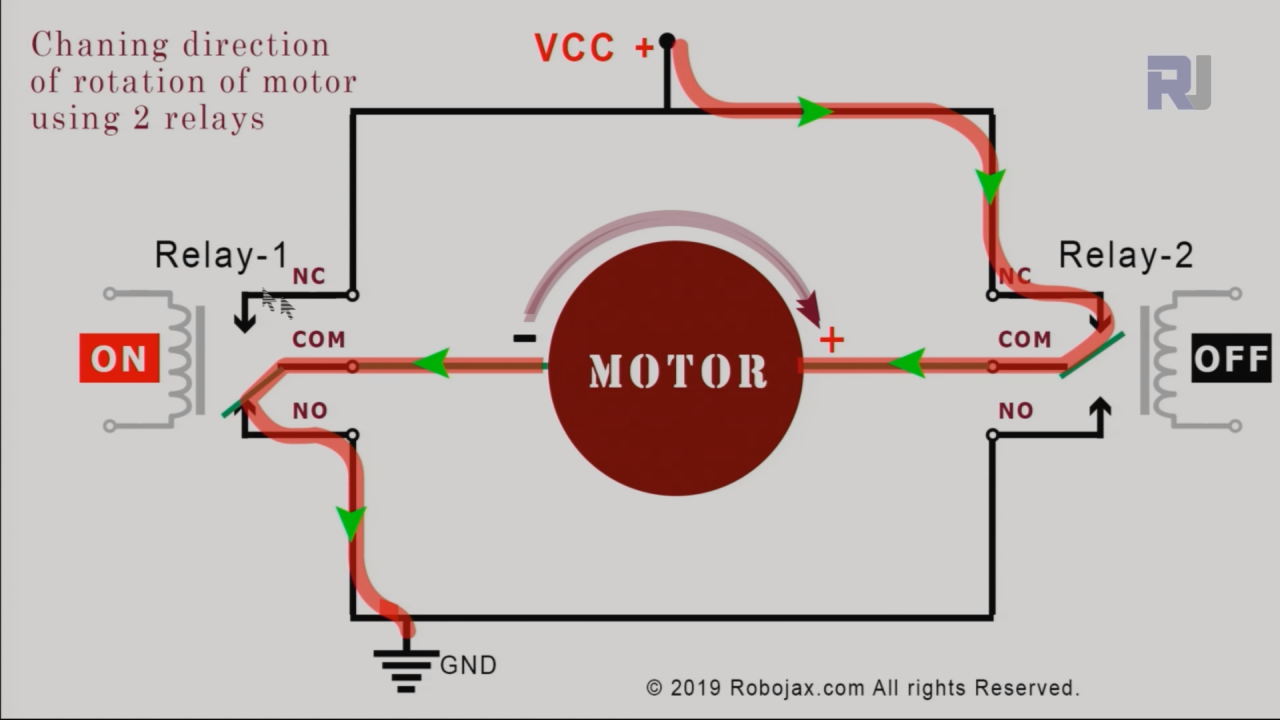
上面的图像展示了电流的路径。
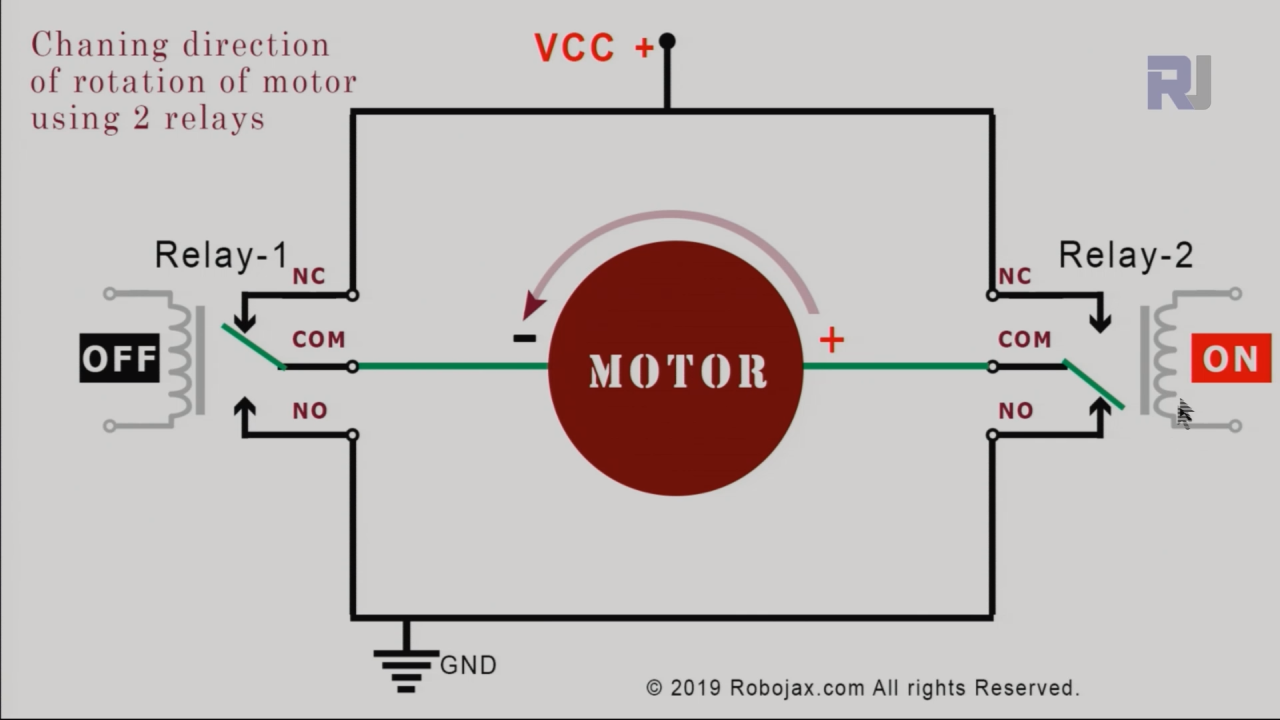
我们可以连接两个继电器,如上所示,以控制电动机的旋转方向。如果继电器1关闭,而继电器2开启,那么电动机将逆时针旋转。请看电动机上方的箭头。
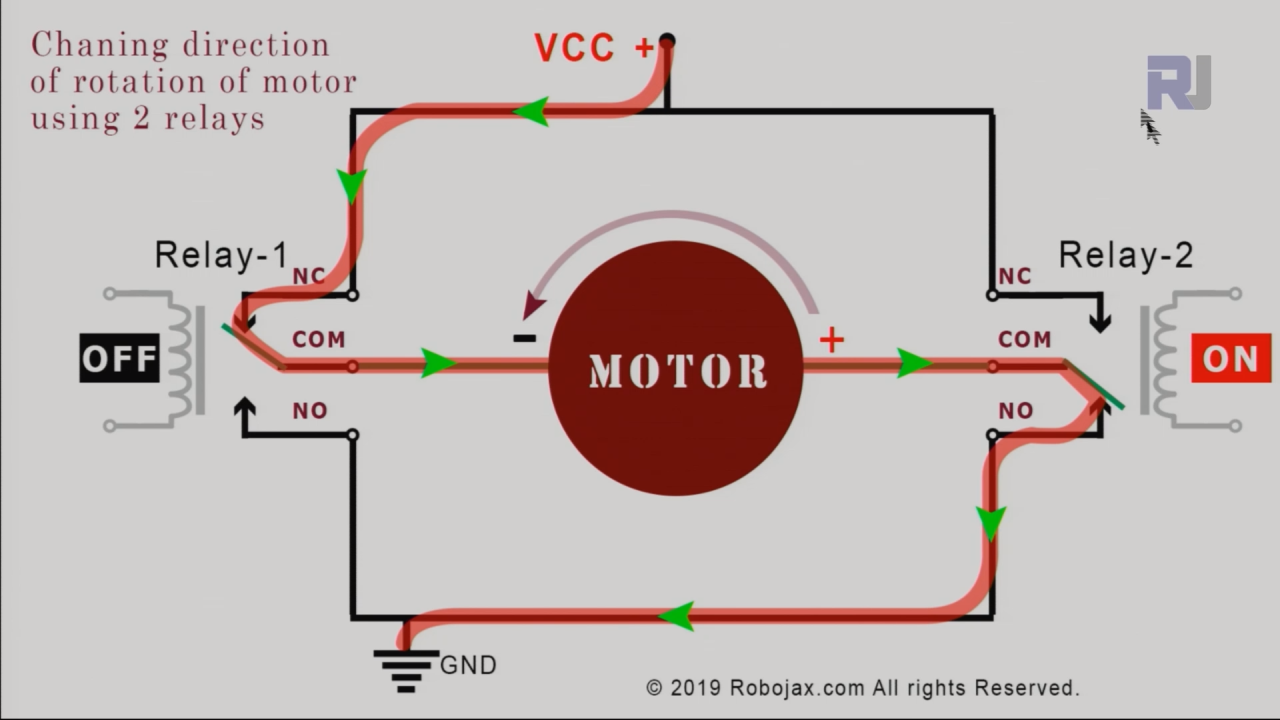
上述图像显示了电流的路径。
数据表详细信息
| 制造商 | 宋格 |
|---|---|
| 部件编号 | SRD-05VDC-SL-C |
| 线圈电压 | 5 伏特 (直流) |
| 接触额定值 | 10 A / 250 VAC |
| 交流电 | 15 A 最大 |
| 切换电压 | 30 伏直流 / 250 伏交流 |
| 接触电阻 | ≤ 100 毫欧 |
| 绝缘电阻 | ≥ 1000 兆Ω |
| 工作温度 | -40 至 +70 °C |
| 包裹 | 带有2个继电器的继电器模块 |
- 确保继电器的额定值符合电动机的电压和电流。
- 在Arduino和继电器模块之间使用一个共同的接地。
- 如有必要,请使用适当的续流二极管以保护Arduino免受反向电动势的影响。
- 保持电线长度短,以最小化电阻和干扰。
- 在启动系统之前,请仔细检查继电器连接。
- 在给电机施加全功率之前,请使用较低的电压测试电路。
- 为方便故障排查,对电线进行标记。
接线说明
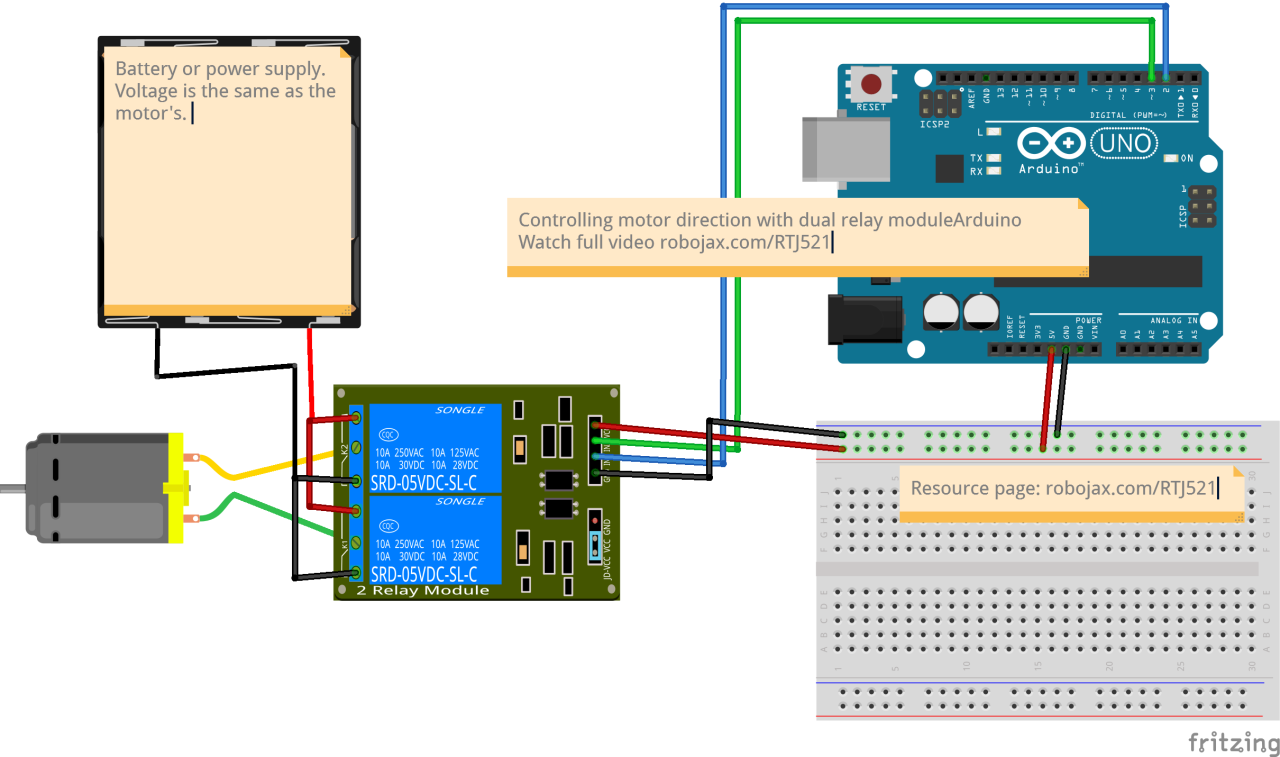
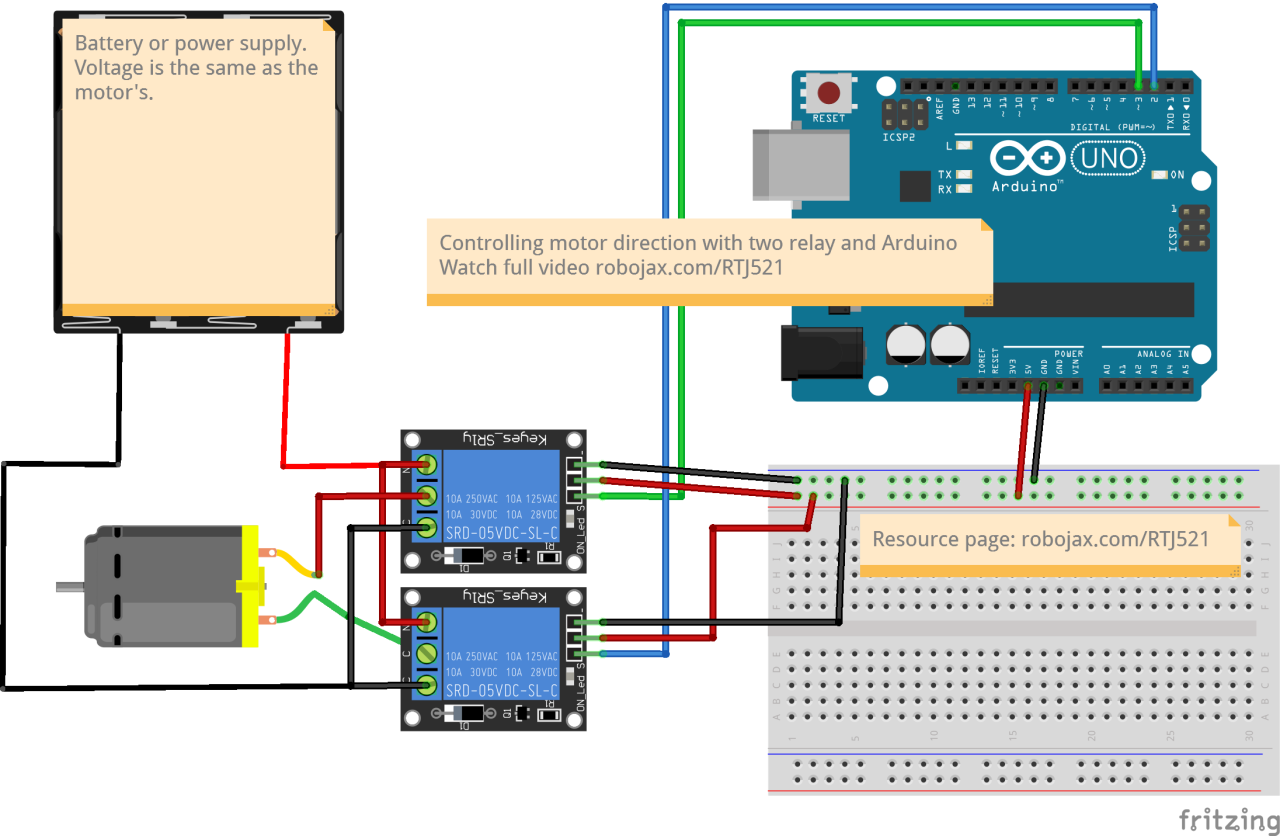
代码示例与详细讲解
在代码中,我们定义了两个引脚用于继电器。int relay1 = 2;和int relay2 = 3;这些引脚将控制继电器的操作。setup()此函数将这些引脚初始化为输出,并通过将两个继电器设置为高电平来保持电机关闭。
void setup() {
    pinMode(relay1, OUTPUT); // set pin as output for relay 1
    pinMode(relay2, OUTPUT); // set pin as output for relay 2
    digitalWrite(relay1, HIGH);
    digitalWrite(relay2, HIGH);
}在中loop()为了控制电机的方向,我们设置电机逆时针(CCW)旋转。relay1太低和relay2太高了。这允许电流朝一个方向流动。
digitalWrite(relay1, LOW); // turn relay 1 ON
digitalWrite(relay2, HIGH); // turn relay 2 OFF
Serial.println("Rotating in CCW");
delay(3000); // wait for 3 seconds
为了停止电动机,我们通过再次将两个继电器设为高电平来关闭它们。然后,我们通过切换继电器的状态来反转方向,使电动机顺时针(CW)旋转。
digitalWrite(relay1, HIGH); // turn relay 1 OFF
digitalWrite(relay2, LOW); // turn relay 2 ON
Serial.println("Rotating in CW");
delay(3000); // wait for 3 seconds
该项目的完整代码加载在文章下方。确保观看视频以获得代码的详细解释(视频时间为00:00)。
演示 / 期待什么
当设置完成并上传代码后,电机将首先逆时针旋转三秒钟,然后停止两秒钟,接着顺时针旋转三秒钟,最后再次停止。这个循环将不断重复。常见的错误包括继电器接线不正确或将电机直接连接到Arduino,这可能会损坏控制板。请参考视频以确认预期的行为(视频中时间为00:00)。
视频时间戳
- 00:00 介绍
- 04:27 这怎么运作
- 08:05 电线说明
- 11:45 基本代码讲解
- 15:25 高级代码解释
- 18:40 使用两个单路继电器的演示
- 19:43 使用双重继电器模块的演示
图像
++
/*
* Lesson 52: Control a DC motor with Relay using Arduino | Arduino Step By Step Course
Basic code
 * Arduino code to change the direction of rotation
 * of a DC motor with 2 relays.

 *
 * This is basic code. I have advanced code which can be used in both
 * for Low-level trigger and High-level trigger relay with clean code.
Please watch video explaining this code: https://youtu.be/2n0vUa0cZOI

 *
 * Written by Ahmad Shamshiri for Robojax.com on
 * Sunday, August 18, 2019
 * at 20:22 in Ajax, Ontario, Canada
 *

This code is available at http://robojax.com/course1/?vid=lecture52

with over 100 lectures free on YouTube. Watch it here: http://robojax.com/L/?id=338
Get the code for the course: http://robojax.com/L/?id=339


or make a donation using PayPal: http://robojax.com/L/?id=64
*
 * This code is "AS IS" without warranty or liability. Free to be used as long as you keep this note intact.
 * This code has been downloaded from Robojax.com
    This program is free software: you can redistribute it and/or modify
    it under the terms of the GNU General Public License as published by
    the Free Software Foundation, either version 3 of the License, or
    (at your option) any later version.

    This program is distributed in the hope that it will be useful,
    but WITHOUT ANY WARRANTY; without even the implied warranty of
    MERCHANTABILITY or FITNESS FOR A PARTICULAR PURPOSE.  See the
    GNU General Public License for more details.

    You should have received a copy of the GNU General Public License
    along with this program.  If not, see <https://www.gnu.org/licenses/>.
 */


int relay1 = 2;
int relay2 = 3;


void setup() {

    pinMode(relay1, OUTPUT);// set pin as output for relay 1
    pinMode(relay2, OUTPUT);// set pin as output for relay 2


    // keep the motor off by keeping both HIGH
    digitalWrite(relay1, HIGH);
    digitalWrite(relay2, HIGH);


  Serial.begin(9600);// initialize serial monitor with 9600 baud
  Serial.println("Robojax Motor Direction of Rotation");
  Serial.println("Using 2 Relays");
  delay(2000);
}

void loop() {

 // Rotate in CCW direction
  digitalWrite(relay1, LOW);// turn relay 1 ON
  digitalWrite(relay2, HIGH);// turn relay 2 OFF
  Serial.println("Rotating in CCW");
  delay(3000);// wait for 3 seconds

 // stop the motor
  digitalWrite(relay1, HIGH);// turn relay 1 OFF
  digitalWrite(relay2, HIGH);// turn relay 2 OFF
  Serial.println("Stopped");
  delay(2000);// stop for 2 seconds

 // Rotate in CW direction
  digitalWrite(relay1, HIGH);// turn relay 1 OFF
  digitalWrite(relay2, LOW);// turn relay 2 ON
  Serial.println("Rotating in CW");
  delay(3000);// wait for 3 seconds

 // stop the motor
  digitalWrite(relay1, HIGH);// turn relay 1 OFF
  digitalWrite(relay2, HIGH);// turn relay 2 OFF
  Serial.println("Stopped");
  delay(2000);// stop for 2 seconds

 Serial.println("===============");


}// loop end
|||您可能需要的东西
-
易趣从eBay购买一个双通道继电器。ebay.us
资源与参考
-
外部
-
外部从eBay购买一个双通道继电器。ebay.us
-
外部从亚马逊美国购买一个双通道继电器amzn.to
-
外部在亚马逊购买一个双通道继电器。amzn.to
文件📁
没有可用的文件。