Lesson 52-1: Basic Code: Control a DC Motor with a Relay Using Arduino
In this lesson, we will learn how to control the direction of a DC motor using two relays and an Arduino. By changing the polarity of the voltage supplied to the motor, we can reverse its direction. This project is straightforward and ideal for beginners looking to understand relay control with Arduino. Be sure to watch the video for additional insights and demonstrations (in video at 00:00).
In this tutorial, we will use two relays to switch the polarity of the power supply to the motor. When one relay is activated, it allows current to flow in one direction, making the motor rotate in one direction. When the other relay is activated, it reverses the current flow, causing the motor to rotate in the opposite direction. The relays act as switches that are controlled by the Arduino.


Hardware Explained
The main components for this project include an Arduino board, two relays, a DC motor, and a power supply. The Arduino board is the brain of the operation, sending signals to the relays to control the motor's direction. Each relay has three terminals: common (COM), normally closed (NC), and normally open (NO). When activated, the relay connects the COM terminal to either the NC or NO terminal, effectively switching the circuit.
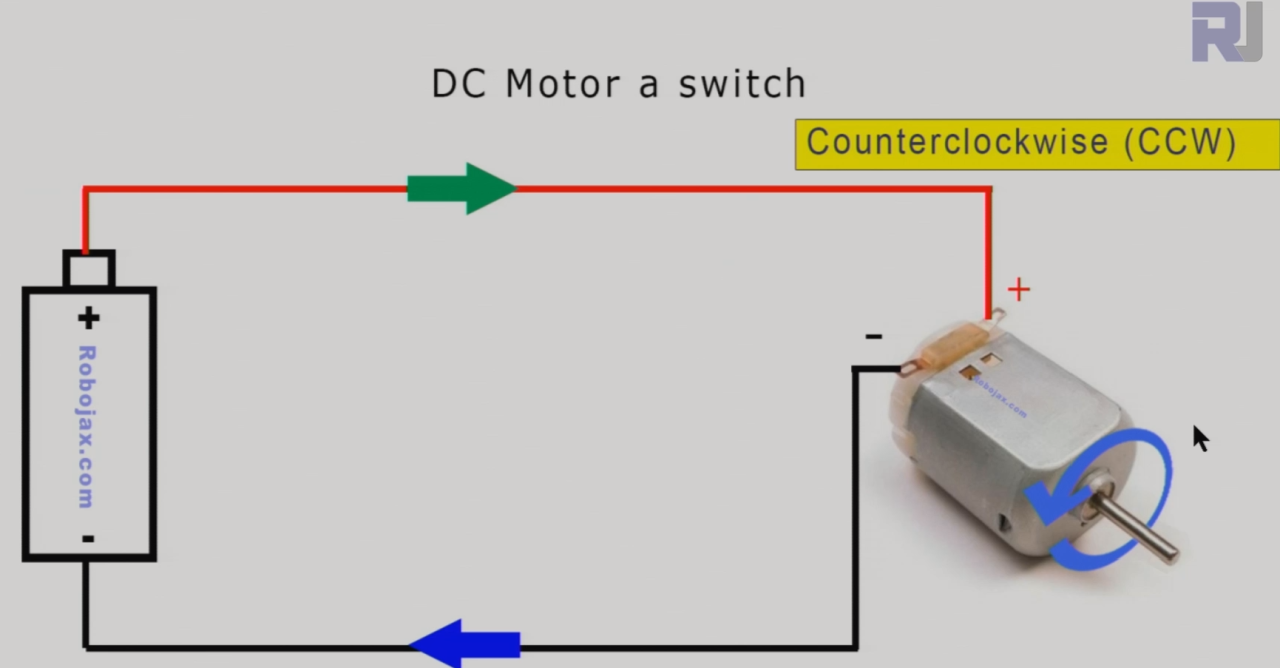
Image above shows to connect a motor wires to a battery, the motor rotates for example in counter clockwise direction (CCW).
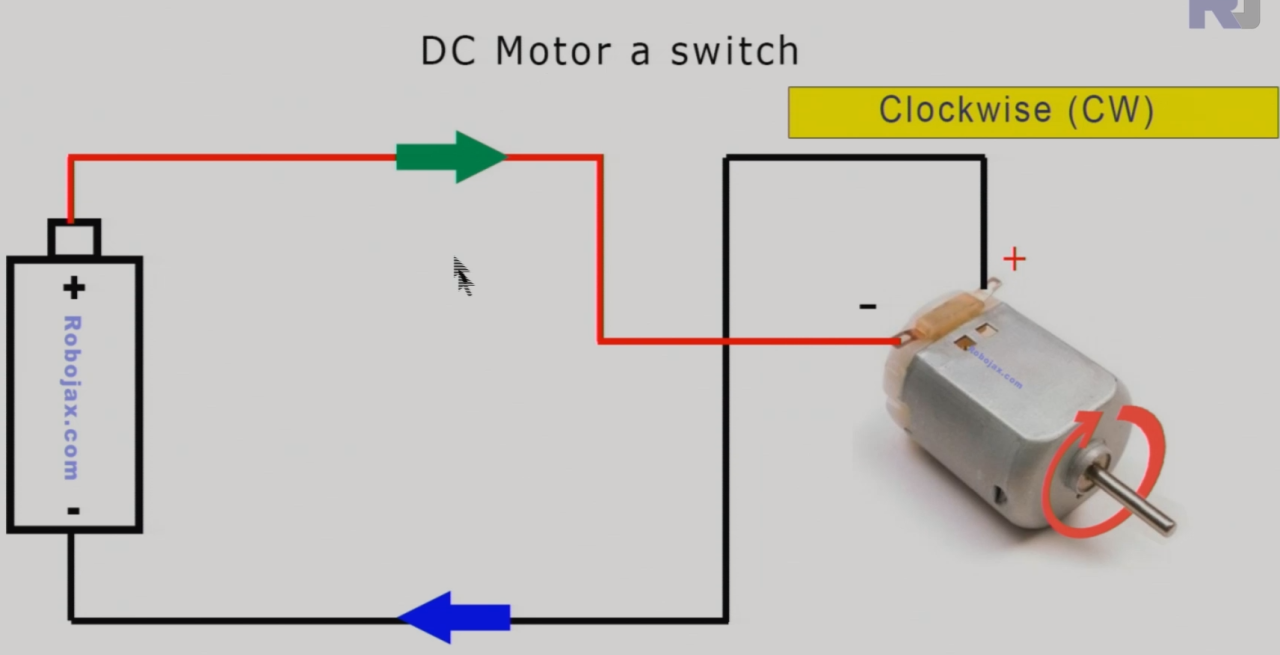
Image above shows if you connect the + and - wires to different terminals of motor, it rotates for example in clockwise direction (CW).
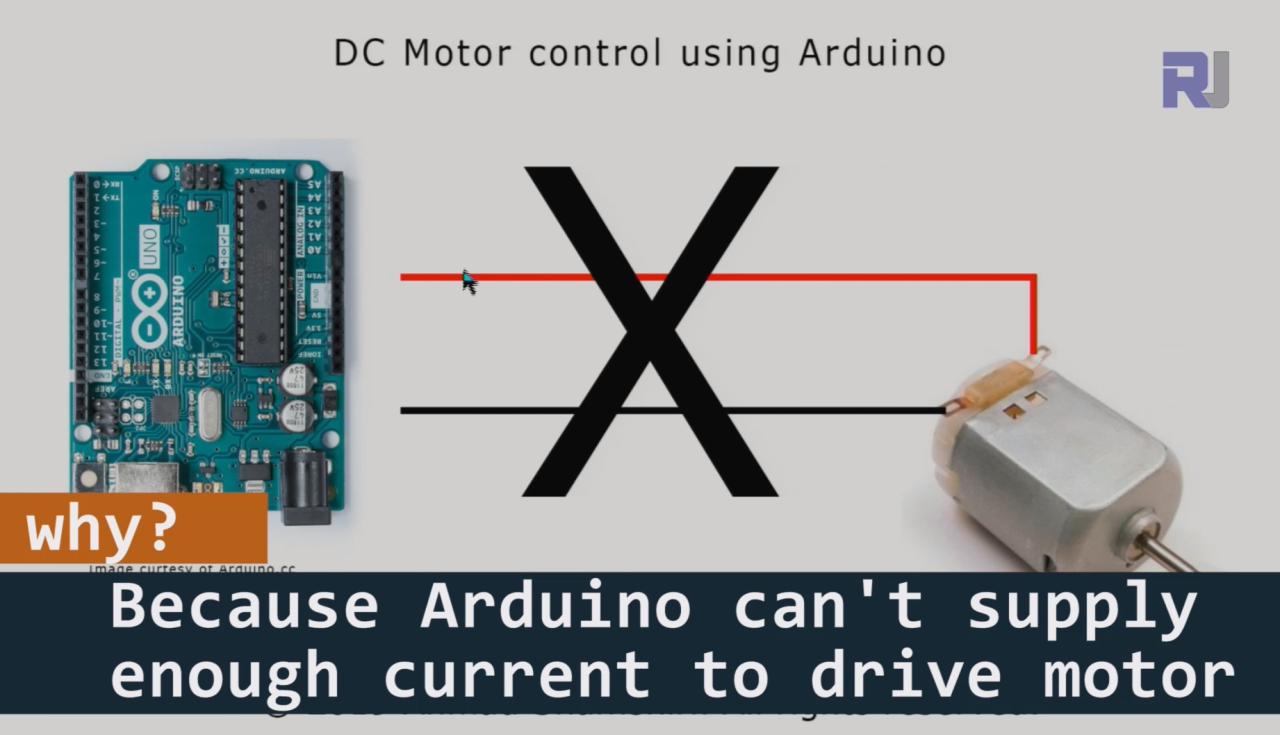
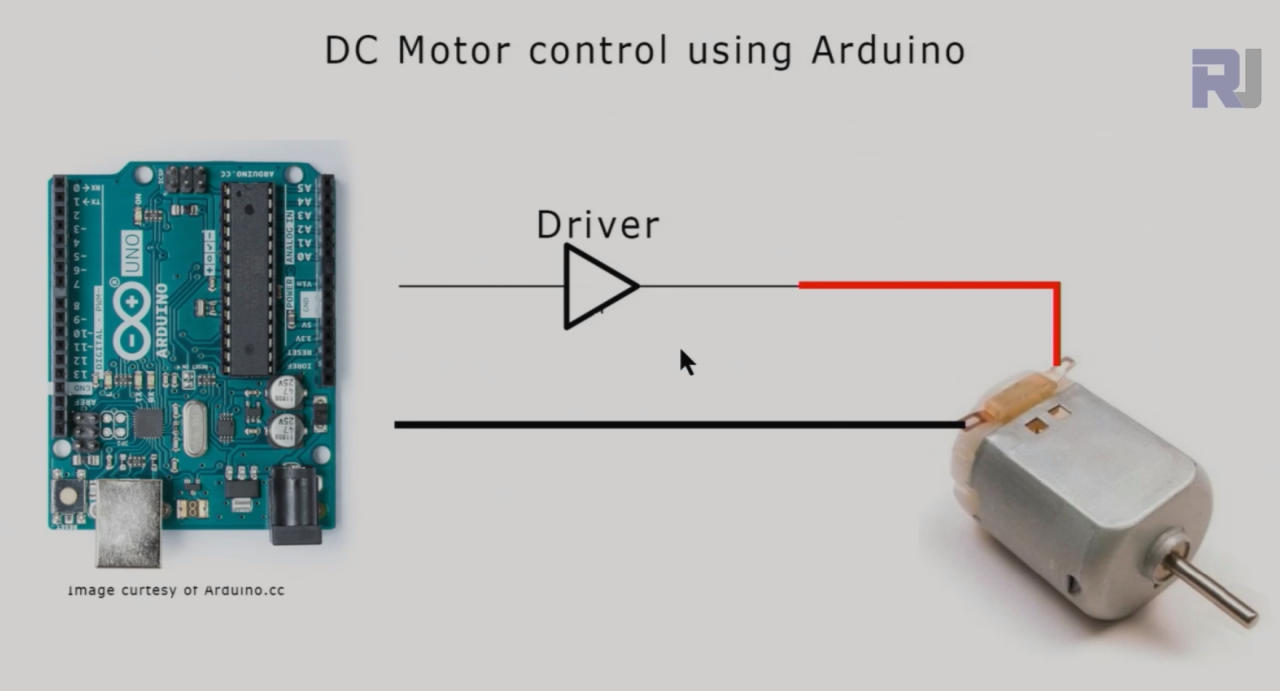
We can't connect a relay direcly to Arduino, ESP32 or Raspberry pi boards as the motor need very hight current to operate.

We need motor driver t be between Arduino and motor.
Relays are important because they allow the Arduino to control high-power devices like motors without being directly connected to them. This is crucial since the Arduino's output pins can only handle a limited current. By using relays, we can safely control the motor's operation from the Arduino.
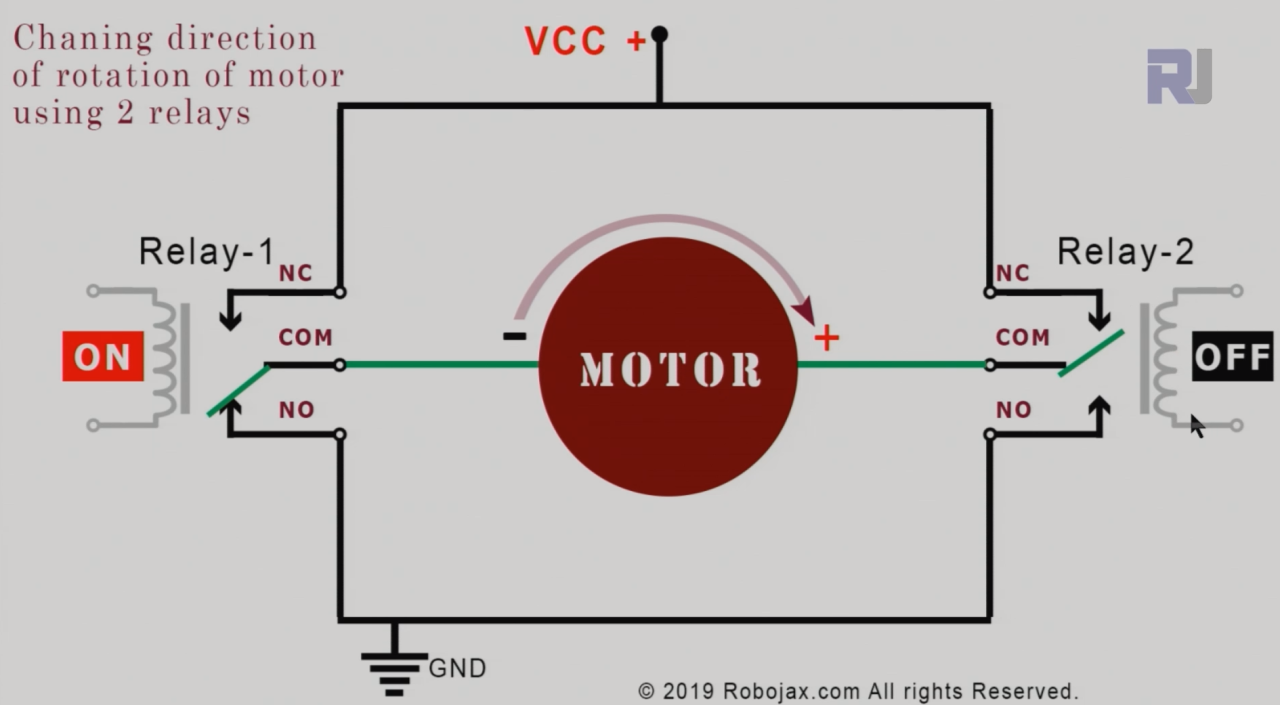
we can connect two relay as shown above to control the direction of rotation of motor. Relay-1 if ON and Relay-2 if OFF. now motor rotates in CW direction
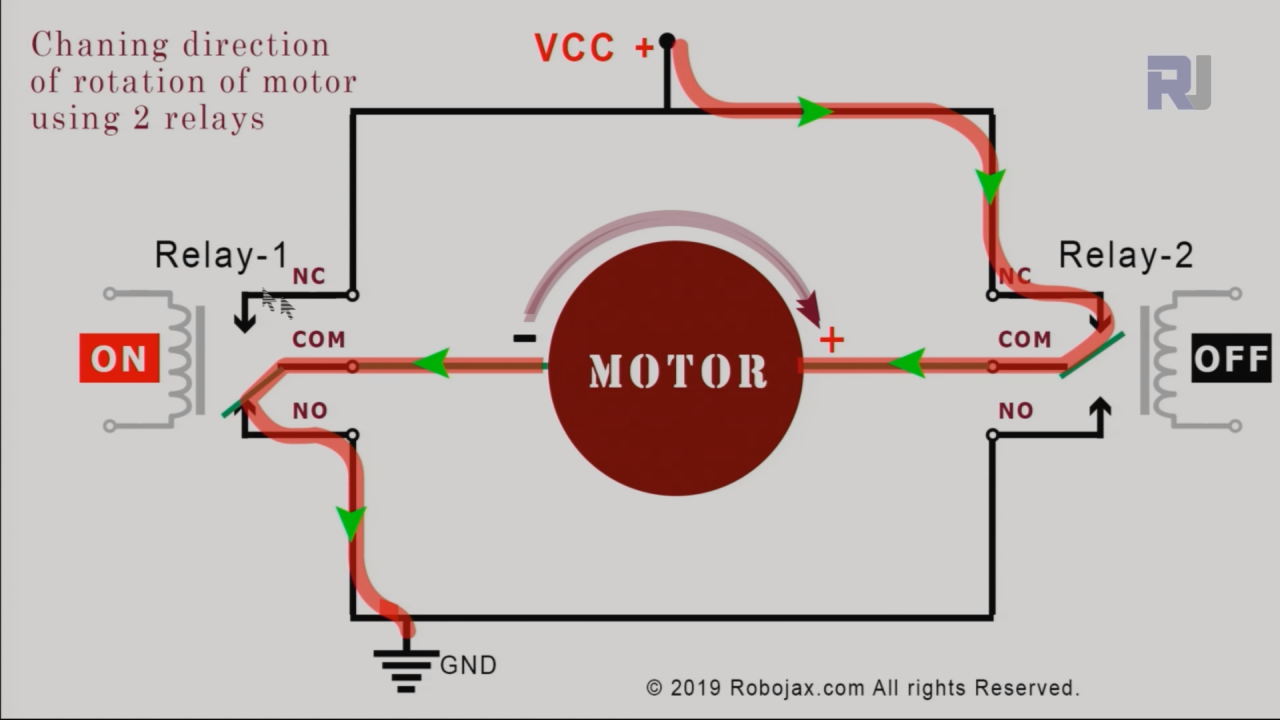
Image above shows the path of current.
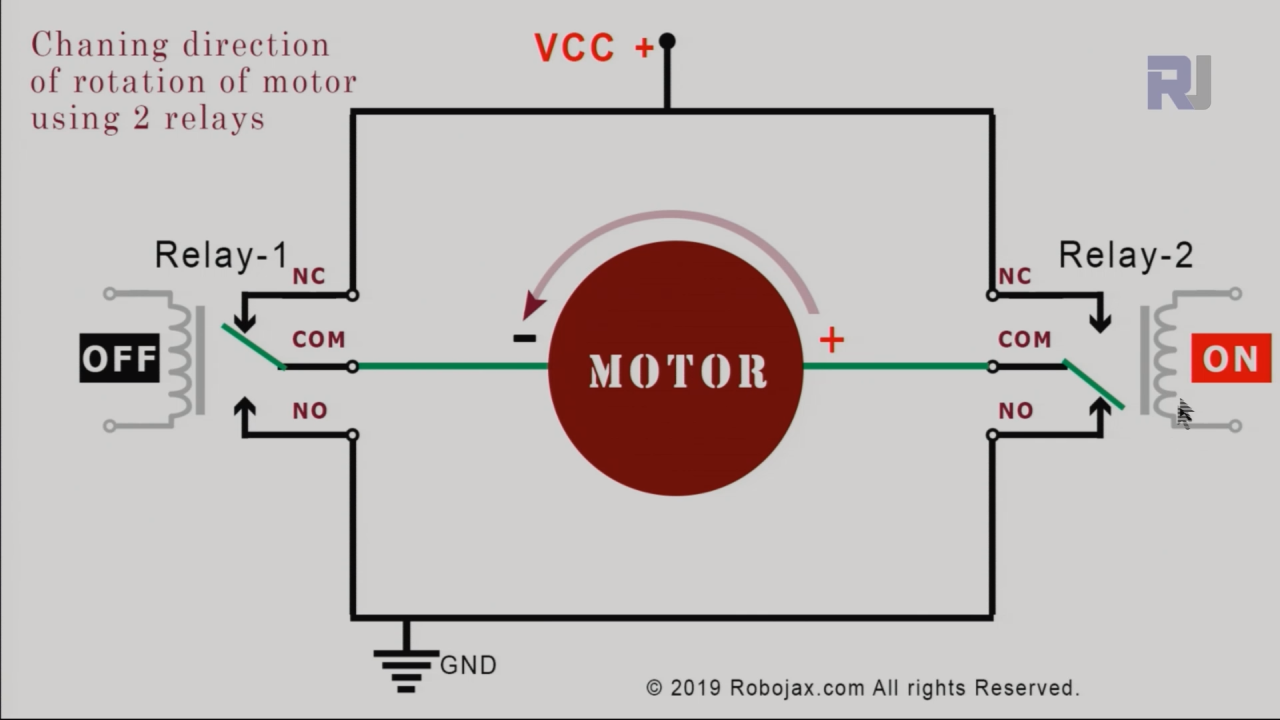
we can connect two relay as shown above to control the direction of rotation of motor. Relay-1 if OFF and Relay-2 if ON . now motor rotates in CCW direction. Look at the arrow abobe the motor.
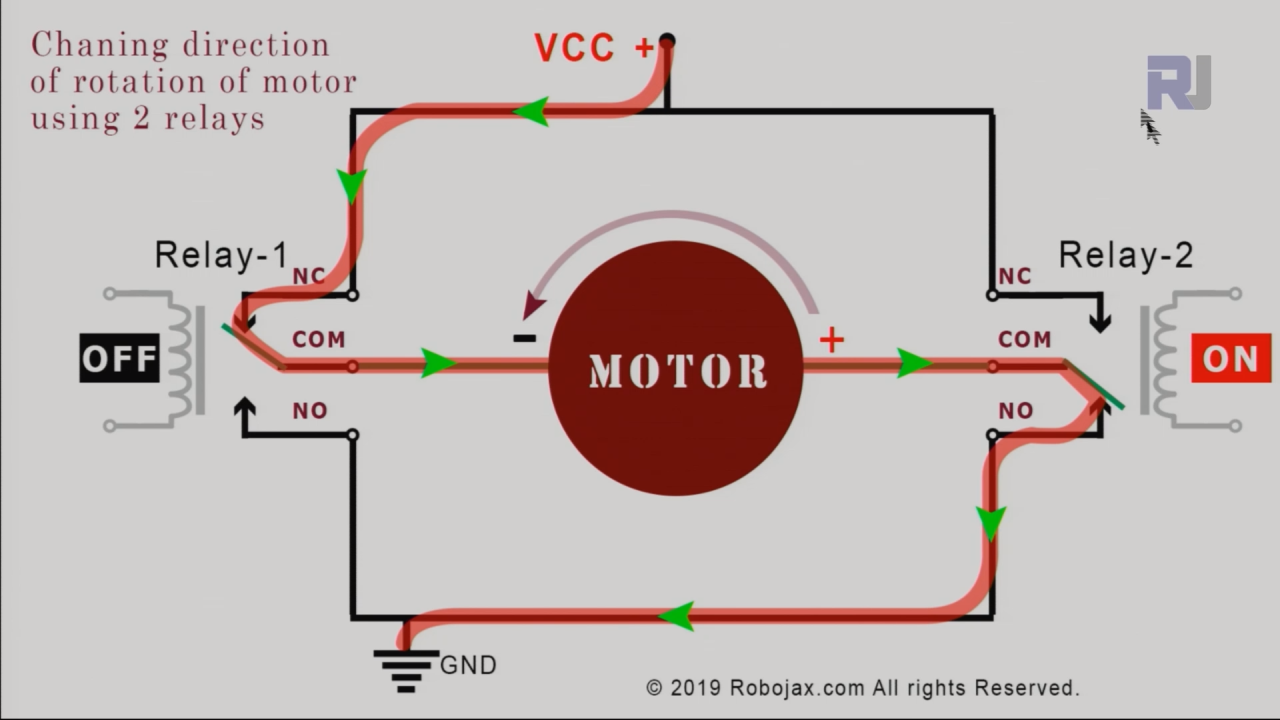
The iamge bove shows the path of current.
Datasheet Details
| Manufacturer | Songle |
|---|---|
| Part number | SRD-05VDC-SL-C |
| Coil voltage | 5 V (DC) |
| Contact rating | 10 A / 250 VAC |
| Switching current | 15 A max |
| Switching voltage | 30 V DC / 250 V AC |
| Contact resistance | ≤ 100 mΩ |
| Insulation resistance | ≥ 1000 MΩ |
| Operating temperature | -40 to +70 °C |
| Package | Relay Module with 2 Relays |
- Ensure relays are rated for the motor's voltage and current.
- Use a common ground between the Arduino and the relay module.
- Use appropriate flyback diodes if necessary to protect the Arduino from back EMF.
- Keep wire lengths short to minimize resistance and interference.
- Double-check relay connections before powering on the system.
- Test the circuit with lower voltages before applying full power to the motor.
- Label wires for easy identification during troubleshooting.
Wiring Instructions


Code Examples & Walkthrough
In the code, we define two pins for the relays using int relay1 = 2; and int relay2 = 3;. These pins will control the operation of the relays. The setup() function initializes these pins as outputs and keeps the motor off by setting both relays to high.
void setup() {
    pinMode(relay1, OUTPUT); // set pin as output for relay 1
    pinMode(relay2, OUTPUT); // set pin as output for relay 2
    digitalWrite(relay1, HIGH);
    digitalWrite(relay2, HIGH);
}
In the loop() function, we control the motor's direction. To rotate the motor counterclockwise (CCW), we set relay1 to low and relay2 to high. This allows current to flow in one direction.
digitalWrite(relay1, LOW); // turn relay 1 ON
digitalWrite(relay2, HIGH); // turn relay 2 OFF
Serial.println("Rotating in CCW");
delay(3000); // wait for 3 seconds
To stop the motor, we turn off both relays by setting them high again. We then reverse the direction by switching the states of the relays, allowing the motor to rotate clockwise (CW).
digitalWrite(relay1, HIGH); // turn relay 1 OFF
digitalWrite(relay2, LOW); // turn relay 2 ON
Serial.println("Rotating in CW");
delay(3000); // wait for 3 seconds
The full code for this project is loaded below the article. Make sure to watch the video for a detailed explanation of the code (in video at 00:00).
Demonstration / What to Expect
When the setup is complete and the code is uploaded, the motor will first rotate counterclockwise for three seconds, then stop for two seconds, followed by a clockwise rotation for another three seconds, and finally stop again. This cycle will repeat continuously. Common pitfalls include incorrect wiring of the relays or connecting the motor directly to the Arduino, which can damage the board. Refer to the video for visual confirmation of the expected behavior (in video at 00:00).
Video Timestamps
- 00:00 Introduction
- 04:27 How does it work
- 08:05 Wiring Explained
- 11:45 Basic Code Explained
- 15:25 Advanced code explained
- 18:40 Demonstration with two single relay
- 19:43 Demonstration with a dual relay module
Images
++
/*
* Lesson 52: Control a DC motor with Relay using Arduino | Arduino Step By Step Course
Basic code
 * Arduino code to change the direction of rotation
 * of a DC motor with 2 relays.

 *
 * This is basic code. I have advanced code which can be used in both
 * for Low-level trigger and High-level trigger relay with clean code.
Please watch video explaining this code: https://youtu.be/2n0vUa0cZOI

 *
 * Written by Ahmad Shamshiri for Robojax.com on
 * Sunday, August 18, 2019
 * at 20:22 in Ajax, Ontario, Canada
 *

This code is available at http://robojax.com/course1/?vid=lecture52

with over 100 lectures free on YouTube. Watch it here: http://robojax.com/L/?id=338
Get the code for the course: http://robojax.com/L/?id=339


or make a donation using PayPal: http://robojax.com/L/?id=64
*
 * This code is "AS IS" without warranty or liability. Free to be used as long as you keep this note intact.
 * This code has been downloaded from Robojax.com
    This program is free software: you can redistribute it and/or modify
    it under the terms of the GNU General Public License as published by
    the Free Software Foundation, either version 3 of the License, or
    (at your option) any later version.

    This program is distributed in the hope that it will be useful,
    but WITHOUT ANY WARRANTY; without even the implied warranty of
    MERCHANTABILITY or FITNESS FOR A PARTICULAR PURPOSE.  See the
    GNU General Public License for more details.

    You should have received a copy of the GNU General Public License
    along with this program.  If not, see <https://www.gnu.org/licenses/>.
 */


int relay1 = 2;
int relay2 = 3;


void setup() {

    pinMode(relay1, OUTPUT);// set pin as output for relay 1
    pinMode(relay2, OUTPUT);// set pin as output for relay 2


    // keep the motor off by keeping both HIGH
    digitalWrite(relay1, HIGH);
    digitalWrite(relay2, HIGH);


  Serial.begin(9600);// initialize serial monitor with 9600 baud
  Serial.println("Robojax Motor Direction of Rotation");
  Serial.println("Using 2 Relays");
  delay(2000);
}

void loop() {

 // Rotate in CCW direction
  digitalWrite(relay1, LOW);// turn relay 1 ON
  digitalWrite(relay2, HIGH);// turn relay 2 OFF
  Serial.println("Rotating in CCW");
  delay(3000);// wait for 3 seconds

 // stop the motor
  digitalWrite(relay1, HIGH);// turn relay 1 OFF
  digitalWrite(relay2, HIGH);// turn relay 2 OFF
  Serial.println("Stopped");
  delay(2000);// stop for 2 seconds

 // Rotate in CW direction
  digitalWrite(relay1, HIGH);// turn relay 1 OFF
  digitalWrite(relay2, LOW);// turn relay 2 ON
  Serial.println("Rotating in CW");
  delay(3000);// wait for 3 seconds

 // stop the motor
  digitalWrite(relay1, HIGH);// turn relay 1 OFF
  digitalWrite(relay2, HIGH);// turn relay 2 OFF
  Serial.println("Stopped");
  delay(2000);// stop for 2 seconds

 Serial.println("===============");


}// loop end
Things you might need
-
eBay
Resources & references
-
External
-
External
-
External
-
External
Files📁
No files available.