第76-1课:使用单个VL6180激光距离传感器与Arduino
第76-1課:用Arduino使用單一粒VL6180激光距離感測器
喺呢個教學入面,我哋會學點樣用VL6180X激光距離感測器配合Arduino板。呢粒細細粒嘅感測器可以準確量度最多20厘米嘅距離,適合用喺機械人同物件偵測等各種應用。完成呢個教學之後,你就會清楚知道點樣接線、安裝所需嘅函式庫,同埋寫程式去攞距離讀數。
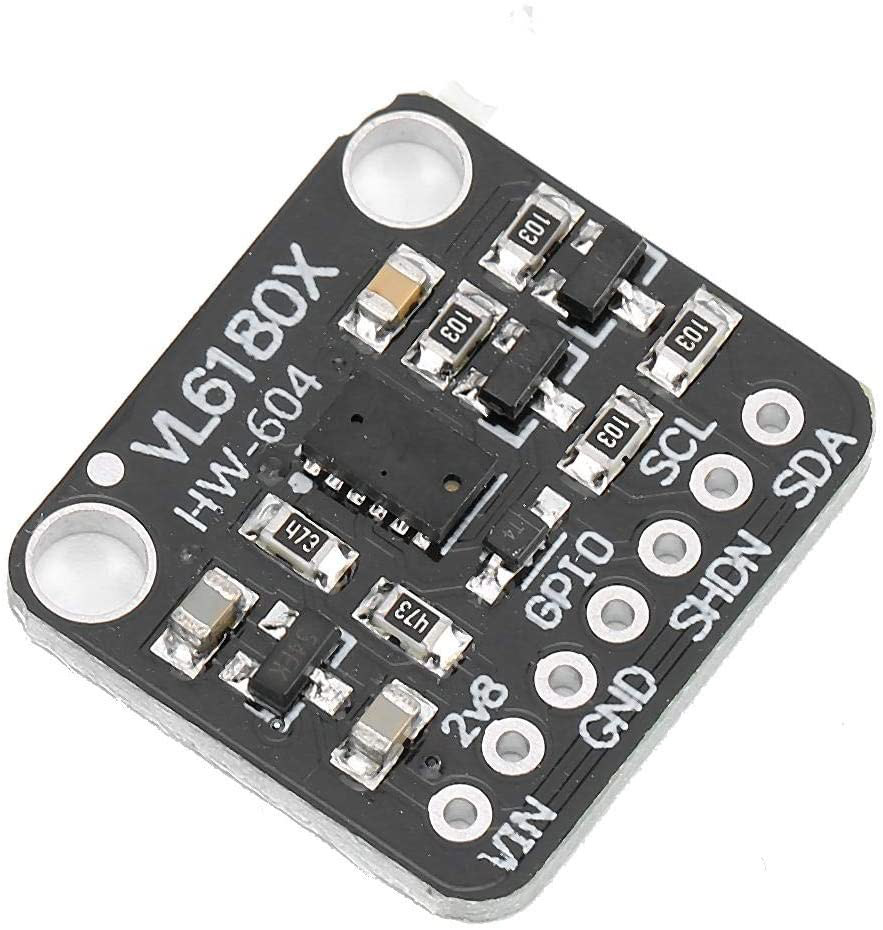
VL6180X感測器係用飛行時間(ToF)原理運作,佢會發射激光,然後量度光線撞到物件之後反射返嚟嘅時間。呢個方法可以做到精確嘅距離量度,廣泛用喺流動裝置同機械人上面。喺跟住落嚟嘅章節,我哋會討論硬件組件、接線指示同程式碼實現。
硬件解說
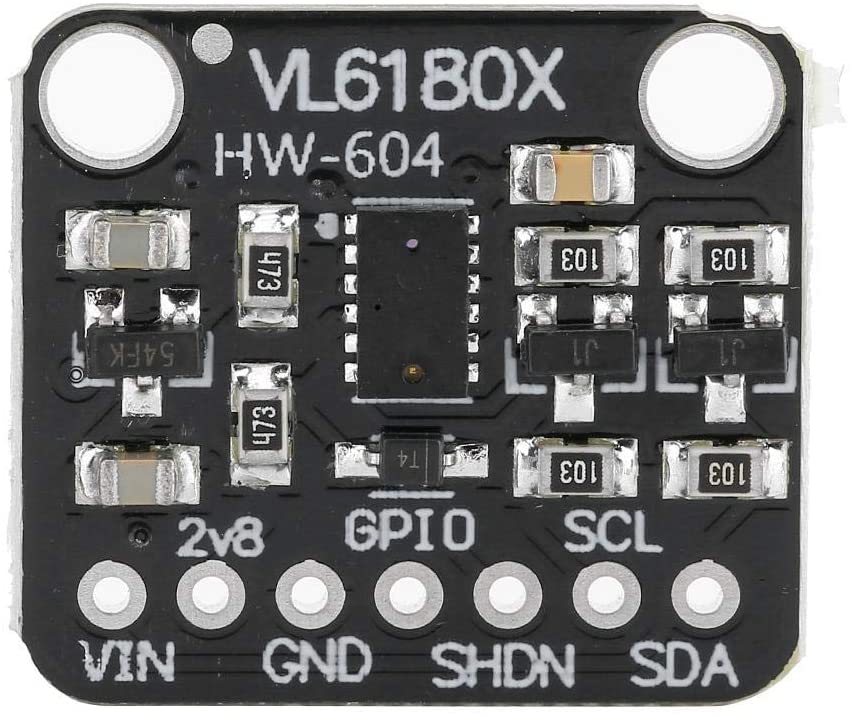
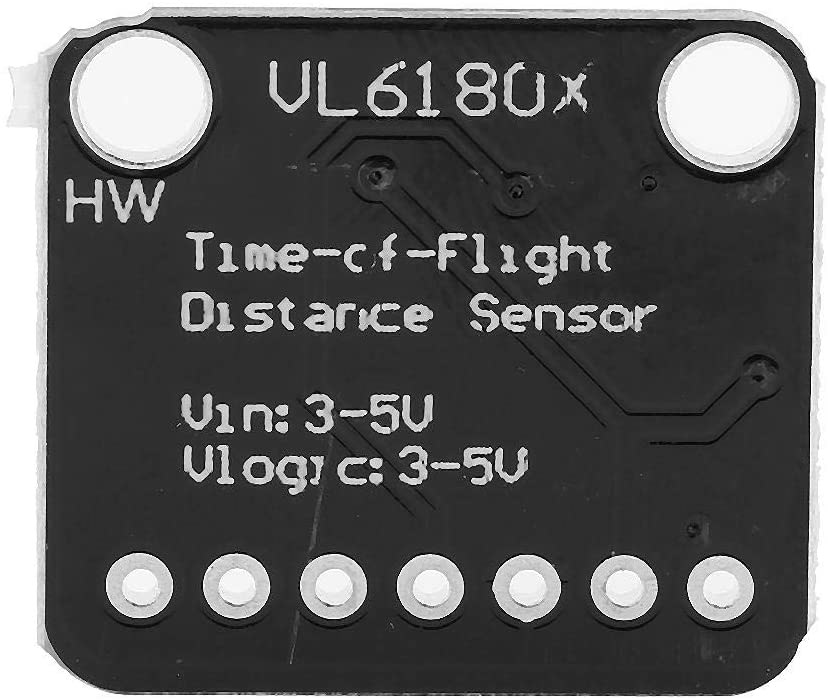
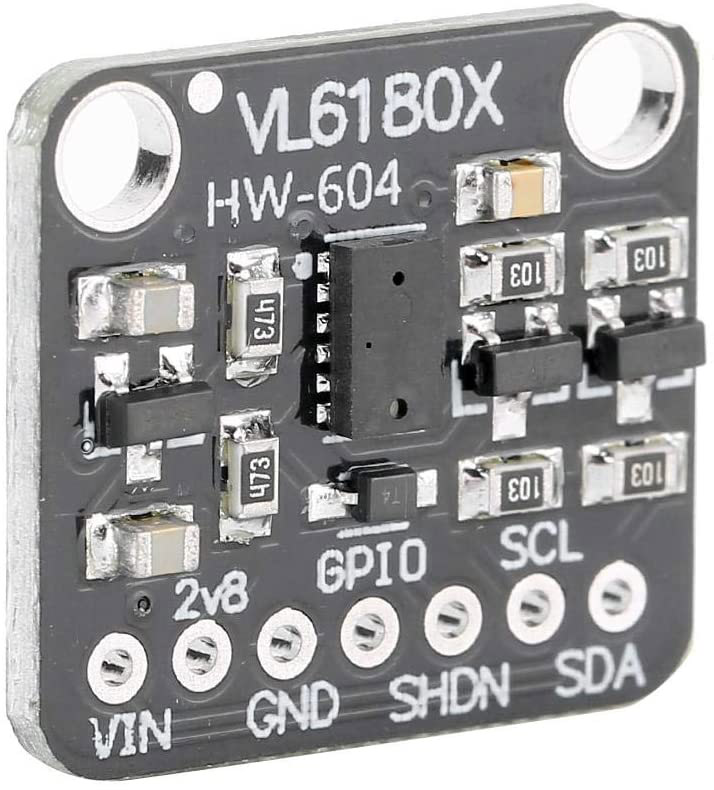
呢個項目嘅主要組件係VL6180X激光距離感測器。呢粒感測器有I2C介面,好容易就可以連接到Arduino。佢有幾個針腳,包括電源、接地同數據線。感測器嘅工作電壓範圍係2.6至3.6伏特,可以好準確咁量度距離。
另外,Arduino板就係負責讀取感測器數據同處理數據嘅微控制器。呢個設置需要基本嘅電子組件,例如跳線同麵包板嚟做連接。了解每個組件點樣互相配合,對於成功實現係好重要嘅。
數據手冊細節
| 製造商 | STMicroelectronics |
|---|---|
| 零件編號 | VL6180X |
| 邏輯/IO電壓 | 2.6 - 3.6 V |
| 供電電壓 | 2.6 - 3.6 V |
| 輸出電流 | 1.7 mA(典型值) |
| 峰值電流 | 10 mA(最大值) |
| PWM頻率指引 | 不適用 |
| 輸入邏輯閾值 | 不適用 |
| 電壓降 / RDS(on) / 飽和 | 不適用 |
| 熱限制 | -20至70 °C |
| 封裝 | 4.8 x 2.8 x 1 mm |
| 備註 / 變體 | 近距離偵測同測距感測器 |
- 確保電源供應喺指定範圍之內,以免整壞感測器。
- 如有需要,喺I2C線上加拉高電阻,確保通訊可靠。
- 將感測器遠離直接陽光,先至可以攞到準確讀數。
- 可以考慮用麵包板嚟方便連接同調整。
- 查閱函式庫文件,了解特定函數嘅用法同功能。
接線指示

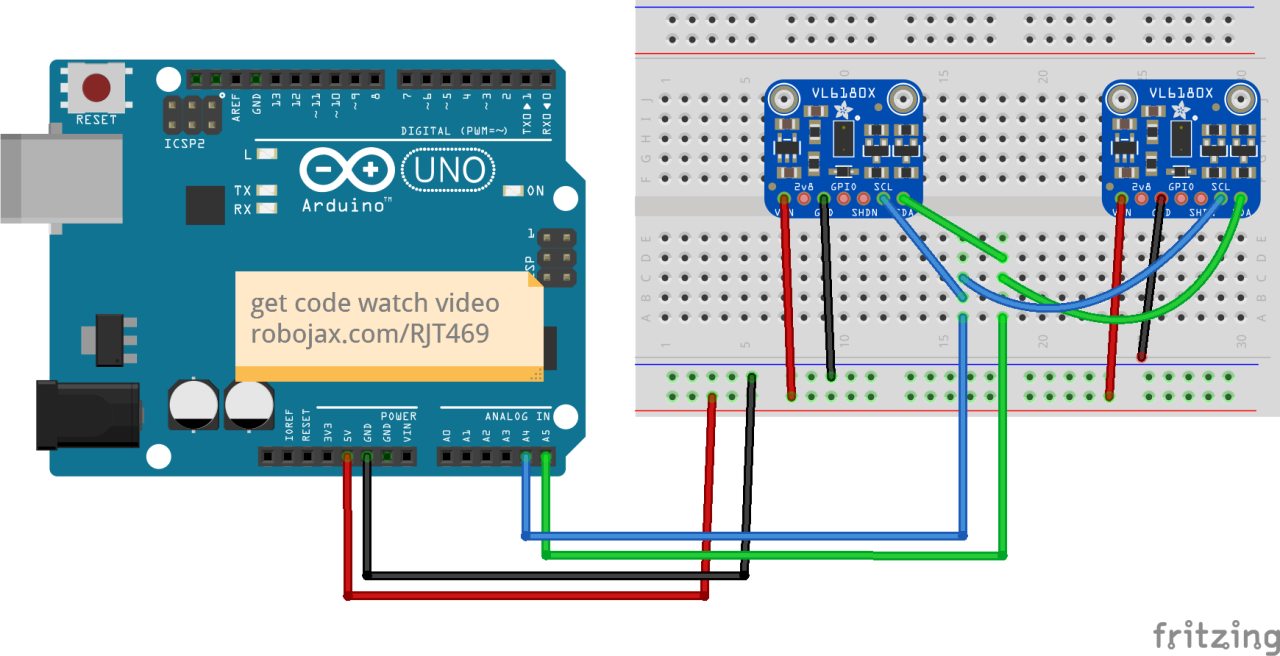
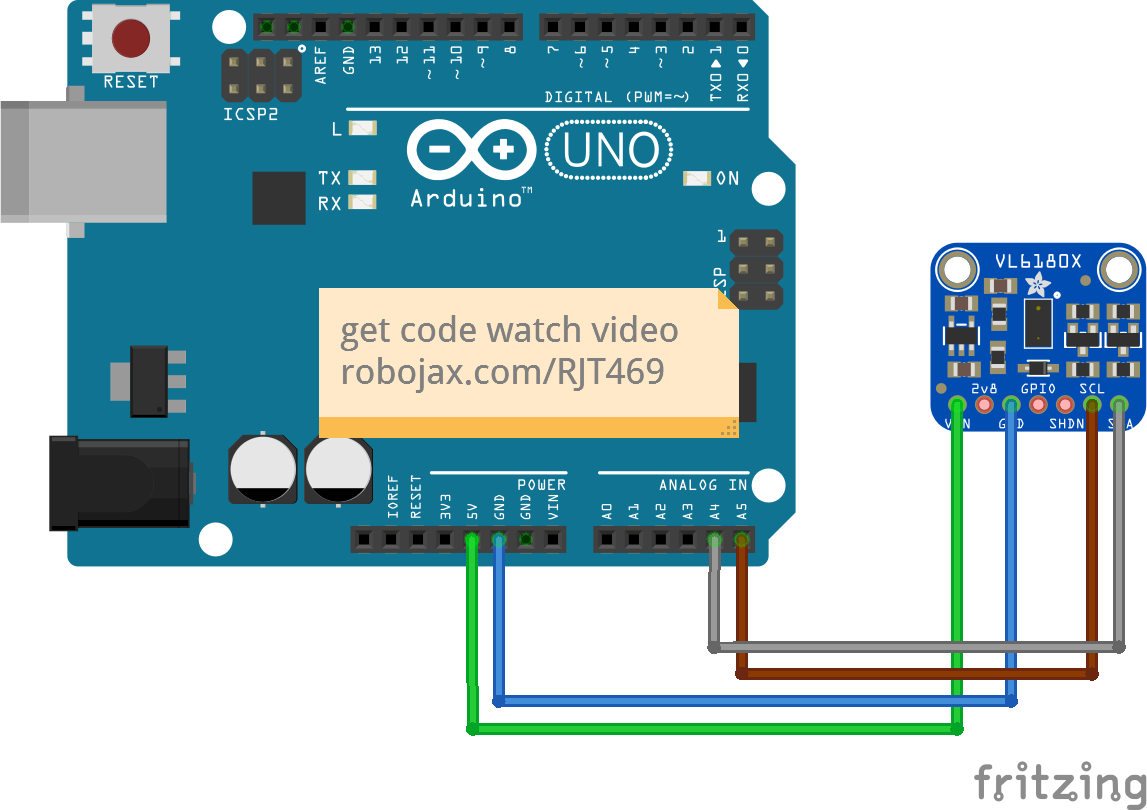
要將VL6180X感測器接到Arduino,首先將感測器嘅VCC針腳連接到Arduino嘅5V針腳。跟住將感測器嘅GND針腳連接到Arduino嘅GND針腳。感測器嘅SCL針腳要連接到A5,而SDA針腳就要連接到Arduino嘅A4。
確保按照呢個順序連接感測器:VCC去5V,GND去GND,SDA去A4,同SCL去A5。如果你打算用多過一粒感測器,要確保每粒都有獨立嘅I2C地址,同埋要適當處理關閉(shutdown)針腳。
程式碼示例同解說
喺程式碼入面,我哋首先包含所需嘅函式庫,然後初始化感測器實例。下面嘅片段示範點樣設置I2C通訊,同檢查係咪搵到感測器:
void setup() {
  Serial.begin(115200);
  while (!Serial) { delay(1); }

  if (! vl.begin()) {
    Serial.println("搵唔到感測器");
    while (1);
  }
  Serial.println("搵到感測器!");
}
呢段程式碼初始化序列監視器,然後嘗試同VL6180X感測器開始通訊。如果搵唔到感測器,佢會印出錯誤訊息,然後停止程式。
跟住,我哋讀取感測器嘅距離,同時檢查有冇錯誤:
void loop() {
  uint8_t range = vl.readRange();
  uint8_t status = vl.readRangeStatus();

  if (status == VL6180X_ERROR_NONE) {
    Serial.print("距離:"); Serial.print(range);
    Serial.println("mm");
  }
}
呢段片段讀取感測器量度到嘅距離,然後印到序列監視器。如果有任何錯誤,就可以根據返回嘅狀態印出相應嘅錯誤訊息。
示範 / 預期效果
完成接線同上載程式碼去Arduino之後,你應該會喺序列監視器度見到距離讀數。當有物件放喺感測器嘅量度範圍之內,就會顯示以毫米為單位嘅距離。如果物件太遠或者太近,感測器就會返回錯誤訊息。呢個行為可以喺影片示範入面確認(影片19:30位置)。
影片時間標記
- 00:00 開始
- 00:56 介紹
- 04:30 查閱VL6080V數據手冊
- 06:58 接線示範
- 07:32 兩粒或以上感測器嘅接線
- 09:22 安裝函式庫
- 10:30 Arduino程式碼解說(1粒感測器)
- 12:57 兩粒或以上感測器嘅程式碼
- 19:35 1粒感測器示範
- 22:05 2粒感測器示範
圖片
/*
 *  Arduino code
Using a single VL6180X 20cm Time-of-Flight proximity sensor with Arduino

View code for using a single VL6180X sensor: https://robojax.com?vid=robojax_VL6180X_laser2

 * Original code and library by https://github.com/adafruit/Adafruit_VL6180X
 *
 * Written/updated by Ahmad Shamshiri for Robojax Robojax.com
 * on Mar 10, 2021  in Ajax, Ontario, Canada
Watch the video instruction for this sketch: https://youtu.be/_H9D0czQpSI


If you found this tutorial helpful, please support me so I can continue creating
content like this.
or make a donation using PayPal http://robojax.com/L/?id=64

*
 * Code is available at http://robojax.com/learn/arduino

 * This code is "AS IS" without warranty or liability. Free to be used as long as you keep this note intact.
 * This code has been downloaded from Robojax.com
    This program is free software: you can redistribute it and/or modify
    it under the terms of the GNU General Public License as published by
    the Free Software Foundation, either version 3 of the License, or
    (at your option) any later version.

    This program is distributed in the hope that it will be useful,
    but WITHOUT ANY WARRANTY; without even the implied warranty of
    MERCHANTABILITY or FITNESS FOR A PARTICULAR PURPOSE.  See the
    GNU General Public License for more details.

    You should have received a copy of the GNU General Public License
    along with this program.  If not, see <https://www.gnu.org/licenses/>.

*/
#include <Wire.h>
#include "Adafruit_VL6180X.h"

Adafruit_VL6180X vl = Adafruit_VL6180X();

void setup() {
  Serial.begin(115200);

  // wait for serial port to open on native usb devices
  while (!Serial) {
    delay(1);
  }

  Serial.println("Adafruit VL6180x test!");
  if (! vl.begin()) {
    Serial.println("Failed to find sensor");
    while (1);
  }
  Serial.println("Sensor found!");
}

void loop() {

  uint8_t range = vl.readRange();
  uint8_t status = vl.readRangeStatus();

  if (status == VL6180X_ERROR_NONE) {
    Serial.print("Range: "); Serial.print(range);
    Serial.println("mm");
  }
//  if(range <=76)
//  {
//    //do something
//  }

  // Some error occurred, print it out!

  if  ((status >= VL6180X_ERROR_SYSERR_1) && (status <= VL6180X_ERROR_SYSERR_5)) {
    Serial.println("System error");
  }
  else if (status == VL6180X_ERROR_ECEFAIL) {
    Serial.println("ECE failure");
  }
  else if (status == VL6180X_ERROR_NOCONVERGE) {
    Serial.println("No convergence");
  }
  else if (status == VL6180X_ERROR_RANGEIGNORE) {
    Serial.println("Ignoring range");
  }
  else if (status == VL6180X_ERROR_SNR) {
    Serial.println("Signal/Noise error");
  }
  else if (status == VL6180X_ERROR_RAWUFLOW) {
    Serial.println("Raw reading underflow");
  }
  else if (status == VL6180X_ERROR_RAWOFLOW) {
    Serial.println("Raw reading overflow");
  }
  else if (status == VL6180X_ERROR_RANGEUFLOW) {
    Serial.println("Range reading underflow");
  }
  else if (status == VL6180X_ERROR_RANGEOFLOW) {
    Serial.println("Range reading overflow");
  }
  delay(50);
}/*
* Lesson 76-1: Using one VL6180 laser distance sensor with Arduino
* Adafruit code modified for this tutorial
* by Ahmad Shamshiri at 22:22 on
* March 10-11, 2021 in Ajax, ON, Canada
Please watch video instruction of this code: https://youtu.be/_H9D0czQpSI
View code for using two or more VL6180X sensors: https://robojax.com/course1/lecture76
This video is part of the Arduino Step by Step Course, which starts here: https://youtu.be/-6qSrDUA5a8
If you found this tutorial helpful, please support me so I can continue creating
content like this. You can support me on Patreon: http://robojax.com/L/?id=63
or make a donation using PayPal: http://robojax.com/L/?id=64
* This code is "AS IS" without warranty or liability. Free to be used as long as you keep this note intact. *
* This code has been downloaded from Robojax.com
This program is free software: you can redistribute it and/or modify
it under the terms of the GNU General Public License as published by
the Free Software Foundation, either version 3 of the License, or
(at your option) any later version.
This program is distributed in the hope that it will be useful,
but WITHOUT ANY WARRANTY; without even the implied warranty of
MERCHANTABILITY or FITNESS FOR A PARTICULAR PURPOSE. See the
GNU General Public License for more details.
You should have received a copy of the GNU General Public License
along with this program. If not, see <https://www.gnu.org/licenses/>.
*/
#include <Wire.h>
#include "Adafruit_VL6180X.h"
Adafruit_VL6180X vl = Adafruit_VL6180X();
void setup() {
Serial.begin(115200);
// wait for serial port to open on native usb devices
while (!Serial) {
delay(1);
}
Serial.println("Adafruit VL6180x test!");
if (! vl.begin()) {
Serial.println("Failed to find sensor");
while (1);
}
Serial.println("Sensor found!");
}
void loop() {
uint8_t range = vl.readRange();
uint8_t status = vl.readRangeStatus();
if (status == VL6180X_ERROR_NONE) {
Serial.print("Range: "); Serial.print(range);
Serial.println("mm");
}
// if(range <=76)
// {
// //do something
// }
// Some error occurred, print it out!
if ((status >= VL6180X_ERROR_SYSERR_1) && (status <= VL6180X_ERROR_SYSERR_5)) {
Serial.println("System error");
}
else if (status == VL6180X_ERROR_ECEFAIL) {
Serial.println("ECE failure");
}
else if (status == VL6180X_ERROR_NOCONVERGE) {
Serial.println("No convergence");
}
else if (status == VL6180X_ERROR_RANGEIGNORE) {
Serial.println("Ignoring range");
}
else if (status == VL6180X_ERROR_SNR) {
Serial.println("Signal/Noise error");
}
else if (status == VL6180X_ERROR_RAWUFLOW) {
Serial.println("Raw reading underflow");
}
else if (status == VL6180X_ERROR_RAWOFLOW) {
Serial.println("Raw reading overflow");
}
else if (status == VL6180X_ERROR_RANGEUFLOW) {
Serial.println("Range reading underflow");
}
else if (status == VL6180X_ERROR_RANGEOFLOW) {
Serial.println("Range reading overflow");
}
delay(50);
}/*
* Arduino code
* Lesson 76-2: Using two or more VL6180 Laser Distance Sensors with Arduino
* Adafruit code modified for this tutorial
* Using two or more VL6180X 20cm Time-of-Flight proximity sensors with Arduino
*
* View code for using single VL6180X sensors: https://robojax.com/course1/lecture76
*
* Original code and library by https://github.com/adafruit/Adafruit_VL6180X
*
* Written/updated by Ahmad Shamshiri for Robojax Robojax.com
* on Mar 12, 2021 in Ajax, Ontario, Canada
* Watch the video instruction for this sketch: https://youtu.be/_H9D0czQpSI
*
*
* Please watch video instruction for this code: https://youtu.be/_H9D0czQpSI
*
* This video is part of Arduino Step by Step Course which starts here: https://youtu.be/-6qSrDUA5a8
*
*
* If you found this tutorial helpful, please support me so I can continue creating
* content like this.
*
* or make a donation using PayPal http://robojax.com/L/?id=64
*
* This code is "AS IS" without warranty or liability. Free to be used as long as you keep this note intact.
* This code has been downloaded from Robojax.com
* This program is free software: you can redistribute it and/or modify
* it under the terms of the GNU General Public License as published by
* the Free Software Foundation, either version 3 of the License, or
* (at your option) any later version.
*
* This program is distributed in the hope that it will be useful,
* but WITHOUT ANY WARRANTY; without even the implied warranty of
* MERCHANTABILITY or FITNESS FOR A PARTICULAR PURPOSE. See the
* GNU General Public License for more details.
*
* You should have received a copy of the GNU General Public License
* along with this program. If not, see <https://www.gnu.org/licenses/>.
*
*/
#include <Adafruit_VL6180X.h>
// address we will assign if dual sensor is present
#define LOX1_ADDRESS 0x30
#define LOX2_ADDRESS 0x31
// set the pins to shutdown
#define SHT_LOX1 7
#define SHT_LOX2 6
// Optional define GPIO pins to check to see if complete
#define GPIO_LOX1 4
#define GPIO_LOX2 3
#define TIMING_PIN 13
// objects for the VL6180X
Adafruit_VL6180X lox1 = Adafruit_VL6180X();
Adafruit_VL6180X lox2 = Adafruit_VL6180X();
// Setup mode for doing reads
typedef enum {RUN_MODE_DEFAULT, RUN_MODE_TIMED, RUN_MODE_ASYNC, RUN_MODE_GPIO, RUN_MODE_CONT} runmode_t;
runmode_t run_mode = RUN_MODE_DEFAULT;
uint8_t show_command_list = 1;
//==========================================================================
// Define some globals used in the continuous range mode
// Note: going to start table drive this part, may back up and do the rest later
Adafruit_VL6180X *sensors[] = {&lox1, &lox2};
const uint8_t COUNT_SENSORS = sizeof(sensors) / sizeof(sensors[0]);
const int sensor_gpios[COUNT_SENSORS] = {GPIO_LOX1, GPIO_LOX2}; // if any are < 0 will poll instead
uint8_t tempRange;
uint8_t sensor_ranges[COUNT_SENSORS];
uint8_t sensor_status[COUNT_SENSORS];
// Could do with uint8_t for 8 sensors, but just in case...
const uint16_t ALL_SENSORS_PENDING = ((1 << COUNT_SENSORS) - 1);
uint16_t sensors_pending = ALL_SENSORS_PENDING;
uint32_t sensor_last_cycle_time;
/*
Reset all sensors by setting all of their XSHUT pins low for delay(10), then set all XSHUT high to bring out of reset
Keep sensor #1 awake by keeping XSHUT pin high
Put all other sensors into shutdown by pulling XSHUT pins low
Initialize sensor #1 with lox.begin(new_i2c_address) Pick any number but 0x29 and it must be under 0x7F. Going with 0x30 to 0x3F is probably OK.
Keep sensor #1 awake, and now bring sensor #2 out of reset by setting its XSHUT pin high.
Initialize sensor #2 with lox.begin(new_i2c_address) Pick any number but 0x29 and whatever you set the first sensor to
*/
void setID() {
// all reset
digitalWrite(SHT_LOX1, LOW);
digitalWrite(SHT_LOX2, LOW);
delay(10);
// all unreset
digitalWrite(SHT_LOX1, HIGH);
digitalWrite(SHT_LOX2, HIGH);
delay(10);
// activating LOX1 and reseting LOX2
digitalWrite(SHT_LOX1, HIGH);
digitalWrite(SHT_LOX2, LOW);
// initing LOX1
if (!lox1.begin()) {
Serial.println(F("Failed to boot first VL6180X"));
while (1);
}
lox1.setAddress(LOX1_ADDRESS);
delay(10);
// activating LOX2
digitalWrite(SHT_LOX2, HIGH);
delay(10);
//initing LOX2
if (!lox2.begin()) {
Serial.println(F("Failed to boot second VL6180X"));
while (1);
}
lox2.setAddress(LOX2_ADDRESS);
delay(10);
}
void readSensor(Adafruit_VL6180X &vl) {
float lux = vl.readLux(VL6180X_ALS_GAIN_5);
uint8_t range = vl.readRange();
uint8_t status = vl.readRangeStatus();
if (status == VL6180X_ERROR_NONE) {
tempRange = range;//save it for the moment
}
// Some error occurred, print it out!
if ((status >= VL6180X_ERROR_SYSERR_1) && (status <= VL6180X_ERROR_SYSERR_5)) {
Serial.print("(System error)");
}
else if (status == VL6180X_ERROR_ECEFAIL) {
Serial.print("(ECE failure)");
}
else if (status == VL6180X_ERROR_NOCONVERGE) {
Serial.print("(No convergence)");
}
else if (status == VL6180X_ERROR_RANGEIGNORE) {
Serial.print("(Ignoring range)");
}
else if (status == VL6180X_ERROR_SNR) {
Serial.print("Signal/Noise error");
}
else if (status == VL6180X_ERROR_RAWUFLOW) {
Serial.print("Raw reading underflow");
}
else if (status == VL6180X_ERROR_RAWOFLOW) {
Serial.print("Raw reading overflow");
}
else if (status == VL6180X_ERROR_RANGEUFLOW) {
Serial.print("Range reading underflow");
}
else if (status == VL6180X_ERROR_RANGEOFLOW) {
Serial.print("Range reading overflow");
}
}
void read_sensors() {
readSensor(lox1);
sensor_ranges[0]=tempRange;//save it now
readSensor(lox2);
sensor_ranges[1]=tempRange; //save it now
Serial.println();
}
//===============================================================
// Setup
//===============================================================
void setup() {
Serial.begin(115200);
// wait until serial port opens for native USB devices
while (! Serial) {
delay(1);
}
pinMode(SHT_LOX1, OUTPUT);
pinMode(SHT_LOX2, OUTPUT);
// Enable timing pin so easy to see when pass starts and ends
pinMode(TIMING_PIN, OUTPUT);
#ifdef GPIO_LOX1
// If we defined GPIO pins, enable them as PULL UP
pinMode(GPIO_LOX1, INPUT_PULLUP);
pinMode(GPIO_LOX2, INPUT_PULLUP);
#endif
Serial.println("Shutdown pins inited...");
digitalWrite(SHT_LOX1, LOW);
digitalWrite(SHT_LOX2, LOW);
digitalWrite(TIMING_PIN, LOW);
Serial.println("All in reset mode...(pins are low)");
Serial.println("Starting...");
setID();
}
//===============================================================
// Loop
//===============================================================
void loop() {
read_sensors();
for(int i=0; i<COUNT_SENSORS; i++)
{
Serial.print("Sensor ");
Serial.print(i);
Serial.print(" :");
Serial.print(sensor_ranges[i]);
Serial.print("mm");
Serial.println();
}
// if(sensor_ranges[1] >=76)
// {
// //do something here
// }
delay(100);
}你可能需要嘅嘢
-
易贝Purchase VL618X sensor from eBayebay.us
-
阿里巴巴速卖通Purchase VL618X sensor from AliExpresss.click.aliexpress.com
-
邦购Purchase VL618X sensor from Banggoodbanggood.com
資源與參考資料
-
外部
-
外部
-
外部Purchase VL6180X from Amazon USAamzn.to
-
外部VL6080X datasheetst.com
文件📁
冇文件可用。