Somo la 76-1: Kutumia Sensor ya Umbali ya Laser ya VL6180 Moja na Arduino
Somo la 76-1: Kutumia Sensor ya Umbali ya Laser VL6180 Moja na Arduino
Katika mafunzo haya, tutajifunza jinsi ya kutumia sensor ya umbali ya laser VL6180X na bodi ya Arduino. Sensor hii ndogo inaweza kupima umbali kwa usahihi hadi sentimita 20, na kuifanya kufaa kwa matumizi mbalimbali katika robotiki na ugunduzi wa vitu. Kufikia mwisho wa mafunzo haya, utakuwa na uelewa wazi wa jinsi ya kuunganisha sensor, kusakinisha maktaba muhimu, na kutekeleza msimbo ili kupata usomaji wa umbali.
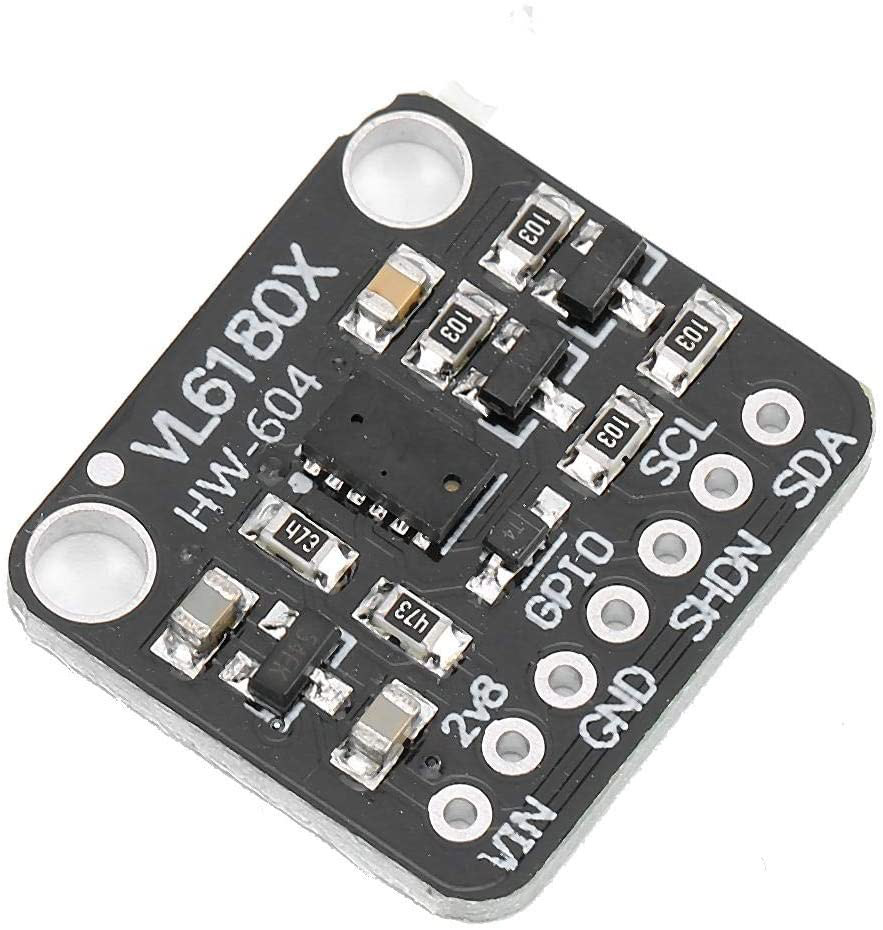
Sensor ya VL6180X inafanya kazi kwa kutumia kanuni ya muda wa safari (ToF), ikitoa laser na kupima muda unaochukua mwanga kurudi baada ya kuruka kutoka kwenye kitu. Njia hii inaruhusu vipimo sahihi vya umbali na inatumiwa sana katika vifaa vya mkononi na robotiki. Katika sehemu zifuatazo, tutajadili vipengele vya vifaa, maagizo ya wiring, na utekelezaji wa msimbo.
Vifaa Vimeelezwa
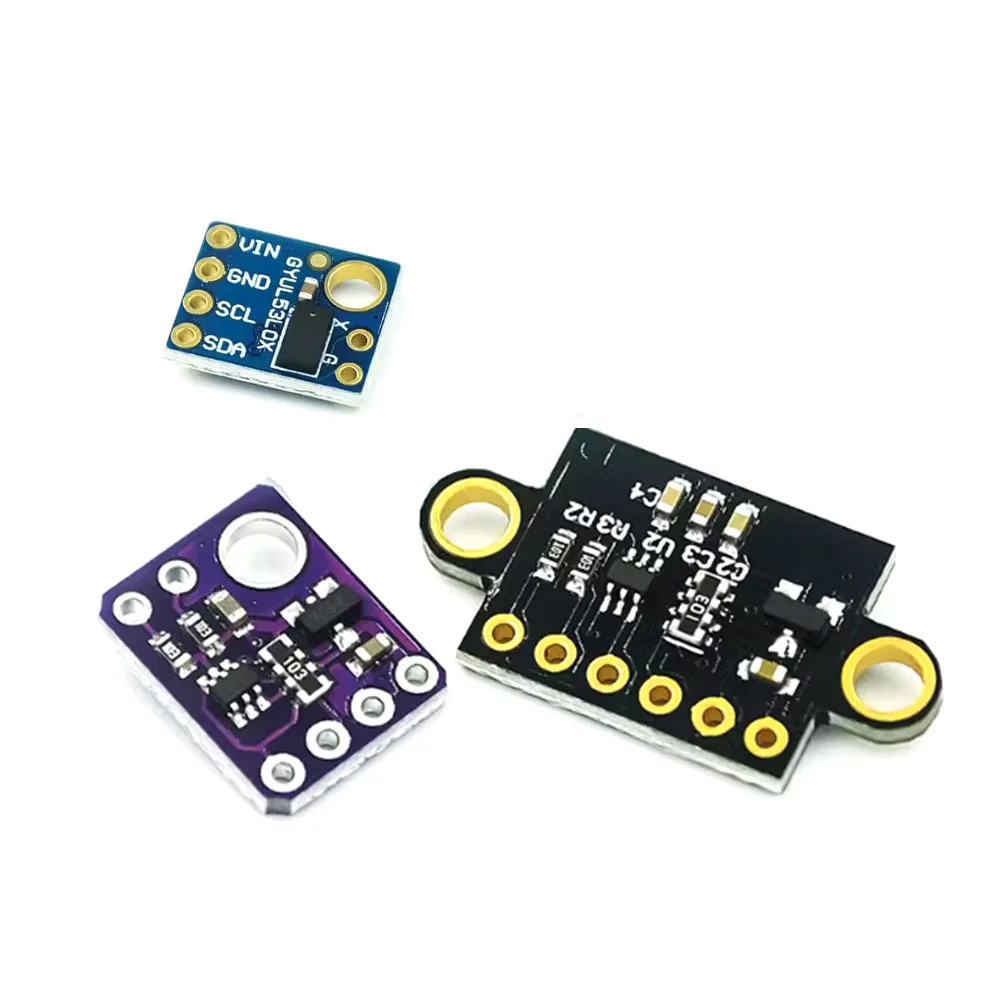
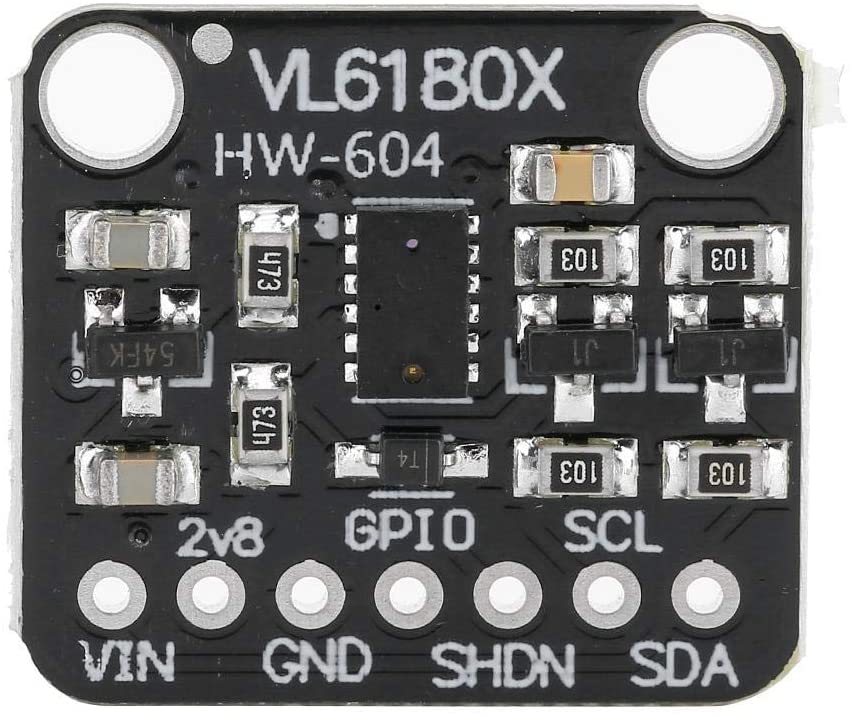
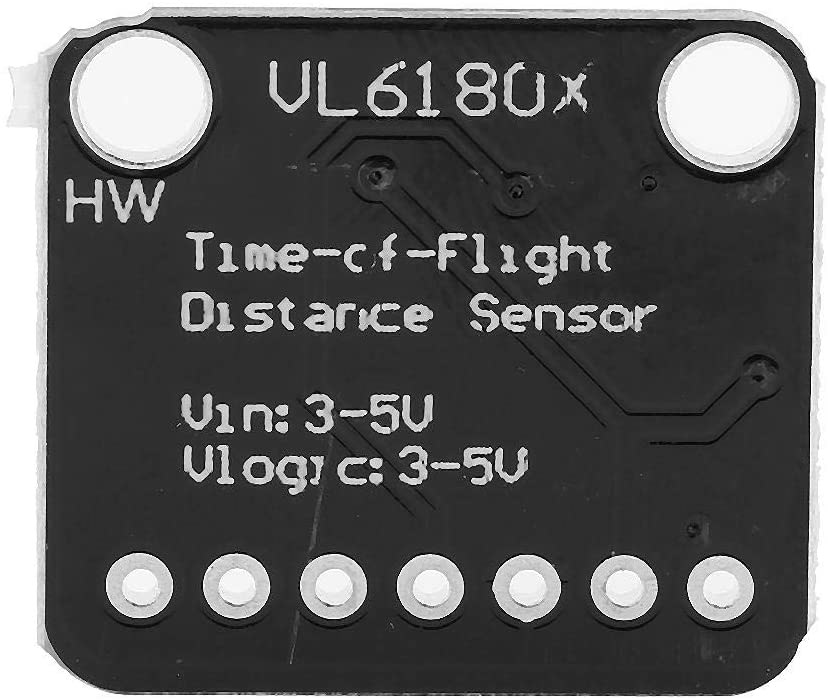
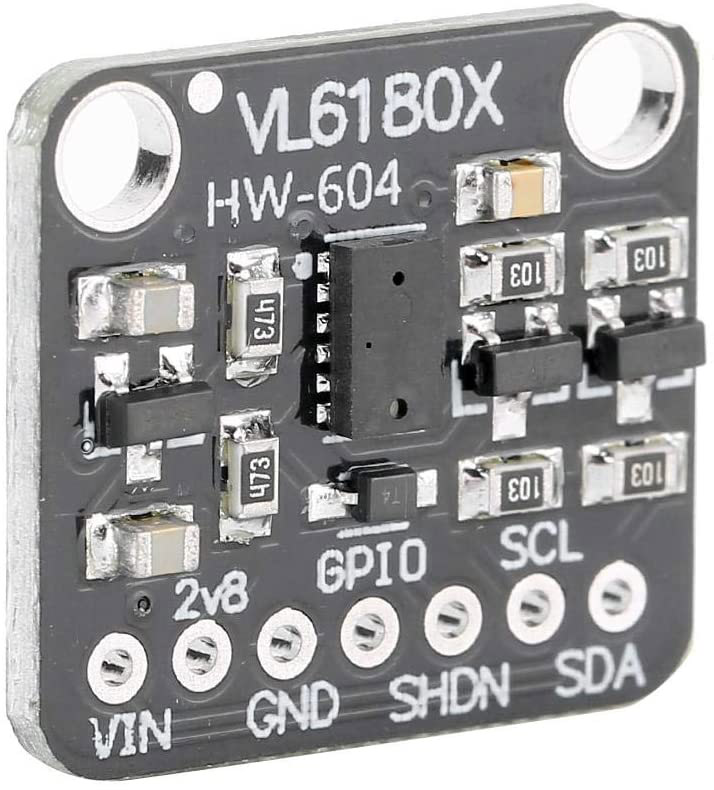
Kipengele kikuu cha mradi huu ni sensor ya umbali ya laser VL6180X. Sensor hii ina kiolesura cha I2C, na kuifanya iwe rahisi kuunganisha kwenye Arduino. Ina pini kadhaa, ikiwa ni pamoja na nguvu, ardhi, na mistari ya data. Sensor inafanya kazi katika kiwango cha voltage cha 2.6 hadi 3.6 volti na inaweza kupima umbali kwa usahihi wa hali ya juu.
Zaidi ya hayo, bodi ya Arduino hutumika kama kidhibiti kidogo kinachosoma data kutoka kwenye sensor na kuisindika. Usanidi unahitaji vipengele vya kielektroniki vya msingi kama vile waya za kurukaruka na bodi ya mkate kwa miunganisho. Kuelewa jinsi kila kipengele kinavyoingiliana ni muhimu kwa utekelezaji wenye mafanikio.
Maelezo ya Datasheet
| Mtengenezaji | STMicroelectronics |
|---|---|
| Nambari ya sehemu | VL6180X |
| Voltage ya Logic/IO | 2.6 - 3.6 V |
| Voltage ya usambazaji | 2.6 - 3.6 V |
| Mkondo wa pato | 1.7 mA (typ.) |
| Mkondo wa kilele | 10 mA (max.) |
| Mwongozo wa mzunguko wa PWM | N/A |
| Viwango vya kizingiti cha mantiki ya kuingiza | N/A |
| Kushuka kwa voltage / RDS(on) / kueneza | N/A |
| Mipaka ya joto | -20 hadi 70 °C |
| Kifurushi | 4.8 x 2.8 x 1 mm |
| Vidokezo / lahaja | Sensor ya ukaribu na upimaji wa umbali |
- Hakikisha usambazaji wa nguvu uko ndani ya kiwango kilichobainishwa ili kuepuka kuharibu sensor.
- Tumia resistors za kuvuta-juu kwenye mistari ya I2C ikiwa ni lazima kwa mawasiliano ya kuaminika.
- Weka sensor mbali na mwanga wa jua wa moja kwa moja kwa usomaji sahihi.
- Zingatia kutumia bodi ya mkate kwa miunganisho rahisi na marekebisho.
- Angalia nyaraka za maktaba kwa matumizi maalum ya kazi na uwezo.
Maagizo ya Wiring

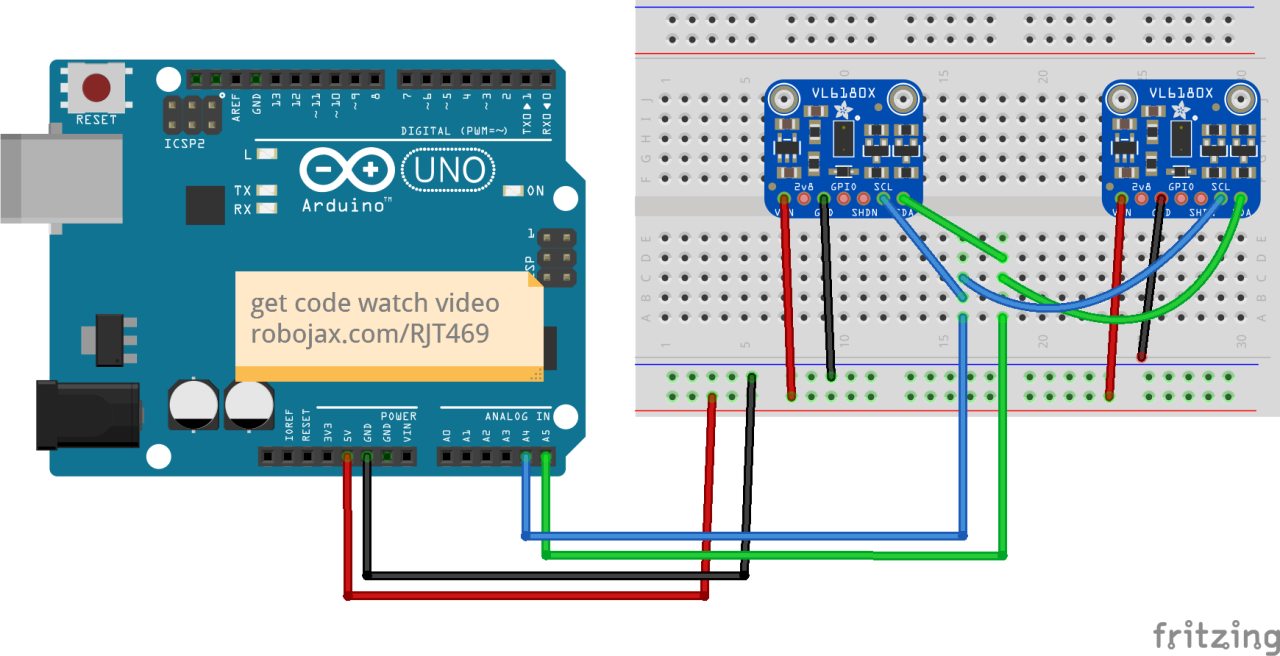
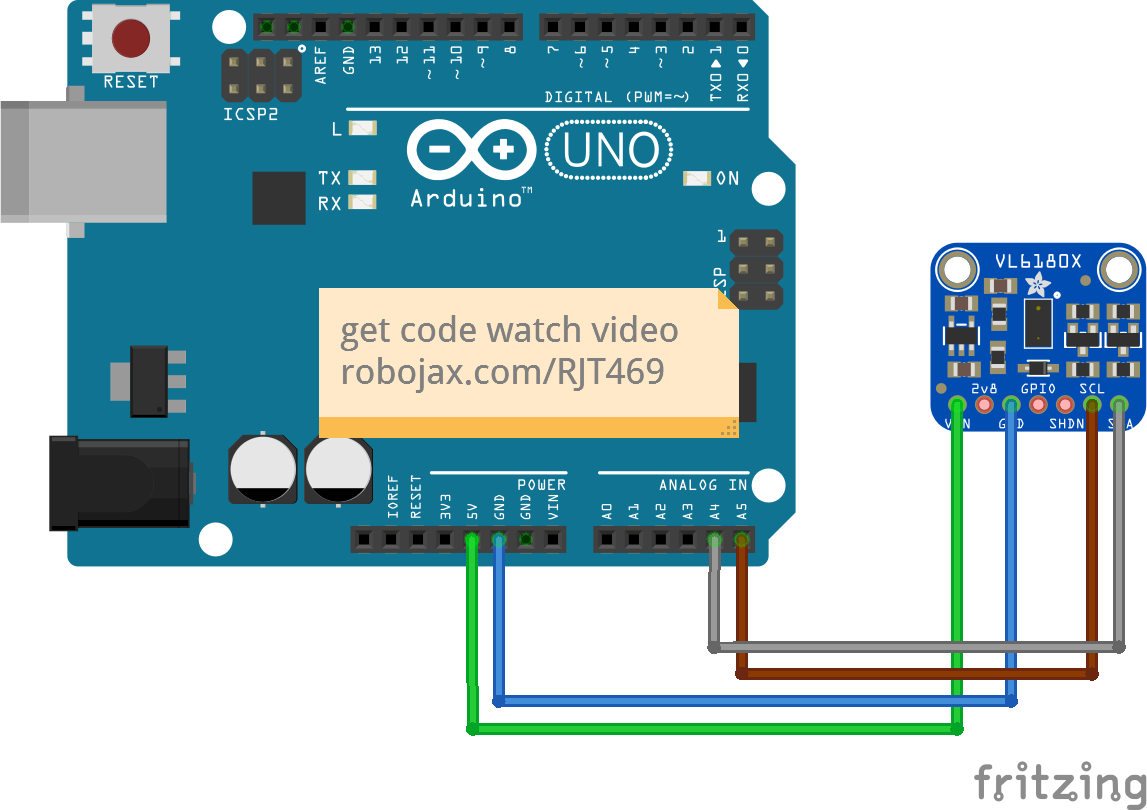
Ili kuunganisha sensor ya VL6180X kwenye Arduino, anza kwa kuunganisha pini ya VCC ya sensor kwenye pini ya 5V kwenye Arduino. Ifuatayo, unganisha pini ya GND ya sensor kwenye pini ya GND kwenye Arduino. Pini ya SCL ya sensor inapaswa kuunganishwa kwenye A5, wakati pini ya SDA inapaswa kuunganishwa kwenye A4 kwenye Arduino.
Hakikisha umeunganisha sensor kwa utaratibu huu: VCC kwa 5V, GND kwa GND, SDA kwa A4, na SCL kwa A5. Ikiwa unapanga kutumia sensor nyingi, hakikisha kila moja ina anwani ya kipekee ya I2C na kwamba pini za kuzima zinasimamiwa ipasavyo.
Mifano ya Msimbo na Maelezo
Katika msimbo, tunaanza kwa kujumuisha maktaba muhimu na kuanzisha tukio la sensor. Sehemu ifuatayo inaonyesha jinsi ya kusanidi mawasiliano ya I2C na kuangalia ikiwa sensor imepatikana:
void setup() {
  Serial.begin(115200);
  while (!Serial) { delay(1); }

  if (! vl.begin()) {
    Serial.println("Imeshindwa kupata sensor");
    while (1);
  }
  Serial.println("Sensor imepatikana!");
}
Msimbo huu huanzisha kifuatiliaji cha serial na kujaribu kuanza mawasiliano na sensor ya VL6180X. Ikiwa sensor haipatikani, itachapisha ujumbe wa hitilafu na kusimamisha programu.
Ifuatayo, tunasoma umbali kutoka kwenye sensor na kuangalia hitilafu zozote:
void loop() {
  uint8_t range = vl.readRange();
  uint8_t status = vl.readRangeStatus();

  if (status == VL6180X_ERROR_NONE) {
    Serial.print("Umbali: "); Serial.print(range);
    Serial.println("mm");
  }
}
Sehemu hii inasoma umbali uliopimwa na sensor na kuuchapisha kwenye kifuatiliaji cha serial. Ikiwa kuna hitilafu zozote, ujumbe wa hitilafu unaolingana unaweza kuchapishwa kulingana na hali iliyorejeshwa.
Maonyesho / Nini cha Kutarajia
Baada ya kukamilisha wiring na kupakia msimbo kwenye Arduino, unapaswa kuona usomaji wa umbali kwenye kifuatiliaji cha serial. Wakati kitu kinawekwa ndani ya masafa ya sensor, umbali katika milimita utaonyeshwa. Ikiwa kitu kiko mbali sana au karibu sana, sensor itarejesha ujumbe wa hitilafu. Tabia hii inaweza kuthibitishwa katika maonyesho ya video (katika video saa 19:30).
Vidokezo vya Muda wa Video
- 00:00 Mwanzo
- 00:56 Utangulizi
- 04:30 Datasheet ya VL6080V imeangaliwa
- 06:58 Wiring imeonyeshwa
- 07:32 Wiring kwa sensor mbili au zaidi
- 09:22 Kusakinisha maktaba
- 10:30 Msimbo wa Arduino umeelezwa (sensor 1)
- 12:57 Msimbo wa sensor 2 au zaidi
- 19:35 Maonyesho ya sensor 1
- 22:05 Maonyesho na sensor 2
Bilder
/*
 *  Arduino code
Using a single VL6180X 20cm Time-of-Flight proximity sensor with Arduino

View code for using a single VL6180X sensor: https://robojax.com?vid=robojax_VL6180X_laser2

 * Original code and library by https://github.com/adafruit/Adafruit_VL6180X
 *
 * Written/updated by Ahmad Shamshiri for Robojax Robojax.com
 * on Mar 10, 2021  in Ajax, Ontario, Canada
Watch the video instruction for this sketch: https://youtu.be/_H9D0czQpSI


If you found this tutorial helpful, please support me so I can continue creating
content like this.
or make a donation using PayPal http://robojax.com/L/?id=64

*
 * Code is available at http://robojax.com/learn/arduino

 * This code is "AS IS" without warranty or liability. Free to be used as long as you keep this note intact.
 * This code has been downloaded from Robojax.com
    This program is free software: you can redistribute it and/or modify
    it under the terms of the GNU General Public License as published by
    the Free Software Foundation, either version 3 of the License, or
    (at your option) any later version.

    This program is distributed in the hope that it will be useful,
    but WITHOUT ANY WARRANTY; without even the implied warranty of
    MERCHANTABILITY or FITNESS FOR A PARTICULAR PURPOSE.  See the
    GNU General Public License for more details.

    You should have received a copy of the GNU General Public License
    along with this program.  If not, see <https://www.gnu.org/licenses/>.

*/
#include <Wire.h>
#include "Adafruit_VL6180X.h"

Adafruit_VL6180X vl = Adafruit_VL6180X();

void setup() {
  Serial.begin(115200);

  // wait for serial port to open on native usb devices
  while (!Serial) {
    delay(1);
  }

  Serial.println("Adafruit VL6180x test!");
  if (! vl.begin()) {
    Serial.println("Failed to find sensor");
    while (1);
  }
  Serial.println("Sensor found!");
}

void loop() {

  uint8_t range = vl.readRange();
  uint8_t status = vl.readRangeStatus();

  if (status == VL6180X_ERROR_NONE) {
    Serial.print("Range: "); Serial.print(range);
    Serial.println("mm");
  }
//  if(range <=76)
//  {
//    //do something
//  }

  // Some error occurred, print it out!

  if  ((status >= VL6180X_ERROR_SYSERR_1) && (status <= VL6180X_ERROR_SYSERR_5)) {
    Serial.println("System error");
  }
  else if (status == VL6180X_ERROR_ECEFAIL) {
    Serial.println("ECE failure");
  }
  else if (status == VL6180X_ERROR_NOCONVERGE) {
    Serial.println("No convergence");
  }
  else if (status == VL6180X_ERROR_RANGEIGNORE) {
    Serial.println("Ignoring range");
  }
  else if (status == VL6180X_ERROR_SNR) {
    Serial.println("Signal/Noise error");
  }
  else if (status == VL6180X_ERROR_RAWUFLOW) {
    Serial.println("Raw reading underflow");
  }
  else if (status == VL6180X_ERROR_RAWOFLOW) {
    Serial.println("Raw reading overflow");
  }
  else if (status == VL6180X_ERROR_RANGEUFLOW) {
    Serial.println("Range reading underflow");
  }
  else if (status == VL6180X_ERROR_RANGEOFLOW) {
    Serial.println("Range reading overflow");
  }
  delay(50);
}/*
* Lesson 76-1: Using one VL6180 laser distance sensor with Arduino
* Adafruit code modified for this tutorial
* by Ahmad Shamshiri at 22:22 on
* March 10-11, 2021 in Ajax, ON, Canada
Please watch video instruction of this code: https://youtu.be/_H9D0czQpSI
View code for using two or more VL6180X sensors: https://robojax.com/course1/lecture76
This video is part of the Arduino Step by Step Course, which starts here: https://youtu.be/-6qSrDUA5a8
If you found this tutorial helpful, please support me so I can continue creating
content like this. You can support me on Patreon: http://robojax.com/L/?id=63
or make a donation using PayPal: http://robojax.com/L/?id=64
* This code is "AS IS" without warranty or liability. Free to be used as long as you keep this note intact. *
* This code has been downloaded from Robojax.com
This program is free software: you can redistribute it and/or modify
it under the terms of the GNU General Public License as published by
the Free Software Foundation, either version 3 of the License, or
(at your option) any later version.
This program is distributed in the hope that it will be useful,
but WITHOUT ANY WARRANTY; without even the implied warranty of
MERCHANTABILITY or FITNESS FOR A PARTICULAR PURPOSE. See the
GNU General Public License for more details.
You should have received a copy of the GNU General Public License
along with this program. If not, see <https://www.gnu.org/licenses/>.
*/
#include <Wire.h>
#include "Adafruit_VL6180X.h"
Adafruit_VL6180X vl = Adafruit_VL6180X();
void setup() {
Serial.begin(115200);
// wait for serial port to open on native usb devices
while (!Serial) {
delay(1);
}
Serial.println("Adafruit VL6180x test!");
if (! vl.begin()) {
Serial.println("Failed to find sensor");
while (1);
}
Serial.println("Sensor found!");
}
void loop() {
uint8_t range = vl.readRange();
uint8_t status = vl.readRangeStatus();
if (status == VL6180X_ERROR_NONE) {
Serial.print("Range: "); Serial.print(range);
Serial.println("mm");
}
// if(range <=76)
// {
// //do something
// }
// Some error occurred, print it out!
if ((status >= VL6180X_ERROR_SYSERR_1) && (status <= VL6180X_ERROR_SYSERR_5)) {
Serial.println("System error");
}
else if (status == VL6180X_ERROR_ECEFAIL) {
Serial.println("ECE failure");
}
else if (status == VL6180X_ERROR_NOCONVERGE) {
Serial.println("No convergence");
}
else if (status == VL6180X_ERROR_RANGEIGNORE) {
Serial.println("Ignoring range");
}
else if (status == VL6180X_ERROR_SNR) {
Serial.println("Signal/Noise error");
}
else if (status == VL6180X_ERROR_RAWUFLOW) {
Serial.println("Raw reading underflow");
}
else if (status == VL6180X_ERROR_RAWOFLOW) {
Serial.println("Raw reading overflow");
}
else if (status == VL6180X_ERROR_RANGEUFLOW) {
Serial.println("Range reading underflow");
}
else if (status == VL6180X_ERROR_RANGEOFLOW) {
Serial.println("Range reading overflow");
}
delay(50);
}/*
* Arduino code
* Lesson 76-2: Using two or more VL6180 Laser Distance Sensors with Arduino
* Adafruit code modified for this tutorial
* Using two or more VL6180X 20cm Time-of-Flight proximity sensors with Arduino
*
* View code for using single VL6180X sensors: https://robojax.com/course1/lecture76
*
* Original code and library by https://github.com/adafruit/Adafruit_VL6180X
*
* Written/updated by Ahmad Shamshiri for Robojax Robojax.com
* on Mar 12, 2021 in Ajax, Ontario, Canada
* Watch the video instruction for this sketch: https://youtu.be/_H9D0czQpSI
*
*
* Please watch video instruction for this code: https://youtu.be/_H9D0czQpSI
*
* This video is part of Arduino Step by Step Course which starts here: https://youtu.be/-6qSrDUA5a8
*
*
* If you found this tutorial helpful, please support me so I can continue creating
* content like this.
*
* or make a donation using PayPal http://robojax.com/L/?id=64
*
* This code is "AS IS" without warranty or liability. Free to be used as long as you keep this note intact.
* This code has been downloaded from Robojax.com
* This program is free software: you can redistribute it and/or modify
* it under the terms of the GNU General Public License as published by
* the Free Software Foundation, either version 3 of the License, or
* (at your option) any later version.
*
* This program is distributed in the hope that it will be useful,
* but WITHOUT ANY WARRANTY; without even the implied warranty of
* MERCHANTABILITY or FITNESS FOR A PARTICULAR PURPOSE. See the
* GNU General Public License for more details.
*
* You should have received a copy of the GNU General Public License
* along with this program. If not, see <https://www.gnu.org/licenses/>.
*
*/
#include <Adafruit_VL6180X.h>
// address we will assign if dual sensor is present
#define LOX1_ADDRESS 0x30
#define LOX2_ADDRESS 0x31
// set the pins to shutdown
#define SHT_LOX1 7
#define SHT_LOX2 6
// Optional define GPIO pins to check to see if complete
#define GPIO_LOX1 4
#define GPIO_LOX2 3
#define TIMING_PIN 13
// objects for the VL6180X
Adafruit_VL6180X lox1 = Adafruit_VL6180X();
Adafruit_VL6180X lox2 = Adafruit_VL6180X();
// Setup mode for doing reads
typedef enum {RUN_MODE_DEFAULT, RUN_MODE_TIMED, RUN_MODE_ASYNC, RUN_MODE_GPIO, RUN_MODE_CONT} runmode_t;
runmode_t run_mode = RUN_MODE_DEFAULT;
uint8_t show_command_list = 1;
//==========================================================================
// Define some globals used in the continuous range mode
// Note: going to start table drive this part, may back up and do the rest later
Adafruit_VL6180X *sensors[] = {&lox1, &lox2};
const uint8_t COUNT_SENSORS = sizeof(sensors) / sizeof(sensors[0]);
const int sensor_gpios[COUNT_SENSORS] = {GPIO_LOX1, GPIO_LOX2}; // if any are < 0 will poll instead
uint8_t tempRange;
uint8_t sensor_ranges[COUNT_SENSORS];
uint8_t sensor_status[COUNT_SENSORS];
// Could do with uint8_t for 8 sensors, but just in case...
const uint16_t ALL_SENSORS_PENDING = ((1 << COUNT_SENSORS) - 1);
uint16_t sensors_pending = ALL_SENSORS_PENDING;
uint32_t sensor_last_cycle_time;
/*
Reset all sensors by setting all of their XSHUT pins low for delay(10), then set all XSHUT high to bring out of reset
Keep sensor #1 awake by keeping XSHUT pin high
Put all other sensors into shutdown by pulling XSHUT pins low
Initialize sensor #1 with lox.begin(new_i2c_address) Pick any number but 0x29 and it must be under 0x7F. Going with 0x30 to 0x3F is probably OK.
Keep sensor #1 awake, and now bring sensor #2 out of reset by setting its XSHUT pin high.
Initialize sensor #2 with lox.begin(new_i2c_address) Pick any number but 0x29 and whatever you set the first sensor to
*/
void setID() {
// all reset
digitalWrite(SHT_LOX1, LOW);
digitalWrite(SHT_LOX2, LOW);
delay(10);
// all unreset
digitalWrite(SHT_LOX1, HIGH);
digitalWrite(SHT_LOX2, HIGH);
delay(10);
// activating LOX1 and reseting LOX2
digitalWrite(SHT_LOX1, HIGH);
digitalWrite(SHT_LOX2, LOW);
// initing LOX1
if (!lox1.begin()) {
Serial.println(F("Failed to boot first VL6180X"));
while (1);
}
lox1.setAddress(LOX1_ADDRESS);
delay(10);
// activating LOX2
digitalWrite(SHT_LOX2, HIGH);
delay(10);
//initing LOX2
if (!lox2.begin()) {
Serial.println(F("Failed to boot second VL6180X"));
while (1);
}
lox2.setAddress(LOX2_ADDRESS);
delay(10);
}
void readSensor(Adafruit_VL6180X &vl) {
float lux = vl.readLux(VL6180X_ALS_GAIN_5);
uint8_t range = vl.readRange();
uint8_t status = vl.readRangeStatus();
if (status == VL6180X_ERROR_NONE) {
tempRange = range;//save it for the moment
}
// Some error occurred, print it out!
if ((status >= VL6180X_ERROR_SYSERR_1) && (status <= VL6180X_ERROR_SYSERR_5)) {
Serial.print("(System error)");
}
else if (status == VL6180X_ERROR_ECEFAIL) {
Serial.print("(ECE failure)");
}
else if (status == VL6180X_ERROR_NOCONVERGE) {
Serial.print("(No convergence)");
}
else if (status == VL6180X_ERROR_RANGEIGNORE) {
Serial.print("(Ignoring range)");
}
else if (status == VL6180X_ERROR_SNR) {
Serial.print("Signal/Noise error");
}
else if (status == VL6180X_ERROR_RAWUFLOW) {
Serial.print("Raw reading underflow");
}
else if (status == VL6180X_ERROR_RAWOFLOW) {
Serial.print("Raw reading overflow");
}
else if (status == VL6180X_ERROR_RANGEUFLOW) {
Serial.print("Range reading underflow");
}
else if (status == VL6180X_ERROR_RANGEOFLOW) {
Serial.print("Range reading overflow");
}
}
void read_sensors() {
readSensor(lox1);
sensor_ranges[0]=tempRange;//save it now
readSensor(lox2);
sensor_ranges[1]=tempRange; //save it now
Serial.println();
}
//===============================================================
// Setup
//===============================================================
void setup() {
Serial.begin(115200);
// wait until serial port opens for native USB devices
while (! Serial) {
delay(1);
}
pinMode(SHT_LOX1, OUTPUT);
pinMode(SHT_LOX2, OUTPUT);
// Enable timing pin so easy to see when pass starts and ends
pinMode(TIMING_PIN, OUTPUT);
#ifdef GPIO_LOX1
// If we defined GPIO pins, enable them as PULL UP
pinMode(GPIO_LOX1, INPUT_PULLUP);
pinMode(GPIO_LOX2, INPUT_PULLUP);
#endif
Serial.println("Shutdown pins inited...");
digitalWrite(SHT_LOX1, LOW);
digitalWrite(SHT_LOX2, LOW);
digitalWrite(TIMING_PIN, LOW);
Serial.println("All in reset mode...(pins are low)");
Serial.println("Starting...");
setID();
}
//===============================================================
// Loop
//===============================================================
void loop() {
read_sensors();
for(int i=0; i<COUNT_SENSORS; i++)
{
Serial.print("Sensor ");
Serial.print(i);
Serial.print(" :");
Serial.print(sensor_ranges[i]);
Serial.print("mm");
Serial.println();
}
// if(sensor_ranges[1] >=76)
// {
// //do something here
// }
delay(100);
}Tänker att du kanske behöver
-
eBayPurchase VL618X sensor from eBayebay.us
-
AliExpressPurchase VL618X sensor from AliExpresss.click.aliexpress.com
-
BanggoodPurchase VL618X sensor from Banggoodbanggood.com
Resurser och referenser
-
Extern.
-
Extern.
-
Extern.Purchase VL6180X from Amazon USAamzn.to
-
Extern.VL6080X datasheetst.com
Filer📁
Inga filer tillgängliga.


![Arduino UNO R4 Minima [ABX00080]](https://i.ebayimg.com/images/g/ofkAAeSwB9lpSbCs/s-l225.jpg)