Lekcja 76-1: Używanie pojedynczego czujnika odległości laserowej VL6180 z Arduino
Lekcja 76-1: Użycie pojedynczego czujnika odległości laserowego VL6180 z Arduino
W tym samouczku nauczymy się, jak używać czujnika odległości laserowego VL6180X z płytką Arduino. Ten kompaktowy czujnik może dokładnie mierzyć odległości do 20 centymetrów, co czyni go odpowiednim do różnych zastosowań w robotyce i wykrywaniu obiektów. Po ukończeniu tego samouczka będziesz mieć jasne zrozumienie, jak podłączyć czujnik, zainstalować niezbędną bibliotekę i zaimplementować kod, aby uzyskać odczyty odległości.
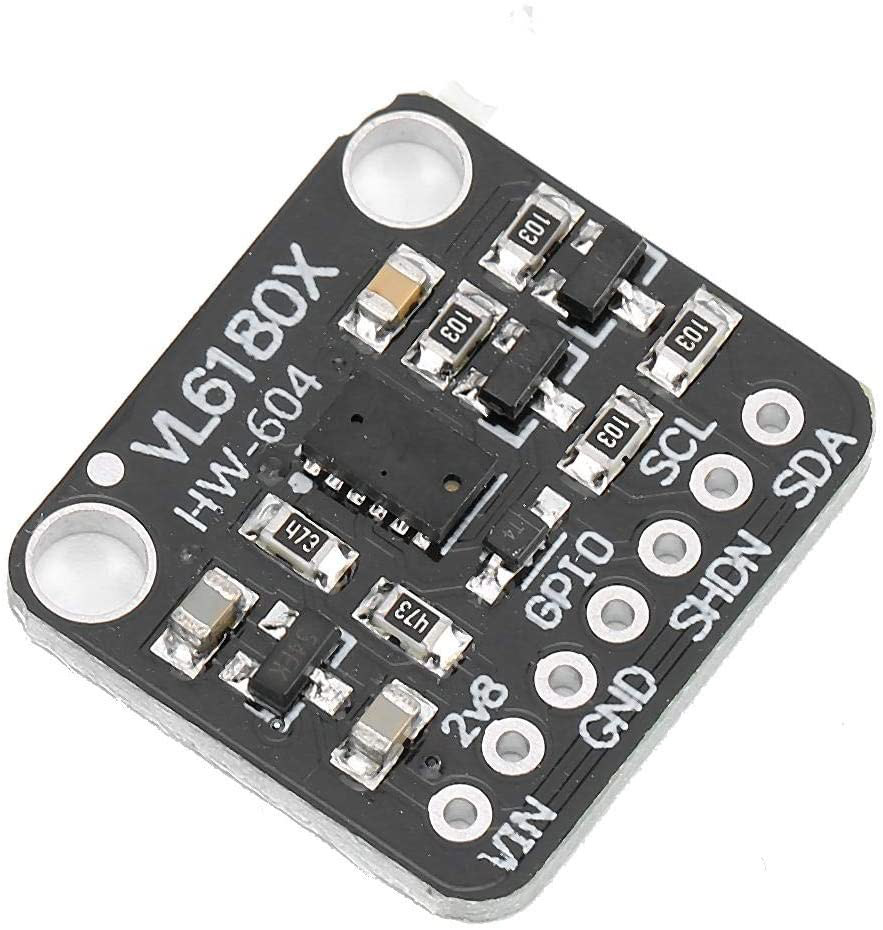
Czujnik VL6180X działa na zasadzie pomiaru czasu przelotu (ToF), emitując laser i mierząc czas, jaki zajmuje światłu powrót po odbiciu od obiektu. Ta metoda pozwala na precyzyjne pomiary odległości i jest szeroko stosowana w urządzeniach mobilnych i robotyce. W poniższych sekcjach omówimy komponenty sprzętowe, instrukcje podłączenia i implementację kodu.
Omówienie sprzętu
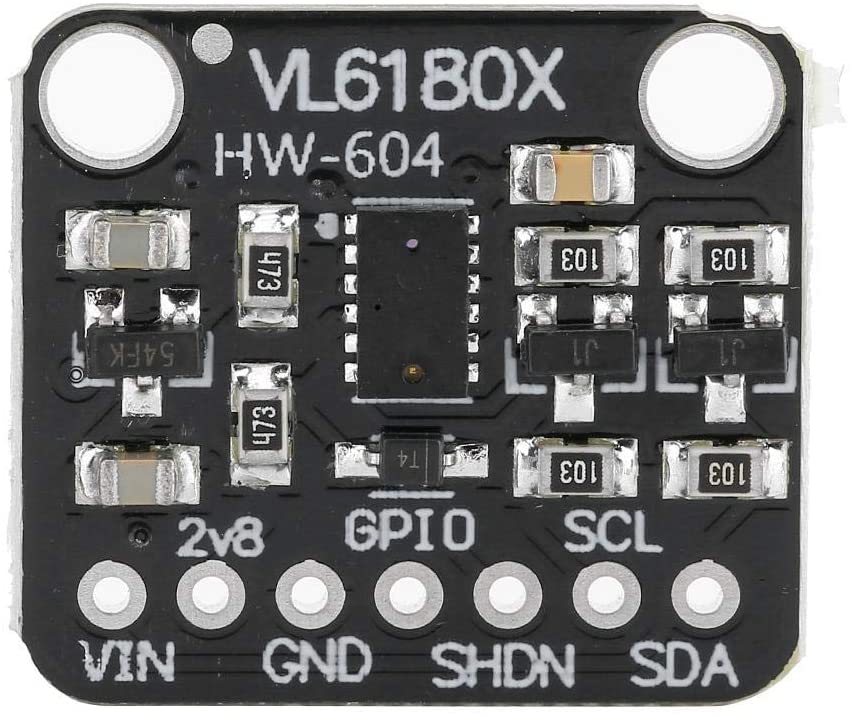
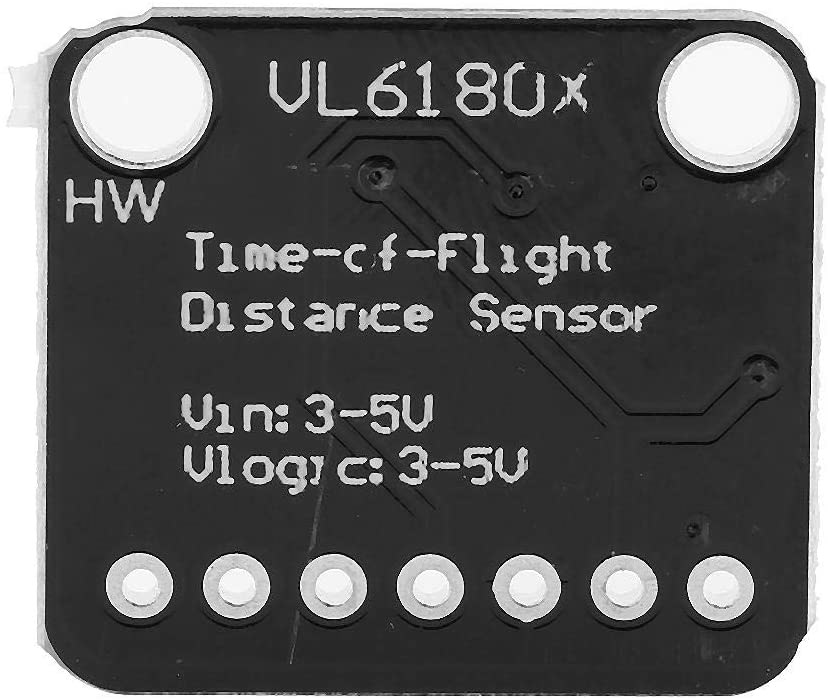
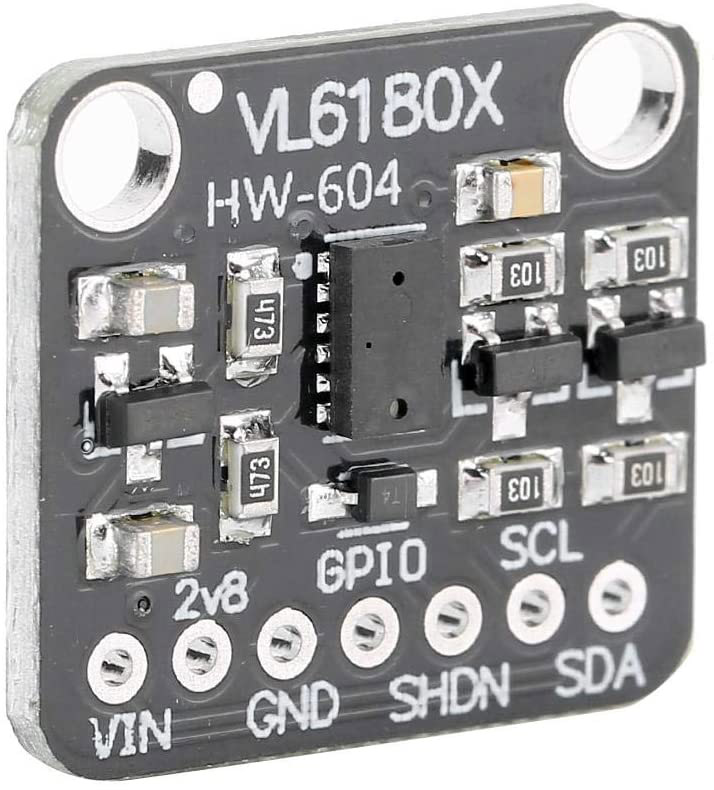
Głównym komponentem tego projektu jest czujnik odległości laserowy VL6180X. Ten czujnik ma interfejs I2C, co ułatwia podłączenie do Arduino. Posiada kilka pinów, w tym zasilanie, masę i linie danych. Czujnik działa w zakresie napięcia od 2,6 do 3,6 wolta i może mierzyć odległości z wysoką dokładnością.
Dodatkowo płytka Arduino służy jako mikrokontroler, który odczytuje dane z czujnika i je przetwarza. Konfiguracja wymaga podstawowych komponentów elektronicznych, takich jak przewody połączeniowe i płytka stykowa do połączeń. Zrozumienie, jak każdy komponent współdziała, jest kluczowe dla pomyślnej implementacji.
Szczegóły z karty katalogowej
| Producent | STMicroelectronics |
|---|---|
| Numer części | VL6180X |
| Napięcie logiczne/IO | 2,6 - 3,6 V |
| Napięcie zasilania | 2,6 - 3,6 V |
| Prąd wyjściowy | 1,7 mA (typ.) |
| Prąd szczytowy | 10 mA (maks.) |
| Wytyczne dotyczące częstotliwości PWM | N/D |
| Progi logiczne wejściowe | N/D |
| Spadek napięcia / RDS(on) / nasycenie | N/D |
| Limity termiczne | -20 do 70 °C |
| Obudowa | 4,8 x 2,8 x 1 mm |
| Uwagi / warianty | Czujnik zbliżeniowy i pomiaru odległości |
- Upewnij się, że zasilanie mieści się w określonym zakresie, aby uniknąć uszkodzenia czujnika.
- W razie potrzeby użyj rezystorów podciągających na liniach I2C, aby zapewnić niezawodną komunikację.
- Trzymaj czujnik z dala od bezpośredniego światła słonecznego, aby uzyskać dokładne odczyty.
- Rozważ użycie płytki stykowej do łatwych połączeń i regulacji.
- Sprawdź dokumentację biblioteki, aby poznać konkretne funkcje i możliwości.
Instrukcje podłączenia

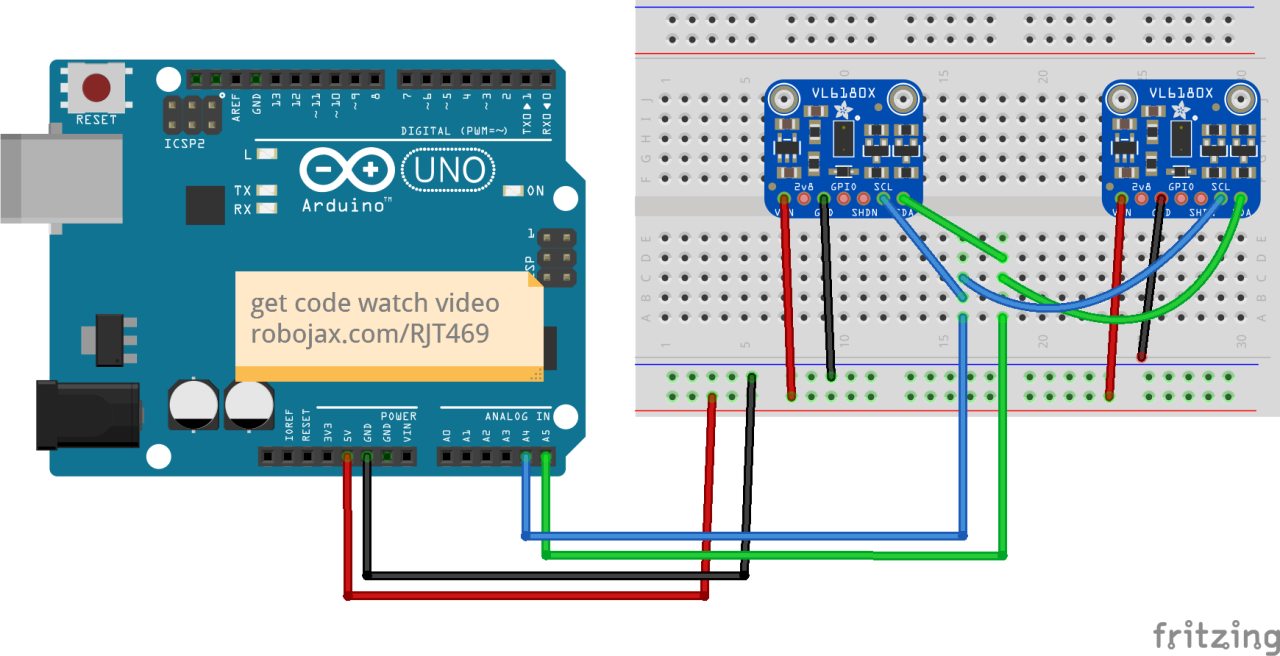
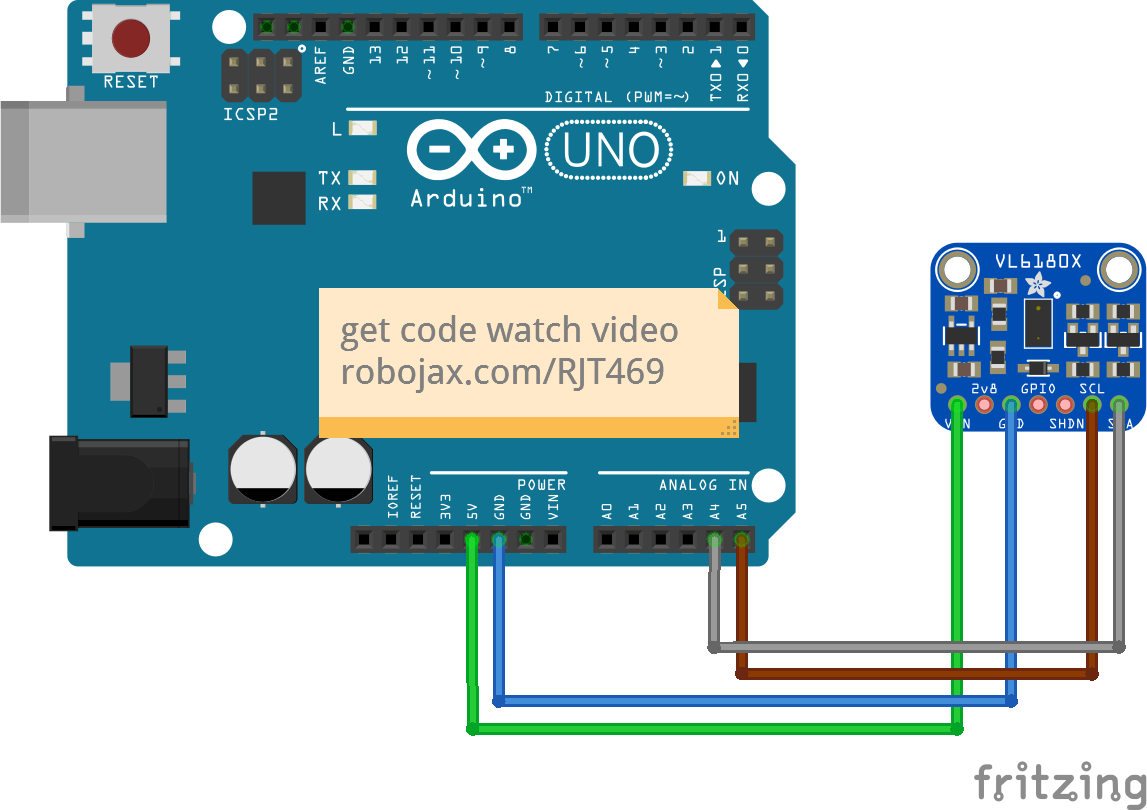
Aby podłączyć czujnik VL6180X do Arduino, zacznij od połączenia pinu VCC czujnika z pinem 5V na Arduino. Następnie podłącz pin GND czujnika do pinu GND na Arduino. Pin SCL czujnika należy podłączyć do A5, a pin SDA do A4 na Arduino.
Upewnij się, że podłączasz czujnik w tej kolejności: VCC do 5V, GND do GND, SDA do A4 i SCL do A5. Jeśli planujesz użyć wielu czujników, upewnij się, że każdy ma unikalny adres I2C, a piny wyłączające są odpowiednio zarządzane.
Przykłady kodu i omówienie
W kodzie zaczynamy od dołączenia niezbędnych bibliotek i zainicjowania instancji czujnika. Poniższy fragment pokazuje, jak skonfigurować komunikację I2C i sprawdzić, czy czujnik został znaleziony:
void setup() {
  Serial.begin(115200);
  while (!Serial) { delay(1); }

  if (! vl.begin()) {
    Serial.println("Nie znaleziono czujnika");
    while (1);
  }
  Serial.println("Znaleziono czujnik!");
}
Ten kod inicjalizuje monitor szeregowy i próbuje rozpocząć komunikację z czujnikiem VL6180X. Jeśli czujnik nie zostanie znaleziony, wyświetli komunikat o błędzie i zatrzyma program.
Następnie odczytujemy zakres z czujnika i sprawdzamy ewentualne błędy:
void loop() {
  uint8_t range = vl.readRange();
  uint8_t status = vl.readRangeStatus();

  if (status == VL6180X_ERROR_NONE) {
    Serial.print("Zakres: "); Serial.print(range);
    Serial.println("mm");
  }
}
Ten fragment odczytuje odległość zmierzoną przez czujnik i wyświetla ją na monitorze szeregowym. Jeśli wystąpią jakiekolwiek błędy, odpowiednie komunikaty o błędach mogą zostać wyświetlone na podstawie zwróconego statusu.
Demonstracja / Czego się spodziewać
Po zakończeniu podłączania i wgraniu kodu do Arduino powinieneś zaobserwować odczyty odległości na monitorze szeregowym. Gdy obiekt zostanie umieszczony w zasięgu czujnika, wyświetlona zostanie odległość w milimetrach. Jeśli obiekt jest zbyt daleko lub zbyt blisko, czujnik zwróci komunikat o błędzie. To zachowanie można potwierdzić w demonstracji wideo (na wideo o 19:30).
Znaczniki czasu wideo
- 00:00 Start
- 00:56 Wprowadzenie
- 04:30 Przegląd karty katalogowej VL6080V
- 06:58 Pokazane podłączenie
- 07:32 Podłączenie dla dwóch lub więcej czujników
- 09:22 Instalacja biblioteki
- 10:30 Wyjaśnienie kodu Arduino (1 czujnik)
- 12:57 Kod dla 2 lub więcej czujników
- 19:35 Demonstracja z 1 czujnikiem
- 22:05 Demonstracja z 2 czujnikami
Obrazy
/*
 *  Arduino code
Using a single VL6180X 20cm Time-of-Flight proximity sensor with Arduino

View code for using a single VL6180X sensor: https://robojax.com?vid=robojax_VL6180X_laser2

 * Original code and library by https://github.com/adafruit/Adafruit_VL6180X
 *
 * Written/updated by Ahmad Shamshiri for Robojax Robojax.com
 * on Mar 10, 2021  in Ajax, Ontario, Canada
Watch the video instruction for this sketch: https://youtu.be/_H9D0czQpSI


If you found this tutorial helpful, please support me so I can continue creating
content like this.
or make a donation using PayPal http://robojax.com/L/?id=64

*
 * Code is available at http://robojax.com/learn/arduino

 * This code is "AS IS" without warranty or liability. Free to be used as long as you keep this note intact.
 * This code has been downloaded from Robojax.com
    This program is free software: you can redistribute it and/or modify
    it under the terms of the GNU General Public License as published by
    the Free Software Foundation, either version 3 of the License, or
    (at your option) any later version.

    This program is distributed in the hope that it will be useful,
    but WITHOUT ANY WARRANTY; without even the implied warranty of
    MERCHANTABILITY or FITNESS FOR A PARTICULAR PURPOSE.  See the
    GNU General Public License for more details.

    You should have received a copy of the GNU General Public License
    along with this program.  If not, see <https://www.gnu.org/licenses/>.

*/
#include <Wire.h>
#include "Adafruit_VL6180X.h"

Adafruit_VL6180X vl = Adafruit_VL6180X();

void setup() {
  Serial.begin(115200);

  // wait for serial port to open on native usb devices
  while (!Serial) {
    delay(1);
  }

  Serial.println("Adafruit VL6180x test!");
  if (! vl.begin()) {
    Serial.println("Failed to find sensor");
    while (1);
  }
  Serial.println("Sensor found!");
}

void loop() {

  uint8_t range = vl.readRange();
  uint8_t status = vl.readRangeStatus();

  if (status == VL6180X_ERROR_NONE) {
    Serial.print("Range: "); Serial.print(range);
    Serial.println("mm");
  }
//  if(range <=76)
//  {
//    //do something
//  }

  // Some error occurred, print it out!

  if  ((status >= VL6180X_ERROR_SYSERR_1) && (status <= VL6180X_ERROR_SYSERR_5)) {
    Serial.println("System error");
  }
  else if (status == VL6180X_ERROR_ECEFAIL) {
    Serial.println("ECE failure");
  }
  else if (status == VL6180X_ERROR_NOCONVERGE) {
    Serial.println("No convergence");
  }
  else if (status == VL6180X_ERROR_RANGEIGNORE) {
    Serial.println("Ignoring range");
  }
  else if (status == VL6180X_ERROR_SNR) {
    Serial.println("Signal/Noise error");
  }
  else if (status == VL6180X_ERROR_RAWUFLOW) {
    Serial.println("Raw reading underflow");
  }
  else if (status == VL6180X_ERROR_RAWOFLOW) {
    Serial.println("Raw reading overflow");
  }
  else if (status == VL6180X_ERROR_RANGEUFLOW) {
    Serial.println("Range reading underflow");
  }
  else if (status == VL6180X_ERROR_RANGEOFLOW) {
    Serial.println("Range reading overflow");
  }
  delay(50);
}/*
* Lesson 76-1: Using one VL6180 laser distance sensor with Arduino
* Adafruit code modified for this tutorial
* by Ahmad Shamshiri at 22:22 on
* March 10-11, 2021 in Ajax, ON, Canada
Please watch video instruction of this code: https://youtu.be/_H9D0czQpSI
View code for using two or more VL6180X sensors: https://robojax.com/course1/lecture76
This video is part of the Arduino Step by Step Course, which starts here: https://youtu.be/-6qSrDUA5a8
If you found this tutorial helpful, please support me so I can continue creating
content like this. You can support me on Patreon: http://robojax.com/L/?id=63
or make a donation using PayPal: http://robojax.com/L/?id=64
* This code is "AS IS" without warranty or liability. Free to be used as long as you keep this note intact. *
* This code has been downloaded from Robojax.com
This program is free software: you can redistribute it and/or modify
it under the terms of the GNU General Public License as published by
the Free Software Foundation, either version 3 of the License, or
(at your option) any later version.
This program is distributed in the hope that it will be useful,
but WITHOUT ANY WARRANTY; without even the implied warranty of
MERCHANTABILITY or FITNESS FOR A PARTICULAR PURPOSE. See the
GNU General Public License for more details.
You should have received a copy of the GNU General Public License
along with this program. If not, see <https://www.gnu.org/licenses/>.
*/
#include <Wire.h>
#include "Adafruit_VL6180X.h"
Adafruit_VL6180X vl = Adafruit_VL6180X();
void setup() {
Serial.begin(115200);
// wait for serial port to open on native usb devices
while (!Serial) {
delay(1);
}
Serial.println("Adafruit VL6180x test!");
if (! vl.begin()) {
Serial.println("Failed to find sensor");
while (1);
}
Serial.println("Sensor found!");
}
void loop() {
uint8_t range = vl.readRange();
uint8_t status = vl.readRangeStatus();
if (status == VL6180X_ERROR_NONE) {
Serial.print("Range: "); Serial.print(range);
Serial.println("mm");
}
// if(range <=76)
// {
// //do something
// }
// Some error occurred, print it out!
if ((status >= VL6180X_ERROR_SYSERR_1) && (status <= VL6180X_ERROR_SYSERR_5)) {
Serial.println("System error");
}
else if (status == VL6180X_ERROR_ECEFAIL) {
Serial.println("ECE failure");
}
else if (status == VL6180X_ERROR_NOCONVERGE) {
Serial.println("No convergence");
}
else if (status == VL6180X_ERROR_RANGEIGNORE) {
Serial.println("Ignoring range");
}
else if (status == VL6180X_ERROR_SNR) {
Serial.println("Signal/Noise error");
}
else if (status == VL6180X_ERROR_RAWUFLOW) {
Serial.println("Raw reading underflow");
}
else if (status == VL6180X_ERROR_RAWOFLOW) {
Serial.println("Raw reading overflow");
}
else if (status == VL6180X_ERROR_RANGEUFLOW) {
Serial.println("Range reading underflow");
}
else if (status == VL6180X_ERROR_RANGEOFLOW) {
Serial.println("Range reading overflow");
}
delay(50);
}/*
* Arduino code
* Lesson 76-2: Using two or more VL6180 Laser Distance Sensors with Arduino
* Adafruit code modified for this tutorial
* Using two or more VL6180X 20cm Time-of-Flight proximity sensors with Arduino
*
* View code for using single VL6180X sensors: https://robojax.com/course1/lecture76
*
* Original code and library by https://github.com/adafruit/Adafruit_VL6180X
*
* Written/updated by Ahmad Shamshiri for Robojax Robojax.com
* on Mar 12, 2021 in Ajax, Ontario, Canada
* Watch the video instruction for this sketch: https://youtu.be/_H9D0czQpSI
*
*
* Please watch video instruction for this code: https://youtu.be/_H9D0czQpSI
*
* This video is part of Arduino Step by Step Course which starts here: https://youtu.be/-6qSrDUA5a8
*
*
* If you found this tutorial helpful, please support me so I can continue creating
* content like this.
*
* or make a donation using PayPal http://robojax.com/L/?id=64
*
* This code is "AS IS" without warranty or liability. Free to be used as long as you keep this note intact.
* This code has been downloaded from Robojax.com
* This program is free software: you can redistribute it and/or modify
* it under the terms of the GNU General Public License as published by
* the Free Software Foundation, either version 3 of the License, or
* (at your option) any later version.
*
* This program is distributed in the hope that it will be useful,
* but WITHOUT ANY WARRANTY; without even the implied warranty of
* MERCHANTABILITY or FITNESS FOR A PARTICULAR PURPOSE. See the
* GNU General Public License for more details.
*
* You should have received a copy of the GNU General Public License
* along with this program. If not, see <https://www.gnu.org/licenses/>.
*
*/
#include <Adafruit_VL6180X.h>
// address we will assign if dual sensor is present
#define LOX1_ADDRESS 0x30
#define LOX2_ADDRESS 0x31
// set the pins to shutdown
#define SHT_LOX1 7
#define SHT_LOX2 6
// Optional define GPIO pins to check to see if complete
#define GPIO_LOX1 4
#define GPIO_LOX2 3
#define TIMING_PIN 13
// objects for the VL6180X
Adafruit_VL6180X lox1 = Adafruit_VL6180X();
Adafruit_VL6180X lox2 = Adafruit_VL6180X();
// Setup mode for doing reads
typedef enum {RUN_MODE_DEFAULT, RUN_MODE_TIMED, RUN_MODE_ASYNC, RUN_MODE_GPIO, RUN_MODE_CONT} runmode_t;
runmode_t run_mode = RUN_MODE_DEFAULT;
uint8_t show_command_list = 1;
//==========================================================================
// Define some globals used in the continuous range mode
// Note: going to start table drive this part, may back up and do the rest later
Adafruit_VL6180X *sensors[] = {&lox1, &lox2};
const uint8_t COUNT_SENSORS = sizeof(sensors) / sizeof(sensors[0]);
const int sensor_gpios[COUNT_SENSORS] = {GPIO_LOX1, GPIO_LOX2}; // if any are < 0 will poll instead
uint8_t tempRange;
uint8_t sensor_ranges[COUNT_SENSORS];
uint8_t sensor_status[COUNT_SENSORS];
// Could do with uint8_t for 8 sensors, but just in case...
const uint16_t ALL_SENSORS_PENDING = ((1 << COUNT_SENSORS) - 1);
uint16_t sensors_pending = ALL_SENSORS_PENDING;
uint32_t sensor_last_cycle_time;
/*
Reset all sensors by setting all of their XSHUT pins low for delay(10), then set all XSHUT high to bring out of reset
Keep sensor #1 awake by keeping XSHUT pin high
Put all other sensors into shutdown by pulling XSHUT pins low
Initialize sensor #1 with lox.begin(new_i2c_address) Pick any number but 0x29 and it must be under 0x7F. Going with 0x30 to 0x3F is probably OK.
Keep sensor #1 awake, and now bring sensor #2 out of reset by setting its XSHUT pin high.
Initialize sensor #2 with lox.begin(new_i2c_address) Pick any number but 0x29 and whatever you set the first sensor to
*/
void setID() {
// all reset
digitalWrite(SHT_LOX1, LOW);
digitalWrite(SHT_LOX2, LOW);
delay(10);
// all unreset
digitalWrite(SHT_LOX1, HIGH);
digitalWrite(SHT_LOX2, HIGH);
delay(10);
// activating LOX1 and reseting LOX2
digitalWrite(SHT_LOX1, HIGH);
digitalWrite(SHT_LOX2, LOW);
// initing LOX1
if (!lox1.begin()) {
Serial.println(F("Failed to boot first VL6180X"));
while (1);
}
lox1.setAddress(LOX1_ADDRESS);
delay(10);
// activating LOX2
digitalWrite(SHT_LOX2, HIGH);
delay(10);
//initing LOX2
if (!lox2.begin()) {
Serial.println(F("Failed to boot second VL6180X"));
while (1);
}
lox2.setAddress(LOX2_ADDRESS);
delay(10);
}
void readSensor(Adafruit_VL6180X &vl) {
float lux = vl.readLux(VL6180X_ALS_GAIN_5);
uint8_t range = vl.readRange();
uint8_t status = vl.readRangeStatus();
if (status == VL6180X_ERROR_NONE) {
tempRange = range;//save it for the moment
}
// Some error occurred, print it out!
if ((status >= VL6180X_ERROR_SYSERR_1) && (status <= VL6180X_ERROR_SYSERR_5)) {
Serial.print("(System error)");
}
else if (status == VL6180X_ERROR_ECEFAIL) {
Serial.print("(ECE failure)");
}
else if (status == VL6180X_ERROR_NOCONVERGE) {
Serial.print("(No convergence)");
}
else if (status == VL6180X_ERROR_RANGEIGNORE) {
Serial.print("(Ignoring range)");
}
else if (status == VL6180X_ERROR_SNR) {
Serial.print("Signal/Noise error");
}
else if (status == VL6180X_ERROR_RAWUFLOW) {
Serial.print("Raw reading underflow");
}
else if (status == VL6180X_ERROR_RAWOFLOW) {
Serial.print("Raw reading overflow");
}
else if (status == VL6180X_ERROR_RANGEUFLOW) {
Serial.print("Range reading underflow");
}
else if (status == VL6180X_ERROR_RANGEOFLOW) {
Serial.print("Range reading overflow");
}
}
void read_sensors() {
readSensor(lox1);
sensor_ranges[0]=tempRange;//save it now
readSensor(lox2);
sensor_ranges[1]=tempRange; //save it now
Serial.println();
}
//===============================================================
// Setup
//===============================================================
void setup() {
Serial.begin(115200);
// wait until serial port opens for native USB devices
while (! Serial) {
delay(1);
}
pinMode(SHT_LOX1, OUTPUT);
pinMode(SHT_LOX2, OUTPUT);
// Enable timing pin so easy to see when pass starts and ends
pinMode(TIMING_PIN, OUTPUT);
#ifdef GPIO_LOX1
// If we defined GPIO pins, enable them as PULL UP
pinMode(GPIO_LOX1, INPUT_PULLUP);
pinMode(GPIO_LOX2, INPUT_PULLUP);
#endif
Serial.println("Shutdown pins inited...");
digitalWrite(SHT_LOX1, LOW);
digitalWrite(SHT_LOX2, LOW);
digitalWrite(TIMING_PIN, LOW);
Serial.println("All in reset mode...(pins are low)");
Serial.println("Starting...");
setID();
}
//===============================================================
// Loop
//===============================================================
void loop() {
read_sensors();
for(int i=0; i<COUNT_SENSORS; i++)
{
Serial.print("Sensor ");
Serial.print(i);
Serial.print(" :");
Serial.print(sensor_ranges[i]);
Serial.print("mm");
Serial.println();
}
// if(sensor_ranges[1] >=76)
// {
// //do something here
// }
delay(100);
}Rzeczy, których możesz potrzebować
-
AllegroPurchase VL618X sensor from eBayebay.us
-
AliExpressPurchase VL618X sensor from AliExpresss.click.aliexpress.com
-
BanggoodPurchase VL618X sensor from Banggoodbanggood.com
Zasoby i odniesienia
-
Zewnętrzny
-
Zewnętrzny
-
ZewnętrznyPurchase VL6180X from Amazon USAamzn.to
-
ZewnętrznyVL6080X datasheetst.com
Pliki📁
Brak dostępnych plików.