Lis 76-1: Kosalela ya VL6180 Laser Distance Sensor moko na Arduino
Lithui 76-1: Kosalela Sensor ya Bolili ya VL6180 moko na Arduino
Na lithui oyo, tokoyekola ndenge ya kosalela sensor ya bolili ya laser ya VL6180X na carte ya Arduino. Sensor oyo ya moke ekoki komeka bolili na ndenge ya malamu kino na basantimɛtrɛ 20, oyo esalaka ete ebongisama mpo na misala ndenge na ndenge na robotiki mpe na koyeba biloko. Na suka ya lithui oyo, okomona polele ndenge ya kokangisa sensor, kotia bibliotɛki oyo esengeli, mpe kosalela kode mpo na kozwa bomekeli ya bolili.
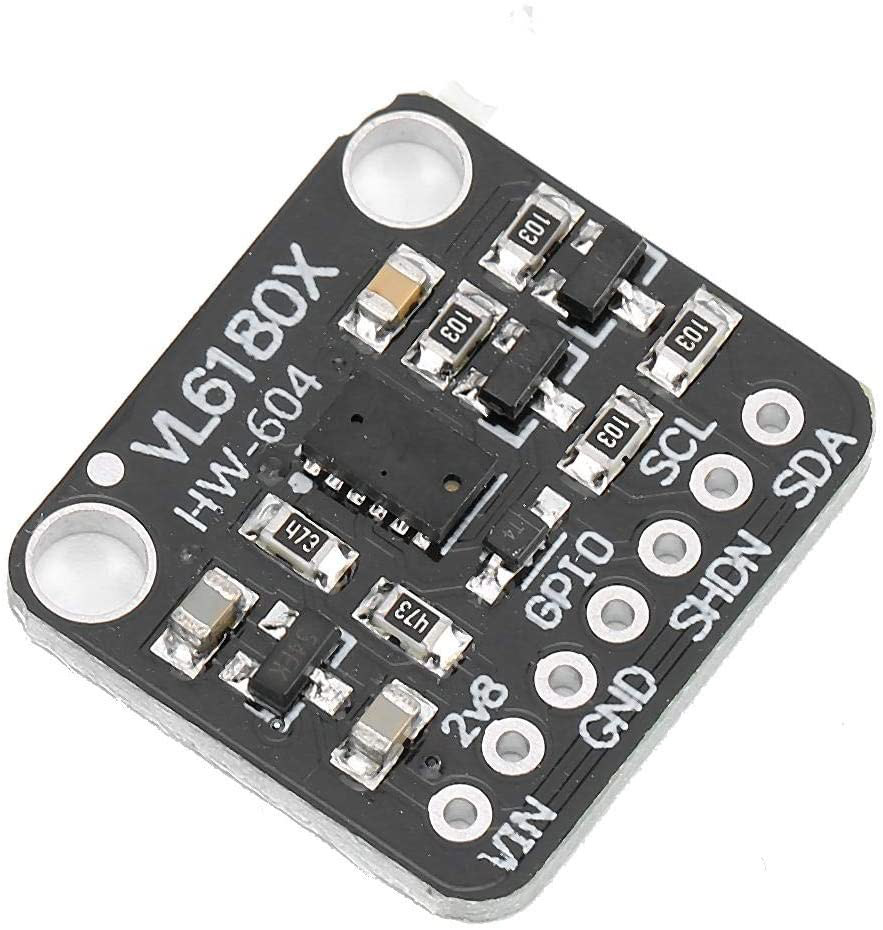
Sensor ya VL6180X esalaka na ndenge ya time-of-flight (ToF), epesaka laser mpe emekaka ntango oyo pole ekomi sima ya kobeta na eloko. Ndenge oyo epesaka bomekeli ya bolili na ndenge ya malamu mpe esalelamaka mingi na biloko ya mobile mpe na robotiki. Na biteni oyo elandi, tokolobela biloko ya hardware, ndenge ya kokangisa, mpe ndenge ya kosalela kode.
Hardware Elobami
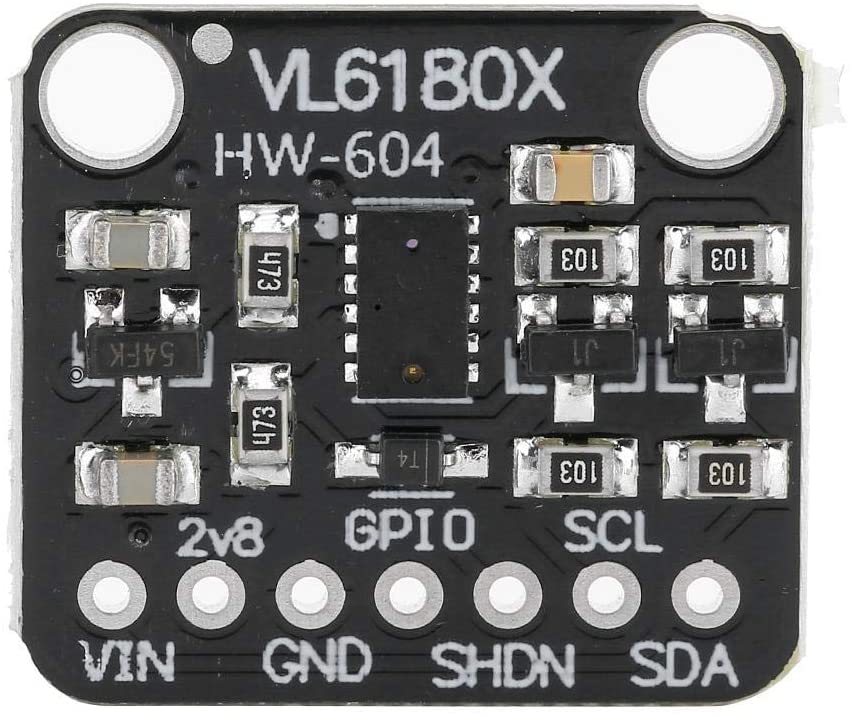
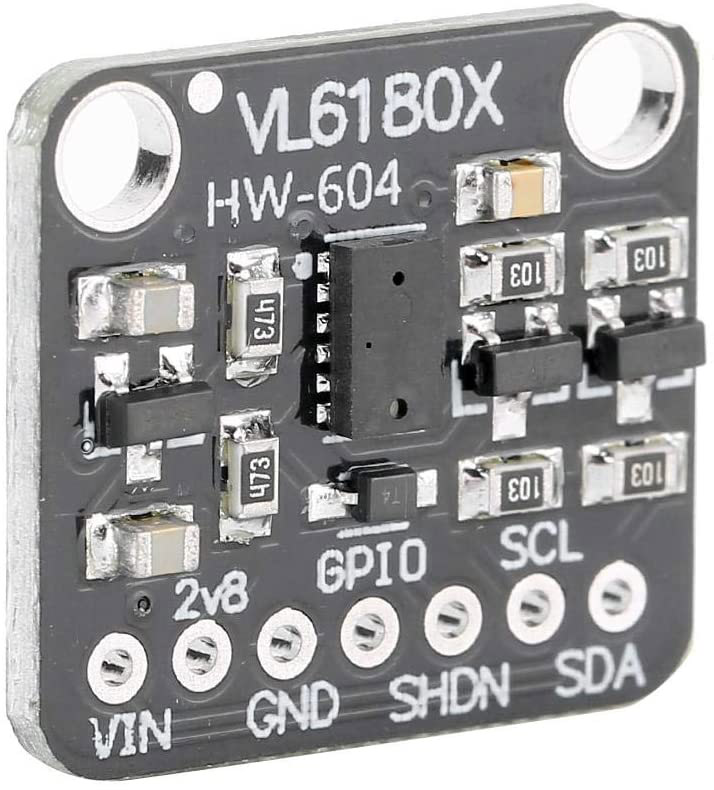
Eloko ya liboso na projet oyo ezali sensor ya bolili ya laser ya VL6180X. Sensor oyo ezali na interface ya I2C, oyo esalaka ete ekangama pete na Arduino. Ezali na ba pins ebele, lokola ya puissance, ya mabele, mpe ba lignes ya ba données. Sensor esalaka na voltage kati na 2.6 mpe 3.6 volts mpe ekoki komeka bolili na ndenge ya malamu mingi.
Na yango, carte ya Arduino ezali lokola microcontrôleur oyo etangaka ba données ya sensor mpe esalelaka yango. Mpo na kosala yango, esengeli na ba composants ya électronique lokola ba fils ya jumper mpe breadboard mpo na kokangisa. Koyeba ndenge biloko nyonso esanganaka ezali mpenza ntina mpo na kosala yango na ndenge ya malamu.
Bafandi ya Datasheet
| Mosali | STMicroelectronics |
|---|---|
| Numero ya eteni | VL6180X |
| Voltage ya logique/IO | 2.6 - 3.6 V |
| Voltage ya alimentation | 2.6 - 3.6 V |
| Courant ya libanda | 1.7 mA (typ.) |
| Courant ya suka | 10 mA (max.) |
| Likanisi ya fréquence ya PWM | N/A |
| Ba seuils ya logique ya entrée | N/A |
| Kokita ya voltage / RDS(on) / saturation | N/A |
| Ba limites ya température | -20 kino 70 °C |
| Paquet | 4.8 x 2.8 x 1 mm |
| Banote / ba variantes | Sensor ya proximité mpe ya bolili |
- Kokanola ete alimentation ezali na kati ya ndelo oyo elobami mpo ete sensor ebeba te.
- Salela ba résistances ya pull-up na ba lignes ya I2C soki esengeli mpo na communication ya malamu.
- Kotya sensor mosika na mwinda ya moi mpo na bomekeli ya malamu.
- Kanola kosalela breadboard mpo na kokangisa pete mpe kobongola.
- Talá mikanda ya bibliotɛki mpo na koyeba ndenge ya kosalela ba fonctions mpe makoki na yango.
Bilakisi ya Kokangisa

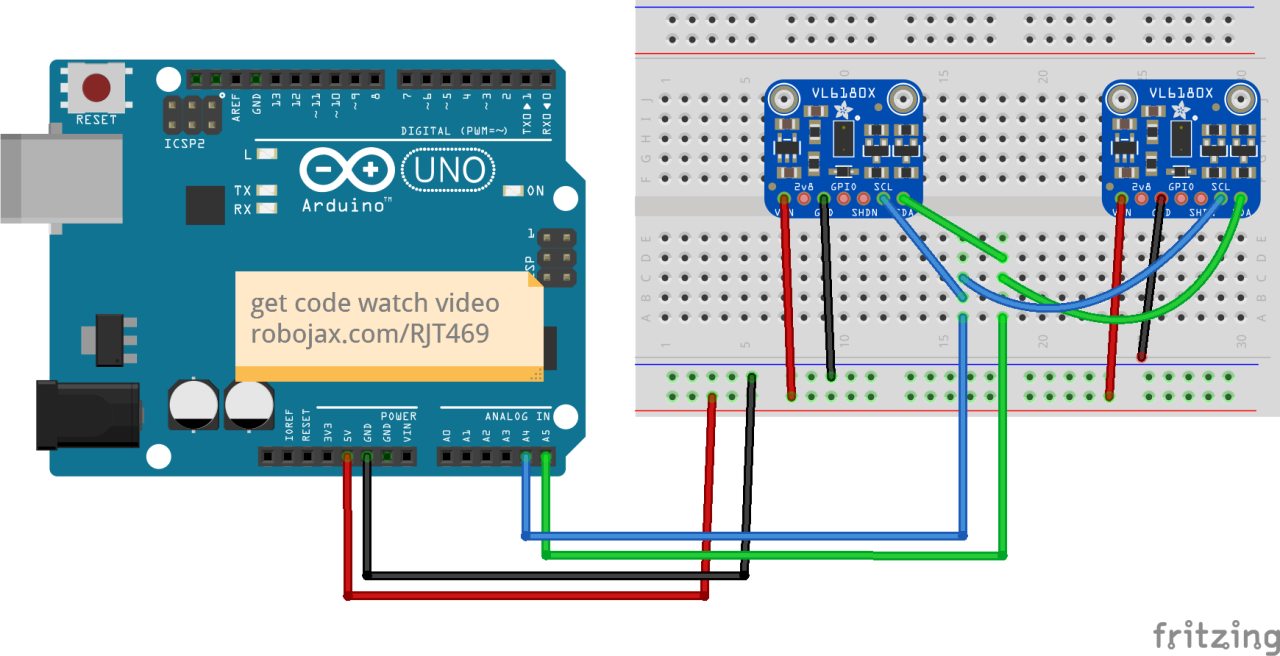
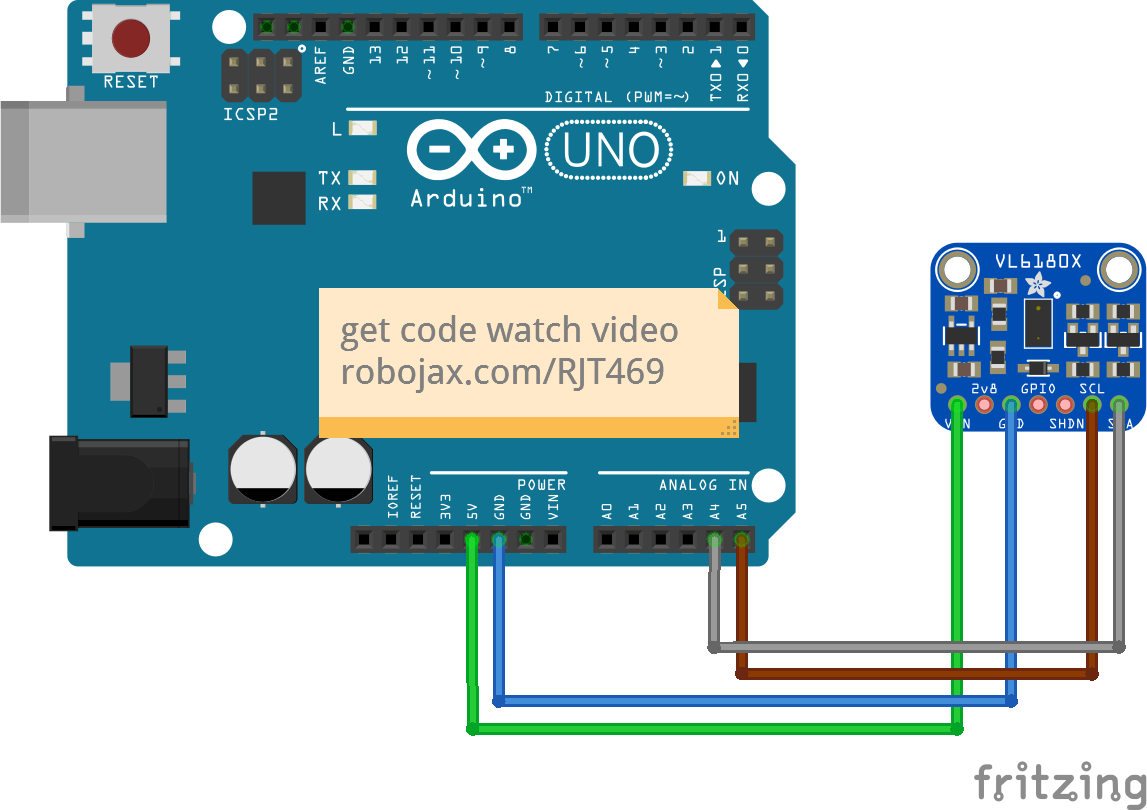
Mpo na kokangisa sensor ya VL6180X na Arduino, banda na kokangisa pin ya VCC ya sensor na pin ya 5V ya Arduino. Na sima, kokangisa pin ya GND ya sensor na pin ya GND ya Arduino. Pin ya SCL ya sensor esengeli kokangama na A5, mpe pin ya SDA esengeli kokangama na A4 ya Arduino.
Kokanola ete okangisa sensor na ndenge oyo: VCC na 5V, GND na GND, SDA na A4, mpe SCL na A5. Soki olingi kosalela ba sensors ebele, kanola ete moko na moko ezali na adresse ya I2C ya sikisiki mpe ba pins ya shutdown esengeli kobongisama na ndenge ya malamu.
Ba Kode ya Misesa & Mateya
Na kode, tobandaka na kotia ba bibliotɛki oyo esengeli mpe kobandisa sensor. Eteni oyo elandi elakisi ndenge ya kobongisa communication ya I2C mpe kotala soki sensor ezali:
void setup() {
  Serial.begin(115200);
  while (!Serial) { delay(1); }

  if (! vl.begin()) {
    Serial.println("Sensor ezwamaki te");
    while (1);
  }
  Serial.println("Sensor ezwami!");
}
Kode oyo ebandisaka moniteur ya série mpe emekaka kosala communication na sensor ya VL6180X. Soki sensor ezwami te, ekoma message ya libunga mpe ekosala ete programme esalela te.
Na sima, tozongaka kotanga bolili ya sensor mpe kotala soki ezali na libunga:
void loop() {
  uint8_t range = vl.readRange();
  uint8_t status = vl.readRangeStatus();

  if (status == VL6180X_ERROR_NONE) {
    Serial.print("Bolili: "); Serial.print(range);
    Serial.println("mm");
  }
}
Eteni oyo etangaka bolili oyo sensor emekaki mpe ekomaka yango na moniteur ya série. Soki ezali na ba libunga, ba messages ya libunga ekoki kokomama kolanda na statut oyo ezwami.
Elakiseli / Nini Okokanola
Sima ya kokokisa kokangisa mpe kotia kode na Arduino, okomona bomekeli ya bolili na moniteur ya série. Soki eloko etyami na kati ya ndelo ya sensor, bolili na milimɛtrɛ ekomonana. Soki eloko ezali mosika mingi to pembeni mingi, sensor ekozongisa message ya libunga. Ndenge oyo ekoki komonama na video ya elakiseli (na video na 19:30).
Ba Ntango ya Video
- 00:00 Ebandeli
- 00:56 Maloba ya liboso
- 04:30 Datasheet ya VL6080V emonani
- 06:58 Kokangisa emonani
- 07:32 Kokangisa mpo na ba sensors mibale to koleka
- 09:22 Kotia bibliotɛki
- 10:30 Kode ya Arduino elobami (sensor moko)
- 12:57 Kode mpo na ba sensors mibale to koleka
- 19:35 Elakiseli ya sensor moko
- 22:05 Elakiseli na ba sensors mibale
Images
/*
 *  Arduino code
Using a single VL6180X 20cm Time-of-Flight proximity sensor with Arduino

View code for using a single VL6180X sensor: https://robojax.com?vid=robojax_VL6180X_laser2

 * Original code and library by https://github.com/adafruit/Adafruit_VL6180X
 *
 * Written/updated by Ahmad Shamshiri for Robojax Robojax.com
 * on Mar 10, 2021  in Ajax, Ontario, Canada
Watch the video instruction for this sketch: https://youtu.be/_H9D0czQpSI


If you found this tutorial helpful, please support me so I can continue creating
content like this.
or make a donation using PayPal http://robojax.com/L/?id=64

*
 * Code is available at http://robojax.com/learn/arduino

 * This code is "AS IS" without warranty or liability. Free to be used as long as you keep this note intact.
 * This code has been downloaded from Robojax.com
    This program is free software: you can redistribute it and/or modify
    it under the terms of the GNU General Public License as published by
    the Free Software Foundation, either version 3 of the License, or
    (at your option) any later version.

    This program is distributed in the hope that it will be useful,
    but WITHOUT ANY WARRANTY; without even the implied warranty of
    MERCHANTABILITY or FITNESS FOR A PARTICULAR PURPOSE.  See the
    GNU General Public License for more details.

    You should have received a copy of the GNU General Public License
    along with this program.  If not, see <https://www.gnu.org/licenses/>.

*/
#include <Wire.h>
#include "Adafruit_VL6180X.h"

Adafruit_VL6180X vl = Adafruit_VL6180X();

void setup() {
  Serial.begin(115200);

  // wait for serial port to open on native usb devices
  while (!Serial) {
    delay(1);
  }

  Serial.println("Adafruit VL6180x test!");
  if (! vl.begin()) {
    Serial.println("Failed to find sensor");
    while (1);
  }
  Serial.println("Sensor found!");
}

void loop() {

  uint8_t range = vl.readRange();
  uint8_t status = vl.readRangeStatus();

  if (status == VL6180X_ERROR_NONE) {
    Serial.print("Range: "); Serial.print(range);
    Serial.println("mm");
  }
//  if(range <=76)
//  {
//    //do something
//  }

  // Some error occurred, print it out!

  if  ((status >= VL6180X_ERROR_SYSERR_1) && (status <= VL6180X_ERROR_SYSERR_5)) {
    Serial.println("System error");
  }
  else if (status == VL6180X_ERROR_ECEFAIL) {
    Serial.println("ECE failure");
  }
  else if (status == VL6180X_ERROR_NOCONVERGE) {
    Serial.println("No convergence");
  }
  else if (status == VL6180X_ERROR_RANGEIGNORE) {
    Serial.println("Ignoring range");
  }
  else if (status == VL6180X_ERROR_SNR) {
    Serial.println("Signal/Noise error");
  }
  else if (status == VL6180X_ERROR_RAWUFLOW) {
    Serial.println("Raw reading underflow");
  }
  else if (status == VL6180X_ERROR_RAWOFLOW) {
    Serial.println("Raw reading overflow");
  }
  else if (status == VL6180X_ERROR_RANGEUFLOW) {
    Serial.println("Range reading underflow");
  }
  else if (status == VL6180X_ERROR_RANGEOFLOW) {
    Serial.println("Range reading overflow");
  }
  delay(50);
}/*
* Lesson 76-1: Using one VL6180 laser distance sensor with Arduino
* Adafruit code modified for this tutorial
* by Ahmad Shamshiri at 22:22 on
* March 10-11, 2021 in Ajax, ON, Canada
Please watch video instruction of this code: https://youtu.be/_H9D0czQpSI
View code for using two or more VL6180X sensors: https://robojax.com/course1/lecture76
This video is part of the Arduino Step by Step Course, which starts here: https://youtu.be/-6qSrDUA5a8
If you found this tutorial helpful, please support me so I can continue creating
content like this. You can support me on Patreon: http://robojax.com/L/?id=63
or make a donation using PayPal: http://robojax.com/L/?id=64
* This code is "AS IS" without warranty or liability. Free to be used as long as you keep this note intact. *
* This code has been downloaded from Robojax.com
This program is free software: you can redistribute it and/or modify
it under the terms of the GNU General Public License as published by
the Free Software Foundation, either version 3 of the License, or
(at your option) any later version.
This program is distributed in the hope that it will be useful,
but WITHOUT ANY WARRANTY; without even the implied warranty of
MERCHANTABILITY or FITNESS FOR A PARTICULAR PURPOSE. See the
GNU General Public License for more details.
You should have received a copy of the GNU General Public License
along with this program. If not, see <https://www.gnu.org/licenses/>.
*/
#include <Wire.h>
#include "Adafruit_VL6180X.h"
Adafruit_VL6180X vl = Adafruit_VL6180X();
void setup() {
Serial.begin(115200);
// wait for serial port to open on native usb devices
while (!Serial) {
delay(1);
}
Serial.println("Adafruit VL6180x test!");
if (! vl.begin()) {
Serial.println("Failed to find sensor");
while (1);
}
Serial.println("Sensor found!");
}
void loop() {
uint8_t range = vl.readRange();
uint8_t status = vl.readRangeStatus();
if (status == VL6180X_ERROR_NONE) {
Serial.print("Range: "); Serial.print(range);
Serial.println("mm");
}
// if(range <=76)
// {
// //do something
// }
// Some error occurred, print it out!
if ((status >= VL6180X_ERROR_SYSERR_1) && (status <= VL6180X_ERROR_SYSERR_5)) {
Serial.println("System error");
}
else if (status == VL6180X_ERROR_ECEFAIL) {
Serial.println("ECE failure");
}
else if (status == VL6180X_ERROR_NOCONVERGE) {
Serial.println("No convergence");
}
else if (status == VL6180X_ERROR_RANGEIGNORE) {
Serial.println("Ignoring range");
}
else if (status == VL6180X_ERROR_SNR) {
Serial.println("Signal/Noise error");
}
else if (status == VL6180X_ERROR_RAWUFLOW) {
Serial.println("Raw reading underflow");
}
else if (status == VL6180X_ERROR_RAWOFLOW) {
Serial.println("Raw reading overflow");
}
else if (status == VL6180X_ERROR_RANGEUFLOW) {
Serial.println("Range reading underflow");
}
else if (status == VL6180X_ERROR_RANGEOFLOW) {
Serial.println("Range reading overflow");
}
delay(50);
}/*
* Arduino code
* Lesson 76-2: Using two or more VL6180 Laser Distance Sensors with Arduino
* Adafruit code modified for this tutorial
* Using two or more VL6180X 20cm Time-of-Flight proximity sensors with Arduino
*
* View code for using single VL6180X sensors: https://robojax.com/course1/lecture76
*
* Original code and library by https://github.com/adafruit/Adafruit_VL6180X
*
* Written/updated by Ahmad Shamshiri for Robojax Robojax.com
* on Mar 12, 2021 in Ajax, Ontario, Canada
* Watch the video instruction for this sketch: https://youtu.be/_H9D0czQpSI
*
*
* Please watch video instruction for this code: https://youtu.be/_H9D0czQpSI
*
* This video is part of Arduino Step by Step Course which starts here: https://youtu.be/-6qSrDUA5a8
*
*
* If you found this tutorial helpful, please support me so I can continue creating
* content like this.
*
* or make a donation using PayPal http://robojax.com/L/?id=64
*
* This code is "AS IS" without warranty or liability. Free to be used as long as you keep this note intact.
* This code has been downloaded from Robojax.com
* This program is free software: you can redistribute it and/or modify
* it under the terms of the GNU General Public License as published by
* the Free Software Foundation, either version 3 of the License, or
* (at your option) any later version.
*
* This program is distributed in the hope that it will be useful,
* but WITHOUT ANY WARRANTY; without even the implied warranty of
* MERCHANTABILITY or FITNESS FOR A PARTICULAR PURPOSE. See the
* GNU General Public License for more details.
*
* You should have received a copy of the GNU General Public License
* along with this program. If not, see <https://www.gnu.org/licenses/>.
*
*/
#include <Adafruit_VL6180X.h>
// address we will assign if dual sensor is present
#define LOX1_ADDRESS 0x30
#define LOX2_ADDRESS 0x31
// set the pins to shutdown
#define SHT_LOX1 7
#define SHT_LOX2 6
// Optional define GPIO pins to check to see if complete
#define GPIO_LOX1 4
#define GPIO_LOX2 3
#define TIMING_PIN 13
// objects for the VL6180X
Adafruit_VL6180X lox1 = Adafruit_VL6180X();
Adafruit_VL6180X lox2 = Adafruit_VL6180X();
// Setup mode for doing reads
typedef enum {RUN_MODE_DEFAULT, RUN_MODE_TIMED, RUN_MODE_ASYNC, RUN_MODE_GPIO, RUN_MODE_CONT} runmode_t;
runmode_t run_mode = RUN_MODE_DEFAULT;
uint8_t show_command_list = 1;
//==========================================================================
// Define some globals used in the continuous range mode
// Note: going to start table drive this part, may back up and do the rest later
Adafruit_VL6180X *sensors[] = {&lox1, &lox2};
const uint8_t COUNT_SENSORS = sizeof(sensors) / sizeof(sensors[0]);
const int sensor_gpios[COUNT_SENSORS] = {GPIO_LOX1, GPIO_LOX2}; // if any are < 0 will poll instead
uint8_t tempRange;
uint8_t sensor_ranges[COUNT_SENSORS];
uint8_t sensor_status[COUNT_SENSORS];
// Could do with uint8_t for 8 sensors, but just in case...
const uint16_t ALL_SENSORS_PENDING = ((1 << COUNT_SENSORS) - 1);
uint16_t sensors_pending = ALL_SENSORS_PENDING;
uint32_t sensor_last_cycle_time;
/*
Reset all sensors by setting all of their XSHUT pins low for delay(10), then set all XSHUT high to bring out of reset
Keep sensor #1 awake by keeping XSHUT pin high
Put all other sensors into shutdown by pulling XSHUT pins low
Initialize sensor #1 with lox.begin(new_i2c_address) Pick any number but 0x29 and it must be under 0x7F. Going with 0x30 to 0x3F is probably OK.
Keep sensor #1 awake, and now bring sensor #2 out of reset by setting its XSHUT pin high.
Initialize sensor #2 with lox.begin(new_i2c_address) Pick any number but 0x29 and whatever you set the first sensor to
*/
void setID() {
// all reset
digitalWrite(SHT_LOX1, LOW);
digitalWrite(SHT_LOX2, LOW);
delay(10);
// all unreset
digitalWrite(SHT_LOX1, HIGH);
digitalWrite(SHT_LOX2, HIGH);
delay(10);
// activating LOX1 and reseting LOX2
digitalWrite(SHT_LOX1, HIGH);
digitalWrite(SHT_LOX2, LOW);
// initing LOX1
if (!lox1.begin()) {
Serial.println(F("Failed to boot first VL6180X"));
while (1);
}
lox1.setAddress(LOX1_ADDRESS);
delay(10);
// activating LOX2
digitalWrite(SHT_LOX2, HIGH);
delay(10);
//initing LOX2
if (!lox2.begin()) {
Serial.println(F("Failed to boot second VL6180X"));
while (1);
}
lox2.setAddress(LOX2_ADDRESS);
delay(10);
}
void readSensor(Adafruit_VL6180X &vl) {
float lux = vl.readLux(VL6180X_ALS_GAIN_5);
uint8_t range = vl.readRange();
uint8_t status = vl.readRangeStatus();
if (status == VL6180X_ERROR_NONE) {
tempRange = range;//save it for the moment
}
// Some error occurred, print it out!
if ((status >= VL6180X_ERROR_SYSERR_1) && (status <= VL6180X_ERROR_SYSERR_5)) {
Serial.print("(System error)");
}
else if (status == VL6180X_ERROR_ECEFAIL) {
Serial.print("(ECE failure)");
}
else if (status == VL6180X_ERROR_NOCONVERGE) {
Serial.print("(No convergence)");
}
else if (status == VL6180X_ERROR_RANGEIGNORE) {
Serial.print("(Ignoring range)");
}
else if (status == VL6180X_ERROR_SNR) {
Serial.print("Signal/Noise error");
}
else if (status == VL6180X_ERROR_RAWUFLOW) {
Serial.print("Raw reading underflow");
}
else if (status == VL6180X_ERROR_RAWOFLOW) {
Serial.print("Raw reading overflow");
}
else if (status == VL6180X_ERROR_RANGEUFLOW) {
Serial.print("Range reading underflow");
}
else if (status == VL6180X_ERROR_RANGEOFLOW) {
Serial.print("Range reading overflow");
}
}
void read_sensors() {
readSensor(lox1);
sensor_ranges[0]=tempRange;//save it now
readSensor(lox2);
sensor_ranges[1]=tempRange; //save it now
Serial.println();
}
//===============================================================
// Setup
//===============================================================
void setup() {
Serial.begin(115200);
// wait until serial port opens for native USB devices
while (! Serial) {
delay(1);
}
pinMode(SHT_LOX1, OUTPUT);
pinMode(SHT_LOX2, OUTPUT);
// Enable timing pin so easy to see when pass starts and ends
pinMode(TIMING_PIN, OUTPUT);
#ifdef GPIO_LOX1
// If we defined GPIO pins, enable them as PULL UP
pinMode(GPIO_LOX1, INPUT_PULLUP);
pinMode(GPIO_LOX2, INPUT_PULLUP);
#endif
Serial.println("Shutdown pins inited...");
digitalWrite(SHT_LOX1, LOW);
digitalWrite(SHT_LOX2, LOW);
digitalWrite(TIMING_PIN, LOW);
Serial.println("All in reset mode...(pins are low)");
Serial.println("Starting...");
setID();
}
//===============================================================
// Loop
//===============================================================
void loop() {
read_sensors();
for(int i=0; i<COUNT_SENSORS; i++)
{
Serial.print("Sensor ");
Serial.print(i);
Serial.print(" :");
Serial.print(sensor_ranges[i]);
Serial.print("mm");
Serial.println();
}
// if(sensor_ranges[1] >=76)
// {
// //do something here
// }
delay(100);
}Nko o na nki.
-
eBayPurchase VL618X sensor from eBayebay.us
-
AliExpressPurchase VL618X sensor from AliExpresss.click.aliexpress.com
-
BanggoodPurchase VL618X sensor from Banggoodbanggood.com
Mokili na bisika
-
L'extérieur
-
L'extérieur
-
L'extérieurPurchase VL6180X from Amazon USAamzn.to
-
L'extérieurVL6080X datasheetst.com
Fichiers📁
Aucun fichier disponible.