Pelajaran 76-1: Menggunakan Satu Sensor Jarak Laser VL6180 dengan Arduino
Pelajaran 76-1: Menggunakan Satu Sensor Jarak Laser VL6180 dengan Arduino
Dalam tutorial ini, kita akan mempelajari cara menggunakan sensor jarak laser VL6180X dengan papan Arduino. Sensor kompak ini dapat mengukur jarak secara akurat hingga 20 sentimeter, sehingga cocok untuk berbagai aplikasi dalam robotika dan deteksi objek. Di akhir tutorial ini, Anda akan memiliki pemahaman yang jelas tentang cara menghubungkan sensor, menginstal pustaka yang diperlukan, dan mengimplementasikan kode untuk mendapatkan pembacaan jarak.
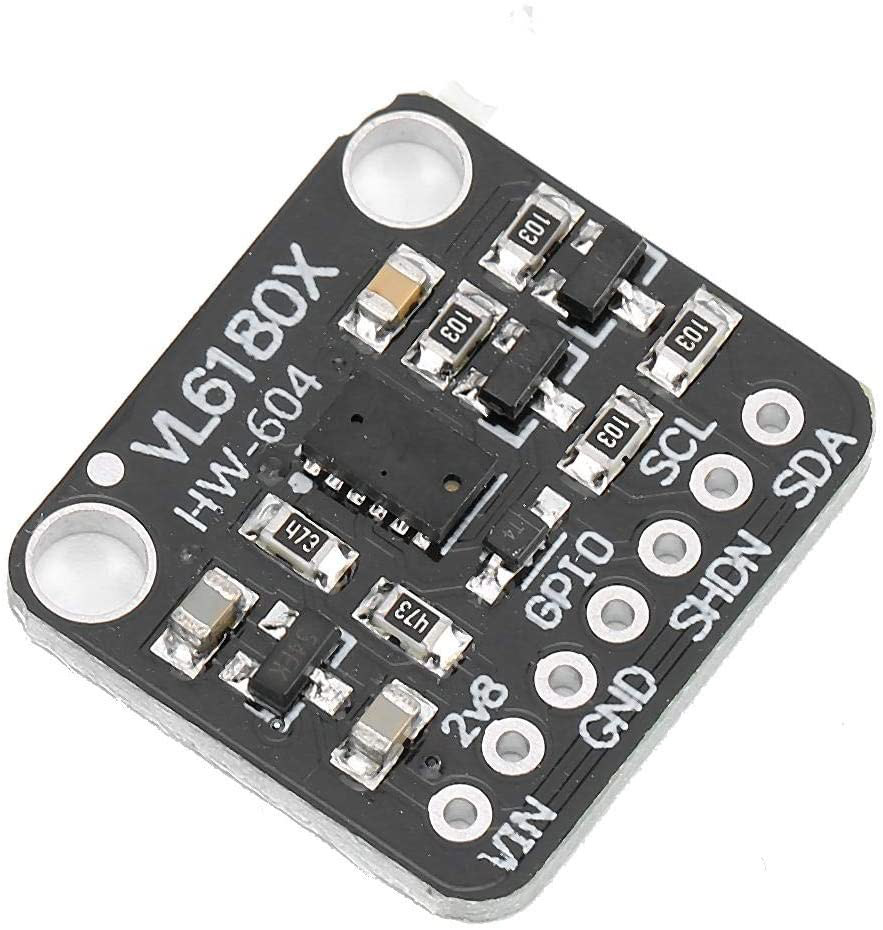
Sensor VL6180X beroperasi menggunakan prinsip waktu terbang (ToF), memancarkan laser dan mengukur waktu yang dibutuhkan cahaya untuk kembali setelah memantul dari suatu objek. Metode ini memungkinkan pengukuran jarak yang presisi dan banyak digunakan pada perangkat seluler dan robotika. Pada bagian berikut, kita akan membahas komponen perangkat keras, instruksi pengkabelan, dan implementasi kode.
Penjelasan Perangkat Keras
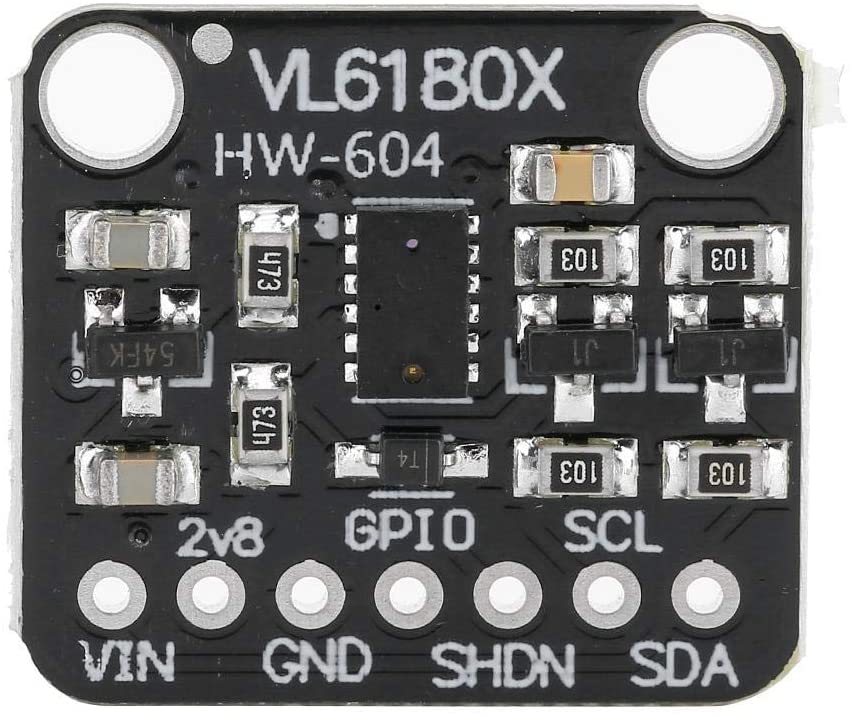
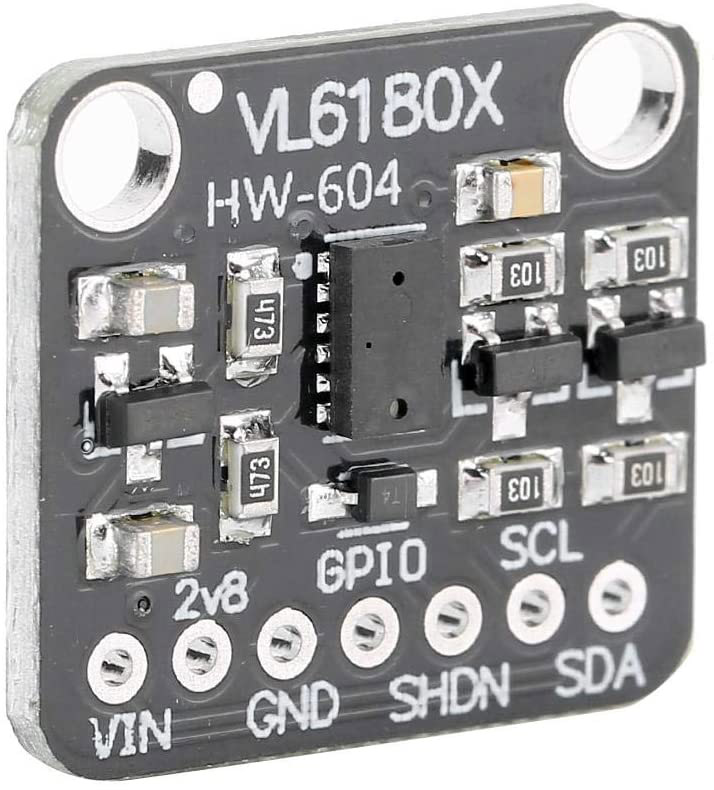
Komponen utama dari proyek ini adalah sensor jarak laser VL6180X. Sensor ini memiliki antarmuka I2C, sehingga mudah dihubungkan ke Arduino. Sensor ini memiliki beberapa pin, termasuk daya, ground, dan jalur data. Sensor beroperasi pada rentang tegangan 2,6 hingga 3,6 volt dan dapat mengukur jarak dengan akurasi tinggi.
Selain itu, papan Arduino berfungsi sebagai mikrokontroler yang membaca data dari sensor dan memprosesnya. Pengaturan ini memerlukan komponen elektronik dasar seperti kabel jumper dan papan breadboard untuk koneksi. Memahami bagaimana setiap komponen berinteraksi sangat penting untuk implementasi yang berhasil.
Detail Datasheet
| Produsen | STMicroelectronics |
|---|---|
| Nomor bagian | VL6180X |
| Tegangan logika/IO | 2,6 - 3,6 V |
| Tegangan suplai | 2,6 - 3,6 V |
| Arus keluaran | 1,7 mA (khas) |
| Arus puncak | 10 mA (maks.) |
| Panduan frekuensi PWM | T/A |
| Ambang logika masukan | T/A |
| Penurunan tegangan / RDS(on) / saturasi | T/A |
| Batas termal | -20 hingga 70 °C |
| Kemasan | 4,8 x 2,8 x 1 mm |
| Catatan / varian | Sensor jarak dan kedekatan |
- Pastikan catu daya berada dalam rentang yang ditentukan untuk menghindari kerusakan pada sensor.
- Gunakan resistor pull-up pada jalur I2C jika diperlukan untuk komunikasi yang andal.
- Jauhkan sensor dari sinar matahari langsung untuk pembacaan yang akurat.
- Pertimbangkan untuk menggunakan papan breadboard untuk koneksi dan penyesuaian yang mudah.
- Periksa dokumentasi pustaka untuk penggunaan fungsi dan kemampuan tertentu.
Instruksi Pengkabelan

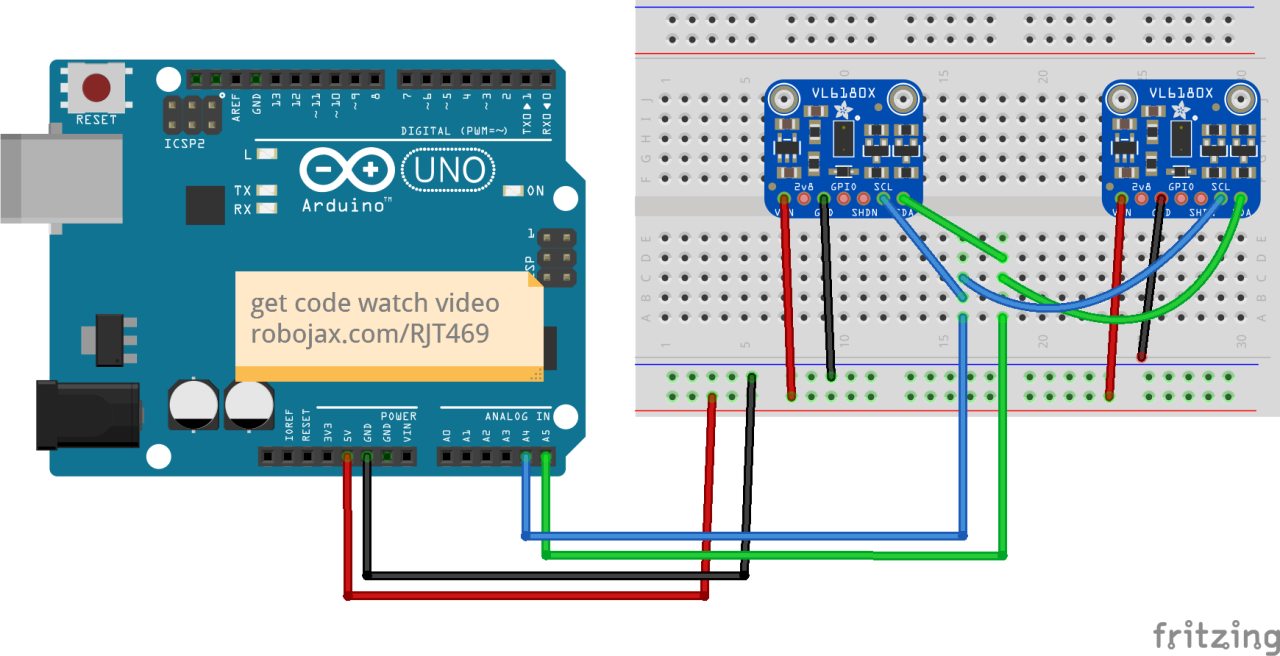
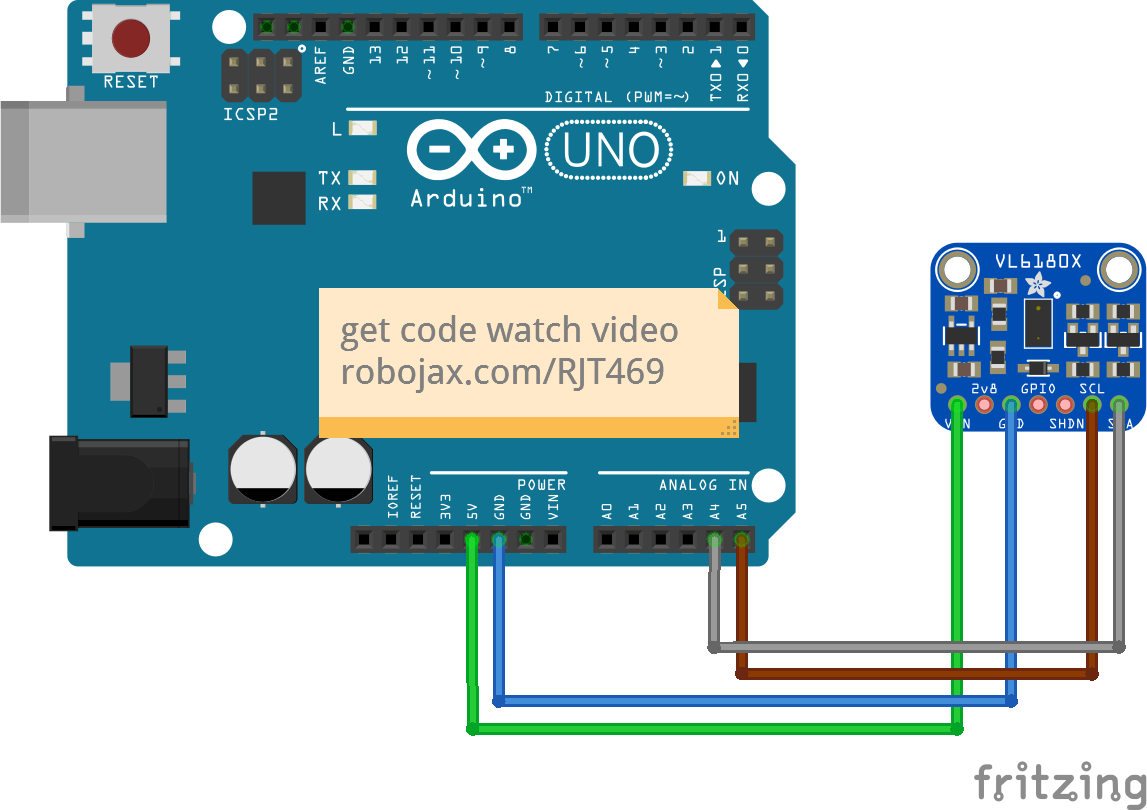
Untuk menghubungkan sensor VL6180X ke Arduino, mulailah dengan menghubungkan pin VCC sensor ke pin 5V pada Arduino. Selanjutnya, hubungkan pin GND sensor ke pin GND pada Arduino. Pin SCL sensor harus dihubungkan ke A5, sedangkan pin SDA harus dihubungkan ke A4 pada Arduino.
Pastikan untuk menghubungkan sensor dalam urutan ini: VCC ke 5V, GND ke GND, SDA ke A4, dan SCL ke A5. Jika Anda berencana menggunakan beberapa sensor, pastikan setiap sensor memiliki alamat I2C yang unik dan pin shutdown dikelola dengan tepat.
Contoh Kode & Penjelasan
Dalam kode, kita mulai dengan menyertakan pustaka yang diperlukan dan menginisialisasi instance sensor. Cuplikan berikut menunjukkan cara mengatur komunikasi I2C dan memeriksa apakah sensor ditemukan:
void setup() {
  Serial.begin(115200);
  while (!Serial) { delay(1); }

  if (! vl.begin()) {
    Serial.println("Gagal menemukan sensor");
    while (1);
  }
  Serial.println("Sensor ditemukan!");
}
Kode ini menginisialisasi monitor serial dan mencoba memulai komunikasi dengan sensor VL6180X. Jika sensor tidak ditemukan, kode akan mencetak pesan kesalahan dan menghentikan program.
Selanjutnya, kita membaca jarak dari sensor dan memeriksa adanya kesalahan:
void loop() {
  uint8_t range = vl.readRange();
  uint8_t status = vl.readRangeStatus();

  if (status == VL6180X_ERROR_NONE) {
    Serial.print("Jarak: "); Serial.print(range);
    Serial.println("mm");
  }
}
Cuplikan ini membaca jarak yang diukur oleh sensor dan mencetaknya ke monitor serial. Jika ada kesalahan, pesan kesalahan yang sesuai dapat dicetak berdasarkan status yang dikembalikan.
Demonstrasi / Apa yang Diharapkan
Setelah menyelesaikan pengkabelan dan mengunggah kode ke Arduino, Anda akan melihat pembacaan jarak pada monitor serial. Ketika sebuah objek ditempatkan dalam jangkauan sensor, jarak dalam milimeter akan ditampilkan. Jika objek terlalu jauh atau terlalu dekat, sensor akan mengembalikan pesan kesalahan. Perilaku ini dapat dikonfirmasi dalam demonstrasi video (di video pada menit 19:30).
Stempel Waktu Video
- 00:00 Mulai
- 00:56 Pendahuluan
- 04:30 Datasheet VL6080V dilihat
- 06:58 Pengkabelan ditunjukkan
- 07:32 Pengkabelan untuk dua atau lebih sensor
- 09:22 Menginstal pustaka
- 10:30 Kode Arduino dijelaskan (1 sensor)
- 12:57 Kode untuk 2 atau lebih sensor
- 19:35 Demonstrasi 1 sensor
- 22:05 Demonstrasi dengan 2 sensor
Gambar
/*
 *  Arduino code
Using a single VL6180X 20cm Time-of-Flight proximity sensor with Arduino

View code for using a single VL6180X sensor: https://robojax.com?vid=robojax_VL6180X_laser2

 * Original code and library by https://github.com/adafruit/Adafruit_VL6180X
 *
 * Written/updated by Ahmad Shamshiri for Robojax Robojax.com
 * on Mar 10, 2021  in Ajax, Ontario, Canada
Watch the video instruction for this sketch: https://youtu.be/_H9D0czQpSI


If you found this tutorial helpful, please support me so I can continue creating
content like this.
or make a donation using PayPal http://robojax.com/L/?id=64

*
 * Code is available at http://robojax.com/learn/arduino

 * This code is "AS IS" without warranty or liability. Free to be used as long as you keep this note intact.
 * This code has been downloaded from Robojax.com
    This program is free software: you can redistribute it and/or modify
    it under the terms of the GNU General Public License as published by
    the Free Software Foundation, either version 3 of the License, or
    (at your option) any later version.

    This program is distributed in the hope that it will be useful,
    but WITHOUT ANY WARRANTY; without even the implied warranty of
    MERCHANTABILITY or FITNESS FOR A PARTICULAR PURPOSE.  See the
    GNU General Public License for more details.

    You should have received a copy of the GNU General Public License
    along with this program.  If not, see <https://www.gnu.org/licenses/>.

*/
#include <Wire.h>
#include "Adafruit_VL6180X.h"

Adafruit_VL6180X vl = Adafruit_VL6180X();

void setup() {
  Serial.begin(115200);

  // wait for serial port to open on native usb devices
  while (!Serial) {
    delay(1);
  }

  Serial.println("Adafruit VL6180x test!");
  if (! vl.begin()) {
    Serial.println("Failed to find sensor");
    while (1);
  }
  Serial.println("Sensor found!");
}

void loop() {

  uint8_t range = vl.readRange();
  uint8_t status = vl.readRangeStatus();

  if (status == VL6180X_ERROR_NONE) {
    Serial.print("Range: "); Serial.print(range);
    Serial.println("mm");
  }
//  if(range <=76)
//  {
//    //do something
//  }

  // Some error occurred, print it out!

  if  ((status >= VL6180X_ERROR_SYSERR_1) && (status <= VL6180X_ERROR_SYSERR_5)) {
    Serial.println("System error");
  }
  else if (status == VL6180X_ERROR_ECEFAIL) {
    Serial.println("ECE failure");
  }
  else if (status == VL6180X_ERROR_NOCONVERGE) {
    Serial.println("No convergence");
  }
  else if (status == VL6180X_ERROR_RANGEIGNORE) {
    Serial.println("Ignoring range");
  }
  else if (status == VL6180X_ERROR_SNR) {
    Serial.println("Signal/Noise error");
  }
  else if (status == VL6180X_ERROR_RAWUFLOW) {
    Serial.println("Raw reading underflow");
  }
  else if (status == VL6180X_ERROR_RAWOFLOW) {
    Serial.println("Raw reading overflow");
  }
  else if (status == VL6180X_ERROR_RANGEUFLOW) {
    Serial.println("Range reading underflow");
  }
  else if (status == VL6180X_ERROR_RANGEOFLOW) {
    Serial.println("Range reading overflow");
  }
  delay(50);
}/*
* Lesson 76-1: Using one VL6180 laser distance sensor with Arduino
* Adafruit code modified for this tutorial
* by Ahmad Shamshiri at 22:22 on
* March 10-11, 2021 in Ajax, ON, Canada
Please watch video instruction of this code: https://youtu.be/_H9D0czQpSI
View code for using two or more VL6180X sensors: https://robojax.com/course1/lecture76
This video is part of the Arduino Step by Step Course, which starts here: https://youtu.be/-6qSrDUA5a8
If you found this tutorial helpful, please support me so I can continue creating
content like this. You can support me on Patreon: http://robojax.com/L/?id=63
or make a donation using PayPal: http://robojax.com/L/?id=64
* This code is "AS IS" without warranty or liability. Free to be used as long as you keep this note intact. *
* This code has been downloaded from Robojax.com
This program is free software: you can redistribute it and/or modify
it under the terms of the GNU General Public License as published by
the Free Software Foundation, either version 3 of the License, or
(at your option) any later version.
This program is distributed in the hope that it will be useful,
but WITHOUT ANY WARRANTY; without even the implied warranty of
MERCHANTABILITY or FITNESS FOR A PARTICULAR PURPOSE. See the
GNU General Public License for more details.
You should have received a copy of the GNU General Public License
along with this program. If not, see <https://www.gnu.org/licenses/>.
*/
#include <Wire.h>
#include "Adafruit_VL6180X.h"
Adafruit_VL6180X vl = Adafruit_VL6180X();
void setup() {
Serial.begin(115200);
// wait for serial port to open on native usb devices
while (!Serial) {
delay(1);
}
Serial.println("Adafruit VL6180x test!");
if (! vl.begin()) {
Serial.println("Failed to find sensor");
while (1);
}
Serial.println("Sensor found!");
}
void loop() {
uint8_t range = vl.readRange();
uint8_t status = vl.readRangeStatus();
if (status == VL6180X_ERROR_NONE) {
Serial.print("Range: "); Serial.print(range);
Serial.println("mm");
}
// if(range <=76)
// {
// //do something
// }
// Some error occurred, print it out!
if ((status >= VL6180X_ERROR_SYSERR_1) && (status <= VL6180X_ERROR_SYSERR_5)) {
Serial.println("System error");
}
else if (status == VL6180X_ERROR_ECEFAIL) {
Serial.println("ECE failure");
}
else if (status == VL6180X_ERROR_NOCONVERGE) {
Serial.println("No convergence");
}
else if (status == VL6180X_ERROR_RANGEIGNORE) {
Serial.println("Ignoring range");
}
else if (status == VL6180X_ERROR_SNR) {
Serial.println("Signal/Noise error");
}
else if (status == VL6180X_ERROR_RAWUFLOW) {
Serial.println("Raw reading underflow");
}
else if (status == VL6180X_ERROR_RAWOFLOW) {
Serial.println("Raw reading overflow");
}
else if (status == VL6180X_ERROR_RANGEUFLOW) {
Serial.println("Range reading underflow");
}
else if (status == VL6180X_ERROR_RANGEOFLOW) {
Serial.println("Range reading overflow");
}
delay(50);
}/*
* Arduino code
* Lesson 76-2: Using two or more VL6180 Laser Distance Sensors with Arduino
* Adafruit code modified for this tutorial
* Using two or more VL6180X 20cm Time-of-Flight proximity sensors with Arduino
*
* View code for using single VL6180X sensors: https://robojax.com/course1/lecture76
*
* Original code and library by https://github.com/adafruit/Adafruit_VL6180X
*
* Written/updated by Ahmad Shamshiri for Robojax Robojax.com
* on Mar 12, 2021 in Ajax, Ontario, Canada
* Watch the video instruction for this sketch: https://youtu.be/_H9D0czQpSI
*
*
* Please watch video instruction for this code: https://youtu.be/_H9D0czQpSI
*
* This video is part of Arduino Step by Step Course which starts here: https://youtu.be/-6qSrDUA5a8
*
*
* If you found this tutorial helpful, please support me so I can continue creating
* content like this.
*
* or make a donation using PayPal http://robojax.com/L/?id=64
*
* This code is "AS IS" without warranty or liability. Free to be used as long as you keep this note intact.
* This code has been downloaded from Robojax.com
* This program is free software: you can redistribute it and/or modify
* it under the terms of the GNU General Public License as published by
* the Free Software Foundation, either version 3 of the License, or
* (at your option) any later version.
*
* This program is distributed in the hope that it will be useful,
* but WITHOUT ANY WARRANTY; without even the implied warranty of
* MERCHANTABILITY or FITNESS FOR A PARTICULAR PURPOSE. See the
* GNU General Public License for more details.
*
* You should have received a copy of the GNU General Public License
* along with this program. If not, see <https://www.gnu.org/licenses/>.
*
*/
#include <Adafruit_VL6180X.h>
// address we will assign if dual sensor is present
#define LOX1_ADDRESS 0x30
#define LOX2_ADDRESS 0x31
// set the pins to shutdown
#define SHT_LOX1 7
#define SHT_LOX2 6
// Optional define GPIO pins to check to see if complete
#define GPIO_LOX1 4
#define GPIO_LOX2 3
#define TIMING_PIN 13
// objects for the VL6180X
Adafruit_VL6180X lox1 = Adafruit_VL6180X();
Adafruit_VL6180X lox2 = Adafruit_VL6180X();
// Setup mode for doing reads
typedef enum {RUN_MODE_DEFAULT, RUN_MODE_TIMED, RUN_MODE_ASYNC, RUN_MODE_GPIO, RUN_MODE_CONT} runmode_t;
runmode_t run_mode = RUN_MODE_DEFAULT;
uint8_t show_command_list = 1;
//==========================================================================
// Define some globals used in the continuous range mode
// Note: going to start table drive this part, may back up and do the rest later
Adafruit_VL6180X *sensors[] = {&lox1, &lox2};
const uint8_t COUNT_SENSORS = sizeof(sensors) / sizeof(sensors[0]);
const int sensor_gpios[COUNT_SENSORS] = {GPIO_LOX1, GPIO_LOX2}; // if any are < 0 will poll instead
uint8_t tempRange;
uint8_t sensor_ranges[COUNT_SENSORS];
uint8_t sensor_status[COUNT_SENSORS];
// Could do with uint8_t for 8 sensors, but just in case...
const uint16_t ALL_SENSORS_PENDING = ((1 << COUNT_SENSORS) - 1);
uint16_t sensors_pending = ALL_SENSORS_PENDING;
uint32_t sensor_last_cycle_time;
/*
Reset all sensors by setting all of their XSHUT pins low for delay(10), then set all XSHUT high to bring out of reset
Keep sensor #1 awake by keeping XSHUT pin high
Put all other sensors into shutdown by pulling XSHUT pins low
Initialize sensor #1 with lox.begin(new_i2c_address) Pick any number but 0x29 and it must be under 0x7F. Going with 0x30 to 0x3F is probably OK.
Keep sensor #1 awake, and now bring sensor #2 out of reset by setting its XSHUT pin high.
Initialize sensor #2 with lox.begin(new_i2c_address) Pick any number but 0x29 and whatever you set the first sensor to
*/
void setID() {
// all reset
digitalWrite(SHT_LOX1, LOW);
digitalWrite(SHT_LOX2, LOW);
delay(10);
// all unreset
digitalWrite(SHT_LOX1, HIGH);
digitalWrite(SHT_LOX2, HIGH);
delay(10);
// activating LOX1 and reseting LOX2
digitalWrite(SHT_LOX1, HIGH);
digitalWrite(SHT_LOX2, LOW);
// initing LOX1
if (!lox1.begin()) {
Serial.println(F("Failed to boot first VL6180X"));
while (1);
}
lox1.setAddress(LOX1_ADDRESS);
delay(10);
// activating LOX2
digitalWrite(SHT_LOX2, HIGH);
delay(10);
//initing LOX2
if (!lox2.begin()) {
Serial.println(F("Failed to boot second VL6180X"));
while (1);
}
lox2.setAddress(LOX2_ADDRESS);
delay(10);
}
void readSensor(Adafruit_VL6180X &vl) {
float lux = vl.readLux(VL6180X_ALS_GAIN_5);
uint8_t range = vl.readRange();
uint8_t status = vl.readRangeStatus();
if (status == VL6180X_ERROR_NONE) {
tempRange = range;//save it for the moment
}
// Some error occurred, print it out!
if ((status >= VL6180X_ERROR_SYSERR_1) && (status <= VL6180X_ERROR_SYSERR_5)) {
Serial.print("(System error)");
}
else if (status == VL6180X_ERROR_ECEFAIL) {
Serial.print("(ECE failure)");
}
else if (status == VL6180X_ERROR_NOCONVERGE) {
Serial.print("(No convergence)");
}
else if (status == VL6180X_ERROR_RANGEIGNORE) {
Serial.print("(Ignoring range)");
}
else if (status == VL6180X_ERROR_SNR) {
Serial.print("Signal/Noise error");
}
else if (status == VL6180X_ERROR_RAWUFLOW) {
Serial.print("Raw reading underflow");
}
else if (status == VL6180X_ERROR_RAWOFLOW) {
Serial.print("Raw reading overflow");
}
else if (status == VL6180X_ERROR_RANGEUFLOW) {
Serial.print("Range reading underflow");
}
else if (status == VL6180X_ERROR_RANGEOFLOW) {
Serial.print("Range reading overflow");
}
}
void read_sensors() {
readSensor(lox1);
sensor_ranges[0]=tempRange;//save it now
readSensor(lox2);
sensor_ranges[1]=tempRange; //save it now
Serial.println();
}
//===============================================================
// Setup
//===============================================================
void setup() {
Serial.begin(115200);
// wait until serial port opens for native USB devices
while (! Serial) {
delay(1);
}
pinMode(SHT_LOX1, OUTPUT);
pinMode(SHT_LOX2, OUTPUT);
// Enable timing pin so easy to see when pass starts and ends
pinMode(TIMING_PIN, OUTPUT);
#ifdef GPIO_LOX1
// If we defined GPIO pins, enable them as PULL UP
pinMode(GPIO_LOX1, INPUT_PULLUP);
pinMode(GPIO_LOX2, INPUT_PULLUP);
#endif
Serial.println("Shutdown pins inited...");
digitalWrite(SHT_LOX1, LOW);
digitalWrite(SHT_LOX2, LOW);
digitalWrite(TIMING_PIN, LOW);
Serial.println("All in reset mode...(pins are low)");
Serial.println("Starting...");
setID();
}
//===============================================================
// Loop
//===============================================================
void loop() {
read_sensors();
for(int i=0; i<COUNT_SENSORS; i++)
{
Serial.print("Sensor ");
Serial.print(i);
Serial.print(" :");
Serial.print(sensor_ranges[i]);
Serial.print("mm");
Serial.println();
}
// if(sensor_ranges[1] >=76)
// {
// //do something here
// }
delay(100);
}Hal-hal yang mungkin Anda butuhkan
-
eBayPurchase VL618X sensor from eBayebay.us
-
AliExpressPurchase VL618X sensor from AliExpresss.click.aliexpress.com
-
BanggoodPurchase VL618X sensor from Banggoodbanggood.com
Sumber daya & referensi
-
Eksternal
-
Eksternal
-
EksternalPurchase VL6180X from Amazon USAamzn.to
-
EksternalVL6080X datasheetst.com
Berkas📁
Tidak ada file tersedia.