第97-1課:偵測旋轉編碼器嘅旋轉同撳掣
呢個教學會示範點樣用旋轉編碼器,為你嘅 Arduino 項目建立一個精確又耐用嘅控制介面。同電位器唔同,電位器嘅轉動範圍係固定嘅,而旋轉編碼器就可以向任何方向連續轉動,所以好適合用喺需要增量調整或者無限旋轉嘅應用度。呢個項目集中喺最基本嘅任務:偵測編碼器嘅旋轉方向同位置,以及記錄佢內置按鈕開關被撳下嘅時間。呢啲係好多進階項目嘅核心邏輯,例如建立選單導航系統、調整數碼音量控制,或者精確調校頻率。旋轉編碼器嘅機械觸點亦都比電位器嘅碳膜軌道耐用好多,可以確保你嘅項目有更長嘅使用壽命。
以下係幾個實際嘅想法,你可以用呢個基礎設定嚟整:
- 選單導航系統:轉動編碼器嚟喺 LCD 上滾動選項,然後撳個掣嚟選擇項目。
- 精確調整工具:用嚟微調參數,例如設定計時器或者以細小、明確嘅增量嚟調整摩打速度。
- 機械臂控制器:用編碼器取代搖桿,精確咁逐步控制伺服摩打嘅位置。
所需硬件
要跟住呢個教學做,你需要以下零件:
- Arduino Uno(或者類似嘅兼容板)
- 旋轉編碼器模組(連 PCB)或者一個裸旋轉編碼器加三個 10kΩ 電阻
- 麵包板同杜邦線
- 用嚟編寫程式嘅 USB 線
接線指南
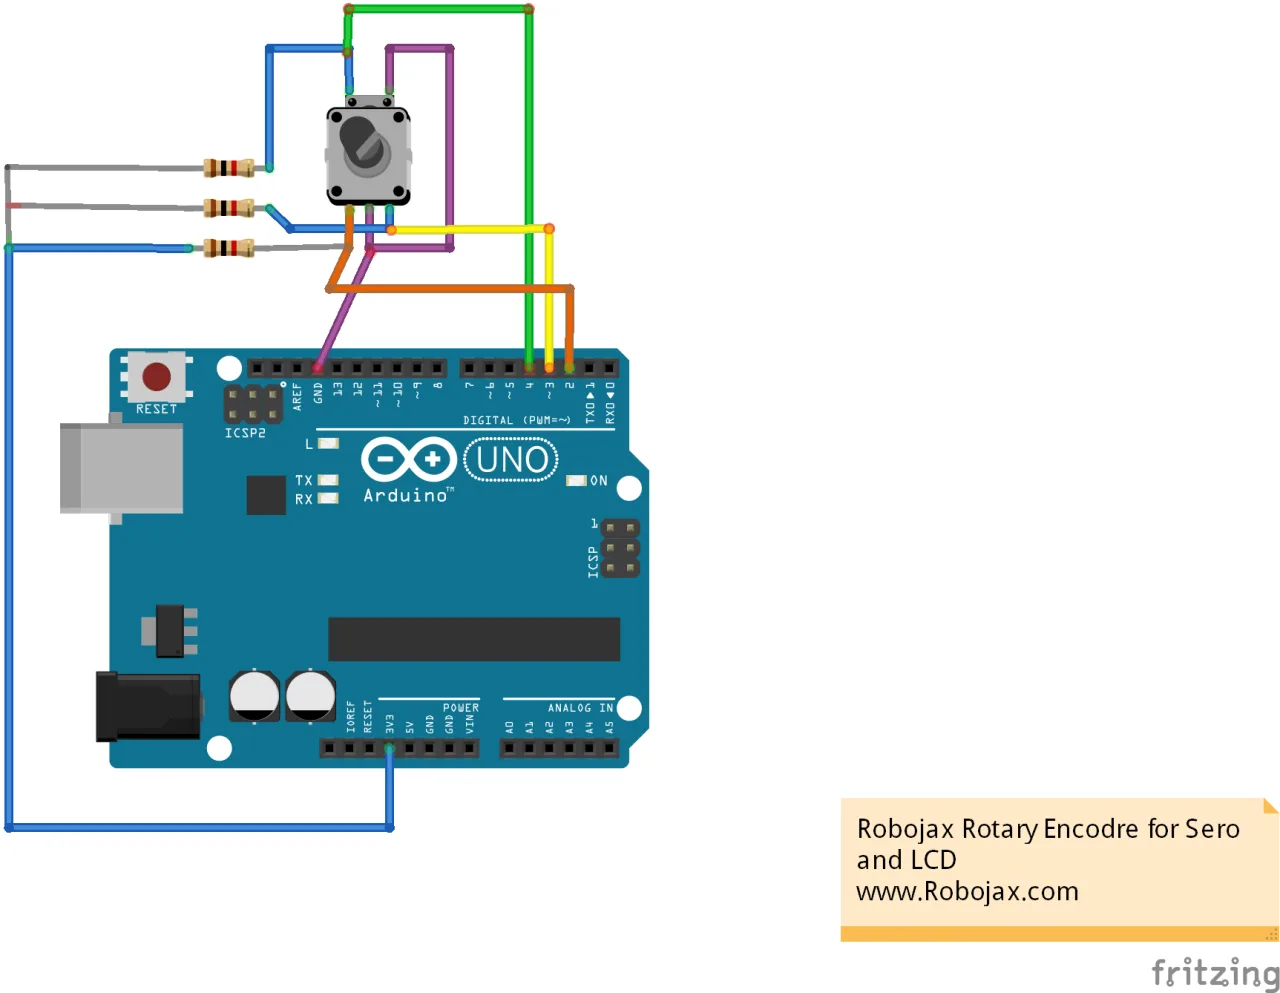
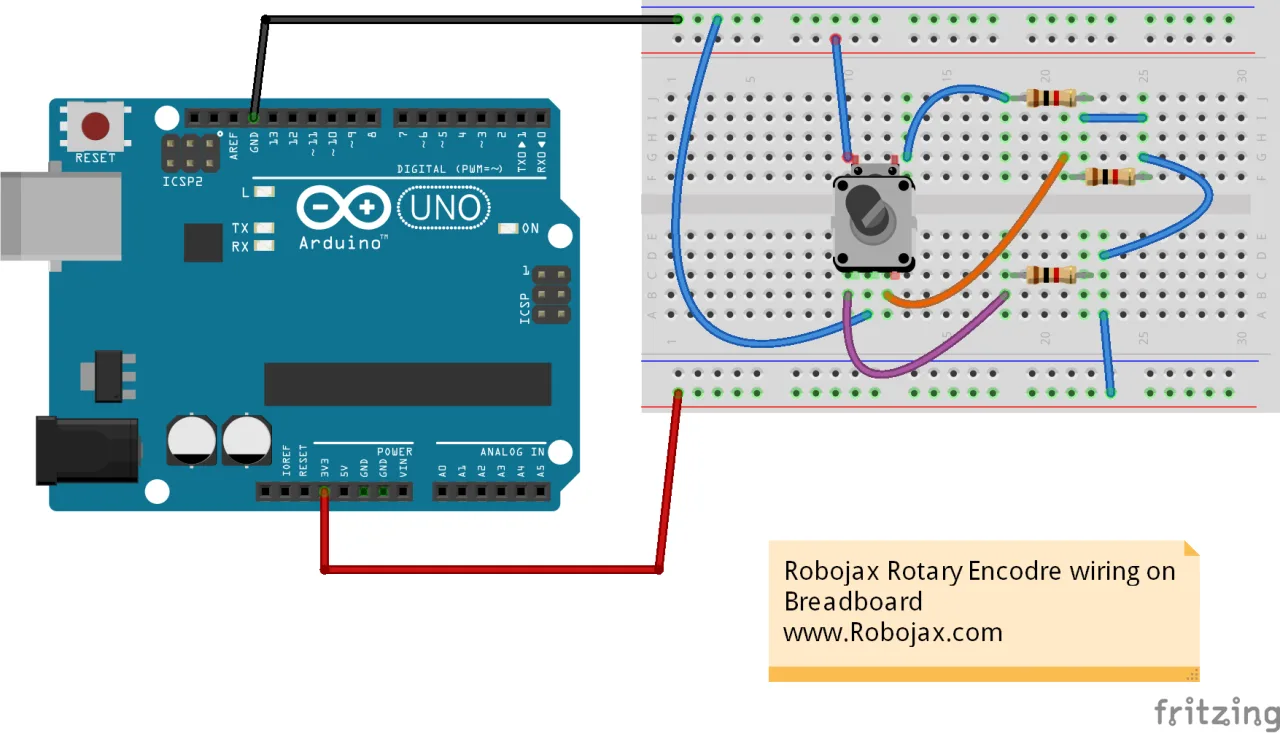
旋轉編碼器簡化咗追蹤旋轉嘅過程。佢有兩個輸出針腳(通常標示為 A 同 B),當你轉動旋鈕時會產生一連串特定嘅訊號。透過讀取呢啲訊號,Arduino 就可以判斷旋轉嘅方向同幅度。編碼器仲有一個內置嘅按鈕開關,只要向下撳個旋鈕就會啟動,提供額外嘅輸入俾用戶互動。
呢個項目嘅接線好簡單。提供嘅圖表顯示咗點樣將編碼器模組連接到 Arduino。CLK(或者 A)針腳連接到數碼針腳 2,DT(或者 B)針腳連接到數碼針腳 3,而 SW(開關)針腳就連接到數碼針腳 4。編碼器嘅 +(VCC)針腳連接到 3.3V 電源,而佢嘅 GND 針腳就連接到共同接地。
如果你用嘅係冇 PCB 嘅裸旋轉編碼器,你需要喺佢嘅輸出針腳加三個上拉電阻(介乎 1kΩ 同 100kΩ 之間),以確保 Arduino 收到乾淨嘅訊號。
程式碼解釋
呢個項目嘅程式碼設計得簡單又有教育意義。佢集中喺 sketch 頂部用戶可配置嘅部分,方便你輕鬆咁將佢改動去配合唔同嘅針腳或者項目。
第一部分定義咗編碼器所連接嘅針腳。如果你嘅硬件接線唔同,呢啲就係你需要更改嘅主要數值。
const int SW_PIN = 4;
const int PIN_A =2;
const int PIN_B =3;SW_PIN:呢個常數定義咗連接編碼器按鈕開關嘅 Arduino 針腳。PIN_A同PIN_B:呢啲常數定義咗連接編碼器兩個輸出通道 A 同 B 嘅 Arduino 針腳。呢啲針腳係用嚟俾Encoder程式庫追蹤旋鈕嘅旋轉。
跟住,程式碼包含咗所需嘅程式庫,並建立咗一個編碼器物件實例,將佢同我哋啱啱定義嘅針腳關聯起嚟。
#include <Encoder.h>
Encoder myEnc(PIN_A, PIN_B);
喺 setup() 函數入面,初始化咗序列監視器用嚟通訊,而開關針腳就設定為輸入。
void setup() {
  Serial.begin(9600);
  pinMode(SW_PIN, INPUT);
  Serial.println("Basic Encoder Test:");
}
loop() 函數入面嘅主要邏輯執行兩項關鍵任務。首先,佢持續讀取編碼器嘅當前位置。如果呢個位置同上次記錄嘅數值唔同,即係代表旋鈕被轉動過,新位置就會打印到序列監視器。第二,佢檢查開關嘅狀態。當開關被撳下時,佢嘅針腳會被拉低,程式碼就會打印一個訊息嚟表示今次撳掣。
long oldPosition  = -999;

void loop() {
  long newPosition = myEnc.read();
  if (newPosition != oldPosition) {
    oldPosition = newPosition;
    Serial.println(newPosition);
  }

  if( digitalRead(SW_PIN) == LOW)
  {
   Serial.println("Switch Pressed");
  }

  delay(200);
}
myEnc.read() 函數係一個嚟自 Encoder 程式庫嘅自訂函數。佢會返回編碼器位置嘅當前計數。透過比較當前同之前嘅讀數,你就可以偵測到移動。digitalRead(SW_PIN) 函數就係一個標準嘅 Arduino 函數,用嚟讀取開關針腳嘅狀態。
現場項目示範
一旦你將程式碼上傳到Arduino,就可以打開序列埠監控視窗(設定為9600 baud)嚟睇結果。當你順時針轉動編碼器旋鈕時,你會見到數字增加。逆時針轉動就會令數字減少。如果你撳低個旋鈕,就會顯示「Switch Pressed」嘅訊息。咁就確認咗系統正確偵測到轉動同按鈕撳壓。
呢條影片嘅相關項目
章節
- [00:01] 用旋轉編碼器控制伺服嘅介紹
- [01:41] 點解用旋轉編碼器而唔用可變電阻
- [04:18] 旋轉編碼器模組同接線嘅概覽
- [13:28] 安裝所需嘅程式庫
- [14:54] 解釋基本編碼器範例程式碼
- [16:43] 示範基本編碼器程式碼
- [17:52] 加入按鈕開關嘅修改版程式碼
- [20:20] 伺服同LCD控制嘅完整程式碼解釋
- [23:47] 搵LCD I2C地址
- [30:01] 完整項目嘅示範
圖片
/*
 *  Lesson 97-1: Rotary Encoder with switch
 *  This code detects rotation of the encoder knob
 *  and also detects when it is pushed
 *  Download and resource page https://robojax.com/RJT453

 *  Watch full details video: https://youtu.be/6xVLbNlmK-g
  This video is part of the Arduino Step by Step Course, which starts here: https://youtu.be/-6qSrDUA5a8


If you found this tutorial helpful, please support me so I can continue creating
content like this. Make a donation using PayPal by credit card: https://bit.ly/donate-robojax

 * This code is "AS IS" without warranty or liability. Free to be used as long as you keep this note intact. *
 * This code has been downloaded from Robojax.com
    This program is free software: you can redistribute it and/or modify
    it under the terms of the GNU General Public License as published by
    the Free Software Foundation, either version 3 of the License, or
    (at your option) any later version.

    This program is distributed in the hope that it will be useful,
    but WITHOUT ANY WARRANTY; without even the implied warranty of
    MERCHANTABILITY or FITNESS FOR A PARTICULAR PURPOSE.  See the
    GNU General Public License for more details.

    You should have received a copy of the GNU General Public License
    along with this program.  If not, see <https://www.gnu.org/licenses/>.
 *  Updated by Ahmad Shamshiri on Jan 23, 2022
 *  Encoder Library - Basic Example
 * http://www.pjrc.com/teensy/td_libs_Encoder.html
 *
 * This example code is in the public domain.
 */
const int SW_PIN = 4;
const int PIN_A =2;
const int PIN_B =3;

#include <Encoder.h>

// Change these two numbers to the pins connected to your encoder.
//   Best Performance: both pins have interrupt capability
//   Good Performance: only the first pin has interrupt capability
//   Low Performance:  neither pin has interrupt capability
Encoder myEnc(PIN_A, PIN_B);
//   avoid using pins with LEDs attached

void setup() {
  Serial.begin(9600);
  pinMode(SW_PIN, INPUT);
  Serial.println("Basic Encoder Test:");
}

long oldPosition  = -999;

void loop() {
  long newPosition = myEnc.read();
  if (newPosition != oldPosition) {
    oldPosition = newPosition;
    Serial.println(newPosition);
  }

  if( digitalRead(SW_PIN) == LOW)
  {
   Serial.println("Switch Pressed");
  }

  delay(200);
  //Watch video details: https://youtu.be/6xVLbNlmK-g
}
你可能需要嘅嘢
-
亞馬遜
-
亞馬遜
-
亞馬遜
-
易贝
-
易贝
-
阿里巴巴速卖通Purchase an LCD1602 from AliExpresss.click.aliexpress.com
資源與參考資料
-
外部PAC9685 Library (from GitHub)github.com
-
外部Purchase an LCD1602 from AliExpresss.click.aliexpress.com
-
外部
-
外部
-
外部Purchase ZK-5DA from Amazon UKamzn.to
-
外部SG90 Servo on Amazon USAamzn.to
-
外部SG90 Servosamzn.to
文件📁
冇文件可用。