Arduino Code and Video for DHT22 Temperature and Humidity Sensor with TM1637 Display and Relay
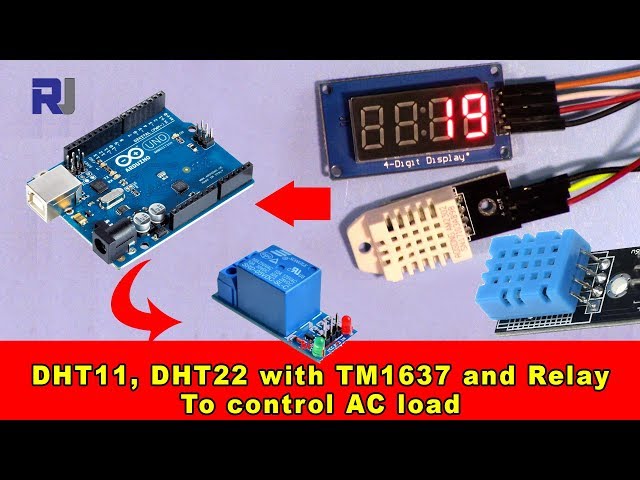
In this tutorial, we will explore how to use a DHT22 temperature and humidity sensor in conjunction with a TM1637 display and a relay to control an AC load, such as a heater or fan. The objective is to turn on the load when the temperature reaches 50 degrees Celsius and turn it off when it drops below that threshold. This setup is ideal for maintaining desired temperature levels in a controlled environment.

To achieve this, we will write an Arduino program that reads temperature and humidity data from the DHT22 sensor, displays the temperature on the TM1637 display, and controls the relay based on the temperature readings. For further clarity, you can check the video at (in video at 10:00).
Hardware Explained
The main components of this project include the DHT22 sensor, TM1637 display, relay module, and an Arduino board. The DHT22 sensor is responsible for measuring the temperature and humidity, providing digital output that the Arduino can read easily. The TM1637 display is used to show the temperature readings in a user-friendly format, while the relay module allows us to control high-voltage devices like heaters and fans safely.
The DHT22 sensor has three pins: VCC (power), GND (ground), and DATA (output). The TM1637 display uses four pins for power, ground, clock, and data communication. The relay module connects to the Arduino and acts as a switch for the AC load, ensuring safe operation when controlling devices that require higher voltage.
Datasheet Details
| Manufacturer | Adafruit |
|---|---|
| Part number | DHT22 |
| Logic/IO voltage | 3.3 V - 5.5 V |
| Supply voltage | 3.3 V - 6 V |
| Output current (per channel) | 0.5 mA |
| Peak current (per channel) | 2.5 mA |
| PWM frequency guidance | N/A |
| Input logic thresholds | 0.3 V - 0.7 V |
| Voltage drop / RDS(on) / saturation | N/A |
| Thermal limits | -40°C to 80°C |
| Package | 3-pin package |
| Notes / variants | Also known as AM2302 |
- Ensure proper power supply (3.3 V - 6 V) to the DHT22.
- Use pull-up resistors on the data line if necessary.
- Allow sensor readings to stabilize for accurate data.
- Double-check pin connections to avoid miscommunication.
- Be cautious with AC loads; ensure proper insulation and safety.
- Implement heat-sinking for the relay if controlling high loads.
- Use debounce techniques if needed when reading sensor data.
- Keep the DHT22 sensor shielded from direct sunlight for accurate readings.
Wiring Instructions

To wire the components, start by connecting the DHT22 sensor. Connect the VCC pin to the 5V pin on the Arduino, the GND pin to the ground (GND), and the DATA pin to digital pin 9 on the Arduino.
Next, wire the TM1637 display. Connect the VCC pin to the 5V pin on the Arduino, the GND pin to ground, the CLK pin (clock) to digital pin 2, and the DIO pin (data) to digital pin 3. For the relay module, connect the VCC pin to the 5V pin, the GND pin to ground, and the control pin (signal) to digital pin 7. Finally, ensure that the AC load is safely connected to the relay module following the manufacturer's guidelines.
Code Examples & Walkthrough
The following code initializes the DHT22 sensor and the TM1637 display. It sets up the necessary pins and prepares to read temperature data.
#include
#define CLK 2
#define DIO 3
#define DHTPIN 9
DHT dht(DHTPIN, DHTTYPE);
void setup() {
  Serial.begin(9600);
  pinMode(RELAY, OUTPUT);
  dht.begin();
}
In this snippet, we include the necessary libraries and define the pins for the TM1637 display and the DHT22 sensor. The setup function initializes the serial communication and sets the relay pin as an output.

The loop function retrieves the temperature and controls the relay based on the temperature reading. If the temperature exceeds 50 degrees, the relay is activated.
void loop() {
  delay(TEST_DELAY);
  int temp = round(getTemp("c"));
  display.showNumberDec(temp, false, 3, 1);
  if(temp > 50) {
    digitalWrite(RELAY, LOW);
  } else {
    digitalWrite(RELAY, HIGH);
  }
}
This code snippet demonstrates how to read the temperature, display it, and control the relay. The temperature is rounded and displayed on the TM1637, and the relay is turned on or off based on the temperature threshold.
For a more comprehensive understanding, please refer to the full code loaded below the article.
Demonstration / What to Expect
As you run the program, you should see the temperature displayed on the TM1637. When the temperature exceeds 50 degrees Celsius, the relay will activate, turning the connected AC load on. Conversely, when the temperature drops below 50 degrees, the relay will deactivate, turning the load off. Be cautious of reversed polarity and ensure proper connections to avoid damage to components (in video at 12:30).
Video Timestamps
- 00:00 - Introduction
- 02:15 - Wiring Explanation
- 05:00 - Code Walkthrough
- 10:00 - Demonstration
- 12:30 - Common Issues
图像


/*
 * Original code from TM1637 https://github.com/avishorp/TM1637
 * Original code and library for DHT22 https://github.com/adafruit/DHT-sensor-library
 * Watch the video for this code https://youtu.be/xD8wHXDzLkQ
 * Other Arduino library and videos https://robojax.com
 */
 /*

 * Modified for Robojax video on January 10, 2018
 * by Ahmad Nejrabi, in Ajax, Ontario, Canada
 */

// ****** Start of TM1637 Display code
#include <Arduino.h>
#include <TM1637Display.h>
// Module connection pins (Digital Pins)
#define CLK 2
#define DIO 3
// The amount of time (in milliseconds) between tests
#define TEST_DELAY   1000
TM1637Display display(CLK, DIO);
// ****** end of TM1637 Display code

// Example testing sketch for various DHT humidity/temperature sensors
// Written by ladyada, public domain
// updated by Ahmad for Robojax.com videos.
// on January 10, 2018 in Ajax, Ontario, Canada

// ****** Start of DHT code
#include "DHT.h"
#define DHTPIN 9     // what digital pin we're connected to
// Uncomment whatever type you're using!
//#define DHTTYPE DHT11   // DHT 11
#define DHTTYPE DHT22   // DHT 22  (AM2302), AM2321
//#define DHTTYPE DHT21   // DHT 21 (AM2301)
DHT dht(DHTPIN, DHTTYPE);
// ********** end of DHT22 code

#define RELAY 7 // the pin connected to relay
void setup()
{
  Serial.begin(9600);
  Serial.println("DHT22 Robojax Test with Display");
  pinMode(RELAY,OUTPUT);// set RELAY pin as output

  dht.begin();
}

void loop()
{
  delay(TEST_DELAY);// wait
  // **** TM1637 code start
  display.setBrightness(0x0f);// set brightness
  uint8_t data[] = { 0x0, 0x0, 0x0, 0x0 };// clear display values
  display.setSegments(data);//clear display
  // **** TM1637 code end


  // Robojax.com test video
  Serial.println(getTemp("c"));

  int temp = round(getTemp("c"));

  display.showNumberDec(temp, false, 3,1);
 if(temp >50 )
 {
  digitalWrite(RELAY, LOW);
 }else{
  digitalWrite(RELAY, HIGH);
 }


}// loop end


/*
 * getTemp(String req)
 * returns the temperature related parameters
 * req is string request
 * getTemp("c") will return temperature in Celsius
 * getTemp("hic") will return heat index in Celsius
 * getTemp("f") will return temperature in Fahrenheit
 * getTemp("hif") will return temperature in Fahrenheit
  * getTemp("h") will return humidity
 */
float getTemp(String req)
{

  // Reading temperature or humidity takes about 250 milliseconds!
  // Sensor readings may also be up to 2 seconds 'old' (its a very slow sensor)
  float h = dht.readHumidity();
  // Read temperature as Celsius (the default)
  float t = dht.readTemperature();
  // Read temperature as Fahrenheit (isFahrenheit = true)
  float f = dht.readTemperature(true);

  // Compute heat index in Fahrenheit (the default)
  float hif = dht.computeHeatIndex(f, h);
  // Compute heat index in Celsius (isFahreheit = false)
  float hic = dht.computeHeatIndex(t, h, false);

  // Check if any reads failed and exit early (to try again).
  if (isnan(h) || isnan(t) || isnan(f)) {
    Serial.println("Failed to read from DHT sensor!");
    return 0.0;
  }
  // Compute heat index in Kelvin
  float k = t + 273.15;
  if(req =="c"){
    return t;//return Celsius
  }else if(req =="f"){
    return f;// return Fahrenheit
  }else if(req =="h"){
    return h;// return humidity
  }else if(req =="hif"){
    return hif;// return heat index in Fahrenheit
  }else if(req =="hic"){
    return hic;// return heat index in Celsius
  }else if(req =="k"){
    return k;// return temperature in Kelvin
  }else{
    return 0.000;// if no request found, return 0.000
  }

}
|||您可能需要的东西
-
亚马逊亚马逊上的4通道继电器模块amzn.to
-
全球速卖通购买 5v 12v 1 2 4 6 8 通道继电器模块s.click.aliexpress.com
资源与参考
文件📁
Arduino 库(zip 格式)
-
DHT22 PCB module red
DHT22-module-red.fzpz0.01 MB
Fritzing 文件
-
Temperature Sensor DHT11
Temperature Sensor DHT11.fzpz0.01 MB -
DHT22 Humidity and Temperature Sensor
DHT22 Humidity and Temperature Sensor.fzpz0.01 MB -
DHT22 PCB module red
DHT22-module-red.fzpz0.01 MB -
DHT22 module white
DHT22-module-white.fzpz0.01 MB -
TM1637 Seven Segment module
TM1637.fzpz0.01 MB -
DHT11 Humitidy and Temperature Sensor (3 pins)
DHT11 Humitidy and Temperature Sensor (3 pins).fzpz0.20 MB
用户手册
-
DHT22 Temperature and Humidity sensor user's manual
robojax-DHT22_manual.pdf0.36 MB