第102课:使用ZK-5DA控制两个4A直流电动机
在本教程中,我们将探索如何使用 ZK-5DA 电机驱动模块来控制两个 4A 的直流电机。该模块基于 TA6586 芯片,提供高效的电机控制,具有低电压降和散热性能。在本教程结束时,您将能够有效地启动、停止和控制电机的速度。为了获得更多说明,请务必查看视频(视频中在 08:55)。

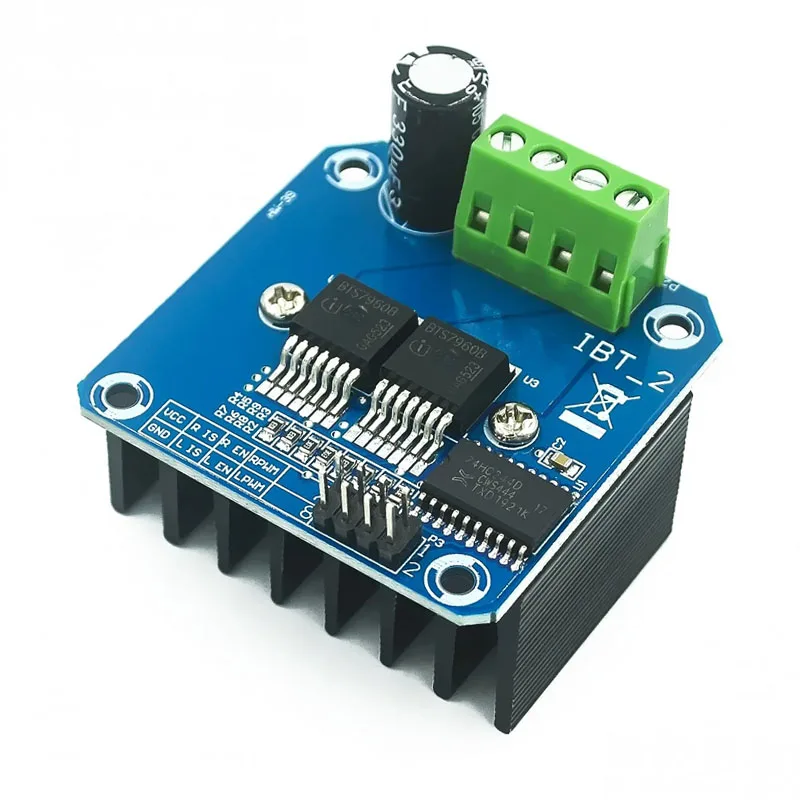
硬件解析
该项目的主要组件是ZK-5DA电机驱动模块。它使用TA6586芯片,可以高效控制两个直流电机。该芯片设计用于每个电机处理高达4A的电流,同时保持低电压降,这有助于在操作过程中减少发热。
除了电机驱动器外,您还需要一个Arduino板来向模块发送控制信号。Arduino将使用PWM(脉宽调制)信号来定义电机的方向和速度。将电机连接到驱动模块上的适当端口可以实现方向控制和速度调整。
数据表详细信息
| 制造商 | 瑞泽半导体 |
|---|---|
| 部件号 | TA6586 |
| 操作电压 | 3-14 伏 |
| 峰值电流 | 9 A |
| 连续电流 | 5 A |
| 待机电流 | < 2 微安 |
| 电压降 | 400 毫伏在 4 安培下 |
| 温度范围 | -25至85°C |
| 包裹 | 标准IC封装 |
| 备注 / 变体 | 热关断,过流保护 |
- 确保在超过3 A的持续运行中有效散热。
- 使用支持PWM的引脚进行速度控制。
- 在连接电动机之前,请检查电压等级。
- 注意接线极性,以避免电机损坏。
- 在操作过程中监测温度,以防止过热。
接线说明

要接线ZK-5DA电机驱动模块,首先连接电源。将电源的正极连接到电机驱动器的'+'端子,负极连接到'-'端子。两个电机将连接到标记清晰的输出端子。
对于Arduino连接,请使用支持PWM的引脚:连接引脚3连接到电机1的控制引脚,以及引脚5连接到电机1的第二控制引脚。同样,连接引脚6到电机2的控制引脚,以及引脚9连接到电动机 2 的第二个控制引脚。最后,确保所有接地线连接在一起。
代码示例与演练
代码首先定义了相关引脚,并初始化串行监视器以进行调试。电机控制功能,例如M1和M2, 处理电机方向和速度。
const int D0=9; // Motor 1 PWM pin
const int D1=6; // Motor 1 direction pin
const int D2=5; // Motor 2 PWM pin
const int D3=3; // Motor 2 direction pin
这里,针脚被设置为使用PWM信号控制电机。setup该函数将这些引脚初始化为输出。
void loop() {
  M2(CW, 80); // Motor 2 runs clockwise at 80% speed
  delay(3000); // Wait for 3 seconds
  brake(2); // Apply brake to motor 2
  delay(1000);
}
该摘录显示了程序的主循环,其中电机2设置为以80%的速度顺时针运行3秒钟,然后施加刹车。brake该函数在被调用时停止电动机。
void M1(bool direction, int speed) {
  int pwm = map(speed, 0, 100, 0, 255); // Map speed to PWM range
  if (direction == CW) {
    analogWrite(D0, pwm);
    analogWrite(D1, LOW);
  } else {
    analogWrite(D1, pwm);
    analogWrite(D0, LOW);
  }
}
theM1功能接收方向和速度作为输入,将速度映射到PWM值,并设置相应的引脚以控制电机的旋转方向。debugPrint函数被调用以在串口监视器中显示当前状态。
完整代码请记得查看文章下方(视频中在08:55)。
演示 / 期待的内容
当您运行代码时,预计电机会按照设定的方向以设定的速度开始旋转。代码包括制动和速度调整,允许动态控制。如果电机没有如预期那样响应,请仔细检查您的接线连接,并确保代码中正确配置了相应的引脚。此外,请注意防止过热,特别是在大电流负载时,正如在测试中所示(视频时间为23:23)。
视频时间戳
- 00:00 介绍
- 03:16 数据表已查看
- 06:34 电线连接解释
- 08:55 代码说明
- 14:28 演示:电机控制
- 17:22 演示:最大电流测试
- 23:23 在 3A、4A 和 5A 下的电压降测试
- 26:28 结论评论
图像
This code has not been parsed yet. Please return to the admin panel to parse it.|||您可能需要的东西
-
全球速卖通Purchase ZK-5DA from AliExpresss.click.aliexpress.com
资源与参考
-
外部Purchase ZK-5DA from AliExpresss.click.aliexpress.com
-
外部
-
外部
-
外部Purchase ZK-5DA from Amazon UKamzn.to
-
外部Purchase ZK-5DA from Amazon, USAamzn.to
文件📁
数据手册 (pdf)
-
TA6586 motor Driver datasheet
TA6586_motor_Driver_datasheet.pdf0.22 MB