レッスン102:ZK-5DAを使用して2つの4A DCモーターを制御する
このチュートリアルでは、ZK-5DAモータードライバーモジュールを使用して、2つの4A DCモーターを制御する方法を探ります。このモジュールは、低い電圧降下と放熱を提供するTA6586チップに基づいています。このチュートリアルの終わりまでに、モーターの開始、停止、および速度制御を効果的に行えるようになります。追加の説明が必要な場合は、ビデオの08:55を確認してください。
ハードウェアの解説
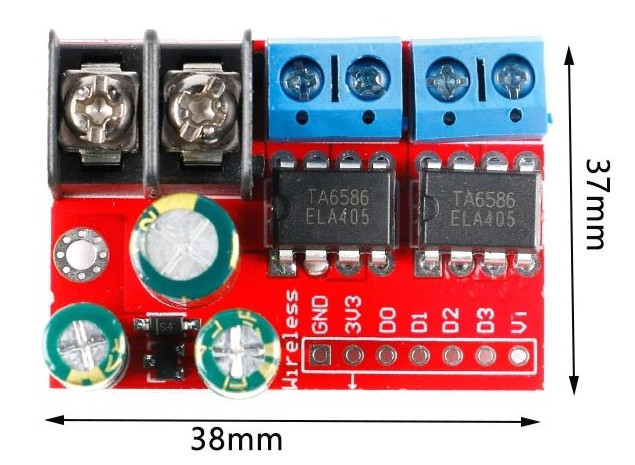
このプロジェクトの主な構成要素はZK-5DAモータードライバーモジュールです。これはTA6586チップを使用しており、2つのDCモーターを効率的に制御できます。このチップは、電圧降下を低く保ちながら、モーターごとに最大4Aの電流を扱うように設計されています。これにより、運転中の熱発生を抑えるのに役立ちます。
モータードライバーに加えて、モジュールに制御信号を送信するためのArduinoボードが必要です。ArduinoはPWM(パルス幅変調)信号を使用してモーターの方向と速度を定義します。モーターをドライバーモジュールの適切な端子に接続することで、方向制御と速度調整が可能になります。
データシートの詳細
| 製造業者 | RZ半導体 |
|---|---|
| 部品番号 | TA6586 |
| 動作電圧 | 3-14 V |
| ピーク電流 | 9 A |
| 連続電流 | 5 A |
| 待機電流 | < 2 µA |
| 電圧降下 | 4 Aで400 mV |
| 温度範囲 | -25から85 °C |
| パッケージ | 標準ICパッケージ |
| ノート / バリアント | 熱シャットダウン、過電流保護 |
- 3 Aを超える連続運転のために、適切な熱放散を確保してください。
- PWM対応ピンを使用して速度制御を行います。
- モーターを接続する前に電圧定格を確認してください。
- 配線の極性に注意して、モーターの損傷を避けてください。
- 運転中に過熱を防ぐために温度を監視してください。
配線指示
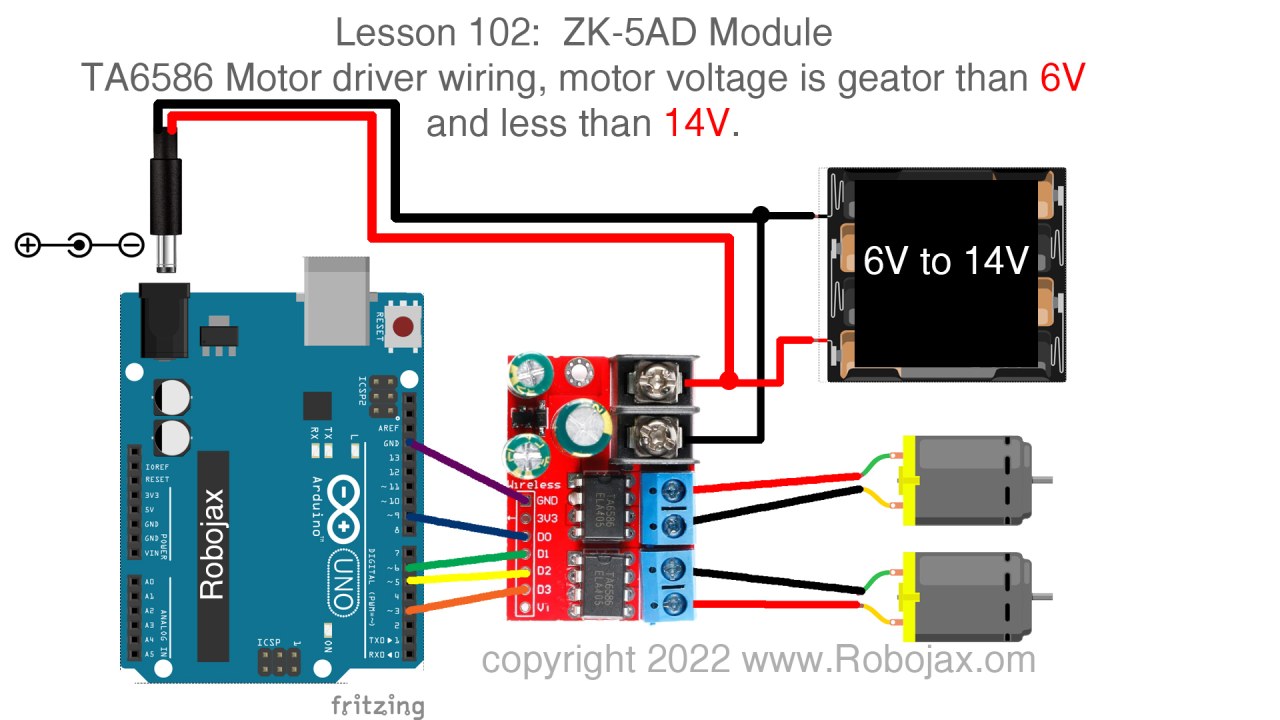
ZK-5DAモータードライバモジュールを配線するには、まず電源を接続します。電源の正端子をモータードライバの'+'端子に接続し、負端子を'-'端子に接続します。2つのモーターは、出力端子に接続され、明確にラベルが付けられています。
Arduinoの接続には、PWM対応ピンを使用してください: ピンを接続します3モーター1の制御ピン、およびピン5モーター1の2番目の制御ピンに。 同様に、ピンを接続します。6モーター2の制御ピンに、ピン9モーター2の2番目のコントロールピンに。最後に、すべてのアースが一緒に接続されていることを確認してください。
コード例とウォークスルー
コードは、関連するピンを定義し、デバッグ用にシリアルモニターを初期化することから始まります。モーター制御機能、例えばM1とM2モーターの方向と速度を制御する。
const int D0=9; // Motor 1 PWM pin
const int D1=6; // Motor 1 direction pin
const int D2=5; // Motor 2 PWM pin
const int D3=3; // Motor 2 direction pin
ここでは、ピンがPWM信号を使用してモーターを制御するように設定されています。setupこの関数はこれらのピンを出力として初期化します。
void loop() {
  M2(CW, 80); // Motor 2 runs clockwise at 80% speed
  delay(3000); // Wait for 3 seconds
  brake(2); // Apply brake to motor 2
  delay(1000);
}
この抜粋はプログラムのメインループを示しており、モーター2はブレーキをかける前に3秒間80%の速度で時計回りに動作するように設定されています。brake関数は呼び出されるとモーターを停止します。
void M1(bool direction, int speed) {
  int pwm = map(speed, 0, 100, 0, 255); // Map speed to PWM range
  if (direction == CW) {
    analogWrite(D0, pwm);
    analogWrite(D1, LOW);
  } else {
    analogWrite(D1, pwm);
    analogWrite(D0, LOW);
  }
}
そのM1関数は方向と速度を入力として受け取り、速度をPWM値にマッピングし、モーターの回転方向を制御するために適切なピンを設定します。debugPrint関数が呼び出されて、シリアルモニターに現在の状態が表示されます。
記事の下(動画の08:55で)で完全なコードを確認することを忘れないでください。
デモンストレーション / 期待すること
コードを実行すると、モーターが指定された方向に設定された速度で回転し始めることを期待してください。このコードにはブレーキと速度調整が含まれており、動的な制御が可能です。モーターが期待どおりに反応しない場合は、配線接続を再確認し、コードで正しいピンが設定されていることを確認してください。また、テスト中に示されたように(ビデオの23:23で)、特に高電流を流す際には過熱に注意してください。
ビデオのタイムスタンプ
- 00:00 はじめに
- 03:16 データシートが表示されました
- 06:34 配線の解説
- 08:55 コードの説明
- 14:28 デモンストレーション: モーター制御
- 17:22 デモンストレーション: 最大電流テスト
- 3A、4A、5Aでの電圧降下テスト
- 26:28 結論の所見
画像
/*
 * Lesson 102: Using ZK-5DA to control 2 DC motors, each 4A
 *
 * Full video details: https://youtu.be/W_Wm28nQAYA
 * Video timing:
00:00 Introduction
03:16 Datasheet viewed
06:34 Wiring explained
08:55 Code explained
14:28 Demonstration: Motor control
17:22 Demonstration: Maximum current test
23:23 Voltage drop test at 3A, 4A, and 5A
26:28 Conclusion remarks

 * Written by Ahmad Shamshiri for Arduino Step by Step Course by Robojax
 * www.Robojax.com
 * on Mar 22, 2022

 *
 * This code is part of Arduino Step by Step Course which starts here:  https://youtu.be/-6qSrDUA5a8
 *
 * For the library for this code, visit http://robojax.com/
 *
If you found this tutorial helpful, please support me so I can continue creating
content like this. Make a donation using PayPal or a credit card: https://bit.ly/donate-robojax
 * This code is "AS IS" without warranty or liability. Free to be used as long as you keep this note intact.
 * This code has been downloaded from Robojax.com
    This program is free software: you can redistribute it and/or modify
    it under the terms of the GNU General Public License as published by
    the Free Software Foundation, either version 3 of the License, or
    (at your option) any later version.

    This program is distributed in the hope that it will be useful,
    but WITHOUT ANY WARRANTY; without even the implied warranty of
    MERCHANTABILITY or FITNESS FOR A PARTICULAR PURPOSE.  See the
    GNU General Public License for more details.

    You should have received a copy of the GNU General Public License
    along with this program.  If not, see <https://www.gnu.org/licenses/>.
 */


 //all pins must be PWM enabled pins with ~ printed beside them
const int D0=9;//~
const int D1=6;
const int D2=5;
const int D3=3;

bool CW = true;
bool CCW = false;


bool debug = false;

void setup() {
  Serial.begin(9600);
  Serial.println("Robojax TA6586 Motor Control");
 pinMode(D0, OUTPUT);
 pinMode(D1, OUTPUT);
 pinMode(D2, OUTPUT);
 pinMode(D3, OUTPUT);


}

void loop() {
  // * Full video details: https://youtu.be/W_Wm28nQAYA
  M2(CW, 80);//motor 1 runs CW at 80% speed
  M1(CW, 100); //motor 1 runs CW at 100% speed
  delay(3000);//wait for 3 seconds
  brake (2);//apply brake to motor 2
  delay(1000);

  M2(CCW, 60);//motor 2 runs CCW at 60% speed
  delay(3000);//wait for 3 seconds
  brake (2);//apply brake to motor 2
  brake (1);//apply brake to motor 1
  delay(3000);//wait for 3 seconds
  for(int i=0; i<=100; i++)
  {
    M1(CCW, i);//run motor 1 to CCW direction with i% speed
    delay(100);
  }
  delay(2000);
  brake (2);//apply brake to motor 2
  delay(3000); delay(3000);//wait for 3 seconds}
}//loop ends

/*
 *  M1(bool direction,int speed)
 * @brief runs motor 1
 * @param direction is CW or CCW,
 * @param speed is an integer between 0 to 100

 * @return returns none
 * Written by Ahmad Shamshiri for robojax.com
 * on Mar 22, 2022
 * Full video details: https://youtu.be/W_Wm28nQAYA
 */
void M1(bool direction,int speed)
{
  int pwm=map(speed, 0, 100, 0, 255);
  if(direction == CW)
  {
   analogWrite(D0,pwm);
   analogWrite(D1,LOW);
  }else{
   analogWrite(D1,pwm);
   analogWrite(D0,LOW);
  }
  debugPrint(1, direction, speed, false);
}//M1 end


/*
 *  M2(bool direction,int speed)
 * @brief runs motor 2
 * @param direction is CW or CCW,
 * @param speed is an integer between 0 to 100

 * @return returns none
 * Written by Ahmad Shamshiri for robojax.com
 * on Mar 22, 2022
 * Full video details: https://youtu.be/W_Wm28nQAYA
 */
void M2(bool direction,int speed)
{
  int pwm=map(speed, 0, 100, 0, 255);
  if(direction == CW)
  {
   analogWrite(D2,pwm);
   analogWrite(D3,LOW);
  }else{
   analogWrite(D3,pwm);
   analogWrite(D2,LOW);
  }
  debugPrint(2, direction, speed, false);
}//M2 ends


/*
 *  brake(int motor)
 * @brief applies brake to a motor
 * @param motor is an integer (1 or 2)

 * @return returns none
 * Written by Ahmad Shamshiri for robojax.com
 * on Mar 22, 2022
 * Full video details: https://youtu.be/W_Wm28nQAYA
 */
void brake(int motor)
{
   if(motor == 1)
  {
   analogWrite(D0,HIGH);
   analogWrite(D1,HIGH);
  }else{
   analogWrite(D2,HIGH);
   analogWrite(D3,HIGH);
  }
  debugPrint(motor, true,  0, true);
}//brake ends


/*
 * debugPrint(int motor, bool direction, int speed, bool stop)
 * @brief prints debugging information
 * @param motor is an integer (1 or 2)
 * @param direction is CW or CCW
 * @param speed is an integer from 0 to 100
 * @param stop is true or false; if true, the word "stop" is printed

 * @return returns none
 * Written by Ahmad Shamshiri for robojax.com
 * on Mar 22, 2022
 * Full video details: https://youtu.be/W_Wm28nQAYA
 */
void debugPrint(int motor, bool direction, int speed, bool stop)
{
  if(debug)
  {
      Serial.print("Motor: ");
      Serial.print(motor);
    if(stop && motor>0)
    {
      Serial.println(" Stopped");
    }else{
      if(direction)
      {
      Serial.print(" CW at ");
      }else{
       Serial.print(" CCW at ");
      }
      Serial.print(speed);
      Serial.println(" %");
    }
  }//debug

}

//not used but can be used to apply brake on both motors
void fullBrake()
{
 brake(1);
 brake(2);

}
必要かもしれないもの
-
アリエクスプレスAliExpressからZK-5DAを購入するs.click.aliexpress.com
リソースと参考文献
-
外部AliExpressからZK-5DAを購入するs.click.aliexpress.com
-
外部Amazon UKでZK-5DAを購入するamzn.to
-
外部AmazonカナダでZK-5DAを購入するamzn.to
-
外部AmazonドイツでZK-5DAを購入するamzn.to
-
外部アメリカのアマゾンでZK-5DAを購入してください。amzn.to
ファイル📁
データシート(pdf)
-
TA6586 motor Driver datasheet
TA6586_motor_Driver_datasheet.pdf0.22 MB