الدرس 102: استخدام ZK-5DA للتحكم في محركين كهربائيين تيار مستمر 4A
في هذا البرنامج التعليمي، سنستكشف كيفية استخدام وحدة قيادة المحرك ZK-5DA للتحكم في موتورين تيار مباشر بقدرة 4 أمبير. تعتمد هذه الوحدة على الرقاقة TA6586، التي توفر تحكمًا فعالًا بالمحرك مع انخفاض جهد منخفض وتفريغ حراري. بنهاية هذا البرنامج التعليمي، ستكون قادرًا على بدء وإيقاف والتحكم في سرعة المحركات بفعالية. لمزيد من التوضيح، تأكد من مشاهدة الفيديو في (في الفيديو عند 08:55).
شرح الأجهزة
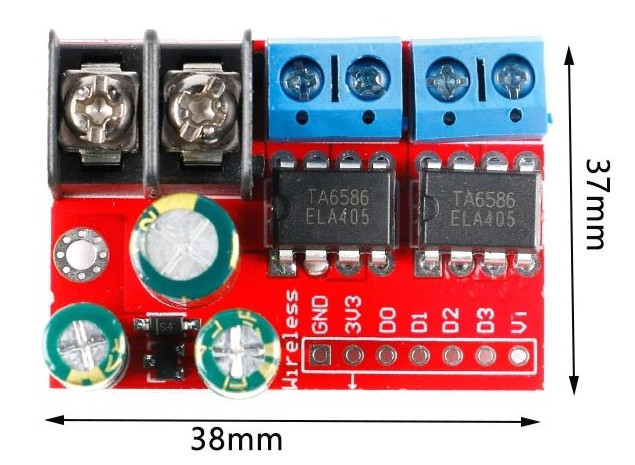
المكون الرئيسي لهذا المشروع هو وحدة السائق ZK-5DA. تستخدم شريحة TA6586، التي تتيح التحكم الفعال في محركين ذو تيار مستمر. هذه الشريحة مصممة لتحمل ما يصل إلى 4 أمبير من التيار لكل محرك مع الحفاظ على انخفاض جهد منخفض، مما يساعد في تقليل توليد الحرارة أثناء التشغيل.
بالإضافة إلى وحدة التحكم في المحرك، ستحتاج إلى لوحة أردوينو لإرسال إشارات التحكم إلى الوحدة. ستقوم لوحة الأردوينو بتحديد اتجاه وسرعة المحركات باستخدام إشارات PWM (تعديل عرض النبضة). يتيح توصيل المحركات بالمنافذ المناسبة على وحدة التحكم التحكم في الاتجاه وتعديل السرعة.
تفاصيل ورقة البيانات
| مصنّع | شركة RZ للموصلات نصف الناقلة |
|---|---|
| رقم الجزء | TA6586 |
| جهد التشغيل | 3-14 ف |
| التيار الذروي | 9 أ |
| تيار مستمر | ٥ أ |
| تيار الانتظار | < 2 ميكرو أمبير |
| انخفاض الجهد | ٤٠٠ مللي فولت عند ٤ أمبير |
| نطاق درجة الحرارة | -25 إلى 85 درجة مئوية |
| حزمة | حزمة IC القياسية |
| ملاحظات / متغيرات | إيقاف حراري، حماية من التيار الزائد |
- تأكد من التهوية المناسبة للحرارة من أجل التشغيل المستمر فوق 3 أمبير.
- استخدم دبابيس تدعم PWM للتحكم في السرعة.
- تحقق من تصنيفات الجهد قبل توصيل المحركات.
- انتبه إلى قطبية الأسلاك لتجنب تلف المحرك.
- راقب درجة الحرارة أثناء التشغيل لتفادي ارتفاع درجة الحرارة.
تعليمات التوصيل
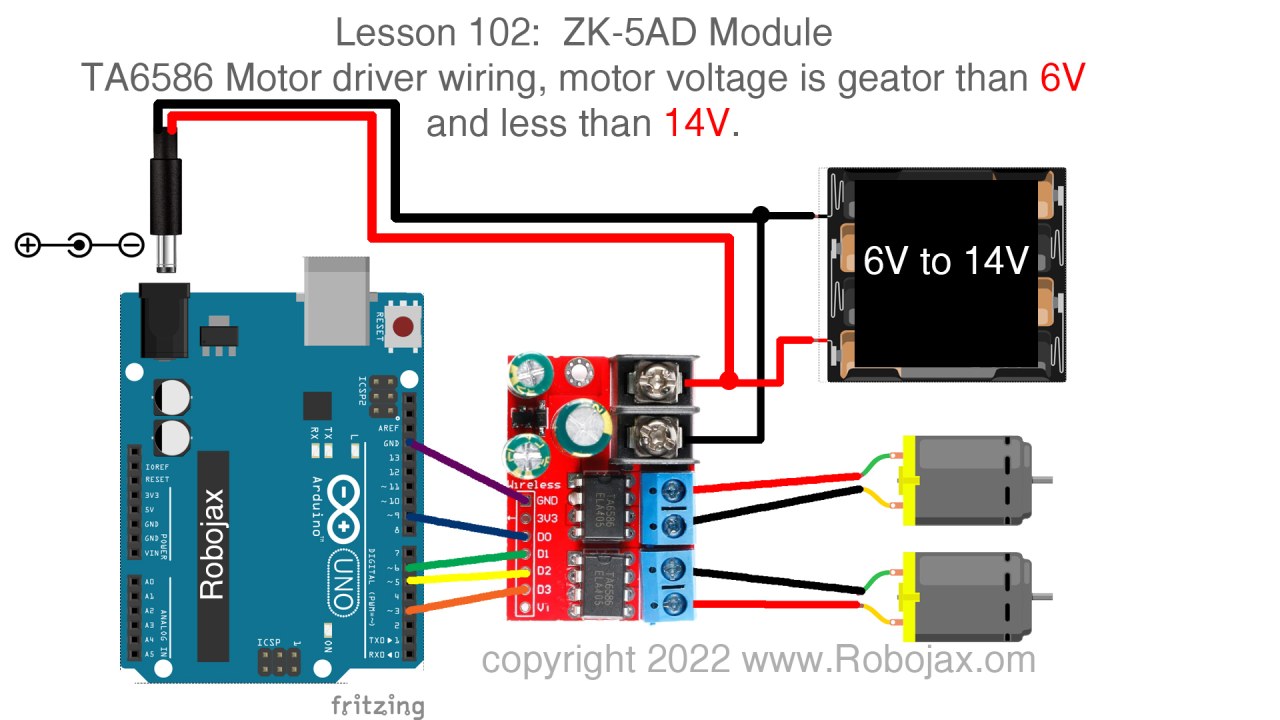
لتوصيل وحدة محرك ZK-5DA، ابدأ بتوصيل مصدر الطاقة. قم بتوصيل الطرف الموجب لمصدر الطاقة الخاص بك بالطرف '+' على وحدة التحكم في المحرك والطرف السالب بالطرف '-'. سيتم توصيل المحركين بأطراف الخرج، المميزة للتوضيح.
لإجراء اتصالات Arduino، استخدم الدبابيس المدعومة لـ PWM: قم بتوصيل الدبوس3إلى دبوس التحكم لمحرك 1، ودبوس5إلى دبوس التحكم الثاني للمحرك 1. بالمثل، قم بتوصيل الدبوس6إلى دبوس التحكم للمحرك 2، ودبوس9إلى دبوس التحكم الثاني للمحرك 2. أخيرًا، تأكد من أن جميع الأرضيات متصلة معًا.
أمثلة الكود وشرحها
يبدأ الكود بتعريف الدبابيس المعنية وتهيئة شاشة السيريال للتصحيح. وظائف التحكم في المحرك، مثلM1وM2, السيطرة على اتجاهات وسرعات المحرك.
const int D0=9; // Motor 1 PWM pin
const int D1=6; // Motor 1 direction pin
const int D2=5; // Motor 2 PWM pin
const int D3=3; // Motor 2 direction pin
هنا، تم إعداد الدبابيس للتحكم في المحركات باستخدام إشارات PWM.setupتقوم الوظيفة بتهيئة هذه الدبابيس كمخرجات.
void loop() {
  M2(CW, 80); // Motor 2 runs clockwise at 80% speed
  delay(3000); // Wait for 3 seconds
  brake(2); // Apply brake to motor 2
  delay(1000);
}
هذا المقطع يظهر الحلقة الرئيسية للبرنامج، حيث يتم ضبط المحرك 2 ليعمل في اتجاه عقارب الساعة بسرعة 80% لمدة 3 ثوانٍ قبل تطبيق الفرامل.brakeتوقف الوظيفة المحرك عند استدعائها.
void M1(bool direction, int speed) {
  int pwm = map(speed, 0, 100, 0, 255); // Map speed to PWM range
  if (direction == CW) {
    analogWrite(D0, pwm);
    analogWrite(D1, LOW);
  } else {
    analogWrite(D1, pwm);
    analogWrite(D0, LOW);
  }
}
الM1تأخذ الوظيفة الاتجاه والسرعة كمدخلات، وتقوم بربط السرعة بقيمة PWM، وتعين الأرجل المناسبة للتحكم في اتجاه دوران المحرك.debugPrintيتم استدعاء الدالة لعرض الحالة الحالية في جهاز المراقبة التسلسلي.
للحصول على التعليمات البرمجية الكاملة، تذكر أن تتحقق أسفل المقال (في الفيديو عند 08:55).
عرض / ما يمكن توقعه
عند تشغيل الكود، توقع أن تبدأ المحركات في الدوران في الاتجاهات المحددة بالسرعات المعينة. يتضمن الكود كبحًا وتعديلات في السرعة، مما يسمح بالتحكم الديناميكي. إذا لم تستجب المحركات كما هو متوقع، تحقق مرة أخرى من اتصالات الأسلاك الخاصة بك وتأكد من أن الدبابيس الصحيحة تم تكوينها في الكود. بالإضافة إلى ذلك، كن حذرًا من ارتفاع درجة الحرارة، خاصة عند سحب تيارات عالية، كما هو موضح خلال الاختبار (في الفيديو عند 23:23).
توقيتات الفيديو
- :00 مقدمة
- 03:16 تم عرض ورقة البيانات
- 06:34 شرح الأسلاك
- 08:55 شرح الكود
- 14:28 عرض: التحكم في المحرك
- 17:22 عرض: اختبار الحد الأقصى للتيار
- اختبار هبوط الجهد عند 3A و4A و5A
- :28 ملاحظات ختامية
الصور
/*
 * Lesson 102: Using ZK-5DA to control 2 DC motors, each 4A
 *
 * Full video details: https://youtu.be/W_Wm28nQAYA
 * Video timing:
00:00 Introduction
03:16 Datasheet viewed
06:34 Wiring explained
08:55 Code explained
14:28 Demonstration: Motor control
17:22 Demonstration: Maximum current test
23:23 Voltage drop test at 3A, 4A, and 5A
26:28 Conclusion remarks

 * Written by Ahmad Shamshiri for Arduino Step by Step Course by Robojax
 * www.Robojax.com
 * on Mar 22, 2022

 *
 * This code is part of Arduino Step by Step Course which starts here:  https://youtu.be/-6qSrDUA5a8
 *
 * For the library for this code, visit http://robojax.com/
 *
If you found this tutorial helpful, please support me so I can continue creating
content like this. Make a donation using PayPal or a credit card: https://bit.ly/donate-robojax
 * This code is "AS IS" without warranty or liability. Free to be used as long as you keep this note intact.
 * This code has been downloaded from Robojax.com
    This program is free software: you can redistribute it and/or modify
    it under the terms of the GNU General Public License as published by
    the Free Software Foundation, either version 3 of the License, or
    (at your option) any later version.

    This program is distributed in the hope that it will be useful,
    but WITHOUT ANY WARRANTY; without even the implied warranty of
    MERCHANTABILITY or FITNESS FOR A PARTICULAR PURPOSE.  See the
    GNU General Public License for more details.

    You should have received a copy of the GNU General Public License
    along with this program.  If not, see <https://www.gnu.org/licenses/>.
 */


 //all pins must be PWM enabled pins with ~ printed beside them
const int D0=9;//~
const int D1=6;
const int D2=5;
const int D3=3;

bool CW = true;
bool CCW = false;


bool debug = false;

void setup() {
  Serial.begin(9600);
  Serial.println("Robojax TA6586 Motor Control");
 pinMode(D0, OUTPUT);
 pinMode(D1, OUTPUT);
 pinMode(D2, OUTPUT);
 pinMode(D3, OUTPUT);


}

void loop() {
  // * Full video details: https://youtu.be/W_Wm28nQAYA
  M2(CW, 80);//motor 1 runs CW at 80% speed
  M1(CW, 100); //motor 1 runs CW at 100% speed
  delay(3000);//wait for 3 seconds
  brake (2);//apply brake to motor 2
  delay(1000);

  M2(CCW, 60);//motor 2 runs CCW at 60% speed
  delay(3000);//wait for 3 seconds
  brake (2);//apply brake to motor 2
  brake (1);//apply brake to motor 1
  delay(3000);//wait for 3 seconds
  for(int i=0; i<=100; i++)
  {
    M1(CCW, i);//run motor 1 to CCW direction with i% speed
    delay(100);
  }
  delay(2000);
  brake (2);//apply brake to motor 2
  delay(3000); delay(3000);//wait for 3 seconds}
}//loop ends

/*
 *  M1(bool direction,int speed)
 * @brief runs motor 1
 * @param direction is CW or CCW,
 * @param speed is an integer between 0 to 100

 * @return returns none
 * Written by Ahmad Shamshiri for robojax.com
 * on Mar 22, 2022
 * Full video details: https://youtu.be/W_Wm28nQAYA
 */
void M1(bool direction,int speed)
{
  int pwm=map(speed, 0, 100, 0, 255);
  if(direction == CW)
  {
   analogWrite(D0,pwm);
   analogWrite(D1,LOW);
  }else{
   analogWrite(D1,pwm);
   analogWrite(D0,LOW);
  }
  debugPrint(1, direction, speed, false);
}//M1 end


/*
 *  M2(bool direction,int speed)
 * @brief runs motor 2
 * @param direction is CW or CCW,
 * @param speed is an integer between 0 to 100

 * @return returns none
 * Written by Ahmad Shamshiri for robojax.com
 * on Mar 22, 2022
 * Full video details: https://youtu.be/W_Wm28nQAYA
 */
void M2(bool direction,int speed)
{
  int pwm=map(speed, 0, 100, 0, 255);
  if(direction == CW)
  {
   analogWrite(D2,pwm);
   analogWrite(D3,LOW);
  }else{
   analogWrite(D3,pwm);
   analogWrite(D2,LOW);
  }
  debugPrint(2, direction, speed, false);
}//M2 ends


/*
 *  brake(int motor)
 * @brief applies brake to a motor
 * @param motor is an integer (1 or 2)

 * @return returns none
 * Written by Ahmad Shamshiri for robojax.com
 * on Mar 22, 2022
 * Full video details: https://youtu.be/W_Wm28nQAYA
 */
void brake(int motor)
{
   if(motor == 1)
  {
   analogWrite(D0,HIGH);
   analogWrite(D1,HIGH);
  }else{
   analogWrite(D2,HIGH);
   analogWrite(D3,HIGH);
  }
  debugPrint(motor, true,  0, true);
}//brake ends


/*
 * debugPrint(int motor, bool direction, int speed, bool stop)
 * @brief prints debugging information
 * @param motor is an integer (1 or 2)
 * @param direction is CW or CCW
 * @param speed is an integer from 0 to 100
 * @param stop is true or false; if true, the word "stop" is printed

 * @return returns none
 * Written by Ahmad Shamshiri for robojax.com
 * on Mar 22, 2022
 * Full video details: https://youtu.be/W_Wm28nQAYA
 */
void debugPrint(int motor, bool direction, int speed, bool stop)
{
  if(debug)
  {
      Serial.print("Motor: ");
      Serial.print(motor);
    if(stop && motor>0)
    {
      Serial.println(" Stopped");
    }else{
      if(direction)
      {
      Serial.print(" CW at ");
      }else{
       Serial.print(" CCW at ");
      }
      Serial.print(speed);
      Serial.println(" %");
    }
  }//debug

}

//not used but can be used to apply brake on both motors
void fullBrake()
{
 brake(1);
 brake(2);

}
الأشياء التي قد تحتاجها
-
علي إكسبريساشترِ ZK-5DA من علي إكسبريسs.click.aliexpress.com
الموارد والمراجع
-
خارجياشترِ ZK-5DA من أمازون ألمانياamzn.to
-
خارجي
-
خارجياشترِ ZK-5DA من أمازون كنداamzn.to
-
خارجي
-
خارجياشترِ ZK-5DA من علي إكسبريسs.click.aliexpress.com
ملفات📁
ورقة البيانات (pdf)
-
TA6586 motor Driver datasheet
TA6586_motor_Driver_datasheet.pdf0.22 MB