Ikẹkọ yii jẹ apakan ti: Ẹ̀kọ́ 107 28BYJ-48 Àwọn Iṣẹ́ Àgbékalẹ̀ Stepper 8
Fídíò yìí ní iṣẹ́ mẹ́jọ. Iṣẹ́ kọ̀ọ̀kan ní kódù ọ̀tọ̀ọ̀tọ̀. Àwọn ìjápọ̀ sí àwọn fídíò mìíràn wà ní ìsàlẹ̀ àpilẹ̀kọ yìí.
Ẹ̀kọ́ 107-3: Ṣíṣàkóso Ẹ̀rọ̀ 28BYJ-48 Stepper Motor Nípa Lílò Àwọn Bọ́tìnì Títẹ̀ Mẹ́ta: CW, CCW, àti Stop (STPB-1)
Ise 3: Ṣiṣakoso Motor Stepper Nipa Lilo Bọtini Titari STPB-1 – Motor Stepper 28BYJ-48
Nkan yii jẹ apakan ti ẹkọ-ọna 8-ise ti o nfi han bi o ṣe le ṣakoso motor stepper 28BYJ-48 pẹlu Arduino. Ninu Ise 3, a ṣe afihan iṣakoso akọkọ ti o da lori bọtini titari nipa lilo bọtini igba diẹ ti a samisi STPB-1. Bọtini naa ni a lo lati mu motor yiyi pẹlu titari ẹyọkan.
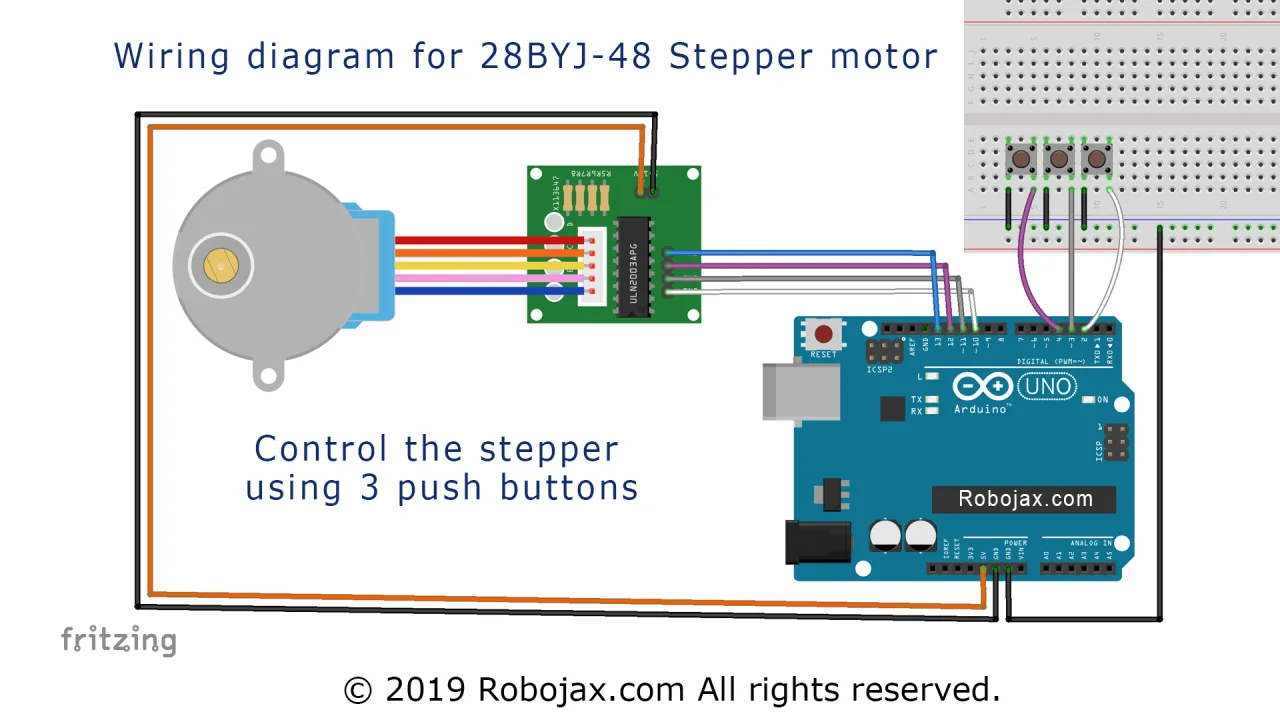
Gbogbo koodu orisun ati aworan itọsọna asopọ fun ise yii ni a le rii ni isalẹ nkan naa.

📘 Ifihan
Ise yii kọ lori awọn ti tẹlẹ nipa fifi input ti ara pẹlu bọtini titari. Nigbati olumulo ba tẹ bọtini naa ẹẹkan, motor naa ṣe iyipo kikun kan. Ilana yii ṣe pataki ni awọn ipo ti o nilo imuṣiṣẹ afọwọṣe ti ilana gbigbe, gẹgẹbi gbigbe pẹpẹ kan, ifunni ẹya kan, tabi ilọsiwaju ipele ẹrọ kan.
⚙️ Aworan Itọsọna Asopọ

Ni afikun si asopọ ULN2003 ati motor stepper lati Awọn Ise 1 ati 2, asopọ tuntun atẹle yii ni a ṣafikun:
-
Opin kan ti bọtini titari (STPB-1) sopọ si pinni Arduino 2
-
Opin keji sopọ si GND
-
Resista fifa-soke ni a ṣeto ni inu koodu
Apejuwe: Aworan itọsọna asopọ ti o nfi iṣakoso motor ULN2003 ati titẹ sii bọtini titari STPB-1 si pinni 2 han.
💻 Alaye Koodu
Koodu naa lo input oni-nọmba lati ri titari bọtini ati mu gbigbe motor ṣiṣẹ:
-
Iṣeto Stepper ati Pinni:
#include <Stepper.h>
const int stepsPerRevolution = 2048;
Stepper myStepper(stepsPerRevolution, 8, 10, 9, 11);
const int buttonPin = 2;-
Iṣẹ Iṣeto:
void setup() {
  myStepper.setSpeed(10);
  pinMode(buttonPin, INPUT_PULLUP);
  Serial.begin(9600);
}-
Lo
INPUT_PULLUPlati rọrun asopọ (ko si nilo resistita ita).
-
Iṣẹ Loop:
void loop() {
  if (digitalRead(buttonPin) == LOW) {
    myStepper.step(stepsPerRevolution);
    delay(1000); // Ṣe idiwọ titari ilopo lairotẹlẹ
  }
}-
Ri titari bọtini (ipo LOW nitori ọgbọn fifa-soke)
-
Yi motor ni iyipo kikun kan siwaju fun titari kọọkan
🎬 Awọn Akoko Lati Fidio Kikun
Lati wo ise yii ninu fidio ẹkọ, lo awọn akoko isalẹ:
-
35:48 – Ise 3: Alaye asopọ
-
37:45 – Ise 3: Alaye koodu
-
39:59 – Ise 3: Ifihan
📁 Abala Gbigba
Iwọ yoo rii koodu orisun ati aworan itọsọna asopọ fun ise yii ni isalẹ nkan naa. Iṣeto yii jẹ aaye ibẹrẹ nla fun ṣiṣe gbigbe ṣiṣẹ ni awọn ohun elo ti olumulo ṣakoso.
Atẹle ni [Ise 4: Bọtini Titari STPB-2 – Mu Duro Lati Ṣiṣẹ Mode].
Aworan




Ikẹkọ yii jẹ apakan ti: Ẹ̀kọ́ 107 28BYJ-48 Àwọn Iṣẹ́ Àgbékalẹ̀ Stepper 8
- Ẹkọ 107-1: Bẹ̀rẹ̀ àti Dúró 28BYJ-48 Stepper Motor pẹ̀lú Ìtọ́sọ́nà Tí a Ṣètò Nínú Kóòdù
- Ẹ̀kọ́ 107-2: Ṣíṣàkóso Ẹ̀rọ̀ 28BYJ-48 Stepper Motor nípasẹ̀ Serial Monitor
- Ẹ̀kọ́ 107-4: Ṣíṣàkóso Ẹ̀rọ̀ 28BYJ-48 Stepper Motor Ní Lílò Àwọn Bọ́tìnì Títẹ Méjì, CW, CCW (Tẹ̀ Ẹ Mú), STPB-2
- Ẹ̀kọ́ 107-5: Rán Ẹ̀rọ̀ 28BYJ-48 fún Ìyípo Ọ̀kan ní Ìtọ́sọ́nà CW tàbí CCW, STPB-3
- Ẹ̀kọ́ 107-6: Ṣíṣàkóso Ẹ̀rọ̀ 28BYJ-48 Stepper Motor Ní Lílò Àwọn Bọ̀tìnì Títẹ Mẹ́ta, pẹ̀lú Igun àti Ìyára STPB-4
- Ẹ̀kọ́ 107-7: Fífi 28BYJ-48 Stepper Motor ránṣẹ́ sí Igun Èyíkéyìí pẹ̀lú Àwọn Bọ́tìnì Títẹ̀ STPB-5 Tí A Ṣàlàyé
- Ẹ̀kọ́ 107-8: Ṣíṣàkóso ìyára 28BYJ-48 Stepper Motor ní lílo Potentiometer
++
/*
* Lesson 107-3: Controlling a stepper motor using 3 push buttons.
We have 3 push buttons: one for clockwise (CW), the second for counter-clockwise (CCW), and one for stopping the motor.

In this lesson, we learn how to use a mini stepper motor 28BYJ-48 for our project. I am presenting 8 projects
  so you can use it in almost any application. In the video, I have explained the code, shown the full wiring diagram, and
  how to connect the wires, push buttons, and breadboard.

  Project 1: Running motor
  Project 2: Controlling stepper motor from Serial Monitor
  Project 3: Controlling stepper motor using push button STPB-1 (this code)
  Project 4: Controlling using push button STPB-2  keep pressing
  Project 5: One Revolution using push button STPB-3
  Project 6: Push button: Any Angle and speed STPB-4
  Project 7: Using multiple buttons to control any angle: STPB-5 angle, speed and direction
  Project 8: Controlling stepper motor using potentiometer

  * Watch Video instruction for this code: https://youtu.be/TQ7R2bY-MWU
  *
  * This code is part of the Arduino Step by Step Course, which starts here:  https://youtu.be/-6qSrDUA5a8
  *
  * For the library for this code, visit http://robojax.com/
  *
 If you found this tutorial helpful, please support me so I can continue creating
 content like this. Make a donation using PayPal via credit card: https://bit.ly/donate-robojax

 * Written by Ahmad Shamshiri for Robojax Robojax.com
 * on Feb 20, 2019 at 19:34 in Ajax, Ontario, Canada

  *  * This code is "AS IS" without warranty or liability. Free to be used as long as you keep this note intact.*
  * This code has been downloaded from Robojax.com
     This program is free software: you can redistribute it and/or modify
     it under the terms of the GNU General Public License as published by
     the Free Software Foundation, either version 3 of the License, or
     (at your option) any later version.

     This program is distributed in the hope that it will be useful,
     but WITHOUT ANY WARRANTY; without even the implied warranty of
     MERCHANTABILITY or FITNESS FOR A PARTICULAR PURPOSE.  See the
     GNU General Public License for more details.

     You should have received a copy of the GNU General Public License
     along with this program.  If not, see <https://www.gnu.org/licenses/>.

 */

int Pin1 = 10;//IN1 is connected to 10
int Pin2 = 11;//IN2 is connected to 11
int Pin3 = 12;//IN3 is connected to 12
int Pin4 = 13;//IN4 is connected to 13
int switchCW  =2;//define input pin for CW push button
int switchStop=3;//define input pin for Stop push button
int switchCCW =4;//define input pin for CCW push button

int pole1[] ={0,0,0,0, 0,1,1,1, 0};//pole1, 8 step values
int pole2[] ={0,0,0,1, 1,1,0,0, 0};//pole2, 8 step values
int pole3[] ={0,1,1,1, 0,0,0,0, 0};//pole3, 8 step values
int pole4[] ={1,1,0,0, 0,0,0,1, 0};//pole4, 8 step values


int poleStep = 0;
int  dirStatus = 3;// stores direction status 3= stop (do not change)

void setup()
{
 pinMode(Pin1, OUTPUT);//define pin for ULN2003 in1
 pinMode(Pin2, OUTPUT);//define pin for ULN2003 in2
 pinMode(Pin3, OUTPUT);//define pin for ULN2003 in3
 pinMode(Pin4, OUTPUT);//define pin for ULN2003 in4

 pinMode(switchCW,INPUT_PULLUP);// CW push button pin as input
 pinMode(switchStop,INPUT_PULLUP);//Stop push button pin as input
 pinMode(switchCCW,INPUT_PULLUP);//CCW push button pin as input

}
void loop()
{

  if(digitalRead(switchCCW) == LOW)
  {
    dirStatus =1;
  }else if(digitalRead(switchCW) == LOW)
  {
   dirStatus  = 2;
  }else if(digitalRead(switchStop) == LOW)
  {
    dirStatus =3;
  }
 if(dirStatus ==1){
   poleStep++;
    driveStepper(poleStep);
 }else if(dirStatus ==2){
   poleStep--;
    driveStepper(poleStep);
 }else{
  driveStepper(8);
 }
 if(poleStep>7){
   poleStep=0;
 }
 if(poleStep<0){
   poleStep=7;
 }
 delay(1);

}// loop

void driveStepper(int c)
{
     digitalWrite(Pin1, pole1[c]);
     digitalWrite(Pin2, pole2[c]);
     digitalWrite(Pin3, pole3[c]);
     digitalWrite(Pin4, pole4[c]);
}
Ohun ti o le nilo
-
Amazon
-
Amazon
-
AliExpressPurchase 5 pcs 28BYJ-48 stepper motors from AliExpresss.click.aliexpress.com
Orisun & itọkasi
-
Ita gbangba
-
Ita gbangba
-
Ita gbangba
Fáìlìs📁
Fayile Fritzing
-
Moto 28BYJ-48
28BYJ-48 Stepper Motor.fzpz0.01 MB