Mafunzo haya ni sehemu ya: Somo la 107 28BYJ-48 Miradi ya Stepper 8
Video hii ina miradi 8. Kila mradi una msimbo tofauti. Viungo vya video zingine viko chini ya makala haya.
Somo la 107-3: Kudhibiti Motor ya Hatua ya 28BYJ-48 Kwa Kutumia Vitufe Vitatu vya Kushinikiza: CW, CCW, na Simama (STPB-1)
Mradi wa 3: Kudhibiti Motor ya Stepper Kwa Kutumia Kitufe cha Kushinikiza STPB-1 – Motor ya Stepper 28BYJ-48
Makala hii ni sehemu ya mfululizo wa mafunzo ya miradi 8 inayoonyesha jinsi ya kudhibiti motor ya stepper 28BYJ-48 na Arduino. Katika Mradi wa 3, tunatanguliza udhibiti wa kwanza unaotegemea kitufe cha kushinikiza kwa kutumia kitufe cha muda kinachoitwa STPB-1. Kitufe kinatumika kuanzisha mzunguko wa motor kwa kubonyeza mara moja.
Nambari zote za chanzo na mchoro wa wiring wa mradi huu unaweza kupatikana chini ya makala.

📘 Utangulizi
Mradi huu unajenga juu ya yaliyotangulia kwa kujumuisha pembejeo ya kimwili kupitia kitufe cha kushinikiza. Wakati mtumiaji anabonyeza kitufe mara moja, motor inafanya mzunguko mmoja kamili. Mbinu hii ni muhimu katika hali zinazohitaji uanzishaji wa mwongozo wa mchakato wa harakati, kama vile kusogeza jukwaa, kulisha sehemu, au kuendeleza hatua ya kimakanika.
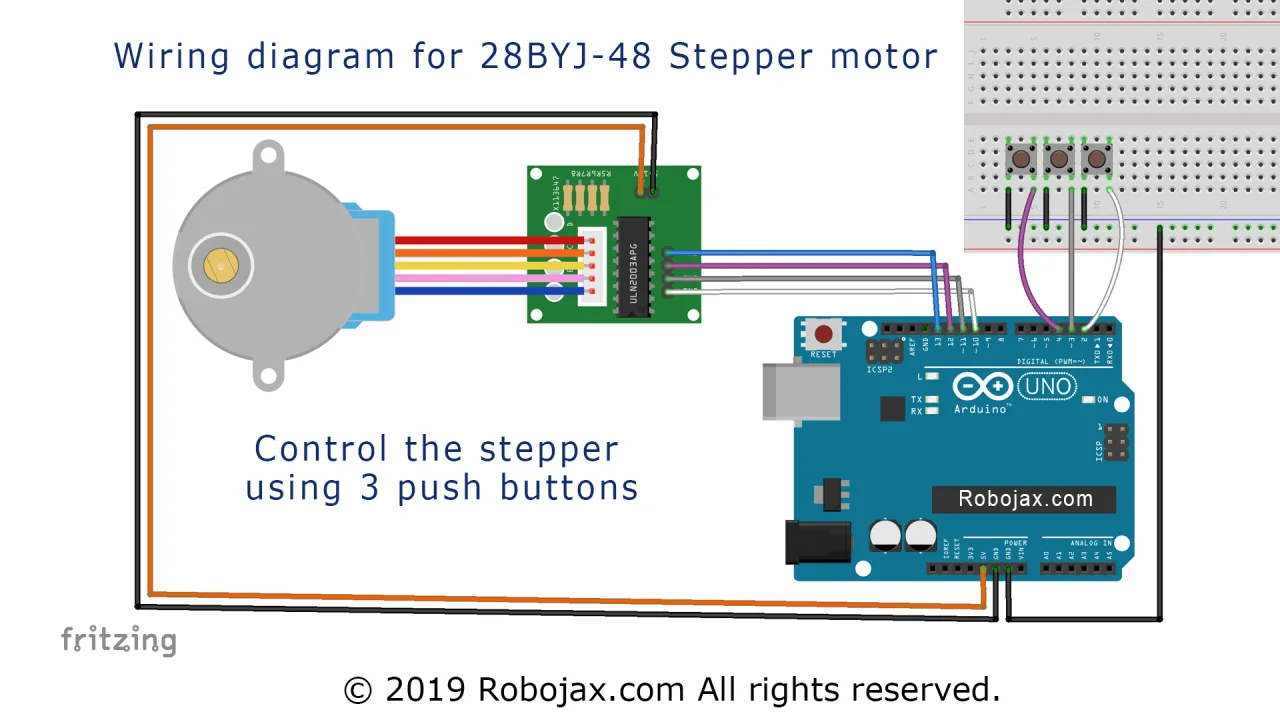
⚙️ Mchoro wa Wiring

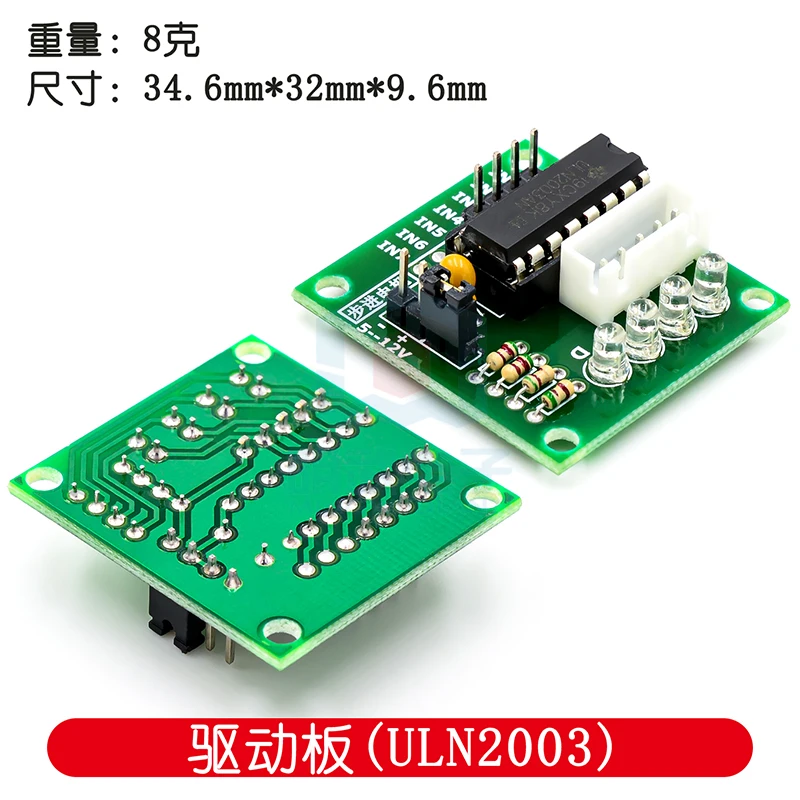
Mbali na wiring ya ULN2003 na motor ya stepper kutoka Miradi ya 1 na 2, uunganisho ufuatao mpya umeongezwa:
-
Ncha moja ya kitufe cha kushinikiza (STPB-1) inaunganishwa na pini ya Arduino 2
-
Ncha nyingine inaunganishwa na GND
-
Kipinga cha kuvuta-juu (pull-up resistor) kinasanidiwa ndani ya nambari
Maelezo: Mchoro wa wiring unaoonyesha udhibiti wa motor ULN2003 na pembejeo ya kitufe cha kushinikiza STPB-1 kwa pini 2.
💻 Maelezo ya Nambari
Nambari inatumia pembejeo ya dijitali kugundua kubonyeza kwa kitufe na kuanzisha harakati ya motor:
-
Uanzishaji wa Stepper na Pini:
#include <Stepper.h>
const int stepsPerRevolution = 2048;
Stepper myStepper(stepsPerRevolution, 8, 10, 9, 11);
const int buttonPin = 2;-
Kazi ya Setup:
void setup() {
  myStepper.setSpeed(10);
  pinMode(buttonPin, INPUT_PULLUP);
  Serial.begin(9600);
}-
Inatumia
INPUT_PULLUPkurahisisha wiring (hakuna kipinga cha nje kinachohitajika).
-
Kazi ya Loop:
void loop() {
  if (digitalRead(buttonPin) == LOW) {
    myStepper.step(stepsPerRevolution);
    delay(1000); // Zuia kuchochea mara mbili kwa bahati mbaya
  }
}-
Inagundua kubonyeza kwa kitufe (hali ya LOW kutokana na mantiki ya pull-up)
-
Inazungusha motor mzunguko mmoja kamili mbele kwa kila kubonyeza
🎬 Nyakati kutoka Video Kamili
Kutazama mradi huu katika video ya mafunzo, tumia nyakati zifuatazo:
-
35:48 – Mradi wa 3: Maelezo ya wiring
-
37:45 – Mradi wa 3: Maelezo ya nambari
-
39:59 – Mradi wa 3: Onyesho
📁 Sehemu ya Kupakua
Utapata nambari ya chanzo na mchoro wa wiring wa mradi huu chini ya makala. Mpangilio huu ni hatua nzuri ya kuanzia kwa kuchochea harakati katika programu zinazodhibitiwa na mtumiaji.
Kinachofuata ni [Mradi wa 4: Kitufe cha Kushinikiza STPB-2 – Hali ya Kushikilia Kuendesha].
Bilder




Mafunzo haya ni sehemu ya: Somo la 107 28BYJ-48 Miradi ya Stepper 8
- Somo la 107-1: Anzisha na Simamisha Motor ya Hatua ya 28BYJ-48 na Mwelekeo Uliowekwa kwenye Msimbo
- Somo la 107-2: Kudhibiti Motor ya Hatua ya 28BYJ-48 kupitia Monitor ya Serial
- Somo la 107-4: Kudhibiti Motor ya Hatua ya 28BYJ-48 Kwa Kutumia Vitufe Viwili vya Kushinikiza, CW, CCW (Bonyeza na Ushikilie), STPB-2
- Somo la 107-5: Tuma Motor ya 28BYJ-48 kwa Mzunguko Mmoja katika Mwelekeo wa CW au CCW, STPB-3
- Somo la 107-6: Kudhibiti Motor ya Hatua ya 28BYJ-48 Kwa Kutumia Vitufe Vitatu vya Kushinikiza, pamoja na Pembe na Kasi STPB-4
- Somo la 107-7: Kutuma Motor ya Hatua ya 28BYJ-48 kwa Pembe Yoyote na Vitufe vya Kushinikiza vya STPB-5 Vilivyofafanuliwa
- Somo la 107-8: Kudhibiti Kasi ya Motor ya Hatua ya 28BYJ-48 Kwa Kutumia Potentiometer
++
/*
* Lesson 107-3: Controlling a stepper motor using 3 push buttons.
We have 3 push buttons: one for clockwise (CW), the second for counter-clockwise (CCW), and one for stopping the motor.

In this lesson, we learn how to use a mini stepper motor 28BYJ-48 for our project. I am presenting 8 projects
  so you can use it in almost any application. In the video, I have explained the code, shown the full wiring diagram, and
  how to connect the wires, push buttons, and breadboard.

  Project 1: Running motor
  Project 2: Controlling stepper motor from Serial Monitor
  Project 3: Controlling stepper motor using push button STPB-1 (this code)
  Project 4: Controlling using push button STPB-2  keep pressing
  Project 5: One Revolution using push button STPB-3
  Project 6: Push button: Any Angle and speed STPB-4
  Project 7: Using multiple buttons to control any angle: STPB-5 angle, speed and direction
  Project 8: Controlling stepper motor using potentiometer

  * Watch Video instruction for this code: https://youtu.be/TQ7R2bY-MWU
  *
  * This code is part of the Arduino Step by Step Course, which starts here:  https://youtu.be/-6qSrDUA5a8
  *
  * For the library for this code, visit http://robojax.com/
  *
 If you found this tutorial helpful, please support me so I can continue creating
 content like this. Make a donation using PayPal via credit card: https://bit.ly/donate-robojax

 * Written by Ahmad Shamshiri for Robojax Robojax.com
 * on Feb 20, 2019 at 19:34 in Ajax, Ontario, Canada

  *  * This code is "AS IS" without warranty or liability. Free to be used as long as you keep this note intact.*
  * This code has been downloaded from Robojax.com
     This program is free software: you can redistribute it and/or modify
     it under the terms of the GNU General Public License as published by
     the Free Software Foundation, either version 3 of the License, or
     (at your option) any later version.

     This program is distributed in the hope that it will be useful,
     but WITHOUT ANY WARRANTY; without even the implied warranty of
     MERCHANTABILITY or FITNESS FOR A PARTICULAR PURPOSE.  See the
     GNU General Public License for more details.

     You should have received a copy of the GNU General Public License
     along with this program.  If not, see <https://www.gnu.org/licenses/>.

 */

int Pin1 = 10;//IN1 is connected to 10
int Pin2 = 11;//IN2 is connected to 11
int Pin3 = 12;//IN3 is connected to 12
int Pin4 = 13;//IN4 is connected to 13
int switchCW  =2;//define input pin for CW push button
int switchStop=3;//define input pin for Stop push button
int switchCCW =4;//define input pin for CCW push button

int pole1[] ={0,0,0,0, 0,1,1,1, 0};//pole1, 8 step values
int pole2[] ={0,0,0,1, 1,1,0,0, 0};//pole2, 8 step values
int pole3[] ={0,1,1,1, 0,0,0,0, 0};//pole3, 8 step values
int pole4[] ={1,1,0,0, 0,0,0,1, 0};//pole4, 8 step values


int poleStep = 0;
int  dirStatus = 3;// stores direction status 3= stop (do not change)

void setup()
{
 pinMode(Pin1, OUTPUT);//define pin for ULN2003 in1
 pinMode(Pin2, OUTPUT);//define pin for ULN2003 in2
 pinMode(Pin3, OUTPUT);//define pin for ULN2003 in3
 pinMode(Pin4, OUTPUT);//define pin for ULN2003 in4

 pinMode(switchCW,INPUT_PULLUP);// CW push button pin as input
 pinMode(switchStop,INPUT_PULLUP);//Stop push button pin as input
 pinMode(switchCCW,INPUT_PULLUP);//CCW push button pin as input

}
void loop()
{

  if(digitalRead(switchCCW) == LOW)
  {
    dirStatus =1;
  }else if(digitalRead(switchCW) == LOW)
  {
   dirStatus  = 2;
  }else if(digitalRead(switchStop) == LOW)
  {
    dirStatus =3;
  }
 if(dirStatus ==1){
   poleStep++;
    driveStepper(poleStep);
 }else if(dirStatus ==2){
   poleStep--;
    driveStepper(poleStep);
 }else{
  driveStepper(8);
 }
 if(poleStep>7){
   poleStep=0;
 }
 if(poleStep<0){
   poleStep=7;
 }
 delay(1);

}// loop

void driveStepper(int c)
{
     digitalWrite(Pin1, pole1[c]);
     digitalWrite(Pin2, pole2[c]);
     digitalWrite(Pin3, pole3[c]);
     digitalWrite(Pin4, pole4[c]);
}
Tänker att du kanske behöver
-
Amazon
-
Amazon
-
AliExpressPurchase 5 pcs 28BYJ-48 stepper motors from AliExpresss.click.aliexpress.com
Resurser och referenser
-
Extern.
-
Extern.
-
Extern.
Filer📁
Fritzing-fil
-
28BYJ-48 Stepper Motor
28BYJ-48 Stepper Motor.fzpz0.01 MB