دا ټیوټوریل برخه ده له: درس 107 28BYJ-48 سټیپر 8 پروژې
دا ویډیو 8 پروژې لري. هر پروژه جلا کوډ لري. د نورو ویډیوګانو لینکونه د دې مقالې لاندې دي.
لومړی ۱۰۷-۳: د ۲۸BYJ-۴۸ سټیپر موټر کنټرول د دریو پش بټنونو په کارولو سره: CW، CCW، او Stop (STPB-1)
پروژه ۳: کنټرول سټیپر موټور د پش بټن STPB-1 په کارولو سره – ۲۸BYJ-48 سټیپر موټور
دا مقاله د ۸-پروژې ټیوټوریل لړۍ برخه ده چې ښیي څنګه د ۲۸BYJ-48 سټیپر موټور د Arduino سره کنټرول کړو. په پروژه ۳ کې، موږ د پش بټن پر بنسټ لومړی کنټرول د لحظوي بټن چې STPB-1 نومیږي په کارولو سره معرفي کوو. بټن د یو فشار سره د موټور د څرخولو لپاره کارول کیږي.
د دې پروژې ټول سرچین کوډ او د تارونو ډیاګرام د مقالې لاندې موندل کیدی شي.

📘 پیژندنه
دا پروژه په پخوانیو پروژو باندې د پش بټن له لارې فزیکي داخل اضافه کوي. کله چې کاروونکی بټن یو ځل فشاروي، موټور یو بشپړ څرخ ترسره کوي. دا تخنیک په هغو حالتونو کې اړین دی چې د حرکت پروسې لاسي فعالولو ته اړتیا وي، لکه د پلیټ فارم حرکت کول، د یوې برخې تغذیه کول، یا د میخانیکي مرحلې پرمخ وړل.
⚙️ د تارونو ډیاګرام

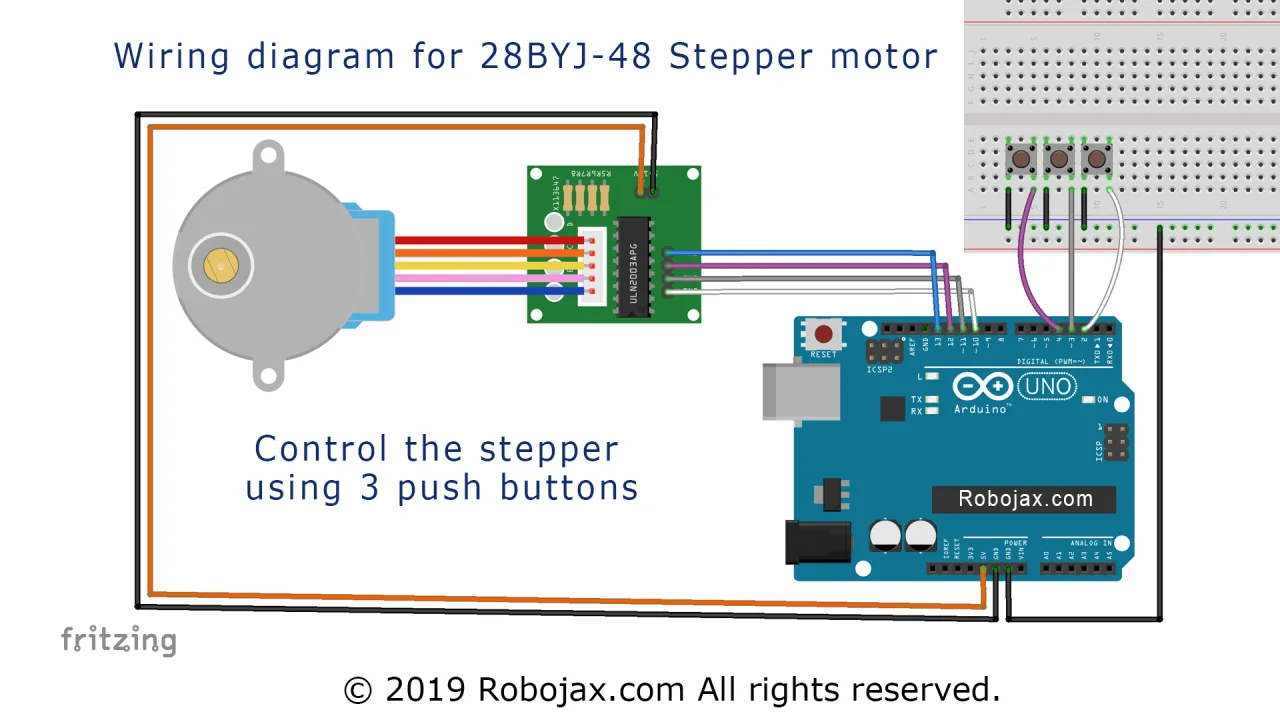
د ULN2003 او سټیپر موټور د تارونو سربیره چې په پروژو ۱ او ۲ کې وو، لاندې نوی اړیکه اضافه شوې ده:
-
د پش بټن (STPB-1) یو ترمینل د Arduino پن ۲ سره نښلول کیږي
-
بل ترمینل د GND سره نښلول کیږي
-
یو پل-اپ ریزسټر په کوډ کې داخلي توګه تنظیم شوی دی
سرلیک: د تارونو ډیاګرام چې د ULN2003 موټور کنټرول او د STPB-1 پش بټن داخل پن ۲ ته ښیي.
💻 د کوډ تشریح
کوډ د بټن فشار کشف کولو او د موټور حرکت پیل کولو لپاره ډیجیټل داخل کاروي:
-
د سټیپر او پن تنظیم:
#include <Stepper.h>
const int stepsPerRevolution = 2048;
Stepper myStepper(stepsPerRevolution, 8, 10, 9, 11);
const int buttonPin = 2;-
د Setup فنکشن:
void setup() {
  myStepper.setSpeed(10);
  pinMode(buttonPin, INPUT_PULLUP);
  Serial.begin(9600);
}-
د تارونو ساده کولو لپاره
INPUT_PULLUPکاروي (بهرني ریزسټر ته اړتیا نشته).
-
د Loop فنکشن:
void loop() {
  if (digitalRead(buttonPin) == LOW) {
    myStepper.step(stepsPerRevolution);
    delay(1000); // د ناڅاپي دوه ځله ټریګر مخنیوی
  }
}-
د بټن فشار کشف کوي (د پل-اپ منطق له امله LOW حالت)
-
موټور په هر فشار سره یو بشپړ څرخ مخکې څرخوي
🎬 د بشپړ ویډیو څخه وختونه
د دې پروژې په ټیوټوریل ویډیو کې لیدلو لپاره، لاندې وختونه وکاروئ:
-
۳۵:۴۸ – پروژه ۳: د تارونو تشریح
-
۳۷:۴۵ – پروژه ۳: د کوډ تشریح
-
۳۹:۵۹ – پروژه ۳: ننداره
📁 د ډاونلوډ برخه
تاسو به د دې پروژې سرچین کوډ او د تارونو ډیاګرام د مقالې لاندې ومومئ. دا تنظیم د کاروونکي کنټرول شویو غوښتنلیکونو کې د حرکت پیل کولو لپاره یو ښه پیل ټکی دی.
بل [پروژه ۴: پش بټن STPB-2 – د چلولو حالت لپاره ونیسئ] دی.
انځورونه




دا ټیوټوریل برخه ده له: درس 107 28BYJ-48 سټیپر 8 پروژې
- لومړی ۱۰۷-۱: د ۲۸BYJ-۴۸ سټیپر موټور پیل او بند کړئ چې لار یې په کوډ کې ټاکل شوې ده
- لومړی ۱۰۷-۲: د ۲۸BYJ-۴۸ سټیپر موټر کنټرول د سیریل مانیټر له لارې
- لومړی ۱۰۷-۴: د ۲۸BYJ-۴۸ سټیپر موټر کنټرول د دوو پش بټنونو په کارولو سره، CW، CCW (په فشار سره وساتئ)، STPB-۲
- درس ۱۰۷-۵: موتور ۲۸BYJ-۴۸ را برای یک دور کامل در جهت عقربههای ساعت یا خلاف جهت عقربههای ساعت بفرستید، STPB-3
- لومړی ۱۰۷-۶: د ۲۸BYJ-۴۸ سټیپر موټر کنټرول د دریو پش بټنونو په کارولو سره، د زاویې او سرعت سره STPB-۴
- لومړی ۱۰۷-۷: د ۲۸BYJ-۴۸ سټیپر موټور لیږل هرې زاویې ته د تعریف شویو STPB-۵ پش بټنونو سره
- لومړی ۱۰۷-۸: د ۲۸BYJ-۴۸ سټیپر موټور سرعت د پوټینشیومیټر په کارولو سره کنټرول کول
++
/*
* Lesson 107-3: Controlling a stepper motor using 3 push buttons.
We have 3 push buttons: one for clockwise (CW), the second for counter-clockwise (CCW), and one for stopping the motor.

In this lesson, we learn how to use a mini stepper motor 28BYJ-48 for our project. I am presenting 8 projects
  so you can use it in almost any application. In the video, I have explained the code, shown the full wiring diagram, and
  how to connect the wires, push buttons, and breadboard.

  Project 1: Running motor
  Project 2: Controlling stepper motor from Serial Monitor
  Project 3: Controlling stepper motor using push button STPB-1 (this code)
  Project 4: Controlling using push button STPB-2  keep pressing
  Project 5: One Revolution using push button STPB-3
  Project 6: Push button: Any Angle and speed STPB-4
  Project 7: Using multiple buttons to control any angle: STPB-5 angle, speed and direction
  Project 8: Controlling stepper motor using potentiometer

  * Watch Video instruction for this code: https://youtu.be/TQ7R2bY-MWU
  *
  * This code is part of the Arduino Step by Step Course, which starts here:  https://youtu.be/-6qSrDUA5a8
  *
  * For the library for this code, visit http://robojax.com/
  *
 If you found this tutorial helpful, please support me so I can continue creating
 content like this. Make a donation using PayPal via credit card: https://bit.ly/donate-robojax

 * Written by Ahmad Shamshiri for Robojax Robojax.com
 * on Feb 20, 2019 at 19:34 in Ajax, Ontario, Canada

  *  * This code is "AS IS" without warranty or liability. Free to be used as long as you keep this note intact.*
  * This code has been downloaded from Robojax.com
     This program is free software: you can redistribute it and/or modify
     it under the terms of the GNU General Public License as published by
     the Free Software Foundation, either version 3 of the License, or
     (at your option) any later version.

     This program is distributed in the hope that it will be useful,
     but WITHOUT ANY WARRANTY; without even the implied warranty of
     MERCHANTABILITY or FITNESS FOR A PARTICULAR PURPOSE.  See the
     GNU General Public License for more details.

     You should have received a copy of the GNU General Public License
     along with this program.  If not, see <https://www.gnu.org/licenses/>.

 */

int Pin1 = 10;//IN1 is connected to 10
int Pin2 = 11;//IN2 is connected to 11
int Pin3 = 12;//IN3 is connected to 12
int Pin4 = 13;//IN4 is connected to 13
int switchCW  =2;//define input pin for CW push button
int switchStop=3;//define input pin for Stop push button
int switchCCW =4;//define input pin for CCW push button

int pole1[] ={0,0,0,0, 0,1,1,1, 0};//pole1, 8 step values
int pole2[] ={0,0,0,1, 1,1,0,0, 0};//pole2, 8 step values
int pole3[] ={0,1,1,1, 0,0,0,0, 0};//pole3, 8 step values
int pole4[] ={1,1,0,0, 0,0,0,1, 0};//pole4, 8 step values


int poleStep = 0;
int  dirStatus = 3;// stores direction status 3= stop (do not change)

void setup()
{
 pinMode(Pin1, OUTPUT);//define pin for ULN2003 in1
 pinMode(Pin2, OUTPUT);//define pin for ULN2003 in2
 pinMode(Pin3, OUTPUT);//define pin for ULN2003 in3
 pinMode(Pin4, OUTPUT);//define pin for ULN2003 in4

 pinMode(switchCW,INPUT_PULLUP);// CW push button pin as input
 pinMode(switchStop,INPUT_PULLUP);//Stop push button pin as input
 pinMode(switchCCW,INPUT_PULLUP);//CCW push button pin as input

}
void loop()
{

  if(digitalRead(switchCCW) == LOW)
  {
    dirStatus =1;
  }else if(digitalRead(switchCW) == LOW)
  {
   dirStatus  = 2;
  }else if(digitalRead(switchStop) == LOW)
  {
    dirStatus =3;
  }
 if(dirStatus ==1){
   poleStep++;
    driveStepper(poleStep);
 }else if(dirStatus ==2){
   poleStep--;
    driveStepper(poleStep);
 }else{
  driveStepper(8);
 }
 if(poleStep>7){
   poleStep=0;
 }
 if(poleStep<0){
   poleStep=7;
 }
 delay(1);

}// loop

void driveStepper(int c)
{
     digitalWrite(Pin1, pole1[c]);
     digitalWrite(Pin2, pole2[c]);
     digitalWrite(Pin3, pole3[c]);
     digitalWrite(Pin4, pole4[c]);
}
هغه شیان چې تاسو ورته اړتیا لرئ
-
امازون
-
امازون
-
علی ایکسپریسPurchase 5 pcs 28BYJ-48 stepper motors from AliExpresss.click.aliexpress.com
سرچینې او حوالې
-
بهرنی
-
بهرنی
-
بهرنی
فایلونه📁
Fritzing فایل
-
28BYJ-48 Stepper Motor
28BYJ-48 Stepper Motor.fzpz0.01 MB