Tento návod je súčasťou: Lekcia 107 28BYJ-48 Stepper 8 Projekty
Toto video obsahuje 8 projektov. Každý projekt má samostatný kód. Odkazy na ďalšie videá nájdete pod týmto článkom.
Lekcia 107-2: Ovládanie krokového motora 28BYJ-48 cez sériový monitor
Projekt 2: Ovládanie krokového motora cez sériový monitor – krokový motor 28BYJ-48
Tento článok je druhou časťou 8-dielneho návodu na ovládanie krokového motora 28BYJ-48 pomocou Arduina. V tomto projekte predstavujeme sériovú komunikáciu ako spôsob vstupu od používateľa. Pomocou sériového monitora Arduina môžu používatelia zadávať príkazy na otáčanie motora v oboch smeroch.
Všetky zdrojové kódy a schémy zapojenia súvisiace s týmto projektom sú k dispozícii na stiahnutie na konci tohto článku.

📘 Úvod
Tento projekt rozširuje základné ovládanie motora tým, že umožňuje interakciu v reálnom čase cez sériový monitor. Namiesto pevného zakódovania logiky otáčania do loop() používateľ zadá príkaz cez monitor, aby sa motor otáčal dopredu alebo dozadu. Toto je ideálne na ladenie alebo vytváranie interaktívnych testovacích nástrojov pre hardvérové zostavy.
⚙️ Schéma zapojenia
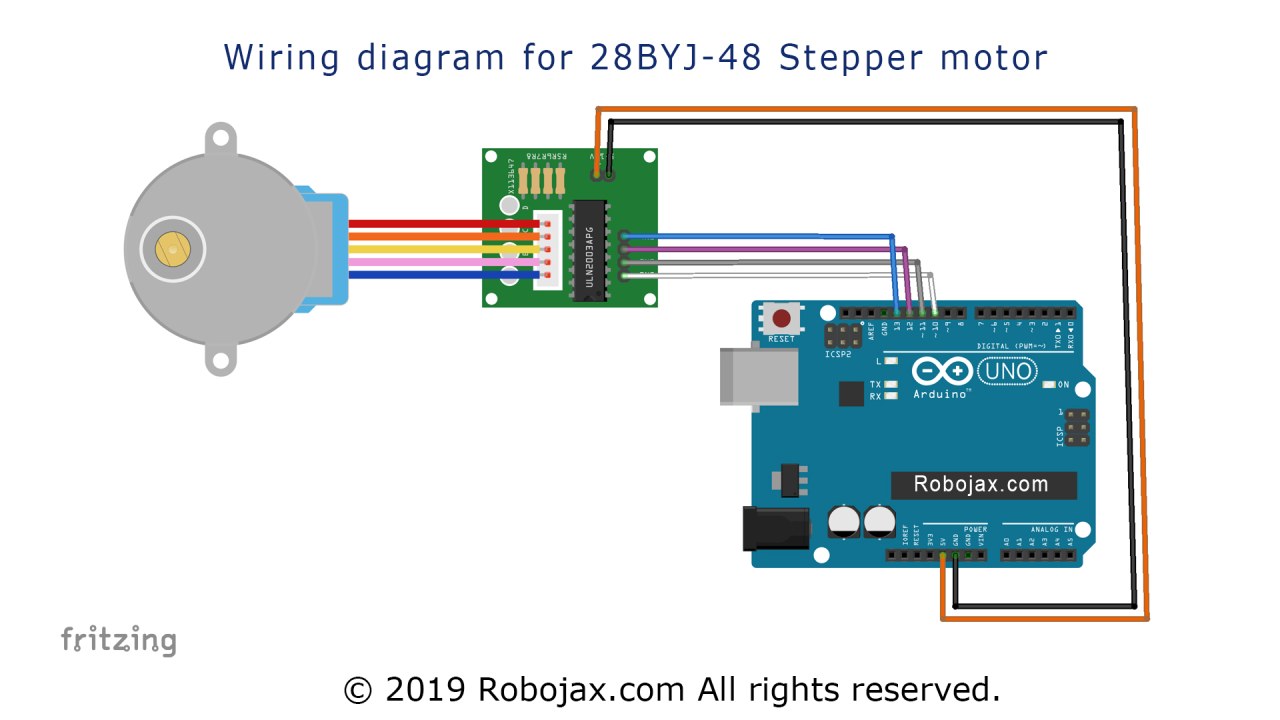
Hardvérová zostava zostáva nezmenená z Projektu 1. Krokový motor 28BYJ-48 sa pripája k driveru ULN2003, ktorý potom komunikuje s Arduinom nasledovne:
-
IN1 → pin Arduina 8
-
IN2 → pin Arduina 9
-
IN3 → pin Arduina 10
-
IN4 → pin Arduina 11
-
Napájanie a GND do ULN2003 z Arduina
Popis: Zapojenie Projektu 2 pomocou ULN2003 a Arduino Uno. Rovnaká konfigurácia ako v Projekte 1.

💻 Vysvetlenie kódu
Kód predstavuje Serial.readStringUntil() na prijímanie vstupu od používateľa zo sériového monitora:
-
Nastavenie krokového motora:
#include <Stepper.h>
const int stepsPerRevolution = 2048;
Stepper myStepper(stepsPerRevolution, 8, 10, 9, 11);
2 Inicializácia
void setup() {
  myStepper.setSpeed(10);
  Serial.begin(9600);
  Serial.println("Zadajte smer: f=dopredu, r=dozadu");
}
-
Hlavná slučka so sériovým vstupom:
void loop() {
  if (Serial.available()) {
    String input = Serial.readStringUntil('\n');
    input.trim();

    if (input == "f") {
      myStepper.step(stepsPerRevolution);
    } else if (input == "r") {
      myStepper.step(-stepsPerRevolution);
    } else {
      Serial.println("Neplatný vstup. Použite 'f' alebo 'r'.");
    }
  }
}-
fspôsobí jedno celé otočenie dopredu. -
rspôsobí jedno celé otočenie dozadu.
Toto pridáva základné ovládanie na základe textu pre interaktívne testovanie krokového motora.
🎬 Časové značky z celého videa
Pozrite si celé výukové video pre tento projekt v nasledujúcich časových značkách:
-
22:23 – Projekt 2: Úvod a vysvetlenie kódu
-
32:03 – Projekt 2: Ukážka pomocou sériového monitora
📁 Časť na stiahnutie
Kód a schému zapojenia pre tento projekt si môžete stiahnuť nižšie. Tieto zdroje vám pomôžu zostaviť, otestovať a prispôsobiť krokový motor ovládaný sériovým monitorom vo vašich vlastných projektoch.
Ďalší je [Projekt 3: Ovládanie krokového motora pomocou tlačidla STPB-1].
Obrázky




Tento návod je súčasťou: Lekcia 107 28BYJ-48 Stepper 8 Projekty
- Lekcia 107-1: Spustenie a zastavenie krokového motora 28BYJ-48 so smerom nastaveným v kóde
- Lekcia 107-3: Ovládanie krokového motora 28BYJ-48 pomocou troch tlačidiel: CW, CCW a Stop (STPB-1)
- Lekcia 107-4: Ovládanie krokového motora 28BYJ-48 pomocou dvoch tlačidiel, CW, CCW (podržané), STPB-2
- Lekcia 107-5: Pošlite motor 28BYJ-48 na jednu otáčku v smere CW alebo CCW, STPB-3
- Lekcia 107-6: Ovládanie krokového motora 28BYJ-48 pomocou troch tlačidiel, s uhlom a rýchlosťou STPB-4
- Lekcia 107-7: Posielanie krokového motora 28BYJ-48 do ľubovoľného uhla pomocou definovaných tlačidiel STPB-5
- Lekcia 107-8: Ovládanie rýchlosti krokového motora 28BYJ-48 pomocou potenciometra
/*
* Lesson 107-2: Controlling a stepper motor from the Serial Monitor
In this lesson, we learn how to use a mini stepper motor 28BYJ-48 for our project. I am presenting eight projects
  so you can use it in almost any application. In the video, I have explained the code, shown the full wiring diagram, and
  how to connect the wires, push buttons, and breadboard.

  Project 2: We will push different keys on the keyboard and control the motor


  Project 1: Running the motor
  Project 2: Controlling a stepper motor from the Serial Monitor (this code)
  Project 3:  Controlling a stepper motor using push button STPB-1
  Project 4: Controlling using push button STPB-2  keep pressing
  Project 5: One Revolution using push button STPB-3
  Project 6: Push button for any angle and speed STPB-4
  Project 7: Using multiple buttons for any angle STPB-5 angle, speed, and direction
  Project 8: Controlling a stepper motor using a potentiometer

  * Watch video instructions for this code: https://youtu.be/TQ7R2bY-MWU
  *
  * This code is part of the Arduino Step by Step Course, which starts here:  https://youtu.be/-6qSrDUA5a8
  *
  * For the library for this code, visit http://robojax.com/
  *
 If you found this tutorial helpful, please support me so I can continue creating
 content like this. Make a donation using PayPal or a credit card: https://bit.ly/donate-robojax


  *  * This code is "AS IS" without warranty or liability. Free to be used as long as you keep this note intact.*
  * This code has been downloaded from Robojax.com
     This program is free software: you can redistribute it and/or modify
     it under the terms of the GNU General Public License as published by
     the Free Software Foundation, either version 3 of the License, or
     (at your option) any later version.

     This program is distributed in the hope that it will be useful,
     but WITHOUT ANY WARRANTY; without even the implied warranty of
     MERCHANTABILITY or FITNESS FOR A PARTICULAR PURPOSE.  See the
     GNU General Public License for more details.

     You should have received a copy of the GNU General Public License
     along with this program.  If not, see <https://www.gnu.org/licenses/>.

 */

int Pin1 = 10;//IN1 is connected to 10
int Pin2 = 11;//IN2 is connected to 11
int Pin3 = 12;//IN3 is connected to 12
int Pin4 = 13;//IN4 is connected to 13
int pole1[] ={0,0,0,0, 0,1,1,1, 0};//pole1, 8 step values
int pole2[] ={0,0,0,1, 1,1,0,0, 0};//pole2, 8 step values
int pole3[] ={0,1,1,1, 0,0,0,0, 0};//pole3, 8 step values
int pole4[] ={1,1,0,0, 0,0,0,1, 0};//pole4, 8 step values

int commandLeft  =106;// 106 is ASCII value for lowercase L (l) rotate CW
int commandStop  =107;// 107 is ASCII value for lowercase K (k) stops
int commandRight =108;// 108 is ASCII value for lowercase J (j) rotate CCW

int poleStep = 0;
int  dirStatus = 3;// stores direction status 3= stop (do not change)
int directionCommand = commandStop;
void setup()
{
 pinMode(Pin1, OUTPUT);
 pinMode(Pin2, OUTPUT);
 pinMode(Pin3, OUTPUT);
 pinMode(Pin4, OUTPUT);
  Serial.begin(9600);
  Serial.println("Robojax 28BYJ-48 Stepper");
}
 void loop()
{
  directionCommand =getCommand();
  if(directionCommand ==commandRight)
  {
    dirStatus =1;
  }else if(directionCommand ==commandLeft)
  {
   dirStatus  = 2;
  }else if(directionCommand ==commandStop)
  {
    dirStatus =3;
  }
 if(dirStatus ==1){
   poleStep++;
    driveStepper(poleStep);
 }else if(dirStatus ==2){
   poleStep--;
    driveStepper(poleStep);
 }else{
  driveStepper(8);
 }
 if(poleStep>7){
   poleStep=0;
 }
 if(poleStep<0){
   poleStep=7;
 }
 delay(1);

}// loop

void driveStepper(int c)
{
     digitalWrite(Pin1, pole1[c]);
     digitalWrite(Pin2, pole2[c]);
     digitalWrite(Pin3, pole3[c]);
     digitalWrite(Pin4, pole4[c]);
}

/*
 *
 * @brief Turns gets command from Serial monitor to control
 * direction of stepper motor
 * @param none
 * @return integer value of ASCII character
 */
int getCommand()
{
  int command =0;
        if (Serial.available() > 0) {
                command =Serial.read()  ;
        }
  //Serial.println(command);
 if(command >= commandLeft &&   command <= commandRight){
  return command;
 }else{
  return 1000;//nothing was received
 }
}//getCommand() end
Veci, ktoré by ste mohli potrebovať
-
Amazon
-
Amazon
-
AliExpressPurchase 5 pcs 28BYJ-48 stepper motors from AliExpresss.click.aliexpress.com
Zdroje a referencie
-
Externé
-
Externé
-
Externé
Súbory📁
Súbor Fritzing
-
28BYJ-48 Stepper Motor
28BYJ-48 Stepper Motor.fzpz0.01 MB