Ten poradnik jest częścią: Lekcja 107 28BYJ-48 Stepper 8 Projektów
Ten film przedstawia 8 projektów. Każdy projekt ma osobny kod. Linki do innych filmów znajdują się poniżej tego artykułu.
Lekcja 107-2: Sterowanie silnikiem krokowym 28BYJ-48 przez monitor szeregowy
Projekt 2: Sterowanie silnikiem krokowym przez monitor szeregowy – silnik krokowy 28BYJ-48
Ten artykuł jest drugą częścią 8-częściowego samouczka dotyczącego sterowania silnikiem krokowym 28BYJ-48 za pomocą Arduino. W tym projekcie wprowadzamy komunikację szeregową jako metodę wprowadzania danych przez użytkownika. Za pomocą monitora szeregowego Arduino użytkownicy mogą wprowadzać polecenia, aby obracać silnikiem w dowolnym kierunku.
Cały kod źródłowy i schematy połączeń związane z tym projektem są dostępne do pobrania na końcu tego artykułu.

📘 Wprowadzenie
Ten projekt rozwija podstawowe sterowanie silnikiem, umożliwiając interakcję w czasie rzeczywistym przez monitor szeregowy. Zamiast sztywnego kodowania logiki obrotu w loop(), użytkownik wprowadza polecenie przez monitor, aby silnik obracał się do przodu lub do tyłu. Jest to idealne rozwiązanie do debugowania lub tworzenia interaktywnych narzędzi testowych dla konfiguracji sprzętowych.
⚙️ Schemat połączeń
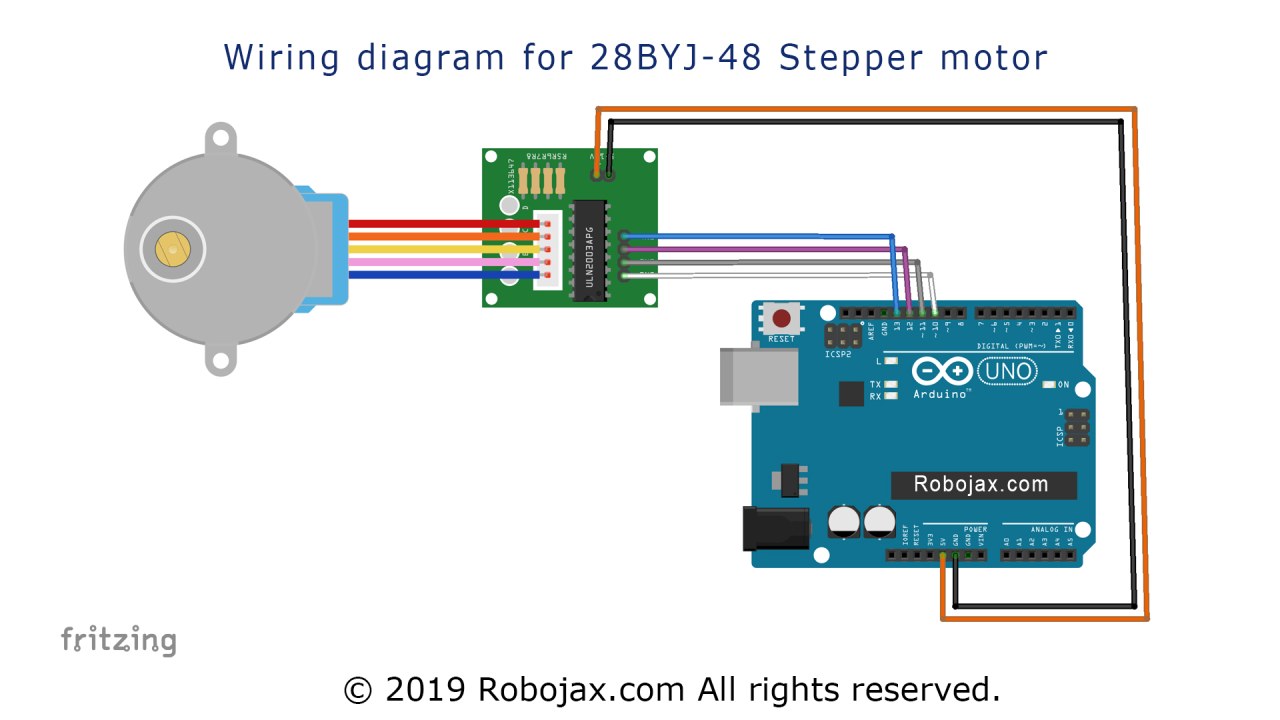
Konfiguracja sprzętowa pozostaje niezmieniona w porównaniu z Projektem 1. Silnik krokowy 28BYJ-48 jest podłączony do sterownika ULN2003, który następnie współpracuje z Arduino w następujący sposób:
-
IN1 → pin Arduino 8
-
IN2 → pin Arduino 9
-
IN3 → pin Arduino 10
-
IN4 → pin Arduino 11
-
Zasilanie i GND do ULN2003 z Arduino
Podpis: Połączenia w Projekcie 2 z użyciem ULN2003 i Arduino Uno. Ta sama konfiguracja co w Projekcie 1.

💻 Wyjaśnienie kodu
Kod wprowadza funkcję Serial.readStringUntil(), aby akceptować dane wejściowe od użytkownika z monitora szeregowego:
-
Konfiguracja silnika krokowego:
#include <Stepper.h>
const int stepsPerRevolution = 2048;
Stepper myStepper(stepsPerRevolution, 8, 10, 9, 11);
2 Inicjalizacja
void setup() {
  myStepper.setSpeed(10);
  Serial.begin(9600);
  Serial.println("Podaj kierunek: f=do przodu, r=do tyłu");
}
-
Główna pętla z danymi wejściowymi z portu szeregowego:
void loop() {
  if (Serial.available()) {
    String input = Serial.readStringUntil('\n');
    input.trim();

    if (input == "f") {
      myStepper.step(stepsPerRevolution);
    } else if (input == "r") {
      myStepper.step(-stepsPerRevolution);
    } else {
      Serial.println("Nieprawidłowe dane. Użyj 'f' lub 'r'.");
    }
  }
}-
fpowoduje jeden pełny obrót do przodu. -
rpowoduje jeden pełny obrót do tyłu.
To dodaje podstawowe sterowanie tekstowe do interaktywnego testowania silnika krokowego.
🎬 Znaczniki czasu z pełnego wideo
Odniesienie do pełnego wideo samouczka dla tego projektu znajduje się w następujących znacznikach czasu:
-
22:23 – Projekt 2: Wprowadzenie i wyjaśnienie kodu
-
32:03 – Projekt 2: Demonstracja z użyciem monitora szeregowego
📁 Sekcja pobierania
Kod i schemat połączeń dla tego projektu można pobrać poniżej. Te zasoby pomogą Ci zbudować, przetestować i dostosować silnik krokowy sterowany przez monitor szeregowy we własnych projektach.
Następny jest [Projekt 3: Sterowanie silnikiem krokowym za pomocą przycisku STPB-1].
Obrazy




Ten poradnik jest częścią: Lekcja 107 28BYJ-48 Stepper 8 Projektów
- Lekcja 107-1: Uruchamianie i zatrzymywanie silnika krokowego 28BYJ-48 z kierunkiem ustawionym w kodzie
- Lekcja 107-3: Sterowanie silnikiem krokowym 28BYJ-48 za pomocą trzech przycisków: CW, CCW i Stop (STPB-1)
- Lekcja 107-4: Sterowanie silnikiem krokowym 28BYJ-48 za pomocą dwóch przycisków, CW, CCW (przytrzymanie), STPB-2
- Lekcja 107-5: Wyślij silnik 28BYJ-48 na jeden obrót w kierunku CW lub CCW, STPB-3
- Lekcja 107-6: Sterowanie silnikiem krokowym 28BYJ-48 za pomocą trzech przycisków, z kątem i prędkością STPB-4
- Lekcja 107-7: Wysyłanie silnika krokowego 28BYJ-48 pod dowolny kąt za pomocą zdefiniowanych przycisków STPB-5
- Lekcja 107-8: Sterowanie prędkością silnika krokowego 28BYJ-48 za pomocą potencjometru
/*
* Lesson 107-2: Controlling a stepper motor from the Serial Monitor
In this lesson, we learn how to use a mini stepper motor 28BYJ-48 for our project. I am presenting eight projects
  so you can use it in almost any application. In the video, I have explained the code, shown the full wiring diagram, and
  how to connect the wires, push buttons, and breadboard.

  Project 2: We will push different keys on the keyboard and control the motor


  Project 1: Running the motor
  Project 2: Controlling a stepper motor from the Serial Monitor (this code)
  Project 3:  Controlling a stepper motor using push button STPB-1
  Project 4: Controlling using push button STPB-2  keep pressing
  Project 5: One Revolution using push button STPB-3
  Project 6: Push button for any angle and speed STPB-4
  Project 7: Using multiple buttons for any angle STPB-5 angle, speed, and direction
  Project 8: Controlling a stepper motor using a potentiometer

  * Watch video instructions for this code: https://youtu.be/TQ7R2bY-MWU
  *
  * This code is part of the Arduino Step by Step Course, which starts here:  https://youtu.be/-6qSrDUA5a8
  *
  * For the library for this code, visit http://robojax.com/
  *
 If you found this tutorial helpful, please support me so I can continue creating
 content like this. Make a donation using PayPal or a credit card: https://bit.ly/donate-robojax


  *  * This code is "AS IS" without warranty or liability. Free to be used as long as you keep this note intact.*
  * This code has been downloaded from Robojax.com
     This program is free software: you can redistribute it and/or modify
     it under the terms of the GNU General Public License as published by
     the Free Software Foundation, either version 3 of the License, or
     (at your option) any later version.

     This program is distributed in the hope that it will be useful,
     but WITHOUT ANY WARRANTY; without even the implied warranty of
     MERCHANTABILITY or FITNESS FOR A PARTICULAR PURPOSE.  See the
     GNU General Public License for more details.

     You should have received a copy of the GNU General Public License
     along with this program.  If not, see <https://www.gnu.org/licenses/>.

 */

int Pin1 = 10;//IN1 is connected to 10
int Pin2 = 11;//IN2 is connected to 11
int Pin3 = 12;//IN3 is connected to 12
int Pin4 = 13;//IN4 is connected to 13
int pole1[] ={0,0,0,0, 0,1,1,1, 0};//pole1, 8 step values
int pole2[] ={0,0,0,1, 1,1,0,0, 0};//pole2, 8 step values
int pole3[] ={0,1,1,1, 0,0,0,0, 0};//pole3, 8 step values
int pole4[] ={1,1,0,0, 0,0,0,1, 0};//pole4, 8 step values

int commandLeft  =106;// 106 is ASCII value for lowercase L (l) rotate CW
int commandStop  =107;// 107 is ASCII value for lowercase K (k) stops
int commandRight =108;// 108 is ASCII value for lowercase J (j) rotate CCW

int poleStep = 0;
int  dirStatus = 3;// stores direction status 3= stop (do not change)
int directionCommand = commandStop;
void setup()
{
 pinMode(Pin1, OUTPUT);
 pinMode(Pin2, OUTPUT);
 pinMode(Pin3, OUTPUT);
 pinMode(Pin4, OUTPUT);
  Serial.begin(9600);
  Serial.println("Robojax 28BYJ-48 Stepper");
}
 void loop()
{
  directionCommand =getCommand();
  if(directionCommand ==commandRight)
  {
    dirStatus =1;
  }else if(directionCommand ==commandLeft)
  {
   dirStatus  = 2;
  }else if(directionCommand ==commandStop)
  {
    dirStatus =3;
  }
 if(dirStatus ==1){
   poleStep++;
    driveStepper(poleStep);
 }else if(dirStatus ==2){
   poleStep--;
    driveStepper(poleStep);
 }else{
  driveStepper(8);
 }
 if(poleStep>7){
   poleStep=0;
 }
 if(poleStep<0){
   poleStep=7;
 }
 delay(1);

}// loop

void driveStepper(int c)
{
     digitalWrite(Pin1, pole1[c]);
     digitalWrite(Pin2, pole2[c]);
     digitalWrite(Pin3, pole3[c]);
     digitalWrite(Pin4, pole4[c]);
}

/*
 *
 * @brief Turns gets command from Serial monitor to control
 * direction of stepper motor
 * @param none
 * @return integer value of ASCII character
 */
int getCommand()
{
  int command =0;
        if (Serial.available() > 0) {
                command =Serial.read()  ;
        }
  //Serial.println(command);
 if(command >= commandLeft &&   command <= commandRight){
  return command;
 }else{
  return 1000;//nothing was received
 }
}//getCommand() end
Rzeczy, których możesz potrzebować
-
Amazon
-
Amazon
-
AliExpressPurchase 5 pcs 28BYJ-48 stepper motors from AliExpresss.click.aliexpress.com
Zasoby i odniesienia
-
Zewnętrzny
-
Zewnętrzny
-
Zewnętrzny
Pliki📁
Plik Fritzing
-
28BYJ-48 Stepper Motor
28BYJ-48 Stepper Motor.fzpz0.01 MB