இந்த பயிற்சி பகுதியாகும்: பாடம் 107 28BYJ-48 ஸ்டெப்பர் 8 திட்டங்கள்
இந்த காணொளியில் 8 திட்டங்கள் உள்ளன. ஒவ்வொரு திட்டத்திற்கும் தனித்தனி குறியீடு உள்ளது. மற்ற காணொளிகளுக்கான இணைப்புகள் இந்தக் கட்டுரையின் கீழே உள்ளன.
பாடம் 107-1: 28BYJ-48 ஸ்டெப்பர் மோட்டாரை குறியீட்டில் திசை அமைத்து தொடங்கவும் நிறுத்தவும்
திட்டம் 1: அடிப்படை மோட்டார் கட்டுப்பாடு – 28BYJ-48 ஸ்டெப்பர் மோட்டார்
இந்த கட்டுரை ஒரு விரிவான வீடியோ பயிற்சியின் பகுதியாகும், இது 28BYJ-48 ஸ்டெப்பர் மோட்டாரைப் பயன்படுத்தி 8 நடைமுறை திட்டங்களை நிரூபிக்கிறது. ஒவ்வொரு திட்டமும் மோட்டாரைக் கட்டுப்படுத்தும் வெவ்வேறு முறையை எடுத்துக்காட்டுகிறது, எளிய லாஜிக் முதல் சீரியல் தொடர்பு மற்றும் பயனர் இடைமுகங்கள் வரை. ஒவ்வொரு திட்டத்திற்குமான மூல குறியீடு மற்றும் வயரிங் வரைபடங்கள் உங்கள் குறிப்பு மற்றும் செயல்படுத்தலுக்காக இந்த கட்டுரையின் கீழே வழங்கப்பட்டுள்ளன.
🔧 அறிமுகம்
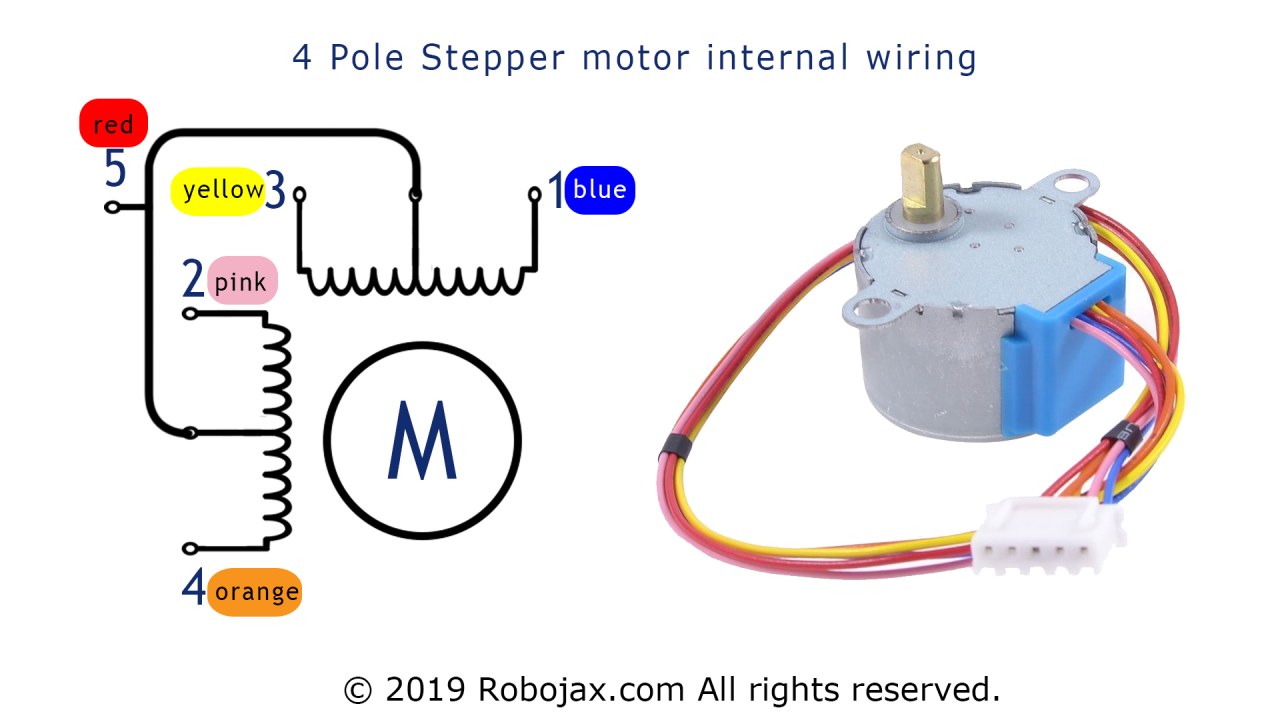
28BYJ-48 ஸ்டெப்பர் மோட்டார் ஒரு பிரபலமான, குறைந்த விலை மோட்டார் ஆகும், இது பெரும்பாலும் உட்பொதிக்கப்பட்ட அமைப்புகள், IoT திட்டங்கள் மற்றும் ஆட்டோமேஷன் பணிகளில் பயன்படுத்தப்படுகிறது. இந்த முதல் திட்டம் அடிப்படை மோட்டார் கட்டுப்பாட்டை நிரூபிப்பதன் மூலம் அடித்தளத்தை வழங்குகிறது: Arduino குறியீட்டைப் பயன்படுத்தி ஸ்டெப்பர் மோட்டாரை முன்னோக்கி மற்றும் பின்னோக்கி எவ்வாறு சுழற்றுவது.
இது தொடரில் உள்ள மேம்பட்ட திட்டங்களுக்கான கட்டுமானத் தொகுதியாக செயல்படுகிறது.
⚙️ வயரிங் வரைபடம்
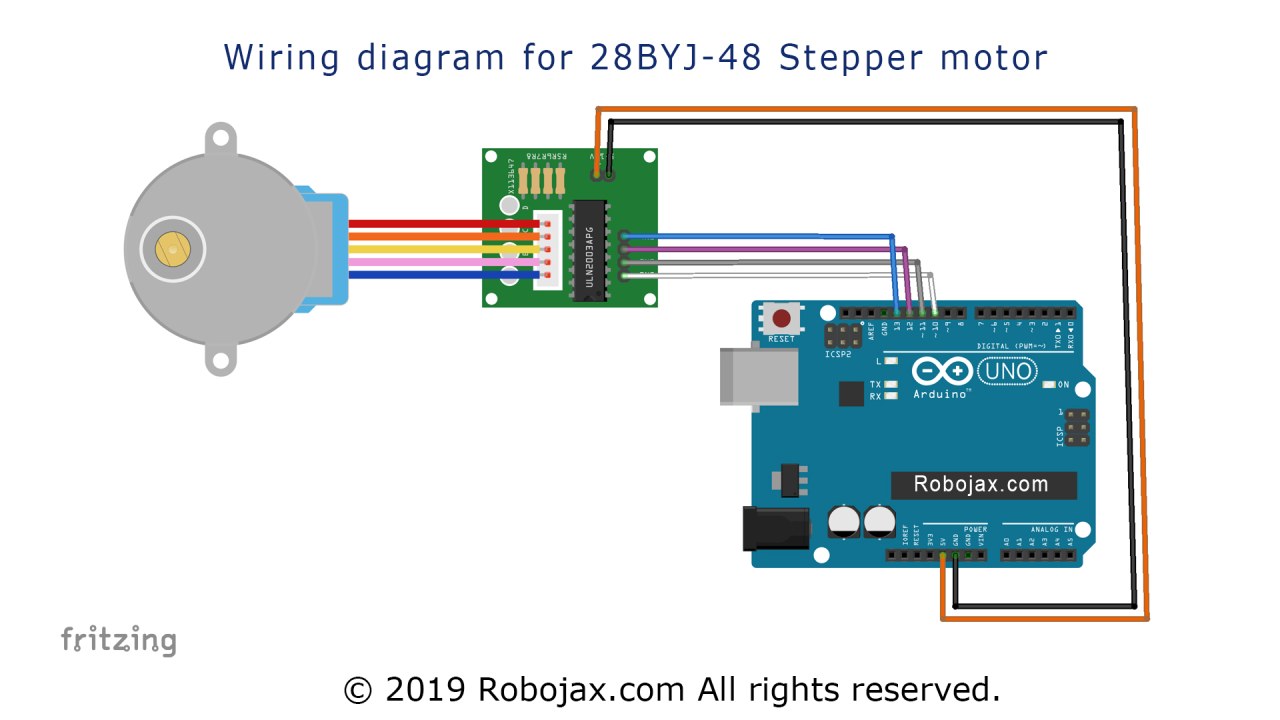
திட்டம் 1 இன் வயரிங் எளிதானது. 28BYJ-48 ஸ்டெப்பர் மோட்டார் ULN2003 டிரைவர் போர்டுடன் இணைக்கப்பட்டுள்ளது, இது பின்வருமாறு Arduino Uno உடன் இடைமுகப்படுத்துகிறது:
-
IN1 → Arduino பின் 8
-
IN2 → Arduino பின் 9
-
IN3 → Arduino பின் 10
-
IN4 → Arduino பின் 11
-
Arduino இலிருந்து ULN2003 க்கு 5V மற்றும் GND
தலைப்பு: திட்டம் 1 க்கான வயரிங் வரைபடம்: ULN2003 டிரைவரைப் பயன்படுத்தி அடிப்படை மோட்டார் கட்டுப்பாடு.
💻 குறியீடு விளக்கம்
இந்த திட்டம் Arduino IDE உடன் சேர்க்கப்பட்டுள்ள Stepper நூலகத்தைப் பயன்படுத்துகிறது. முக்கிய லாஜிக் பின்வருமாறு:
-
நூலக இறக்குமதி மற்றும் மாறிலிகள்:
#include <Stepper.h>
const int stepsPerRevolution = 2048;-
ஸ்டெப்பர் பொருள் துவக்கம்:
Stepper myStepper(stepsPerRevolution, 8, 10, 9, 11);மென்மையான செயல்பாட்டிற்காக பின் வரிசை மோட்டார் சுருள் வரிசையுடன் பொருந்துகிறது என்பதை கவனிக்கவும்.
-
செட்அப் செயல்பாடு:
void setup() {
  myStepper.setSpeed(10);
  Serial.begin(9600);
}-
வேகத்தை 10 RPM ஆக அமைக்கிறது.
-
பிழைத்திருத்தத்திற்காக சீரியல் மானிட்டரைத் தொடங்குகிறது.
-
லூப் செயல்பாடு:
void loop() {
  myStepper.step(stepsPerRevolution); // முன்னோக்கி சுழற்சி
  delay(1000);
  myStepper.step(-stepsPerRevolution); // பின்னோக்கி சுழற்சி
  delay(1000);
}-
மோட்டார் ஒரு முழு சுழற்சியை முன்னோக்கி, பின்னர் பின்னோக்கி திருப்புகிறது.
இந்த எளிய கட்டுப்பாட்டு லாஜிக் மோட்டார் செயல்பாடு மற்றும் வயரிங் ஒருமைப்பாட்டை சரிபார்க்க உதவுகிறது.
🎬 முழு வீடியோவிலிருந்து நேர முத்திரைகள்
ஆழமான காட்சி வழிகாட்டுதலுக்கு, முழு வீடியோவில் பின்வரும் புள்ளிகளைப் பார்க்கவும்:
-
00:00 – தொடக்கம்
-
02:03 – ஸ்டெப்பர் மோட்டார் அறிமுகம்
-
07:40 – மோட்டார் எவ்வாறு கட்டுப்படுத்தப்படுகிறது
-
13:08 – வயரிங் விளக்கப்பட்டது
-
15:43 – திட்டம் 1 குறியீடு
-
20:12 – திட்டம் 1 செயல்விளக்கம்
📁 பதிவிறக்கப் பிரிவு
இந்த திட்டத்திற்கான முழுமையான மூல குறியீடு மற்றும் வயரிங் வரைபடங்களுக்கான இணைப்புகள் இந்த கட்டுரையின் கீழே வழங்கப்பட்டுள்ளன.
Arduino சீரியல் மானிட்டரில் பயனர் தொடர்பு மூலம் செயல்பாட்டை விரிவுபடுத்தும் [திட்டம் 2: சீரியல் மானிட்டர் வழியாக ஸ்டெப்பர் மோட்டாரைக் கட்டுப்படுத்துதல்] க்காக காத்திருங்கள்.
படங்கள்






இந்த பயிற்சி பகுதியாகும்: பாடம் 107 28BYJ-48 ஸ்டெப்பர் 8 திட்டங்கள்
- பாடம் 107-2: சீரியல் மானிட்டர் மூலம் 28BYJ-48 ஸ்டெப்பர் மோட்டாரைக் கட்டுப்படுத்துதல்
- பாடம் 107-3: மூன்று புஷ் பட்டன்களைப் பயன்படுத்தி 28BYJ-48 ஸ்டெப்பர் மோட்டாரைக் கட்டுப்படுத்துதல்: CW, CCW, மற்றும் Stop (STPB-1)
- பாடம் 107-4: இரண்டு புஷ் பட்டன்களைப் பயன்படுத்தி 28BYJ-48 ஸ்டெப்பர் மோட்டாரைக் கட்டுப்படுத்துதல், CW, CCW (அழுத்திப் பிடிக்கவும்), STPB-2
- பாடம் 107-5: 28BYJ-48 மோட்டாரை CW அல்லது CCW திசையில் ஒரு சுழற்சிக்கு அனுப்பவும், STPB-3
- பாடம் 107-6: மூன்று புஷ் பொத்தான்களைப் பயன்படுத்தி 28BYJ-48 ஸ்டெப்பர் மோட்டாரைக் கட்டுப்படுத்துதல், கோணம் மற்றும் வேகத்துடன் STPB-4
- பாடம் 107-7: வரையறுக்கப்பட்ட STPB-5 புஷ் பொத்தான்களுடன் 28BYJ-48 ஸ்டெப்பர் மோட்டாரை எந்த கோணத்திற்கும் அனுப்புதல்
- பாடம் 107-8: பொட்டென்சியோமீட்டரைப் பயன்படுத்தி 28BYJ-48 ஸ்டெப்பர் மோட்டாரின் வேகத்தைக் கட்டுப்படுத்துதல்
//original source is http://www.geeetech.com/wiki/index.php/Stepper_Motor_5V_4-Phase_5-Wire_%26_ULN2003_Driver_Board_for_Arduino
// Update by Ahmad Shamshiri for RoboJax.com
// Published on March 27, 2017 in Ajax, ON, Canada.
/* Lesson 107-2: Reading voltage from potentiometer and saving it on microSD card
In this lesson we learn how to use mini stepper motor 28BYJ-48 for our project. I am presenting 8 projects
  so you can use it in almost any application. In the video, I have explained the code, shown the full wiring diagram and
  how to connect the wires, push buttons and breadboard.


  Project 1: Running motor (this code)
  Project 2: Controlling stepper motor from Serial Monitor
  Project 3:  Controlling stepper motor using push button STPB-1
  Project 4: Controlling using push button STPB-2  keep pressing
  Project 5: One Revolution using push button STPB-3
  Project 6: Push button Any Angle and speed STPB-4
  Project 7: using multiple buttons to any angles STPB-5 angle, speed and direction
  Project 8: Controlling stepper motor using potentiometer

  * Watch Video instruction for this code:https://youtu.be/TQ7R2bY-MWU
  *
  * This code is part of Arduino Step by Step Course which starts here:  https://youtu.be/-6qSrDUA5a8
  *
  * for library of this code visit http://robojax.com/
  *
 If you found this tutorial helpful, please support me so I can continue creating
 content like this. Make a donation using PayPal by credit card https://bit.ly/donate-robojax


  *  * This code is "AS IS" without warranty or liability. Free to be used as long as you keep this note intact.*
  * This code has been downloaded from Robojax.com
     This program is free software: you can redistribute it and/or modify
     it under the terms of the GNU General Public License as published by
     the Free Software Foundation, either version 3 of the License, or
     (at your option) any later version.

     This program is distributed in the hope that it will be useful,
     but WITHOUT ANY WARRANTY; without even the implied warranty of
     MERCHANTABILITY or FITNESS FOR A PARTICULAR PURPOSE.  See the
     GNU General Public License for more details.

     You should have received a copy of the GNU General Public License
     along with this program.  If not, see <https://www.gnu.org/licenses/>.

 */


int Pin1 = 10;
int Pin2 = 11;
int Pin3 = 12;
int Pin4 = 13;
int _step = 0;
boolean dir = true;// false=clockwise, true=counter clockwise
int count=0;
void setup()
{
 pinMode(Pin1, OUTPUT);
 pinMode(Pin2, OUTPUT);
 pinMode(Pin3, OUTPUT);
 pinMode(Pin4, OUTPUT);
}
 void loop()
{
 switch(_step){
   case 0:
     digitalWrite(Pin1, LOW);
     digitalWrite(Pin2, LOW);
     digitalWrite(Pin3, LOW);
     digitalWrite(Pin4, HIGH);
   break;
   case 1:
     digitalWrite(Pin1, LOW);
     digitalWrite(Pin2, LOW);
     digitalWrite(Pin3, HIGH);
     digitalWrite(Pin4, HIGH);
   break;
   case 2:
     digitalWrite(Pin1, LOW);
     digitalWrite(Pin2, LOW);
     digitalWrite(Pin3, HIGH);
     digitalWrite(Pin4, LOW);
   break;
   case 3:
     digitalWrite(Pin1, LOW);
     digitalWrite(Pin2, HIGH);
     digitalWrite(Pin3, HIGH);
     digitalWrite(Pin4, LOW);
   break;
   case 4:
     digitalWrite(Pin1, LOW);
     digitalWrite(Pin2, HIGH);
     digitalWrite(Pin3, LOW);
     digitalWrite(Pin4, LOW);
   break;
   case 5:
     digitalWrite(Pin1, HIGH);
     digitalWrite(Pin2, HIGH);
     digitalWrite(Pin3, LOW);
     digitalWrite(Pin4, LOW);
   break;
     case 6:
     digitalWrite(Pin1, HIGH);
     digitalWrite(Pin2, LOW);
     digitalWrite(Pin3, LOW);
     digitalWrite(Pin4, LOW);
   break;
   case 7:
     digitalWrite(Pin1, HIGH);
     digitalWrite(Pin2, LOW);
     digitalWrite(Pin3, LOW);
     digitalWrite(Pin4, HIGH);
   break;
   default:
     digitalWrite(Pin1, LOW);
     digitalWrite(Pin2, LOW);
     digitalWrite(Pin3, LOW);
     digitalWrite(Pin4, LOW);
   break;
 }
 if(dir){
   _step++;
 }else{
   _step--;
 }
 if(_step>7){
   _step=0;
 }
 if(_step<0){
   _step=7;
 }
 delay(1);

}
நீங்கள் தேவைப்படும் எண்ணங்கள்
-
அமேசான்
-
அமேசான்
-
அலிஎக்ஸ்பிரஸ்Purchase 5 pcs 28BYJ-48 stepper motors from AliExpresss.click.aliexpress.com
வளங்கள் மற்றும் மேற்கோள்கள்
-
வெளியுறுப்பு
-
வெளியுறுப்பு
-
வெளியுறுப்பு
கோப்புகள்📁
பிரிட்சிங் கோப்பு
-
28BYJ-48 Stepper Motor
28BYJ-48 Stepper Motor.fzpz0.01 MB