ይህ ትምህርት አካል ነው: ትምህርት 107 28BYJ-48 ስቴፐር 8 ፕሮጀክቶች
ይህ ቪዲዮ 8 ፕሮጀክቶች አሉት። እያንዳንዱ ፕሮጀክት የተለየ ኮድ አለው። ወደ ሌሎች ቪዲዮዎች የሚወስዱ አገናኞች ከዚህ ጽሑፍ በታች ይገኛሉ።
ትምህርት 107-1፡ የ28BYJ-48 ስቴፐር ሞተርን በኮድ ውስጥ በተቀመጠ አቅጣጫ መጀመር እና ማቆም
ፕሮጀክት 1፡ መሰረታዊ የሞተር ቁጥጥር – 28BYJ-48 እስቴፐር ሞተር
ይህ ጽሑፍ የተሟላ የቪዲዮ ትምህርት አካል ሲሆን 28BYJ-48 እስቴፐር ሞተርን በመጠቀም 8 ተግባራዊ ፕሮጀክቶችን ያሳያል። እያንዳንዱ ፕሮጀክት ሞተሩን ለመቆጣጠር የተለያዩ ዘዴዎችን ያጎላል፣ ከቀላል አመክንዮ እስከ ተከታታይ ግንኙነት እና የተጠቃሚ በይነገጽ። የምንጭ ኮድ እና የወልና ሥዕላዊ መግለጫዎች ለእያንዳንዱ ፕሮጀክት ከዚህ ጽሑፍ በታች ለማጣቀሻዎ እና ለመተግበሪያዎ ቀርበዋል።
🔧 መግቢያ
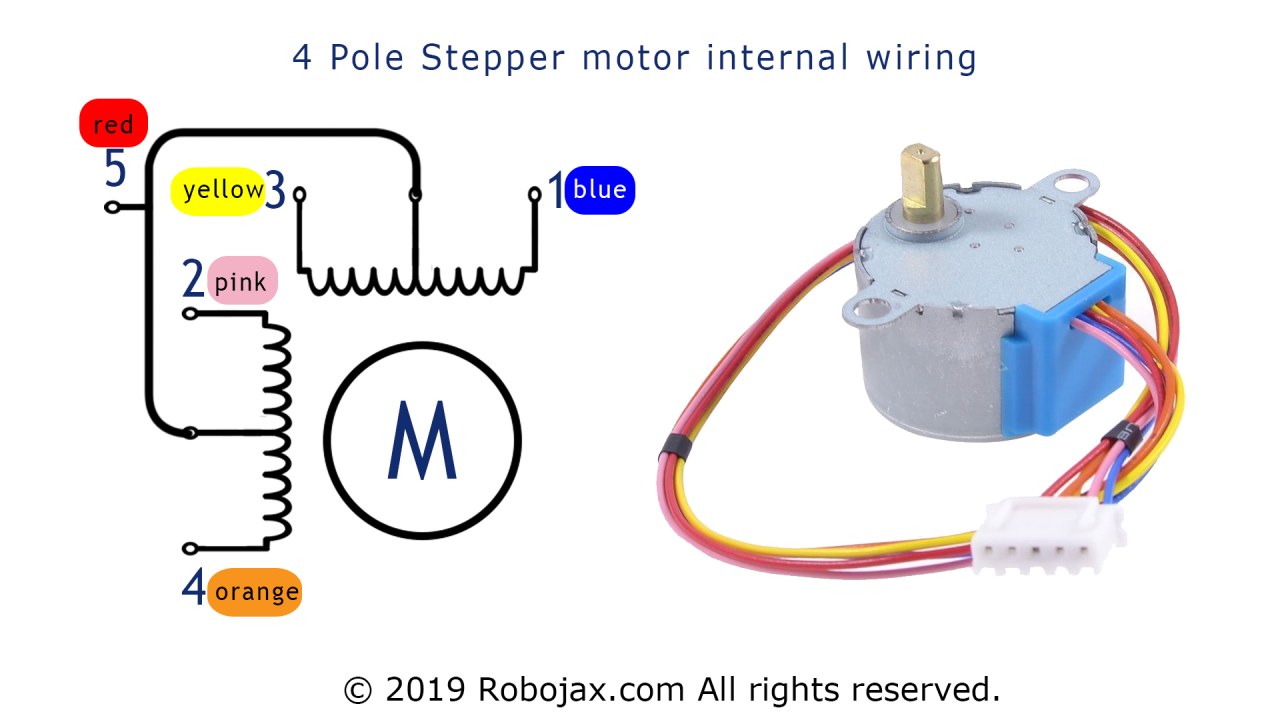
የ28BYJ-48 እስቴፐር ሞተር ታዋቂ እና አነስተኛ ዋጋ ያለው ሞተር ሲሆን ብዙ ጊዜ በተከተቱ ሲስተሞች፣ በአይኦቲ ፕሮጀክቶች እና በአውቶሜሽን ተግባራት ውስጥ ጥቅም ላይ ይውላል። ይህ የመጀመሪያ ፕሮጀክት መሰረታዊ የሞተር ቁጥጥርን በማሳየት መሰረት ይጥላል፡ የእስቴፐር ሞተሩን በአርዱኖ ኮድ ወደፊት እና ወደኋላ እንዴት ማሽከርከር እንደሚቻል።
ይህ በተከታታዩ ውስጥ ለተካተቱት የላቁ ፕሮጀክቶች መሰረታዊ ግንባታ ሆኖ ያገለግላል።
⚙️ የወልና ሥዕላዊ መግለጫ
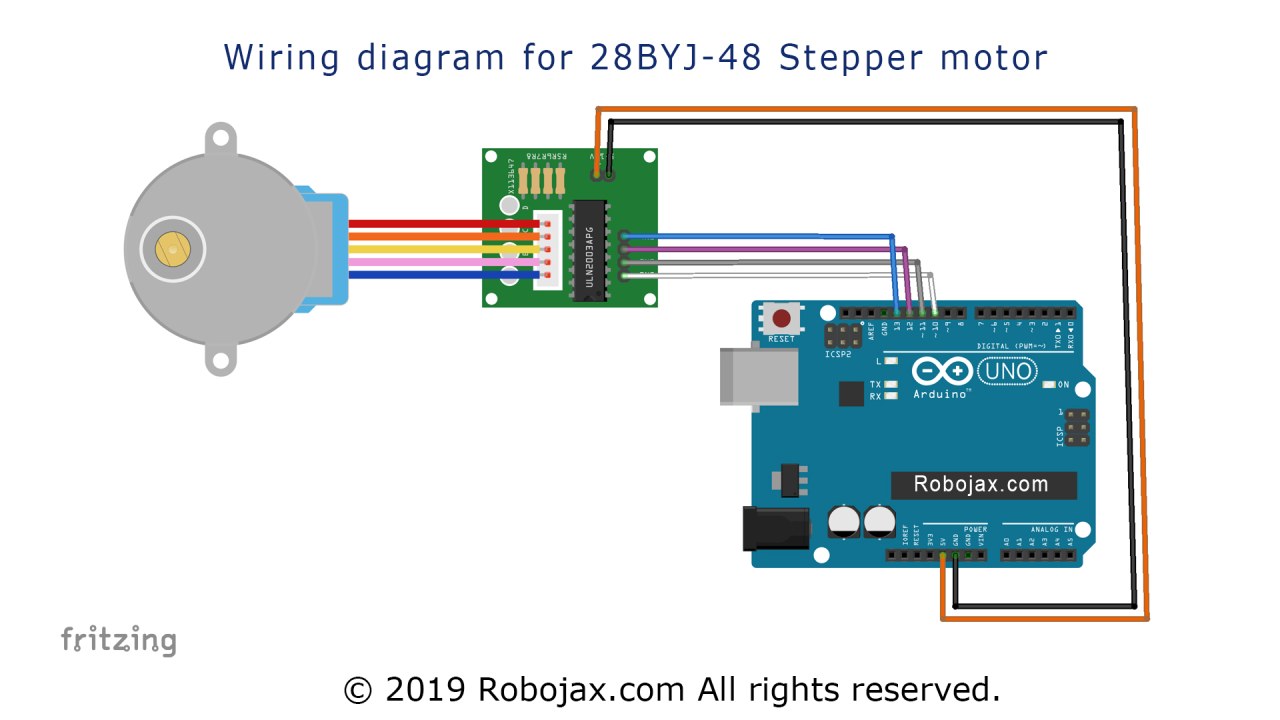
የፕሮጀክት 1 ወልና ቀላል ነው። የ28BYJ-48 እስቴፐር ሞተር ከULN2003 ሾፌር ቦርድ ጋር ይገናኛል፣ ከዚያም ከአርዱኖ ኡኖ ጋር እንደሚከተለው ይገናኛል፡
-
IN1 → የአርዱኖ ፒን 8
-
IN2 → የአርዱኖ ፒን 9
-
IN3 → የአርዱኖ ፒን 10
-
IN4 → የአርዱኖ ፒን 11
-
5V እና GND ከአርዱኖ ወደ ULN2003
መግለጫ፡ የፕሮጀክት 1 የወልና ሥዕላዊ መግለጫ፡ ULN2003 ሾፌርን በመጠቀም መሰረታዊ የሞተር ቁጥጥር።
💻 የኮድ ማብራሪያ
ይህ ፕሮጀክት ከአርዱኖ አይዲኢ ጋር የተካተተውን Stepper ቤተ-መጻሕፍት ይጠቀማል። ዋናው አመክንዮ እንደሚከተለው ነው፡
-
ቤተ-መጻሕፍት ማስመጣት እና ቋሚዎች፡
#include <Stepper.h>
const int stepsPerRevolution = 2048;-
የእስቴፐር ነገር መጀመር፡
Stepper myStepper(stepsPerRevolution, 8, 10, 9, 11);ለስላሳ አሠራር የፒን ቅደም ተከተል ከሞተሩ ጠመዝማዛ ቅደም ተከተል ጋር እንደሚዛመድ ልብ ይበሉ።
-
የሴትአፕ ተግባር፡
void setup() {
  myStepper.setSpeed(10);
  Serial.begin(9600);
}-
ፍጥነቱን ወደ 10 RPM ያዘጋጃል።
-
ለማረም የተከታታይ መቆጣጠሪያውን ይጀምራል።
-
የሉፕ ተግባር፡
void loop() {
  myStepper.step(stepsPerRevolution); // ወደፊት መሽከርከር
  delay(1000);
  myStepper.step(-stepsPerRevolution); // ወደኋላ መሽከርከር
  delay(1000);
}-
ሞተሩ አንድ ሙሉ ዙር ወደፊት ይሽከረከራል፣ ከዚያም ወደኋላ።
ይህ ቀላል የቁጥጥር አመክንዮ የሞተሩን አሠራር እና የወልና ትክክለኛነት ለማረጋገጥ ይረዳል።
🎬 ከሙሉ ቪዲዮ የጊዜ ምልክቶች
ለጥልቅ የእይታ መመሪያ፣ በሙሉ ቪዲዮው ውስጥ የሚከተሉትን ነጥቦች ይመልከቱ፡
-
00:00 – መጀመሪያ
-
02:03 – የእስቴፐር ሞተር መግቢያ
-
07:40 – ሞተሩ እንዴት እንደሚቆጣጠር
-
13:08 – የወልና ማብራሪያ
-
15:43 – የፕሮጀክት 1 ኮድ
-
20:12 – የፕሮጀክት 1 ማሳያ
📁 የማውረድ ክፍል
ለዚህ ፕሮጀክት የተሟላ የምንጭ ኮድ እና የወልና ሥዕላዊ መግለጫዎች አገናኞች ከዚህ ጽሑፍ በታች ቀርበዋል።
ለ[ፕሮጀክት 2፡ እስቴፐር ሞተርን በተከታታይ መቆጣጠሪያ መቆጣጠር] ይጠብቁ፣ በዚያም በአርዱኖ ተከታታይ መቆጣጠሪያ ውስጥ በተጠቃሚ መስተጋብር አማካኝነት ተግባራትን እናስፋፋለን።
ምስሎች






ይህ ትምህርት አካል ነው: ትምህርት 107 28BYJ-48 ስቴፐር 8 ፕሮጀክቶች
- ትምህርት 107-2፡ የ28BYJ-48 ስቴፐር ሞተርን በሴሪያል ሞኒተር መቆጣጠር
- ትምህርት 107-3፡ የ28BYJ-48 ስቴፐር ሞተርን በሶስት የግፊት አዝራሮች መቆጣጠር፡ CW፣ CCW እና ማቆም (STPB-1)
- ትምህርት 107-4፡ የ28BYJ-48 ስቴፐር ሞተርን በሁለት የግፊት አዝራሮች መቆጣጠር፣ CW፣ CCW (ተጭነው ያዙ)፣ STPB-2
- ትምህርት 107-5፡ የ28BYJ-48 ሞተርን በCW ወይም CCW አቅጣጫ ለአንድ ሙሉ ዙር መላክ፣ STPB-3
- ትምህርት 107-6፡ የ28BYJ-48 እርምጃ ሞተርን በሶስት የግፊት አዝራሮች መቆጣጠር፣ በማዕዘን እና ፍጥነት STPB-4
- ትምህርት 107-7፡ የ28BYJ-48 ስቴፐር ሞተርን በተገለጹ STPB-5 የግፊት አዝራሮች ወደ ማንኛውም አንግል መላክ
- ትምህርት 107-8፡ የ28BYJ-48 ስቴፐር ሞተርን ፍጥነት በፖቴንሺዮሜትር በመጠቀም መቆጣጠር
//original source is http://www.geeetech.com/wiki/index.php/Stepper_Motor_5V_4-Phase_5-Wire_%26_ULN2003_Driver_Board_for_Arduino
// Update by Ahmad Shamshiri for RoboJax.com
// Published on March 27, 2017 in Ajax, ON, Canada.
/* Lesson 107-2: Reading voltage from potentiometer and saving it on microSD card
In this lesson we learn how to use mini stepper motor 28BYJ-48 for our project. I am presenting 8 projects
  so you can use it in almost any application. In the video, I have explained the code, shown the full wiring diagram and
  how to connect the wires, push buttons and breadboard.


  Project 1: Running motor (this code)
  Project 2: Controlling stepper motor from Serial Monitor
  Project 3:  Controlling stepper motor using push button STPB-1
  Project 4: Controlling using push button STPB-2  keep pressing
  Project 5: One Revolution using push button STPB-3
  Project 6: Push button Any Angle and speed STPB-4
  Project 7: using multiple buttons to any angles STPB-5 angle, speed and direction
  Project 8: Controlling stepper motor using potentiometer

  * Watch Video instruction for this code:https://youtu.be/TQ7R2bY-MWU
  *
  * This code is part of Arduino Step by Step Course which starts here:  https://youtu.be/-6qSrDUA5a8
  *
  * for library of this code visit http://robojax.com/
  *
 If you found this tutorial helpful, please support me so I can continue creating
 content like this. Make a donation using PayPal by credit card https://bit.ly/donate-robojax


  *  * This code is "AS IS" without warranty or liability. Free to be used as long as you keep this note intact.*
  * This code has been downloaded from Robojax.com
     This program is free software: you can redistribute it and/or modify
     it under the terms of the GNU General Public License as published by
     the Free Software Foundation, either version 3 of the License, or
     (at your option) any later version.

     This program is distributed in the hope that it will be useful,
     but WITHOUT ANY WARRANTY; without even the implied warranty of
     MERCHANTABILITY or FITNESS FOR A PARTICULAR PURPOSE.  See the
     GNU General Public License for more details.

     You should have received a copy of the GNU General Public License
     along with this program.  If not, see <https://www.gnu.org/licenses/>.

 */


int Pin1 = 10;
int Pin2 = 11;
int Pin3 = 12;
int Pin4 = 13;
int _step = 0;
boolean dir = true;// false=clockwise, true=counter clockwise
int count=0;
void setup()
{
 pinMode(Pin1, OUTPUT);
 pinMode(Pin2, OUTPUT);
 pinMode(Pin3, OUTPUT);
 pinMode(Pin4, OUTPUT);
}
 void loop()
{
 switch(_step){
   case 0:
     digitalWrite(Pin1, LOW);
     digitalWrite(Pin2, LOW);
     digitalWrite(Pin3, LOW);
     digitalWrite(Pin4, HIGH);
   break;
   case 1:
     digitalWrite(Pin1, LOW);
     digitalWrite(Pin2, LOW);
     digitalWrite(Pin3, HIGH);
     digitalWrite(Pin4, HIGH);
   break;
   case 2:
     digitalWrite(Pin1, LOW);
     digitalWrite(Pin2, LOW);
     digitalWrite(Pin3, HIGH);
     digitalWrite(Pin4, LOW);
   break;
   case 3:
     digitalWrite(Pin1, LOW);
     digitalWrite(Pin2, HIGH);
     digitalWrite(Pin3, HIGH);
     digitalWrite(Pin4, LOW);
   break;
   case 4:
     digitalWrite(Pin1, LOW);
     digitalWrite(Pin2, HIGH);
     digitalWrite(Pin3, LOW);
     digitalWrite(Pin4, LOW);
   break;
   case 5:
     digitalWrite(Pin1, HIGH);
     digitalWrite(Pin2, HIGH);
     digitalWrite(Pin3, LOW);
     digitalWrite(Pin4, LOW);
   break;
     case 6:
     digitalWrite(Pin1, HIGH);
     digitalWrite(Pin2, LOW);
     digitalWrite(Pin3, LOW);
     digitalWrite(Pin4, LOW);
   break;
   case 7:
     digitalWrite(Pin1, HIGH);
     digitalWrite(Pin2, LOW);
     digitalWrite(Pin3, LOW);
     digitalWrite(Pin4, HIGH);
   break;
   default:
     digitalWrite(Pin1, LOW);
     digitalWrite(Pin2, LOW);
     digitalWrite(Pin3, LOW);
     digitalWrite(Pin4, LOW);
   break;
 }
 if(dir){
   _step++;
 }else{
   _step--;
 }
 if(_step>7){
   _step=0;
 }
 if(_step<0){
   _step=7;
 }
 delay(1);

}
እንደሚያስፈልግዎት ይችላል
-
አማዞን
-
አማዞን
-
አሊኤክስፕሬስPurchase 5 pcs 28BYJ-48 stepper motors from AliExpresss.click.aliexpress.com
ምንጮች እና ምንጮች
ፋይሎች📁
ፍሪትዚንግ ፋይል
-
28BYJ-48 Stepper Motor
28BYJ-48 Stepper Motor.fzpz0.01 MB