H桥 1:在面包板上使用TIP120和TIP125达林顿晶体管构建H桥电机驱动器
呢個教學會指導你點樣用TIP120同TIP125 Darlington 晶體管喺面包板上搭建一個H橋電機驅動器。呢個設置非常適合控制直流電機嘅方向同速度,對於各種機械人同自動化項目都好重要。到呢個教學結束時,你將能夠控制電機進行順時針同逆時針旋轉,仲可以調節速度。
喺呢個指南入面,我哋會用Arduino嚟控制馬達。H橋配置可以透過控制發送到晶體管嘅輸入信號嚟反轉馬達嘅方向。呢個係好多應用嘅關鍵方面,例如需要精確馬達控制嘅機械手臂或者移動機械人。想進一步了解,請參考視頻(視頻喺00:00)。
硬件解说
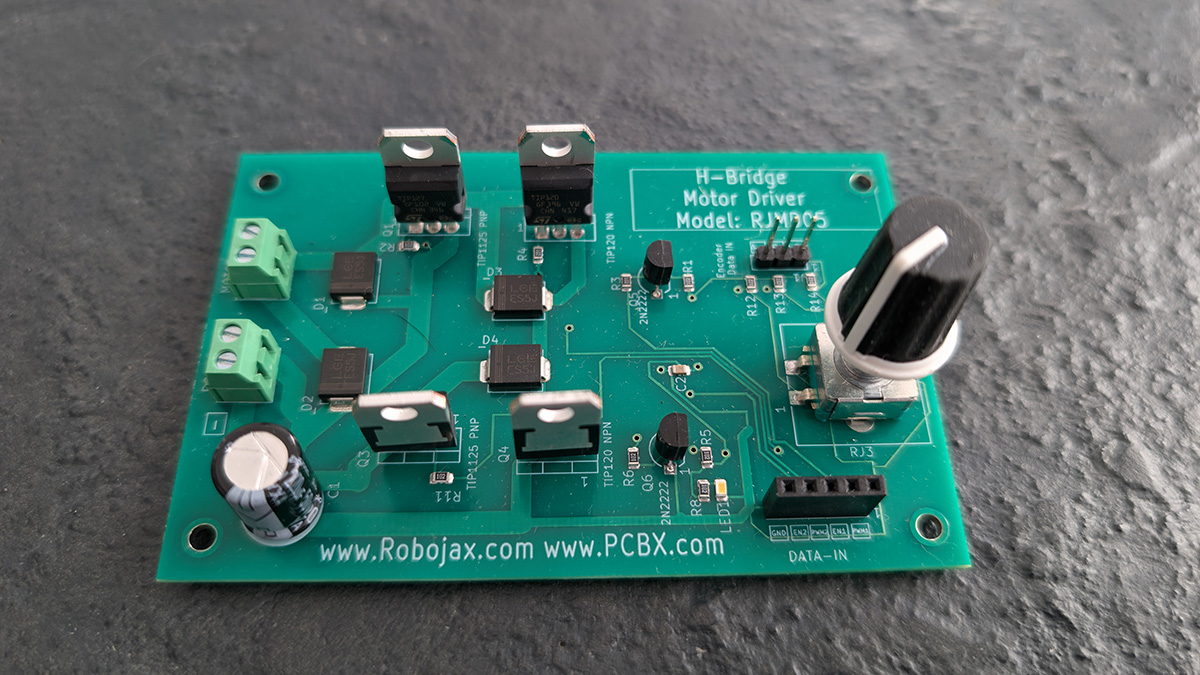
呢個項目嘅主要組件包括TIP120同TIP125晶體管,佢哋用作開關來控制馬達嘅運作。TIP120係一個NPN Darlington晶體管,而TIP125係一個PNP Darlington晶體管。佢哋一齊形成H橋配置,讓我哋可以控制流經馬達嘅電流方向。
喺呢個設置入面,PWM(脈寬調變)信號用嚟控制馬達嘅速度。晶體管快速開關,產生一個平均電壓,決定馬達嘅速度。EN 引腳用嚟啟用或禁用晶體管,確保馬達只喺需要嘅時候運行。
數據表詳情
| 製造商 | 德州仪器 |
|---|---|
| 零件號碼 | TIP120 |
| 邏輯/輸入輸出電壓 | 5-15 伏 |
| 供應電壓 | 60 伏 |
| 每個通道的輸出電流 | 5 A |
| 每個通道的峰值電流 | 30 A |
| PWM 頻率指導 | 1 kHz 最多 |
| 輸入邏輯閾值 | 2.5 V(高),0.8 V(低) |
| 電壓降 / RDS(開)/ 飽和度 | 1.2 伏 |
| 熱限制 | 175 °C |
| 包裹 | TO-220 |
| 備註 / 變體 | 可用作TIP125 |
- 確保高電流應用的適當散熱。
- 使用PWM信號有效控制馬達速度。
- 檢查晶體管方向以防止電路損壞。
- 注意電壓評級,以免超過限制。
- 使用解耦电容器来稳定电压供应。
接線指示

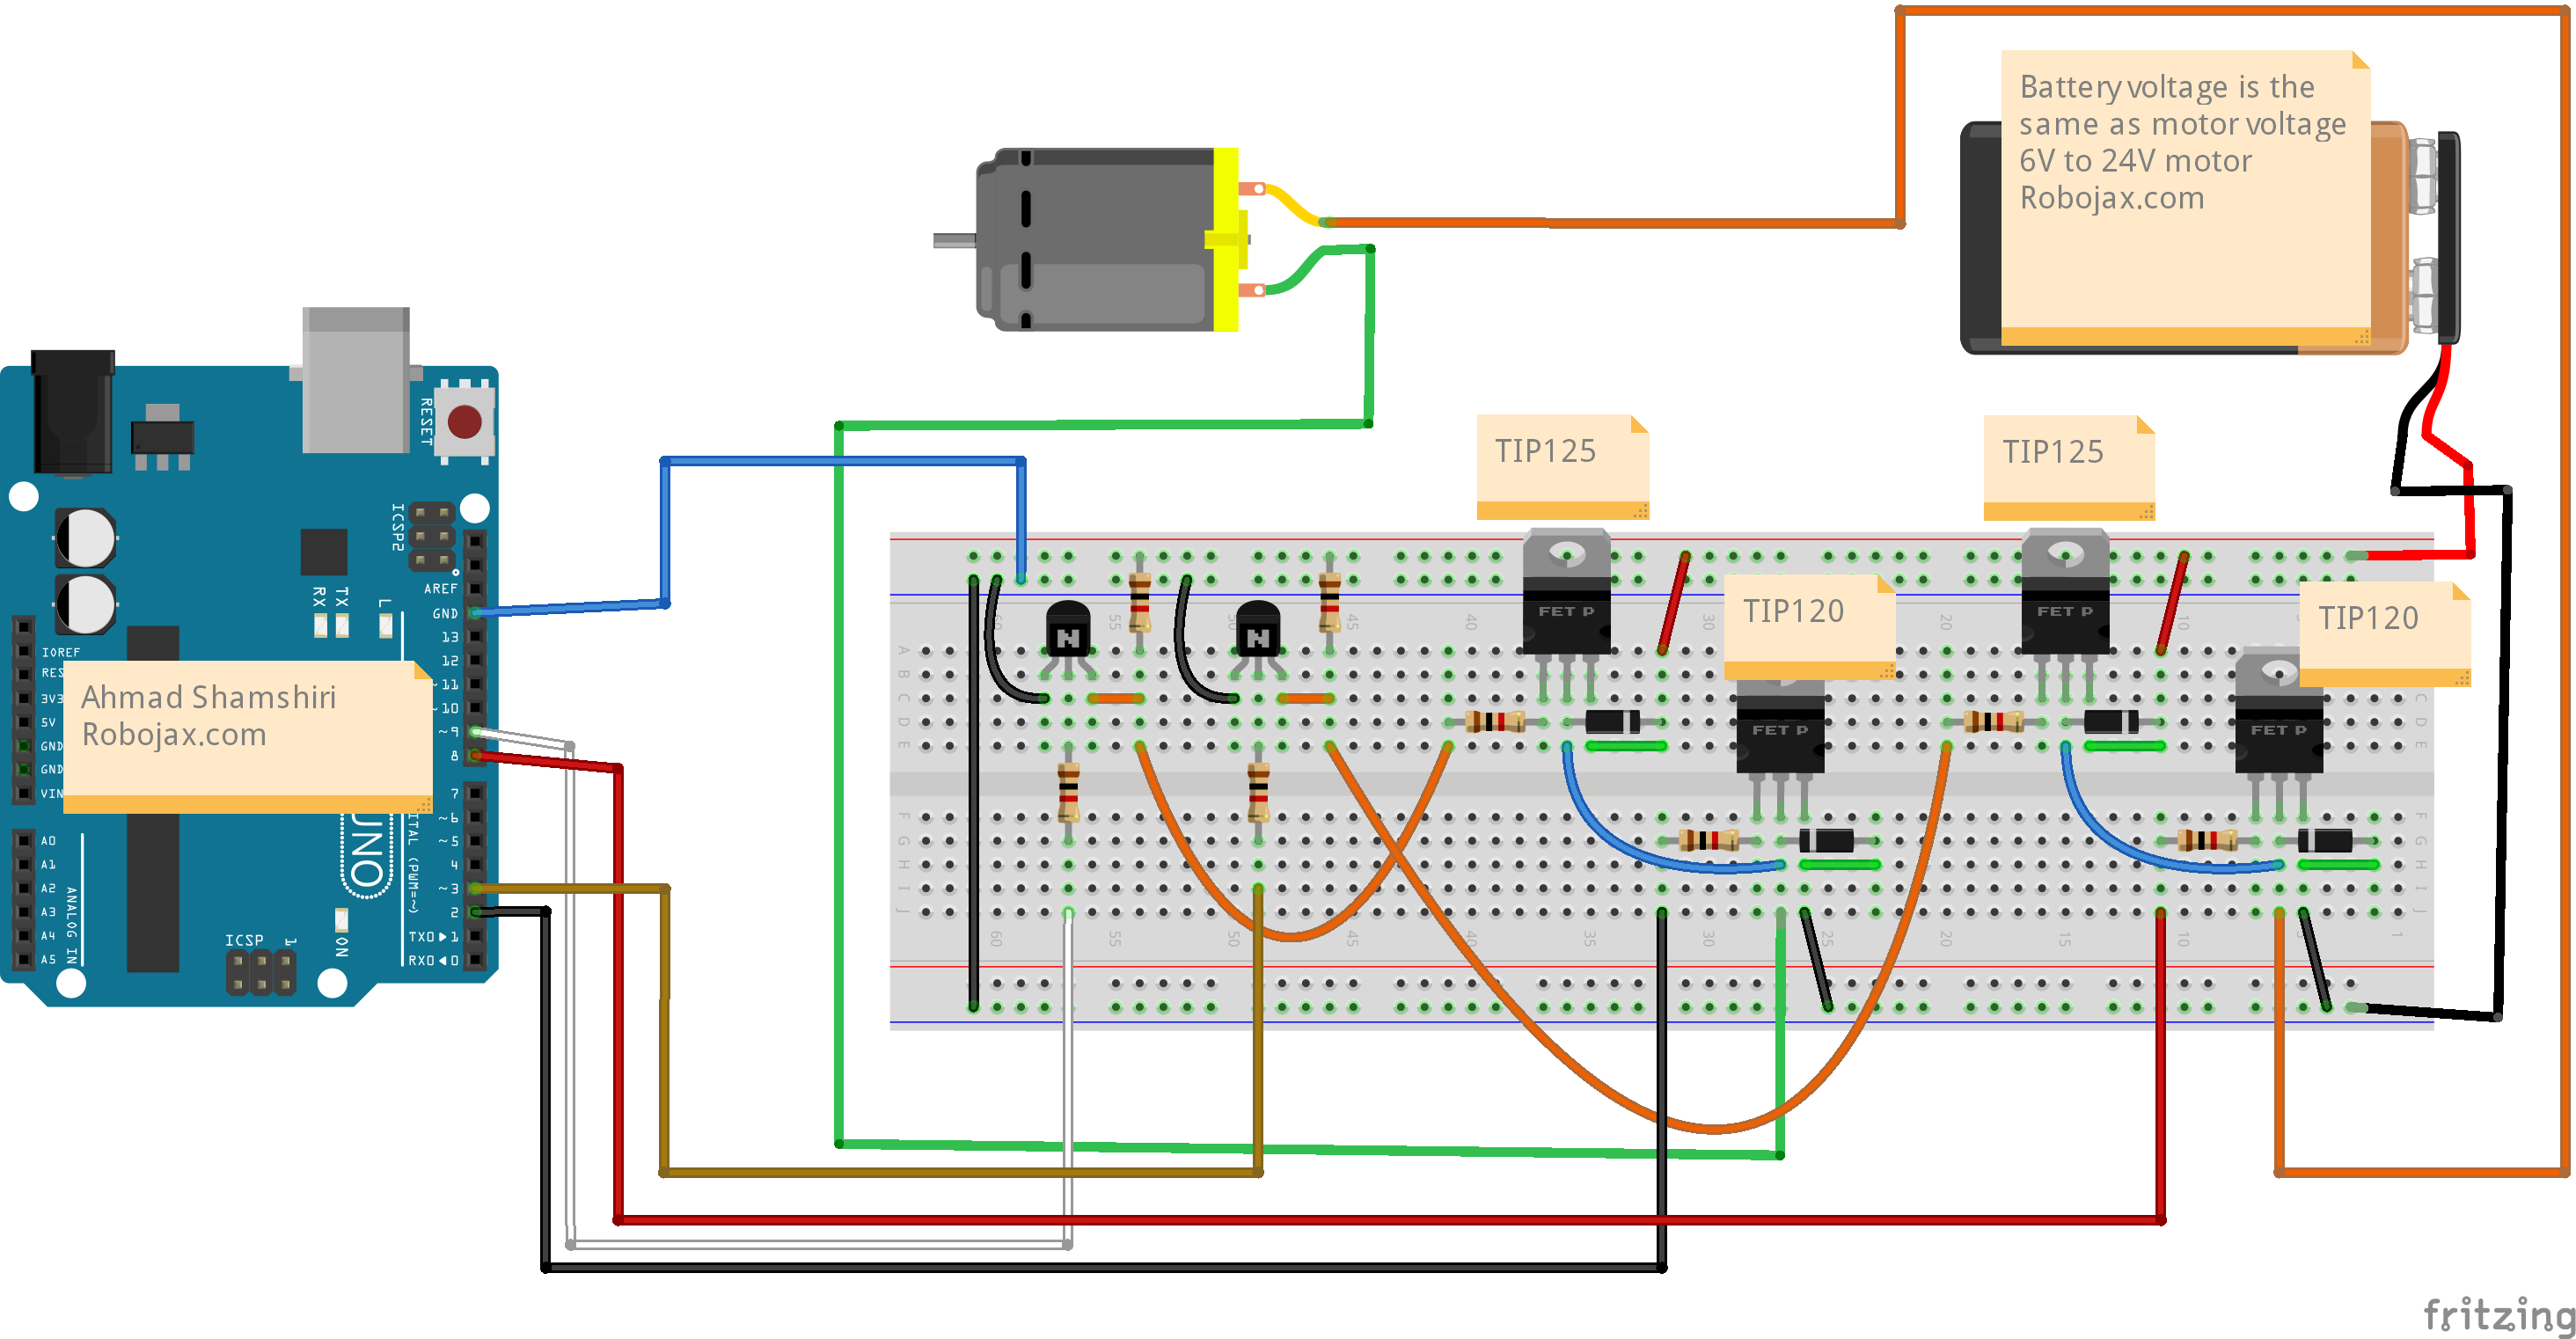
要接駁H橋電機驅動器,首先將TIP120和TIP125的VCC引腳連接到你Arduino的5V電源。將GND引腳接地。PWM控制引腳,PWM1和PWM2應該分別連接到Arduino的數字引腳9和3。使能引腳,EN1和EN2會連接到數字引腳8和2。
接住,將你嘅馬達端子連接到TIP120同TIP125晶體管嘅集電極針腳。確保馬達同你嘅電源兼容。如果使用額外元件,例如二極管作為反向保護,將佢哋並聯喺馬達端子上,以防止反向電動勢造成損壞。如果你使用唔同嘅Arduino型號,請確認PWM同啟用信號嘅針腳映射。
代碼示例及步驟說明
const int PWM1= 9; //pin with ~
const int EN1= 8;
const int PWM2= 3; //pin with ~
const int EN2= 2;
喺設置中,我哋定義咗PWM信號嘅控制針腳同啟用針腳。pinMode這個函數將這些引腳設置為輸出,以控制驅動馬達的晶體管。
void loop() {
  Motor(CW, 50); //in CW at 50% speed
  delay(5000);
  stop(); // stops the motor
  delay(2000);
}
這個循環功能展示了馬達的運作。它首先以50%速度順時針運行馬達5秒,然後停2秒。Motor函數會用方向同速度參數嚟調用,根據呢啲輸入控制馬達嘅行為。
void Motor(boolean direction, int speed=0) {
  int speedPWM = map(speed, 0, 100, 0, 255);
  if(direction) {
    analogWrite(PWM1, speedPWM); // Set speed for CW
  } else {
    analogWrite(PWM2, speedPWM); // Set speed for CCW
  }
}
TheMotor函數接受一個布爾方向和一個整數速度。它將速度百分比映射到PWM值並使用analogWrite設置適當的引腳來控制馬達。這個功能對於動態改變馬達的方向和速度至關重要。
示範 / 期待什麼
完成接線和上載代碼後,你應該會見到馬達以50%速度順時針旋轉5秒,然後停止。經過一段延遲後,它會以80%速度逆時針旋轉另外5秒。常見的陷阱包括接線不正確和超過電壓額定值,這可能會損壞晶體管或馬達。
視頻時間戳
- 00:00- 介紹
- 01:30- 硬件概述
- 03:15- 接線指示
- 05:00- 代碼演示
- 08:45- 示範
圖片

/*
This code is for:
Building an H-Bridge Motor driver using TIP120 and TIP125 on a breadboard and full PCB Design with Arduino
https://youtu.be/6ugrL5ziPn8

This code has been downloaded from Robojax.com
You can access the resources page and download the Gerber file to produce
the PCB or a fully assembled PCB from PCBX.com
Visit https://robojax.com/tutorial_view.php?id=392
to control a DC motor using TIP120 and TIP125 as an
H bridge
Written by Ahmad Shamshiri
26 Aug 2024
*/
const int PWM1= 9;//pin with ~
const int EN1= 8;

const int PWM2= 3;//pin with ~
const int EN2= 2;

const boolean CW =1;
const boolean CCW =0;

void Motor(boolean, int);//prototype
void brake();//prototype

void setup() {
  Serial.begin(9600);
  Serial.println("TIP120 H Bridge by Robojax");
  pinMode(PWM1, OUTPUT);
  pinMode(EN1, OUTPUT);

  pinMode(PWM2, OUTPUT);
  pinMode(EN2, OUTPUT);

}

void loop() {
  Motor(CW, 50);//in CW at 50% speed
  delay(5000);

  stop();
  delay(2000);

  Motor(CCW, 80);//in CCW at 80% speed
  delay(5000);

  brake();
  delay(2000);

  for (int i=0; i<=100; i++)
  {
   Motor(CCW, i);
   delay(25);
  }
    delay(5000);

  brake();
  delay(2000);
}

/*
stop()
stops the output
*/
void stop()
{
    Serial.println ("=== Stop");
  digitalWrite(PWM1, LOW);
  digitalWrite(EN1, LOW);
  digitalWrite(PWM2, LOW);
  digitalWrite(EN2, LOW);
}

/*
brake()
*/
void brake()
{
    Serial.println ("=== Brake");
  digitalWrite(PWM1, HIGH);
  digitalWrite(EN1, LOW);
  digitalWrite(PWM2, HIGH);
  digitalWrite(EN2, LOW);
}

void Motor(boolean direction, int speed=0)
{
  int speedPWM = map(speed, 0, 100, 0, 255);
  Serial.print("Speed: "); Serial.print (speedPWM);
  Serial.print ("(");Serial.print (speed);Serial.print ("%)");


  if(direction){
    Serial.print(" dir: ");Serial.println ("CW");
      analogWrite(PWM1, speedPWM);
    digitalWrite(EN1, HIGH);
    digitalWrite(PWM2, LOW);
    digitalWrite(EN2, LOW);
  }else{
    Serial.print(" dir: ");Serial.println ("CCW");
    digitalWrite(PWM1, LOW);
    digitalWrite(EN1, LOW);
      analogWrite(PWM2, speedPWM);
    digitalWrite(EN2, HIGH);
  }

}
資源與參考資料
文件📁
Gerber files
-
H-Bridge-TIP120-TIP125 Gerber file for PCBXIncludes H-Bridge-TIP120-TIP125.zip, H-Bridge-TIP120-TIP125-BOM.xls and H-Bridge-TIP120-TIP125-coor.xls files to place order easily.
H-Bridge-TIP120-TIP125 Gerber file.zip0.05 MB