This tutorial is part of: Controlling 16 or 32 Servo motor with PCA9685
These collection of tutorial with video help you control 32 or more servo motors using Arduino UNO, Nano, Mini or ESP32 . All codes provided

Control 32 Servos over Wi-Fi Using ESP32 and PCA9685 via Desktop or Mobile Phone V5
In this tutorial, we will learn how to control 32 servo motors using the PCA9685 PWM controller module connected to the ESP32 over Wi-Fi. This setup allows you to control each servo individually or all at once through a web interface accessible from a desktop or mobile device. By the end of this guide, you will have a fully functional system capable of managing multiple servos with ease.

The PCA9685 module provides a simple way to control multiple servos using PWM signals, while the ESP32 handles the Wi-Fi communication and web server functionality. You'll be able to adjust the angle of each servo motor through a user-friendly interface that displays buttons for each servo. For a visual reference, be sure to check out the video (in video at 00:00).
Hardware Explained
This project primarily uses the ESP32 microcontroller and the PCA9685 PWM controller. The ESP32 is a powerful microcontroller with built-in Wi-Fi capabilities, making it ideal for IoT projects. The PCA9685 is a 16-channel PWM controller that can be cascaded to control up to 64 servos. It communicates with the ESP32 via the I2C protocol, allowing multiple controllers to be connected and addressed individually.
Each PCA9685 module has a default I2C address of 0x40. When using multiple modules, you can change their addresses by soldering specific jumpers. For instance, the first module can be at 0x40, the second at 0x41, and so on. This cascading capability enables the control of many servos without needing additional pins on the ESP32.
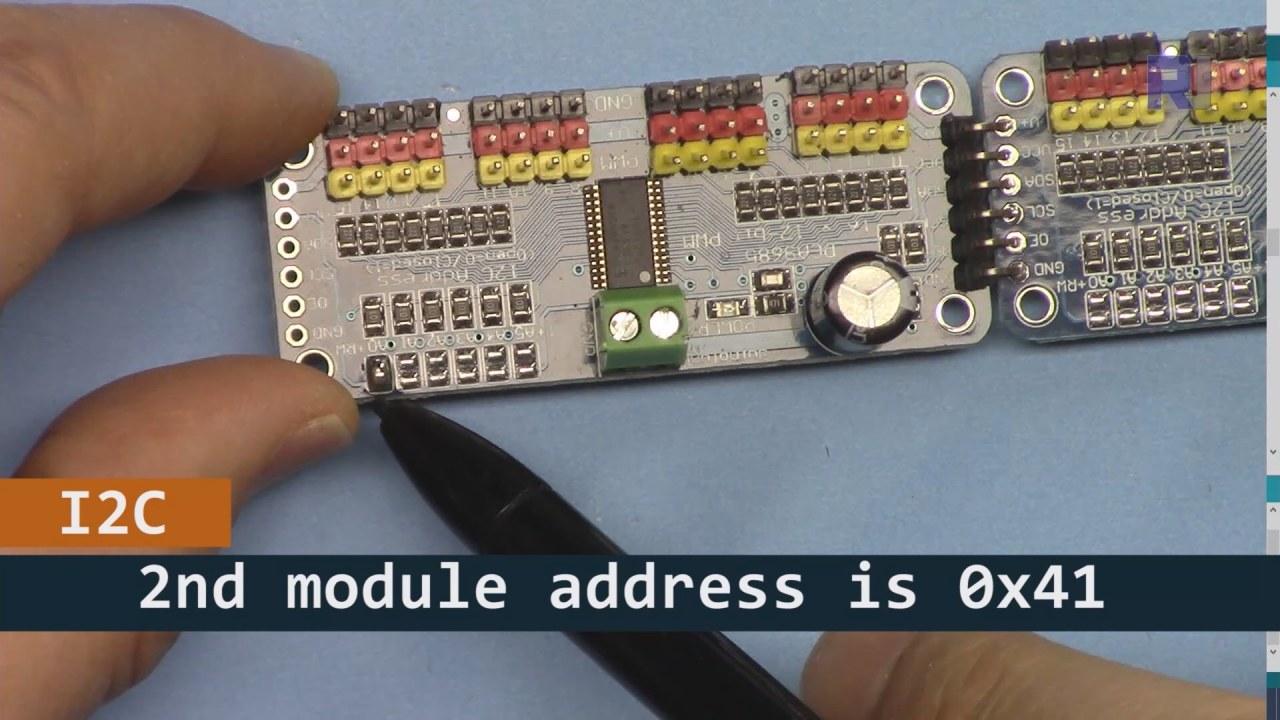
As shown in the image bove, for PCA9685 board 2 (on the left), make sure to solder that path to set I2C address so it is different from board 1 (on the righ).
Datasheet Details
| Manufacturer | Adafruit |
|---|---|
| Part number | PCA9685 |
| Logic/IO voltage | 2.3 V to 5.5 V |
| Supply voltage | 2.3 V to 5.5 V |
| Output current (per channel) | 25 mA |
| Peak current (per channel) | 100 mA |
| PWM frequency guidance | 40 Hz to 1000 Hz |
| Input logic thresholds | 0.3 Vcc (low) / 0.7 Vcc (high) |
| Voltage drop / RDS(on) / saturation | 0.5 V max |
| Thermal limits | 125 °C max |
| Package | TSSOP-28 |
| Notes / variants | Up to 64 servos with cascading |
- Ensure proper power supply (5V, 2A recommended).
- Use pull-up resistors on SDA and SCL lines if needed.
- Check I2C addresses carefully when using multiple PCA9685 modules.
- Consider heat-sinking for high-power applications.
- Test servos individually to ensure correct operation.
Common I2C pin mappings: SDA = GPIO 21, SCL = GPIO 22.
Wiring Instructions

To wire the PCA9685 and ESP32, start by connecting the power and ground. Connect the positive terminal (V+) of the PCA9685 to the 5V output of your power supply. Connect the ground (GND) of the PCA9685 to the ground of the ESP32. Make sure both devices share a common ground.
Next, for the I2C communication, connect the SDA pin of the PCA9685 to GPIO 21 on the ESP32 and the SCL pin to GPIO 22. If you are using multiple PCA9685 modules, ensure that they are appropriately addressed by soldering the A0 jumper to change the address of the second module to 0x41, and so forth. After that, you can connect the servo motors to the PWM output pins of the PCA9685 as required.
Code Examples & Walkthrough
The code begins by including necessary libraries and initializing two PCA9685 boards. The identifiers such as maximumServo and servoAngle define the number of servos and the current angle, respectively.
Adafruit_PWMServoDriver board1 = Adafruit_PWMServoDriver(0x40);
Adafruit_PWMServoDriver board2 = Adafruit_PWMServoDriver(0x41);
int maximumServo = 32; // how many servos are connected
This excerpt shows the initialization of the PCA9685 objects with their respective addresses. The variable maximumServo sets the total number of servos that can be controlled.
In the setup() function, the boards are initialized, and the Wi-Fi connection is established. The initial position of all servos is set using a loop.
void setup() {
  board1.begin();
  board2.begin();
  board1.setPWMFreq(60);  // Analog servos run at ~60 Hz updates
  board2.setPWMFreq(60);
  //initial position of all servos
  for(int i=0; i < maximumServo; i++) {
    if(i < 16) {
      board1.setPWM(i, 0, angleToPulse(allServoPosition[i]));
    } else {
      board2.setPWM(i-15, 0, angleToPulse(allServoPosition[i]));
    }
  }
}
This code configures the PCA9685 boards and sets the PWM frequency. It initializes all servos to their starting positions, which are defined in the allServoPosition array.
Finally, the main loop handles incoming client requests to control the servos based on user input.
void loop() {
  server.handleClient();
  if (buttonPushed && (servoNumber >= 0 && servoNumber < maximumServo)) {
    if (servoNumber < 16) {
      board1.setPWM(servoNumber, 0, angleToPulse(allServoPosition[servoNumber]));
    } else {
      board2.setPWM(servoNumber-15, 0, angleToPulse(allServoPosition[servoNumber]));
    }
  }
  buttonPushed = 0;
}
This loop continuously processes client requests and updates the servo positions based on the button pressed. The variable buttonPushed is reset after each action to ensure proper control.
For the complete code, please refer to the section below the article.
Demonstration / What to Expect
Once everything is set up, you should be able to control each servo individually or all at once from a web interface. You can adjust the angles of the servos by clicking the buttons corresponding to each servo on your device. The system should respond quickly, but keep in mind that power limitations can affect performance (in video at 14:30).
Common pitfalls include ensuring that the I2C addresses are correctly assigned and that sufficient power is provided to the servos. If the servos are not responding, double-check your wiring and connections.
Video Timestamps
- 00:00 Start
- 01:19 Introduction
- 02:32 Setting I2C address
- 05:07 Wiring explained
- 07:44 Preparing Arduino IDE for ESP32
- 09:53 Arduino code explained
- 25:49 Demonstration on desktop
- 31:52 Demonstration on mobile phone
Images


This tutorial is part of: Controlling 16 or 32 Servo motor with PCA9685
- Arduino Code and Video for PCA9685 16-Channel 12-Bit Servo Controller V1
- Control 16 Servo Motors Using a PCA9685 Module and Arduino V2 Sketch #1: One-by-One
- Controlling 16 Servo Motors Using a PCA9685 Module and Arduino V2 Sketch: Individual Servo Control
- Controlling 16 Servo Motors Using a PCA9685 Module and Arduino V2 Sketch #3: All Servos Together
- Controlling a 32 Servo Motor Using a PCA9685 Module and Arduino V3 Sketch #1: All Servos Together
- Controlling a 32 Servo Motor Using a PCA9685 Module and an ESP32 V4
/*
* Original PCA9685 Module library source: https://github.com/adafruit/Adafruit-PWM-Servo-Driver-Library
 *
 * This is the Arduino code PCA6985 32 channel servo controller
 * to control 32 Servo Motors over WiFi using ESP32 MCU
 *  get this code and wiring from for this video:  http://robojax.com/RJT365

 * Watch video for this code:  https://youtu.be/bvqfv-FrrLM
 *
 * Related Videos
V4 video of PCA9685 32 Servo with ESP32: https://youtu.be/JFdXB8Za5Os
V3 video of PCA9685 how to control 32 Servo motors https://youtu.be/6P21wG7N6t4
V2 Video of PCA9685 3 different ways to control Servo motors: https://youtu.be/bal2STaoQ1M
V1 Video introduction to PCA9685 to control 16 Servo  https://youtu.be/y8X9X10Tn1k
 *
 * Written by Ahmad Shamshiri for Robojax Video channel www.Robojax.com
 * Date: Feb 17, 2020, in Ajax, Ontario, Canada


or make donation using PayPal http://robojax.com/L/?id=64

 *  * This code is "AS IS" without warranty or liability. Free to be used as long as you keep this note intact.*
 * This code has been download from Robojax.com
    This program is free software: you can redistribute it and/or modify
    it under the terms of the GNU General Public License as published by
    the Free Software Foundation, either version 3 of the License, or
    (at your option) any later version.

    This program is distributed in the hope that it will be useful,
    but WITHOUT ANY WARRANTY; without even the implied warranty of
    MERCHANTABILITY or FITNESS FOR A PARTICULAR PURPOSE.  See the
    GNU General Public License for more details.

    You should have received a copy of the GNU General Public License
    along with this program.  If not, see <https://www.gnu.org/licenses/>.
 */
////////////////////// PCA9685 settings started
#include <Wire.h>

#include <Adafruit_PWMServoDriver.h>

// called this way, it uses the default address 0x40
Adafruit_PWMServoDriver board1 = Adafruit_PWMServoDriver(0x40);
Adafruit_PWMServoDriver board2 = Adafruit_PWMServoDriver(0x41);
int maximumServo = 32;//how many servos are connected

// Depending on your servo make, the pulse width min and max may vary, you
// want these to be as small/large as possible without hitting the hard stop
// for max range. You'll have to tweak them as necessary to match the servos you
// have!
// Watch video V1 to understand the two lines below: http://youtu.be/y8X9X10Tn1k
#define SERVOMIN  125 // this is the 'minimum' pulse length count (out of 4096)
#define SERVOMAX  575 // this is the 'maximum' pulse length count (out of 4096)

int servoAngle =0;
int servoStep = 10;

int stepDelay = 50;// 50 milliseconds
int servoAngleMin =0;
int servoAngleMax = 180;

// minimum angle of each servo
int allServoMin[]={
      0,    0,    0,    0,    0,    0,    0,    0,// 1 to 8
      0,    0,    0,    0,    0,    0,    0,    0,//9 to 16
      0,    0,    0,    0,    0,    0,    0,    0,//17 to 24
      0,    0,    0,    0,    0,    0,    0,    0};//25 to 32

//maximum value of each servo
int allServoMax[]={
      180,    180,    180,    180,    180,    180,    180,    180,// 1 to 8
      180,    180,    180,    180,    180,    180,    180,    180,//9 to 16
      180,    180,    180,    180,    180,    180,    180,    180,//17 to 24
      180,    180,    180,    180,    180,    180,    180,    180};//25 to 32

// initial position of servos
int allServoPosition[] ={
      0,    0,    0,    0,    0,    0,    0,    0,// 1 to 8
      0,    0,    0,    0,    0,    0,    0,    0,//9 to 16
      0,    0,    0,    0,    0,    0,    0,    0,//17 to 24
      0,    0,    0,    0,    0,    0,    0,    0};//25 to 32

int servoNumber = 100;//servo to move
int buttonPushed =0;
int allServo =0;

void handleServo();//this is prototype of function defined at the end of this code
int angleToPulse(int ang); //this is prototype of function defined at the end of this code
////////////////////////PCA9685 ended

#include "PCA9684_32Servo_ESP32.h"

#include <WiFi.h>
#include <WiFiClient.h>
#include <WebServer.h>
#include <ESPmDNS.h>

const char *ssid = "Robojax";
const char *password = "YouTube2020";

WebServer server(80);

const int led = 13;


/////////////////////////////////////
void handleRoot() {

String HTML_page = pageHeader_p1;

 if(allServo)
 {
 HTML_page.concat("<div class=\"btn\"><a class=\"angleButton colorAll\"  href=\"/servo?do=stop\">Stop Servo</a></div>");

 }else{
 HTML_page.concat("<div class=\"btn\"><a class=\"angleButton colorAll\"  href=\"/servo?do=all\">All Servo</a></div>");
 }

 for (int i=0; i < maximumServo; i++)
 {

  HTML_page.concat("<div class=\"btn\"><a class=\"angleButton colorBtn\"  href=\"/servo?move=");
  HTML_page.concat(i);
  HTML_page.concat("\">SRV ");
  HTML_page.concat(i+1);
  HTML_page.concat(" </a></div>");
 }

 HTML_page.concat("</body>\n</html>");
 server.send(200, "text/html", HTML_page);
}

void handleNotFound() {
  digitalWrite(led, 1);
  String message = "File Not Found\n\n";
  message += "URI: ";
  message += server.uri();
  message += "\nMethod: ";
  message += (server.method() == HTTP_GET) ? "GET" : "POST";
  message += "\nArguments: ";
  message += server.args();
  message += "\n";

  for (uint8_t i = 0; i < server.args(); i++) {
    message += " " + server.argName(i) + ": " + server.arg(i) + "\n";
  }

  server.send(404, "text/plain", message);
  digitalWrite(led, 0);
}


void setup() {
  board1.begin();
  board2.begin();
  board1.setPWMFreq(60);  // Analog servos run at ~60 Hz updates
  board2.setPWMFreq(60);
  //initial position of all servos
  for(int i=0; i < maximumServo; i++) {
    if(i < 16)
    {
      board1.setPWM(i, 0, angleToPulse(allServoPosition[i]) );
    }else{
      board2.setPWM(i-15, 0, angleToPulse(allServoPosition[i]) );
    }
  }//for end

    Serial.begin(115200);
    Serial.println("32 channel Servo test!");


  //Servo control using ESP32 from Robojax.com

  WiFi.mode(WIFI_STA);
  WiFi.begin(ssid, password);
  Serial.println("");


  // Wait for connection
  while (WiFi.status() != WL_CONNECTED) {
    delay(500);
    Serial.print(".");
  }

  Serial.println("");
  Serial.print("Connected to ");
  Serial.println(ssid);
  Serial.print("IP address: ");
  Serial.println(WiFi.localIP());


  if (MDNS.begin("robojaxESP32")) {
    Serial.print("MDNS responder started at http://");
    Serial.println("robojaxESP32");
  }

  server.on("/", handleRoot);
  server.on("/servo", HTTP_GET, handleServo);

  server.onNotFound(handleNotFound);
  server.begin();
  Serial.println("HTTP server started");
}

void loop() {
	server.handleClient();
  if(allServo ){

    for( int angle =servoAngleMin; angle <= servoAngleMax; angle +=servoStep){
      for(int i=0; i<16; i++)
        {

            board2.setPWM(i, 0, angleToPulse(angle) );
            board1.setPWM(i, 0, angleToPulse(angle) );
        }
        delay(stepDelay);
    }

// robojax PCA9865 32 channel Servo control
  delay(100);

  }//if pushed
  if(false){
  Serial.print("Servo #");
  Serial.print (servoNumber);
  Serial.print(" Angle ");
  Serial.println(allServoPosition[servoNumber]);
  }


  if( buttonPushed && (servoNumber >=0 && servoNumber < maximumServo) ){
    if(servoNumber < 16)
    {
      board1.setPWM(servoNumber, 0, angleToPulse(allServoPosition[servoNumber]) );
    }else{
      board2.setPWM(servoNumber-15, 0, angleToPulse(allServoPosition[servoNumber]) );
    }
  }

   buttonPushed =0;
}


/*
 * handleServo()
 * update the buttonPushed varialbe
 * returns nothing
 * Written by Ahmad Shamshiri on Dec 29, 2019
 * www.Robojax.com
 * http://youTube.com/robojaxTV
 */
void handleServo() {
  if(server.arg("do") == "all" )
  {
    allServo =1;

  }else{
    allServo =0;
  }
   int servoNumberRequested= server.arg("move").toInt();

  if(servoNumberRequested >=0 && servoNumberRequested < maximumServo)
  {

    buttonPushed = 1;
    if(allServoPosition[servoNumberRequested] == allServoMin[servoNumberRequested] ) {
     allServoPosition[servoNumberRequested] = allServoMax[servoNumberRequested];
    }else{
     allServoPosition[servoNumberRequested] = allServoMin[servoNumberRequested];
    }
    servoNumber =servoNumberRequested;
  }

  handleRoot();
}//handleServo() end


/*
 * angleToPulse(int ang)
 * gets angle in degree and returns the pulse width
 * also prints the value on seial monitor
 * written by Ahmad Shamshiri for Robojax, Robojax.com
 */
int angleToPulse(int ang){
   int pulse = map(ang,0, 180, SERVOMIN,SERVOMAX);// map angle of 0 to 180 to Servo min and Servo max
   //Serial.print("Angle: ");Serial.print(ang);
   //Serial.print(" pulse: ");Serial.println(pulse);
   return pulse;
}
Things you might need
-
AmazonPurchase PCA9685 from Amazonamzn.to
-
AmazonServo motor on Amazonamzn.to
-
eBayPurchase PCA9685 from eBayebay.us
-
AliExpressPurchase PCA9685 from AliExpresss.click.aliexpress.com
-
AliExpressPurchase SG90 Servo motor 180 or 360 from AliExpresss.click.aliexpress.com
-
BanggoodPurchase PCA9685 from Bangoodbanggood.com
Resources & references
-
ExternalPAC9685 Library (from GitHub)github.com
Files📁
No files available.