如何使用YYNMOS-4四通道MOSFET控制5A至20A的直流电动机或LED灯条
在本教程中,我们将探索如何使用YYNMOS-4四通道MOSFET模块控制各种直流负载,如电动机和LED灯条。该模块使您能够有效管理灯光的亮度或电动机的速度。凭借其处理5A到20A负载的能力,它可以成为您电子项目中的重要组成部分。

我们将把MOSFET模块连接到Arduino,从而通过PWM(脉宽调制)控制负载。这种方法使我们能平滑控制电动机和灯的操作。对于视觉指导,我建议观看相关视频(视频在00:00)。
硬件解释
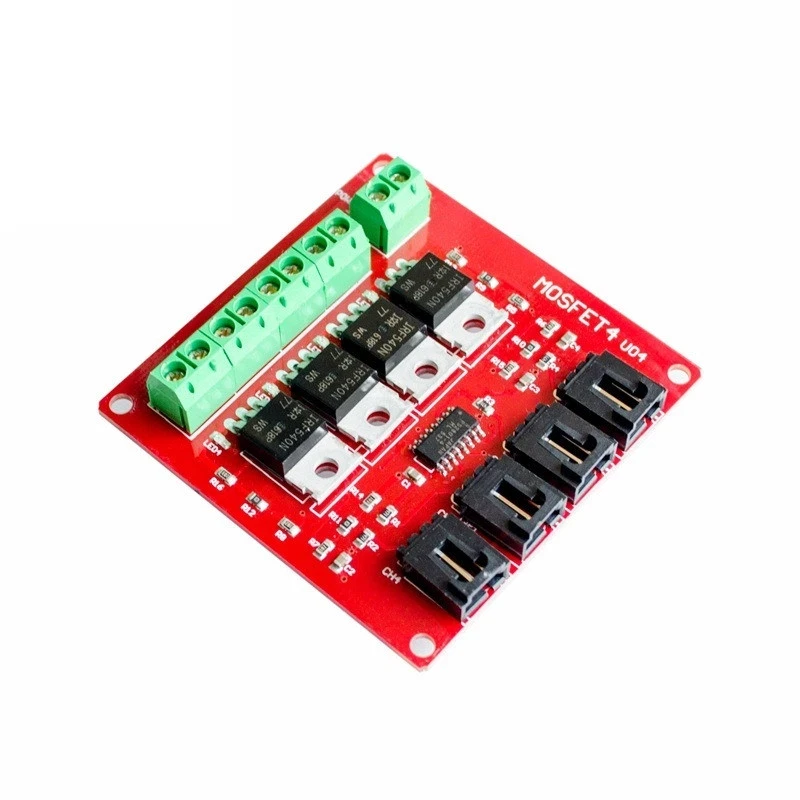
YYNMOS-4模块包含四个MOSFET,可以处理较大的电流,非常适合驱动各种负载。每个MOSFET在导通时的低电阻为10到16毫欧,能够有效地传输电力。您可以连接最多四个设备,每个设备的最大电流为5A,通过适当的散热,这个值可以增加到20A。
除了 MOSFET 之外,该模块还具有控制信号的输入端子和连接负载的输出端子。输入可接受 3V 到 20V 的信号,使其与大多数微控制器兼容,包括 Arduino。该模块还包括 LED 指示灯,用于显示每个输出的状态,为操作期间提供视觉反馈。
数据表详细信息
| 制造商 | YYNMOS |
|---|---|
| 部件编号 | YYNMOS-4 |
| 逻辑/IO 电压 | 3-20 伏 |
| 供电电压 | 5-36 V |
| 每个通道的输出电流 | 5 A |
| 峰值电流(每通道) | 20 A |
| PWM频率指导 | ~1 kHz |
| 输入逻辑阈值 | 高:> 3 V,低:< 1 V |
| 电压降 / RDS(开)/ 饱和度 | 10-16 毫欧 |
| 热限制 | 最高可达85°C |
| 包裹 | 标准PCB模块 |
| 注释 / 变体 | 与PLC兼容 |
- 确保在超过 5A 的电流下提供适当的散热。
- 在连接负载之前检查电压等级。
- 使用PWM信号进行速度或强度控制。
- 注意热限制以防止过热。
- 仔细检查电线以防止短路。
接线说明


要接线YYNMOS-4模块,首先连接电源。将电源的正极连接到DC+模块上的正极和负极连接到DC-终端。您希望控制的每个负载将连接到一个输出对。例如,将负载的正极连接到相应的输出终端,将负极连接到接地。
对于控制信号,将您的Arduino上的PWM支持引脚连接到YYNMOS-4模块上相应的输入引脚。例如,如果您使用Arduino上的引脚3、5、6和9,请将它们连接到模块上的PWM输入。确保Arduino的接地也连接到YYNMOS-4模块的接地,以保持一个共同的参考点。
代码示例与演练
以下代码片段演示了如何定义必要的引脚并使用PWM信号控制电机或LED。变量motor是一个用于便于参考的数组,储存引脚编号。
int pin1 = 3; // PWM pin for motor 1
int pin2 = 5; // PWM pin for motor 2
int pin3 = 6; // PWM pin for motor 3
int pin4 = 9; // PWM pin for motor 4
int motor[]={NULL,pin1, pin2, pin3, pin4};
在这个摘录中,我们定义了四个PWM引脚,用于控制每个电机或LED。数组motor使我们能够在代码中轻松引用这些引脚。
请loop()函数显示如何以不同速度激活电机:
void loop() {
   motorON(1, 75); // Run motor 1 at 75% speed
   delay(4000); // Wait for 4 seconds
   stop(1); // Stop motor 1
   delay(3000); // Wait for 3 seconds
}
这段代码将电机1在75%的速度下激活4秒,然后停止3秒。调整速度和时间可以实现对负载的灵活控制。
有关完整代码,请参考文章下方加载的完整程序。
演示 / 期待什么
在完成接线并将代码上传到您的Arduino之后,您应该会观察到电机或LED灯对PWM信号的响应。电机将以定义的速度启动,并可以动态停止或调整。如果您发现任何问题,请检查极性是否反向或接线是否正确,因为这些是常见的陷阱(视频中的12:30)。
视频时间戳
- 00:00 开始
- 00:58 硬件解释
- 07:53 接线说明
- 10:13 YYNMOS-4的Arduino代码解释
- 14:51 没有Arduino的演示
- 16:32 使用Arduino的演示
图像


++
/*
 * This is Arduino code to control 4 DC motors' speed or 4 LED light strips or other DC loads
 * by utilizing a YYNMOS-4 4-channel MOSFET module.

We can control 4 DC motors with voltage from 5V to 35V and 5A each.
Get the code and wiring from https://robojax.com/RJT338

 * Written by Ahmad Shamshiri on July 13, 2020
 * in Ajax, Ontario, Canada. www.robojax.com
 *
 *
 * Watch video instructions for this code: https://youtu.be/G9uHVcITHf8
 *

If you found this tutorial helpful, please support me so I can continue creating
content like this.

or make a donation using PayPal http://robojax.com/L/?id=64

 * This code has been downloaded from Robojax.com
    This program is free software: you can redistribute it and/or modify
    it under the terms of the GNU General Public License as published by
    the Free Software Foundation, either version 3 of the License, or
    (at your option) any later version.

    This program is distributed in the hope that it will be useful,
    but WITHOUT ANY WARRANTY; without even the implied warranty of
    MERCHANTABILITY or FITNESS FOR A PARTICULAR PURPOSE.  See the
    GNU General Public License for more details.

    You should have received a copy of the GNU General Public License
    along with this program.  If not, see <https://www.gnu.org/licenses/>.
 */

int pin1 = 3;//pwm
int pin2 = 5;//pwm
int pin3 = 6;//pwm
int pin4 = 9;//pwm
int ON = HIGH;
int OFF = LOW;
int motor[]={NULL,pin1, pin2, pin3, pin4};


void setup() {
  Serial.begin(9600);
  Serial.println("Robojax.com 4 DC Motor or LED");
  pinMode(motor[1], OUTPUT);
  pinMode(motor[2], OUTPUT);
  pinMode(motor[3], OUTPUT);
  pinMode(motor[4], OUTPUT);

}

void loop() {
   motorON(1, 75);//run motor 1 at 75% speed
   delay(4000);//for 4 seconds

   motorON(4, 100);//run motor 4 at 100% speed (or 100% light intensity)
   delay(4000); //for 4 seconds

   stop(1);//stop motor 1
   delay(3000);//keep it stopped for 3 seconds

   stop(4);//stop motor 4
   delay(3000);  //keep it stopped for 3 seconds
   for(int i=0; i<=100; i++)
   {
     motorON(1,i); //change speed of motor 1
     delay(100);
   }
  delay(3000);//keep running for 3 seconds
  stop(1);//stop motor 1
  delay(3000);//keep it stopped for 3 seconds

     for(int i=100; i>=0; i--)
   {
     motorON(1,i);  //change speed of motor 1
     delay(100);
   }
   delay(3000); //keep it running for 3 seconds


   for(int i=0; i<=100; i++)
   {
     motorON(4,i);
     delay(100);
   }
  delay(3000);//keep it at for 3 seconds

    for(int i=100; i>=0; i--)
   {
     motorON(4,i);
     delay(100);
   }

}// loop


/*
   motorON(int n, int sp)
 * @brief Runs the specific motor n with speed sp
 * @param n, is an integer from 1 to 4
 * @param sp, is speed in % from 0 to 100
 * @return does not return anything
 * Written by Ahmad Shamshiri
 * www.Robojax.com code July 13, 2020 in Ajax, Ontario, Canada
 */
void motorON(int n, int sp)
{
  if(n >=1 && n <=4)
  {
  int speed=map(sp, 0, 100, 0, 255);
  analogWrite(motor[n],speed);
  Serial.print("Load ");
  Serial.print(n);
  Serial.print(" @");
  Serial.print(sp);
  Serial.println("%");

  }else{
    Serial.println("Motor/load number should be between 1 and 4");
    while(1);// stop forever
  }

}//motorON(int n)


/*
   stop(int n)
 * @brief Stops the specific motor
 * @param n, is an integer from 1 to 4
 * @return does not return anything
 * Written by Ahmad Shamshiri
 * www.Robojax.com code July 13, 2020 in Ajax, Ontario, Canada
 */
void stop(int n)
{
  if(n >=1 && n <=4)
  {

  digitalWrite(motor[n], LOW);
  Serial.print("Load ");
  Serial.print(n);
  Serial.println(" Stopped");

  }else{
    Serial.println("Motor/load number should be between 1 and 4");
    while(1);// stop forever
  }

}//stop(int n)
|||您可能需要的东西
-
亚马逊从亚马逊购买YYNMOS-4四通道MOSFETamzn.to
-
易趣在eBay上购买YYNMOS-4 4通道MOSFETebay.us
-
全球速卖通从AliExpress购买YYNMOS-4 4通道MOSFETs.click.aliexpress.com
-
全球速卖通从AliExpress购买YYNMOS-4 4通道MOSFETs.click.aliexpress.com
-
全球速卖通在AliExpress购买YYNMOS-4 4通道MOSFETs.click.aliexpress.com
资源与参考
-
外部1N4148 (T4) SMD fast-switching diode datasheet (PDF)pdf.datasheetcatalog.com
-
外部60N03 MOSFET, 12mΩ, 30V, 45A datasheet (PDF)cdn.datasheetspdf.com
-
外部
文件📁
没有可用的文件。