搜索代码

在LCD1602上以摄氏度、华氏度和开尔文显示LM35的温度

在LCD1602上以摄氏度、华氏度和开尔文显示LM35的温度

在本教程中,我们将学习如何使用LM35温度传感器测量温度,并以摄氏度、华氏度和开尔文三种不同单位在LCD1602模块上显示结果。这个项目是将传感器读数与视觉输出相结合的绝佳方法,增强你对传感器和显示器在Arduino项目中如何协同工作的理解。你将看到如何正确连接组件以及如何实现完成此任务所需的代码。

LM35_with_LCD-1

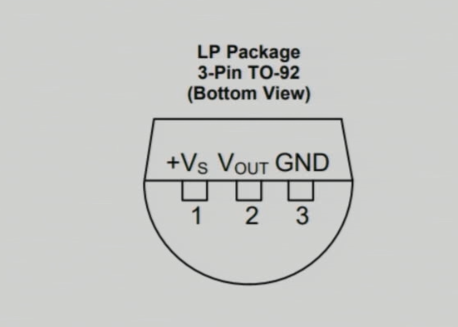
首先,我们将使用LM35温度传感器,它是一个三脚设备。它输出与摄氏温度相对应的模拟电压。将使用LCD1602来显示温度读数。在教程结束时,您将拥有一个完全功能的温度显示系统。有关更多说明,请查看视频(在视频中于00:55)。

硬件解读

该项目的主要组件包括LM35温度传感器和LCD1602显示器。LM35通过提供一个与摄氏温度线性成比例的电压输出来工作,具体为10 mV/°C。这使得在代码中使用简单的计算将电压读数转换为温度读数变得非常简单。

LCD1602 是一个 16x2 字符显示器,可以显示两行文本。它通过 I2C 接口进行控制,这简化了布线,仅使用四个连接:VCC、GND、SDA(数据线)和 SCL(时钟线)。这种设置最小化了 Arduino 上所需的引脚数量,便于连接和管理。

LM35引脚配置

数据表详细信息

制造商 德州仪器
零件号码 LM35
逻辑/输入输出电压 3-30 伏
输出电压 10 mV/°C
温度范围 -55 至 +150 °C
准确性 ±0.5 °C(典型值)
包裹 TO-46, TO-220

  • 确保正确的电源供应,LM35的最小电压为4V。
  • 如有必要,请在SDA/SCL线路上使用下拉电阻。
  • 保持接线简短以减少噪音。
  • 使用电容器解耦电源以提高稳定性。
  • 在通电系统之前,测试每个连接。

接线说明

LM35_LCD1602_wiring_new

将LM35温度传感器接线,将左侧引脚连接到Arduino的5V电源,该电源在代码中定义为VCC2中间的引脚是输出引脚,应连接到模拟输入引脚。A0在Arduino上。最后,将LM35的右引脚连接到地。

对于LCD1602模块,将地脚连接到Arduino的地面。VCC脚应连接到Arduino的5V输出。数据线(SDA)应连接到模拟引脚。A4,时钟线(SCL)应连接到A5此设置允许Arduino使用I2C协议与LCD进行通信。

代码示例与演练

在代码中,我们定义了LM35传感器的输入引脚,并设置了其I2C地址的LCD。setup函数初始化了串行通信和LCD显示。以下摘录显示了如何初始化引脚:

const int inPin = A0; // Pin for LM35 output
const int VCC2 = 2; // Pin for LM35 VCC
const int iteration = 1000; // Number of readings for averaging

这里,inPin被设定为A0,LM35的输出被读取的地方。VCC2为给LM35供电而定义的引脚,和iteration用于平均温度读数。

接下来,我们有一个主循环,处理温度读数并在液晶屏上显示。每种温度类型依次显示,带有延迟:

lcdDisplay(getTemperature('C'),'C');
delay(2000);
lcdDisplay(getTemperature('F'),'F');
delay(2000);
lcdDisplay(getTemperature('K'),'K');  
delay(2000);    

这段代码调用了lcdDisplay函数用于显示摄氏度、华氏度和开尔文温度,并在每次显示之间暂停2秒。

完整代码将在本文下方加载,您可以看到所有用于读取温度并相应显示的函数和逻辑。

演示 / 期待什么

LM35_with_LCD-2

当你运行完成的项目时,LCD 应该会显示以摄氏度、华氏度和开尔文为单位的温度读数,并循环显示每种单位。你可以通过施加热量(例如使用热风枪)来测试传感器的响应,并观察显示的温度变化(在视频中为 09:15)。如果传感器连接的电源低于推荐电压,读数可能会不准确,因此请确保其在至少 4V 的电压下工作。

视频时间戳

  • 00:00- 介绍
  • 00:55- 硬件概述
  • 03:30- 布线说明
  • 06:15- 代码概览
  • 09:15- 演示

图像

LM35_pinout
LM35_pinout
LM35_LCD1602_wiring_new
LM35_with_LCD-2
LM35_with_LCD-2
LM35_with_LCD-1
LM35_with_LCD-1
326-On Lm35 Prints the temperature as C, F, or K on the LCD1602 or LCD2004
语言: C++
/*
 * This Arduino sketch is to use LM35 to measure temperature.

 * Prints the temperature as C, F, or K on the LCD1602 or LCD2004 with I2C module (4 wires).
 
 * 
 * Watch video instructions for this code: https://youtu.be/XpMtQVCMIRA
 * 
 
 * Written by Ahmad Shamshiri on May 12, 2020 at 19:53 in Ajax, Ontario, Canada
 * in Ajax, Ontario, Canada. www.robojax.com
 * 


 or make a donation using PayPal: http://robojax.com/L/?id=64

 *  * This code is "AS IS" without warranty or liability. Free to be used as long as you keep this note intact.* 
 * This code has been downloaded from Robojax.com
    This program is free software: you can redistribute it and/or modify
    it under the terms of the GNU General Public License as published by
    the Free Software Foundation, either version 3 of the License, or
    (at your option) any later version.

    This program is distributed in the hope that it will be useful,
    but WITHOUT ANY WARRANTY; without even the implied warranty of
    MERCHANTABILITY or FITNESS FOR A PARTICULAR PURPOSE.  See the
    GNU General Public License for more details.

    You should have received a copy of the GNU General Public License
    along with this program.  If not, see <https://www.gnu.org/licenses/>.


*/

const int inPin =A0;//can change
const int VCC2 =2;
const int iteration = 1000; //can change (see video)
const float LM35_FACTOR =0.01;// do not change

// start of settings for LCD1602 with I2C
#include <LiquidCrystal_I2C.h>
// Set the LCD address to 0x27 for a 16 chars and 2 line display
LiquidCrystal_I2C lcd(0x26, 16, 2);
// end of settings for LCD1602 with I2C

// the setup routine runs once when you press reset:
void setup() {
  // initialize serial communication at 9600 bits per second:
  Serial.begin(9600);
  Serial.println("Robojax LM35 with LCD for Arduino");
  
  pinMode(VCC2,OUTPUT);
  digitalWrite(VCC2, HIGH);
  
  lcd.begin();  
  lcd.backlight();
  lcd.print("Robojax LM35");
  lcd.setCursor(0,1);
  lcd.print("Temp: "); 
}

// the loop routine runs over and over again forever:
void loop() {
 //robojax.com LM35 with LCD Code for Arduino

  lcdDisplay(getTemperature('C'),'C');
  delay(2000);
  
  lcdDisplay(getTemperature('F'),'F');
  delay(2000);
    
  lcdDisplay(getTemperature('K'),'K');  
  delay(2000);    

if(getTemperature('C') >87)
{
 // do something here (watch video)
}

//  printTemperature('C');
//  Serial.println();
//  printTemperature('F');
//  Serial.println();  
//  printTemperature('K'); 
//  Serial.println();     
//  Serial.println();    
//  Serial.print(" Temperature: ");
//  printDegree();    
//  Serial.print(getTemperature('C'));
//  Serial.println();
  delay(100);
}

/*
 * getTemperature()
 * @brief gets the average temperature
 * @param average temperature
 * @param "type" is character
 *     C = Celsius
 *     K = Kelvin
 *     F = Fahrenheit
 * @return returns one of the values above
 * Written by Ahmad Shamshiri for robojax.com
 * on May 08, 2020 at 02:36 in Ajax, Ontario, Canada
 */
float getTemperature(char type)
{
    float value;
    float averageTemperature =0;
    int sensorValue = analogRead(inPin);
    float voltage = sensorValue * (5.0 / 1023.0); 
    float temperature = voltage / LM35_FACTOR;
    for(int i=0; i< iteration; i++)
    {
      averageTemperature += temperature;
    }

    averageTemperature /=iteration;
  if(type =='F')
   {
    value = averageTemperature *9/5 + 32;//convert to Fahrenheit 
   }else if(type =='K')
   {
    value = averageTemperature + 273.15;//convert to Kelvin
   }else{
    value = averageTemperature;// return Celsius
   }    
    return value ;
}//getTemperature()

/*
 * printTemperature()
 * @brief prints  temperature on serial monitor
 * @param charact type
 * @param "type" is character
 *     C = Celsius
 *     K = Kelvin
 *     F = Fahrenheit
 * @return none
 * Written by Ahmad Shamshiri for robojax.com
 * on May 08, 2020 at 02:45 in Ajax, Ontario, Canada
 */
void printTemperature(char type)
{
    float value;
    float temp = getTemperature(type);
   Serial.print(temp);
    printDegree();    
  if(type =='F')
   {
     Serial.print("F");
    }else if(type =='K')
   {
     Serial.print("K");
   }else{
     Serial.print("C");
   }    
 
}//printTemperature()

/*
 * @brief prints degree symbol on serial monitor
 * @param none
 * @return returns nothing
 * Written by Ahmad Shamshiri on July 13, 2019
 * for Robojax Tutorial Robojax.com
 */
void printDegree()
{
    Serial.print("\\xC2"); 
    Serial.print("\\xB0");  
}


/*
 * lcdDisplay(float value,char symbol)
 * displays value and title on LCD1602
 * How to use:
 * lcdDisplay(35.3,'C');

 */
void lcdDisplay(float value,char symbol)
{
   // Robojax.com LCD1602 for LM35 Demo   

   for(int i=7; i<16;i++)
   {
    lcd.setCursor(i,1);
    lcd.write(254);  
   }
   lcd.setCursor (7,1); //
   lcd.print(value);
   lcd.print((char)223);    
   if(symbol =='F')
   {
    lcd.print("F");
   }else if(symbol =='K')
   {
    lcd.print("K");
   }else{
    lcd.print("C");    
   }
 // Robojax.com LCD1602 for LM35 Demo
}

|||您可能需要的东西

资源与参考

文件📁

没有可用的文件。