LM35からLCD1602に摂氏、華氏、ケルビンの温度を表示しています。
このチュートリアルでは、LM35温度センサーを使用して温度を測定し、結果をLCD1602モジュールに摂氏、華氏、ケルビンの3つの異なる単位で表示する方法を学びます。このプロジェクトは、センサーの読み取りと視覚的出力を組み合わせる優れた方法であり、Arduinoプロジェクトにおけるセンサーとディスプレイの仕組みを理解するのに役立ちます。コンポーネントの配線方法と、このタスクに必要なコードの実装方法を確認します。

最初に、LM35温度センサーを使用します。これは3ピンのデバイスで、摂氏の温度に対応したアナログ電圧を出力します。温度の読み取り値はLCD1602を使用して表示されます。チュートリアルの最後までには、完全に機能する温度表示システムが完成します。詳細については、(ビデオの00:55を参照してください)。
ハードウェアの説明
このプロジェクトの主なコンポーネントには、LM35温度センサーとLCD1602ディスプレイが含まれています。LM35は、摂氏温度に線形比例した電圧出力を提供することによって動作し、具体的には10 mV/°Cです。これにより、コード内で簡単な計算を用いて電圧読み取り値を温度読み取り値に変換することが容易になります。
LCD1602は、2行のテキストを表示できる16x2文字ディスプレイです。これはI2Cインターフェースを介して制御されており、配線を簡素化するためにVCC、GND、SDA(データライン)、SCL(クロックライン)の4つの接続のみを使用します。このセットアップはArduino上で必要なピンの数を最小限に抑え、接続と管理を容易にします。
データシートの詳細
| 製造者 | テキサス・インスツルメンツ |
|---|---|
| 部品番号 | LM35 |
| 論理/IO電圧 | 3-30 V |
| 出力電圧 | 10 mV/°C |
| 温度範囲 | -55から+150°C |
| 精度 | ±0.5 °C(典型) |
| パッケージ | TO-46、TO-220 |
- LM35には最低4Vの適切な電源供給を確保してください。
- SDA/SCLラインに必要に応じてプルアップ抵抗を使用してください。
- 配線は短く保ち、ノイズを最小限に抑えてください。
- 安定性のためにコンデンサを使用して電源を分離します。
- システムの電源を入れる前に各接続をテストしてください。
配線指示

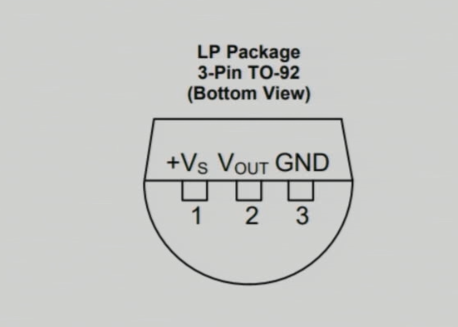
LM35温度センサーを配線するには、左ピンをArduinoからの5V電源に接続します。これはコードで定義されています。VCC2中央のピンは出力ピンで、アナログ入力ピンに接続する必要があります。A0Arduinoに接続します。最後に、LM35の右端子をグラウンドに接続します。
LCD1602モジュールの場合、グラウンドピンをArduinoのグラウンドに接続します。VCCピンはArduinoの5V出力に接続する必要があります。データライン(SDA)はアナログピンに接続するべきです。A4、クロックライン(SCL)は接続する必要がありますA5この設定により、ArduinoはI2Cプロトコルを使用してLCDと通信することができます。
コード例とウォークスルー
コード内では、LM35センサーの入力ピンを定義し、I2CアドレスでLCDを設定します。セットアップ関数は、シリアル通信とLCDディスプレイを初期化します。次の抜粋では、ピンの初期化方法を示します。
const int inPin = A0; // Pin for LM35 output
const int VCC2 = 2; // Pin for LM35 VCC
const int iteration = 1000; // Number of readings for averaging
ここでは、inPin設定されていますA0, そこでLM35の出力が読み取られます。VCC2LM35に電力供給するためのピンが定義されています。iteration温度測定値の平均を取るために使用されます。
次に、温度 readings を処理し、LCD に表示するメインループがあります。各温度タイプは、遅延を伴って順番に表示されます。
lcdDisplay(getTemperature('C'),'C');
delay(2000);
lcdDisplay(getTemperature('F'),'F');
delay(2000);
lcdDisplay(getTemperature('K'),'K');
delay(2000);
このコードのブロックは呼び出しますlcdDisplay摂氏、華氏、ケルビンで温度を表示する関数で、各表示の間に2秒間の間隔を置きます。
この記事の下に完全なコードが読み込まれます。そこで、温度を読み取り、それに応じて表示するために実装されたすべての関数とロジックを見ることができます。
デモンストレーション / 何を期待するか

完成したプロジェクトを実行すると、LCDは摂氏、華氏、そしてケルビンの温度測定値を表示し、各表示を循環します。センサーの反応をテストするには、ヒートガンなどで熱を加え、表示される温度の変化を観察します(ビデオは09:15にあります)。センサーが推奨電圧以下の電源に接続されている場合、測定値が不正確になる可能性があるため、最低でも4Vで動作することを確認してください。
動画のタイムスタンプ
- 00:00- はじめに
- 00:55- ハードウェアの概要
- 03:30- 配線指示
- 06:15- コードの概要
- 09:15- デモンストレーション
画像
/*
 * This Arduino sketch is to use LM35 to measure temperature.

 * Prints the temperature as C, F, or K on the LCD1602 or LCD2004 with I2C module (4 wires).

 *
 * Watch video instructions for this code: https://youtu.be/XpMtQVCMIRA
 *

 * Written by Ahmad Shamshiri on May 12, 2020 at 19:53 in Ajax, Ontario, Canada
 * in Ajax, Ontario, Canada. www.robojax.com
 *


 or make a donation using PayPal: http://robojax.com/L/?id=64

 *  * This code is "AS IS" without warranty or liability. Free to be used as long as you keep this note intact.*
 * This code has been downloaded from Robojax.com
    This program is free software: you can redistribute it and/or modify
    it under the terms of the GNU General Public License as published by
    the Free Software Foundation, either version 3 of the License, or
    (at your option) any later version.

    This program is distributed in the hope that it will be useful,
    but WITHOUT ANY WARRANTY; without even the implied warranty of
    MERCHANTABILITY or FITNESS FOR A PARTICULAR PURPOSE.  See the
    GNU General Public License for more details.

    You should have received a copy of the GNU General Public License
    along with this program.  If not, see <https://www.gnu.org/licenses/>.


*/

const int inPin =A0;//can change
const int VCC2 =2;
const int iteration = 1000; //can change (see video)
const float LM35_FACTOR =0.01;// do not change

// start of settings for LCD1602 with I2C
#include <LiquidCrystal_I2C.h>
// Set the LCD address to 0x27 for a 16 chars and 2 line display
LiquidCrystal_I2C lcd(0x26, 16, 2);
// end of settings for LCD1602 with I2C

// the setup routine runs once when you press reset:
void setup() {
  // initialize serial communication at 9600 bits per second:
  Serial.begin(9600);
  Serial.println("Robojax LM35 with LCD for Arduino");

  pinMode(VCC2,OUTPUT);
  digitalWrite(VCC2, HIGH);

  lcd.begin();
  lcd.backlight();
  lcd.print("Robojax LM35");
  lcd.setCursor(0,1);
  lcd.print("Temp: ");
}

// the loop routine runs over and over again forever:
void loop() {
 //robojax.com LM35 with LCD Code for Arduino

  lcdDisplay(getTemperature('C'),'C');
  delay(2000);

  lcdDisplay(getTemperature('F'),'F');
  delay(2000);

  lcdDisplay(getTemperature('K'),'K');
  delay(2000);

if(getTemperature('C') >87)
{
 // do something here (watch video)
}

//  printTemperature('C');
//  Serial.println();
//  printTemperature('F');
//  Serial.println();
//  printTemperature('K');
//  Serial.println();
//  Serial.println();
//  Serial.print(" Temperature: ");
//  printDegree();
//  Serial.print(getTemperature('C'));
//  Serial.println();
  delay(100);
}

/*
 * getTemperature()
 * @brief gets the average temperature
 * @param average temperature
 * @param "type" is character
 *     C = Celsius
 *     K = Kelvin
 *     F = Fahrenheit
 * @return returns one of the values above
 * Written by Ahmad Shamshiri for robojax.com
 * on May 08, 2020 at 02:36 in Ajax, Ontario, Canada
 */
float getTemperature(char type)
{
    float value;
    float averageTemperature =0;
    int sensorValue = analogRead(inPin);
    float voltage = sensorValue * (5.0 / 1023.0);
    float temperature = voltage / LM35_FACTOR;
    for(int i=0; i< iteration; i++)
    {
      averageTemperature += temperature;
    }

    averageTemperature /=iteration;
  if(type =='F')
   {
    value = averageTemperature *9/5 + 32;//convert to Fahrenheit
   }else if(type =='K')
   {
    value = averageTemperature + 273.15;//convert to Kelvin
   }else{
    value = averageTemperature;// return Celsius
   }
    return value ;
}//getTemperature()

/*
 * printTemperature()
 * @brief prints  temperature on serial monitor
 * @param charact type
 * @param "type" is character
 *     C = Celsius
 *     K = Kelvin
 *     F = Fahrenheit
 * @return none
 * Written by Ahmad Shamshiri for robojax.com
 * on May 08, 2020 at 02:45 in Ajax, Ontario, Canada
 */
void printTemperature(char type)
{
    float value;
    float temp = getTemperature(type);
   Serial.print(temp);
    printDegree();
  if(type =='F')
   {
     Serial.print("F");
    }else if(type =='K')
   {
     Serial.print("K");
   }else{
     Serial.print("C");
   }

}//printTemperature()

/*
 * @brief prints degree symbol on serial monitor
 * @param none
 * @return returns nothing
 * Written by Ahmad Shamshiri on July 13, 2019
 * for Robojax Tutorial Robojax.com
 */
void printDegree()
{
    Serial.print("\\xC2");
    Serial.print("\\xB0");
}


/*
 * lcdDisplay(float value,char symbol)
 * displays value and title on LCD1602
 * How to use:
 * lcdDisplay(35.3,'C');

 */
void lcdDisplay(float value,char symbol)
{
   // Robojax.com LCD1602 for LM35 Demo

   for(int i=7; i<16;i++)
   {
    lcd.setCursor(i,1);
    lcd.write(254);
   }
   lcd.setCursor (7,1); //
   lcd.print(value);
   lcd.print((char)223);
   if(symbol =='F')
   {
    lcd.print("F");
   }else if(symbol =='K')
   {
    lcd.print("K");
   }else{
    lcd.print("C");
   }
 // Robojax.com LCD1602 for LM35 Demo
}
必要かもしれないもの
-
アマゾンAmazonでLM35を購入するamzn.to
-
イーベイeBayでLM35を購入するebay.us
リソースと参考文献
-
データシートLM35 データシートti.com
-
外部LM35 データシート (PDF)ti.com
-
内部
ファイル📁
ファイルは利用できません。