Displaying Temperature from an LM35 on an LCD1602 in Celsius, Fahrenheit, and Kelvin
In this tutorial, we will learn how to use an LM35 temperature sensor to measure temperature and display the results on an LCD1602 module in three different units: Celsius, Fahrenheit, and Kelvin. This project is an excellent way to combine sensor readings with visual output, enhancing your understanding of how sensors and displays work together in Arduino projects. You will see how to wire the components correctly and how to implement the code needed for this task.

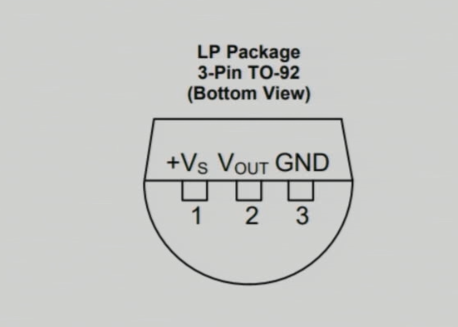
To get started, we will be using the LM35 temperature sensor, which is a three-pin device. It outputs an analog voltage that corresponds to the temperature in degrees Celsius. The LCD1602 will be used to display the temperature readings. By the end of the tutorial, you will have a fully functioning temperature display system. For further clarification, check out the video at (in video at 00:55).
Hardware Explained
The main components of this project include the LM35 temperature sensor and the LCD1602 display. The LM35 operates by providing a voltage output that is linearly proportional to the temperature in Celsius, specifically 10 mV/°C. This makes it straightforward to convert the voltage reading into a temperature reading using simple calculations in the code.
The LCD1602 is a 16x2 character display that can show two lines of text. It is controlled via an I2C interface, which simplifies the wiring by using only four connections: VCC, GND, SDA (data line), and SCL (clock line). This setup minimizes the number of pins required on the Arduino, allowing for easier connections and management.
Datasheet Details
| Manufacturer | Texas Instruments |
|---|---|
| Part number | LM35 |
| Logic/IO voltage | 3–30 V |
| Output voltage | 10 mV/°C |
| Temperature range | -55 to +150 °C |
| Accuracy | ±0.5 °C (typ.) |
| Package | TO-46, TO-220 |
- Ensure proper power supply, minimum 4V for LM35.
- Use a pull-up resistor if necessary for SDA/SCL lines.
- Keep wiring short to minimize noise.
- Decouple power supply with capacitors for stability.
- Test each connection before powering the system.
Wiring Instructions

To wire the LM35 temperature sensor, connect the left pin to a 5V power source from the Arduino, which is defined in the code as VCC2. The middle pin, which is the output pin, should be connected to the analog input pin A0 on the Arduino. Finally, connect the right pin of the LM35 to the ground.
For the LCD1602 module, connect the ground pin to the Arduino's ground. The VCC pin should be connected to the 5V output of the Arduino. The data line (SDA) should be connected to the analog pin A4, while the clock line (SCL) should connect to A5. This setup allows the Arduino to communicate with the LCD using the I2C protocol.
Code Examples & Walkthrough
In the code, we define the input pin for the LM35 sensor and set up the LCD with its I2C address. The setup function initializes the serial communication and the LCD display. The following excerpt shows how to initialize the pins:
const int inPin = A0; // Pin for LM35 output
const int VCC2 = 2; // Pin for LM35 VCC
const int iteration = 1000; // Number of readings for averaging
Here, inPin is set to A0, where the LM35’s output is read. The VCC2 pin is defined for powering the LM35, and iteration is used for averaging the temperature readings.
Next, we have the main loop that handles the temperature readings and displays them on the LCD. Each temperature type is displayed sequentially with a delay:
lcdDisplay(getTemperature('C'),'C');
delay(2000);
lcdDisplay(getTemperature('F'),'F');
delay(2000);
lcdDisplay(getTemperature('K'),'K');
delay(2000);
This block of code calls the lcdDisplay function to show the temperature in Celsius, Fahrenheit, and Kelvin, pausing for 2 seconds between each display.
The full code will load below this article, where you can see all the functions and logic implemented for reading the temperature and displaying it accordingly.
Demonstration / What to Expect

When you run the completed project, the LCD should display the temperature readings in Celsius, Fahrenheit, and Kelvin, cycling through each display. You can test the sensor's response by applying heat, such as from a heat gun, and observing the changes in temperature displayed (in video at 09:15). If the sensor is connected to a power source below the recommended voltage, the readings may be inaccurate, so ensure it operates at a minimum of 4V.
Video Timestamps
- 00:00 - Introduction
- 00:55 - Hardware Overview
- 03:30 - Wiring Instructions
- 06:15 - Code Overview
- 09:15 - Demonstration
Images
/*
 * This Arduino sketch is to use LM35 to measure temperature.

 * Prints the temperature as C, F, or K on the LCD1602 or LCD2004 with I2C module (4 wires).

 *
 * Watch video instructions for this code: https://youtu.be/XpMtQVCMIRA
 *

 * Written by Ahmad Shamshiri on May 12, 2020 at 19:53 in Ajax, Ontario, Canada
 * in Ajax, Ontario, Canada. www.robojax.com
 *


 or make a donation using PayPal: http://robojax.com/L/?id=64

 *  * This code is "AS IS" without warranty or liability. Free to be used as long as you keep this note intact.*
 * This code has been downloaded from Robojax.com
    This program is free software: you can redistribute it and/or modify
    it under the terms of the GNU General Public License as published by
    the Free Software Foundation, either version 3 of the License, or
    (at your option) any later version.

    This program is distributed in the hope that it will be useful,
    but WITHOUT ANY WARRANTY; without even the implied warranty of
    MERCHANTABILITY or FITNESS FOR A PARTICULAR PURPOSE.  See the
    GNU General Public License for more details.

    You should have received a copy of the GNU General Public License
    along with this program.  If not, see <https://www.gnu.org/licenses/>.


*/

const int inPin =A0;//can change
const int VCC2 =2;
const int iteration = 1000; //can change (see video)
const float LM35_FACTOR =0.01;// do not change

// start of settings for LCD1602 with I2C
#include <LiquidCrystal_I2C.h>
// Set the LCD address to 0x27 for a 16 chars and 2 line display
LiquidCrystal_I2C lcd(0x26, 16, 2);
// end of settings for LCD1602 with I2C

// the setup routine runs once when you press reset:
void setup() {
  // initialize serial communication at 9600 bits per second:
  Serial.begin(9600);
  Serial.println("Robojax LM35 with LCD for Arduino");

  pinMode(VCC2,OUTPUT);
  digitalWrite(VCC2, HIGH);

  lcd.begin();
  lcd.backlight();
  lcd.print("Robojax LM35");
  lcd.setCursor(0,1);
  lcd.print("Temp: ");
}

// the loop routine runs over and over again forever:
void loop() {
 //robojax.com LM35 with LCD Code for Arduino

  lcdDisplay(getTemperature('C'),'C');
  delay(2000);

  lcdDisplay(getTemperature('F'),'F');
  delay(2000);

  lcdDisplay(getTemperature('K'),'K');
  delay(2000);

if(getTemperature('C') >87)
{
 // do something here (watch video)
}

//  printTemperature('C');
//  Serial.println();
//  printTemperature('F');
//  Serial.println();
//  printTemperature('K');
//  Serial.println();
//  Serial.println();
//  Serial.print(" Temperature: ");
//  printDegree();
//  Serial.print(getTemperature('C'));
//  Serial.println();
  delay(100);
}

/*
 * getTemperature()
 * @brief gets the average temperature
 * @param average temperature
 * @param "type" is character
 *     C = Celsius
 *     K = Kelvin
 *     F = Fahrenheit
 * @return returns one of the values above
 * Written by Ahmad Shamshiri for robojax.com
 * on May 08, 2020 at 02:36 in Ajax, Ontario, Canada
 */
float getTemperature(char type)
{
    float value;
    float averageTemperature =0;
    int sensorValue = analogRead(inPin);
    float voltage = sensorValue * (5.0 / 1023.0);
    float temperature = voltage / LM35_FACTOR;
    for(int i=0; i< iteration; i++)
    {
      averageTemperature += temperature;
    }

    averageTemperature /=iteration;
  if(type =='F')
   {
    value = averageTemperature *9/5 + 32;//convert to Fahrenheit
   }else if(type =='K')
   {
    value = averageTemperature + 273.15;//convert to Kelvin
   }else{
    value = averageTemperature;// return Celsius
   }
    return value ;
}//getTemperature()

/*
 * printTemperature()
 * @brief prints  temperature on serial monitor
 * @param charact type
 * @param "type" is character
 *     C = Celsius
 *     K = Kelvin
 *     F = Fahrenheit
 * @return none
 * Written by Ahmad Shamshiri for robojax.com
 * on May 08, 2020 at 02:45 in Ajax, Ontario, Canada
 */
void printTemperature(char type)
{
    float value;
    float temp = getTemperature(type);
   Serial.print(temp);
    printDegree();
  if(type =='F')
   {
     Serial.print("F");
    }else if(type =='K')
   {
     Serial.print("K");
   }else{
     Serial.print("C");
   }

}//printTemperature()

/*
 * @brief prints degree symbol on serial monitor
 * @param none
 * @return returns nothing
 * Written by Ahmad Shamshiri on July 13, 2019
 * for Robojax Tutorial Robojax.com
 */
void printDegree()
{
    Serial.print("\\xC2");
    Serial.print("\\xB0");
}


/*
 * lcdDisplay(float value,char symbol)
 * displays value and title on LCD1602
 * How to use:
 * lcdDisplay(35.3,'C');

 */
void lcdDisplay(float value,char symbol)
{
   // Robojax.com LCD1602 for LM35 Demo

   for(int i=7; i<16;i++)
   {
    lcd.setCursor(i,1);
    lcd.write(254);
   }
   lcd.setCursor (7,1); //
   lcd.print(value);
   lcd.print((char)223);
   if(symbol =='F')
   {
    lcd.print("F");
   }else if(symbol =='K')
   {
    lcd.print("K");
   }else{
    lcd.print("C");
   }
 // Robojax.com LCD1602 for LM35 Demo
}
Things you might need
-
AmazonPurchase LM35 from Amazonamzn.to
-
eBayPurchase LM35 from eBayebay.us
Resources & references
-
DatasheetLM35 Datasheetti.com
-
ExternalLM35 datasheet (PDF)ti.com
-
Internal
Files📁
No files available.