Como Usar um LM35 para Medir Temperatura em Celsius, Fahrenheit e Kelvin
Neste tutorial, aprenderemos a usar o sensor de temperatura LM35 para medir a temperatura e exibi-la em Celsius, Fahrenheit e Kelvin no monitor serial. O LM35 é um sensor simples, mas eficaz, que fornece uma tensão proporcional à temperatura, permitindo leituras e conversões fáceis. Este projeto é ideal para iniciantes que desejam integrar a detecção de temperatura em seus projetos Arduino. (no vídeo às 01:00)

Hardware Explicado
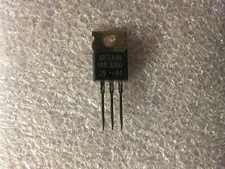
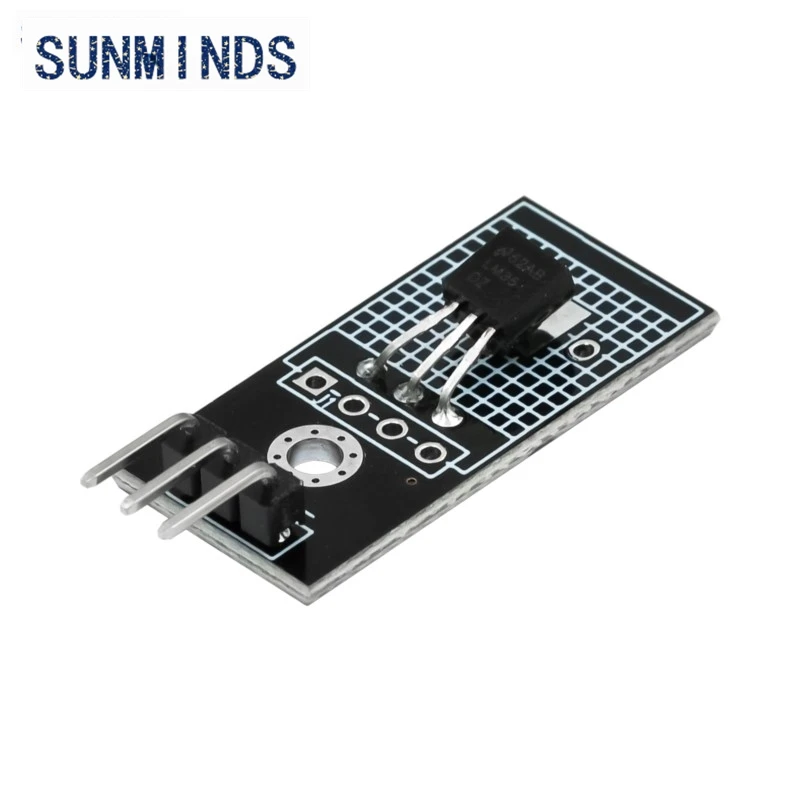
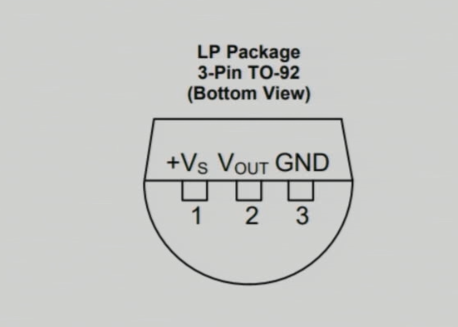
O sensor de temperatura LM35 é um dispositivo de precisão que fornece uma saída de tensão analógica correspondente à temperatura em graus Celsius. O sensor opera em uma faixa de -55°C a 150°C com uma precisão de ±0,5°C. Seu baixo consumo de energia de 60 microamperes o torna adequado para dispositivos alimentados por bateria. A impedância de saída do LM35 é baixa, permitindo que ele acione uma carga de forma eficaz, sem queda de tensão significativa, o que é crucial para manter leituras precisas. O sensor é frequentemente embalado em um formato TO-92, facilitando a integração em diversos projetos.
Detalhes da Ficha Técnica
| Fabricante | Texas Instruments |
|---|---|
| Número da peça | LM35 |
| Tensão lógica/IO | 4-30 V |
| Corrente de saída (típ.) | 60 µA |
| Faixa de temperatura | -55 a 150 °C |
| Tensão de saída | 10 mV/°C |
| Precisão (típ.) | ±0,5 °C (até 25 °C) |
| Pacote | TO-92 |
- Assegure um fornecimento de energia adequado entre 4V a 30V.
- Tenha cuidado com a polaridade invertida nas conexões de energia.
- Use uma conexão de terra estável para evitar ruídos nas medições.
- Mantenha o sensor afastado de fontes de calor diretas para evitar leituras errôneas.
- Considere um filtro passa-baixa se você estiver enfrentando flutuações na tensão de saída.
Instruções de Fiação

Para conectar o sensor LM35, conecte o pino esquerdo (VCC) à fonte de 5V do Arduino. O pino direito (GND) deve ser conectado ao terra (GND) do Arduino. O pino do meio (Saída) é onde você irá ler os dados de temperatura; conecte este pino ao pino de entrada analógica.A0no Arduino. Esta configuração permitirá que o Arduino leia a saída de tensão do LM35, que corresponde à temperatura.
Se você precisar ajustar a fiação para configurações diferentes, certifique-se de atualizar a referência do pino analógico no código para corresponder à sua nova configuração. (no vídeo às 03:15)
Exemplos de Código e Passo a Passo
Os seguintes trechos de código demonstram como ler a temperatura do LM35 e exibi-la em diferentes unidades. Primeiro, definimos o pino de entrada e o fator de conversão do LM35:
const int inPin = A0; // can change
const float LM35_FACTOR = 0.01; // do not change
Neste trecho,inPinrepresenta o pino analógico conectado à saída do LM35, eLM35_FACTORdefine a conversão necessária para converter a tensão em temperatura em graus Celsius.
Em seguida, configuramos a comunicação serial:
void setup() {
  Serial.begin(9600);
  Serial.println("Robojax LM35 for Arduino");
  delay(500);
}Aqui,Serial.begin(9600)inicializa a comunicação serial a uma taxa de transmissão de 9600 bits por segundo, permitindo-nos enviar e receber dados para e do monitor serial.
A função loop lê continuamente a temperatura e a imprime:
void loop() {
  printTemperature('C');
  printTemperature('F');
  printTemperature('K');
  delay(1000);
}
Neste loop, chamamos oprintTemperaturefunção para cada unidade (Celsius, Fahrenheit, Kelvin) para exibir as respectivas temperaturas no monitor serial.
Demonstração / O que Esperar
Quando o LM35 estiver conectado corretamente, você deverá ver as leituras de temperatura exibidas em Celsius, Fahrenheit e Kelvin no monitor serial. À medida que você aplica calor ao sensor, as leituras aumentarão de acordo. Se você notar algum valor aleatório ou errático, verifique a fiação para conexões soltas ou atribuições de pinos incorretas. (no vídeo às 05:00)
Marcação de Vídeo
- 00:00- Introdução
- 01:00- Visão geral do LM35
- 02:30- Instruções de Fiação
- 03:15- Explicação do Código
- 05:00- Demonstração
Imagens
/*
 * This Arduino sketch is to use LM35 to measure temperature
 * This code has two ways to get temperature
 * 1-To print the temperature either in C, F or K on the serial monitor
 * 2-To return the value in C, F and K
 *
 * Watch Video instruction for this code:https://youtu.be/S5IBc_epa1A
 *
 * Full explanation of this code and wiring diagram is available at
 * my Arduino Course at Udemy.com here: http://robojax.com/L/?id=62

 * Written by Ahmad Shamshiri on May 08, 2020 at 02:45 in Ajax, Ontario, Canada
 * in Ajax, Ontario, Canada. www.robojax.com
 *

 * Get this code and other Arduino codes from Robojax.com
Learn Arduino step by step in a structured course with all material, wiring diagrams and libraries
all in one place. Purchase My course on Udemy.com http://robojax.com/L/?id=62

If you found this tutorial helpful, please support me so I can continue creating
content like this.

or make a donation using PayPal http://robojax.com/L/?id=64

 *  * This code is "AS IS" without warranty or liability. Free to be used as long as you keep this note intact.*
 * This code has been downloaded from Robojax.com
    This program is free software: you can redistribute it and/or modify
    it under the terms of the GNU General Public License as published by
    the Free Software Foundation, either version 3 of the License, or
    (at your option) any later version.

    This program is distributed in the hope that it will be useful,
    but WITHOUT ANY WARRANTY; without even the implied warranty of
    MERCHANTABILITY or FITNESS FOR A PARTICULAR PURPOSE.  See the
    GNU General Public License for more details.

    You should have received a copy of the GNU General Public License
    along with this program.  If not, see <https://www.gnu.org/licenses/>.


*/

const int inPin =A0;//can change
const int iteration = 1000; //can change (see video)
const float LM35_FACTOR =0.01;// do not change

// the setup routine runs once when you press reset:
void setup() {
  // initialize serial communication at 9600 bits per second:
  Serial.begin(9600);
  Serial.println("Robojax LM35 for Arduino");
  delay(500);
}

// the loop routine runs over and over again forever:
void loop() {
 //robojax.com LM35 Code for Arduino
  printTemperature('C');
  Serial.println();
  printTemperature('F');
  Serial.println();
  printTemperature('K');
  Serial.println();
  Serial.println();
//  Serial.print(" Temperature: ");
//  printDegree();
//  Serial.print(getTemperature('C'));
if(getTemperature('C') >87)
{
 // do something here (watch video)
}
//  Serial.println();
  delay(1000);
}


/*
 * getTemperature()
 * @brief gets the average temperature
 * @param average temperature
 * @param "type" is character
 *     C = Celsius
 *     K = Kelvin
 *     F = Fahrenheit
 * @return returns one of the values above
 * Written by Ahmad Shamshiri for robojax.com
 * on May 08, 2020 at 02:36 in Ajax, Ontario, Canada
 */
float getTemperature(char type)
{
    float value;
    float averageTemperature =0;
    int sensorValue = analogRead(inPin);
    float voltage = sensorValue * (5.0 / 1023.0);
    float temperature = voltage / LM35_FACTOR;
    for(int i=0; i< iteration; i++)
    {
      averageTemperature += temperature;
    }

    averageTemperature /=iteration;
  if(type =='F')
   {
    value = averageTemperature *9/5 + 32;//convert to Fahrenheit
   }else if(type =='K')
   {
    value = averageTemperature + 273.15;//convert to Kelvin
   }else{
    value = averageTemperature;// return Celsius
   }
    return value ;
}//getTemperature()

/*
 * printTemperature()
 * @brief prints  temperature on serial monitor
 * @param character type
 * @param "type" is character
 *     C = Celsius
 *     K = Kelvin
 *     F = Fahrenheit
 * @return none
 * Written by Ahmad Shamshiri for robojax.com
 * on May 08, 2020 at 02:45 in Ajax, Ontario, Canada
 */
void printTemperature(char type)
{
    float value;
    float temp = getTemperature(type);
   Serial.print(temp);
    printDegree();
  if(type =='F')
   {
     Serial.print("F");
    }else if(type =='K')
   {
     Serial.print("K");
   }else{
     Serial.print("C");
   }

}//printTemperature()

/*
 * @brief prints degree symbol on serial monitor
 * @param none
 * @return returns nothing
 * Written by Ahmad Shamshiri on July 13, 2019
 * for Robojax Tutorial Robojax.com
 */
void printDegree()
{
    Serial.print("\\xC2");
    Serial.print("\\xB0");
}
Coisas que você pode precisar
-
AmazonasCompre o LM35 na Amazon.amzn.to
-
eBayCompre LM35 no eBayebay.us
Recursos e referências
-
Folha de dadosLM35 Folheto Técnicoti.com
Arquivos📁
Nenhum arquivo disponível.