LM35を使用して摂氏、華氏、ケルビンの温度を測定する方法
このチュートリアルでは、LM35温度センサーを使用して温度を測定し、それを摂氏、華氏、ケルビンでシリアルモニターに表示する方法を学びます。LM35は、温度に比例した電圧を出力するシンプルかつ効果的なセンサーで、簡単な読み取りと変換を可能にします。このプロジェクトは、温度センシングをArduinoプロジェクトに統合したい初心者に最適です。

ハードウェアの解説
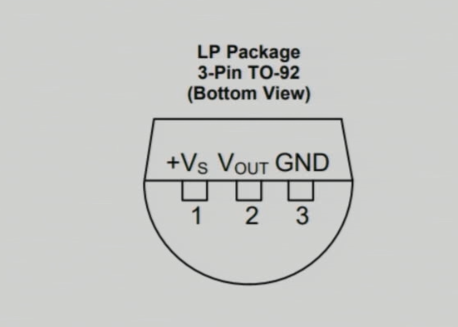
LM35温度センサーは、摂氏温度に対応するアナログ電圧出力を提供する精密機器です。このセンサーは、-55°Cから150°Cの範囲で動作し、精度は±0.5°Cです。60マイクロアンペアの低消費電力により、バッテリー駆動のデバイスに適しています。 LM35の出力インピーダンスは低いため、重要な電圧降下なしに負荷を効果的に駆動でき、正確な測定値を維持するのに重要です。このセンサーは、様々なプロジェクトに統合しやすいTO-92パッケージで提供されることが多いです。
データシートの詳細
| 製造業者 | テキサス・インスツルメンツ |
|---|---|
| 部品番号 | LM35 |
| ロジック/IO電圧 | 4-30 V |
| 出力電流(典型) | 60 µA |
| 温度範囲 | -55 ~ 150 °C |
| 出力電圧 | 10 mV/°C |
| 精度(典型) | ±0.5 °C (最大25 °C) |
| パッケージ | TO-92 |
- 4Vから30Vの間で適切な電源供給を確保してください。
- 電源接続の極性が逆になっていることに注意してください。
- 安定した接地接続を使用して、読み取り時のノイズを避けてください。
- センサーを直接の熱源から遠ざけて、誤った読み取りを防いでください。
- 出力電圧に変動がある場合は、ローパスフィルターを検討してください。
配線指示

LM35センサーを配線するには、左側のピン(VCC)をArduinoの5V電源に接続します。右側のピン(GND)はArduinoのグラウンド(GND)に接続する必要があります。中央のピン(出力)は温度データを読む場所です。このピンをアナログ入力ピンに接続してください。A0Arduino に接続します。このセットアップにより、Arduino は LM35 からの電圧出力を読み取ることができ、それは温度に対応します。
異なる構成のために配線を調整する必要がある場合は、新しいセットアップに合わせてコード内のアナログピン参照を更新することを確認してください。(動画の 03:15 にて)
コード例とウォークスルー
以下のコードスニペットは、LM35から温度を読み取り、異なる単位で表示する方法を示しています。 まず、入力ピンとLM35の変換係数を定義します:
const int inPin = A0; // can change
const float LM35_FACTOR = 0.01; // do not changeこのスニペットでは、inPinLM35出力に接続されたアナログピンを表します。LM35_FACTOR電圧を摂氏温度に変換するために必要な変換を定義します。
次に、シリアル通信を設定します:
void setup() {
  Serial.begin(9600);
  Serial.println("Robojax LM35 for Arduino");
  delay(500);
}ここでは、Serial.begin(9600)シリアル通信を9600ビット毎秒のボーレートで初期化し、シリアルモニターとのデータの送受信を可能にします。
ループ関数は温度を継続的に読み取り、それを印刷します:
void loop() {
  printTemperature('C');
  printTemperature('F');
  printTemperature('K');
  delay(1000);
}このループでは、私たちは呼び出しますprintTemperature各単位(セルシウス、ファーレンハイト、ケルビン)に対して、シリアルモニターにそれぞれの温度を表示する関数。
デモンストレーション / 期待すること
LM35が正しく配線されていると、シリアルモニターに摂氏、華氏、ケルビンで温度測定値が表示されるはずです。センサーに熱を加えると、測定値はそれに応じて上昇します。ランダムまたは不規則な値が表示される場合は、接続が緩んでいたり、ピンの割り当てが間違っていないか配線を確認してください。(動画内で:05:00)
ビデオのタイムスタンプ
- 00:00- はじめに
- 01:00- LM35の概要
- 02:30- 配線指示
- 03:15- コードの説明
- 05:00- デモンストレーション
画像
/*
 * This Arduino sketch is to use LM35 to measure temperature
 * This code has two ways to get temperature
 * 1-To print the temperature either in C, F or K on the serial monitor
 * 2-To return the value in C, F and K
 *
 * Watch Video instruction for this code:https://youtu.be/S5IBc_epa1A
 *
 * Full explanation of this code and wiring diagram is available at
 * my Arduino Course at Udemy.com here: http://robojax.com/L/?id=62

 * Written by Ahmad Shamshiri on May 08, 2020 at 02:45 in Ajax, Ontario, Canada
 * in Ajax, Ontario, Canada. www.robojax.com
 *

 * Get this code and other Arduino codes from Robojax.com
Learn Arduino step by step in a structured course with all material, wiring diagrams and libraries
all in one place. Purchase My course on Udemy.com http://robojax.com/L/?id=62

If you found this tutorial helpful, please support me so I can continue creating
content like this.

or make a donation using PayPal http://robojax.com/L/?id=64

 *  * This code is "AS IS" without warranty or liability. Free to be used as long as you keep this note intact.*
 * This code has been downloaded from Robojax.com
    This program is free software: you can redistribute it and/or modify
    it under the terms of the GNU General Public License as published by
    the Free Software Foundation, either version 3 of the License, or
    (at your option) any later version.

    This program is distributed in the hope that it will be useful,
    but WITHOUT ANY WARRANTY; without even the implied warranty of
    MERCHANTABILITY or FITNESS FOR A PARTICULAR PURPOSE.  See the
    GNU General Public License for more details.

    You should have received a copy of the GNU General Public License
    along with this program.  If not, see <https://www.gnu.org/licenses/>.


*/

const int inPin =A0;//can change
const int iteration = 1000; //can change (see video)
const float LM35_FACTOR =0.01;// do not change

// the setup routine runs once when you press reset:
void setup() {
  // initialize serial communication at 9600 bits per second:
  Serial.begin(9600);
  Serial.println("Robojax LM35 for Arduino");
  delay(500);
}

// the loop routine runs over and over again forever:
void loop() {
 //robojax.com LM35 Code for Arduino
  printTemperature('C');
  Serial.println();
  printTemperature('F');
  Serial.println();
  printTemperature('K');
  Serial.println();
  Serial.println();
//  Serial.print(" Temperature: ");
//  printDegree();
//  Serial.print(getTemperature('C'));
if(getTemperature('C') >87)
{
 // do something here (watch video)
}
//  Serial.println();
  delay(1000);
}


/*
 * getTemperature()
 * @brief gets the average temperature
 * @param average temperature
 * @param "type" is character
 *     C = Celsius
 *     K = Kelvin
 *     F = Fahrenheit
 * @return returns one of the values above
 * Written by Ahmad Shamshiri for robojax.com
 * on May 08, 2020 at 02:36 in Ajax, Ontario, Canada
 */
float getTemperature(char type)
{
    float value;
    float averageTemperature =0;
    int sensorValue = analogRead(inPin);
    float voltage = sensorValue * (5.0 / 1023.0);
    float temperature = voltage / LM35_FACTOR;
    for(int i=0; i< iteration; i++)
    {
      averageTemperature += temperature;
    }

    averageTemperature /=iteration;
  if(type =='F')
   {
    value = averageTemperature *9/5 + 32;//convert to Fahrenheit
   }else if(type =='K')
   {
    value = averageTemperature + 273.15;//convert to Kelvin
   }else{
    value = averageTemperature;// return Celsius
   }
    return value ;
}//getTemperature()

/*
 * printTemperature()
 * @brief prints  temperature on serial monitor
 * @param character type
 * @param "type" is character
 *     C = Celsius
 *     K = Kelvin
 *     F = Fahrenheit
 * @return none
 * Written by Ahmad Shamshiri for robojax.com
 * on May 08, 2020 at 02:45 in Ajax, Ontario, Canada
 */
void printTemperature(char type)
{
    float value;
    float temp = getTemperature(type);
   Serial.print(temp);
    printDegree();
  if(type =='F')
   {
     Serial.print("F");
    }else if(type =='K')
   {
     Serial.print("K");
   }else{
     Serial.print("C");
   }

}//printTemperature()

/*
 * @brief prints degree symbol on serial monitor
 * @param none
 * @return returns nothing
 * Written by Ahmad Shamshiri on July 13, 2019
 * for Robojax Tutorial Robojax.com
 */
void printDegree()
{
    Serial.print("\\xC2");
    Serial.print("\\xB0");
}
必要かもしれないもの
-
アマゾンAmazonでLM35を購入するamzn.to
-
イーベイeBayでLM35を購入するebay.us
リソースと参考文献
-
データシートLM35 データシートti.com
ファイル📁
ファイルは利用できません。


![[3DMakerWorld] Adafruit MCP9808 High Accuracy I2C Temp Sensor Breakout STEMMA](https://i.ebayimg.com/images/g/BfUAAOSwIUFjl7Uf/s-l225.jpg)